
Main Dishes
Breakfast
-
![]()
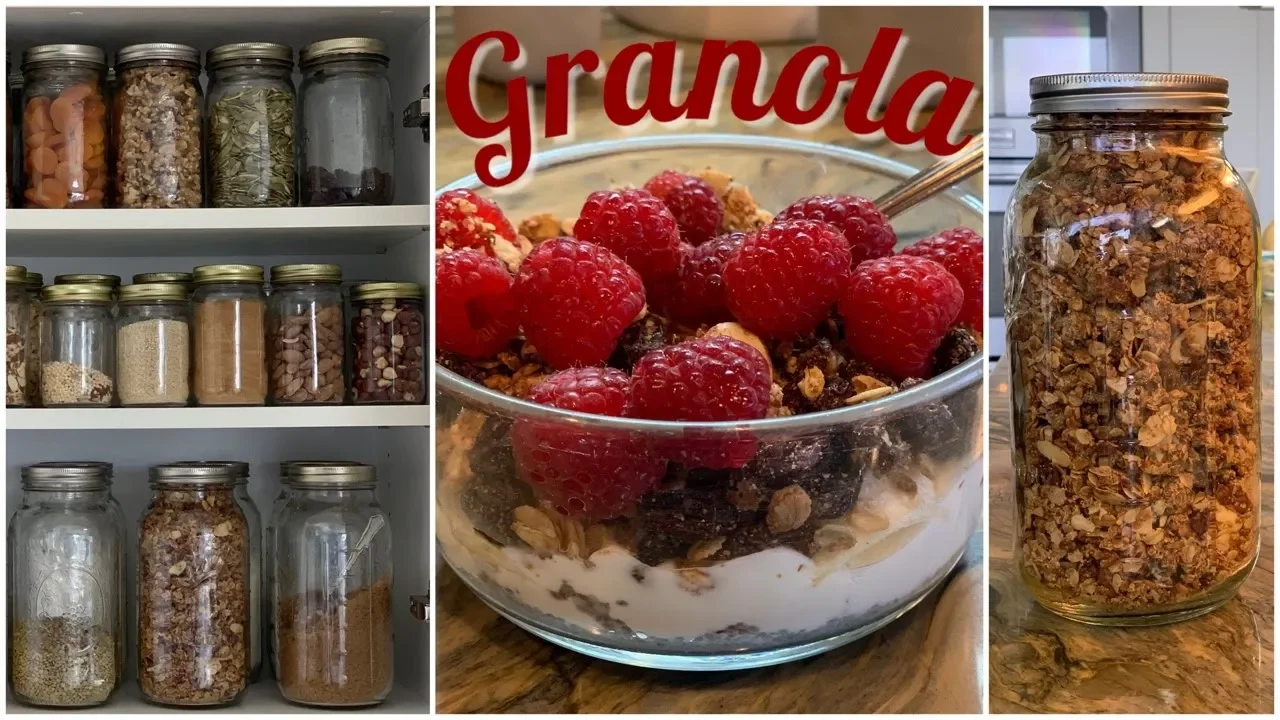
How to Make Granola
Ever want your house to smell like a home? Bake! The sweet smells of food cooking warm the hearts of all around. It's one thing I wanted my children to remember about their childhood: their mama cooking and the house smelling like someone cared for them. Short on time, but still want that feeling? Try baking granola. It's easy and smells glorious and the perk is that you've made a fast healthy snack to be enjoyed over fruit and yogurt.
-
![]()
How To Make Buttermilk Pancakes
For years, there were some recipes I just thought you had to use a box to make them. Like buttermilk pancakes. I can't remember when it was that I started making my own, but it wasn't that long ago. First, I experimented with vegan options because I have a son who is allergic to dairy. At the same time, I make the non-vegan version. What I found was that the vegan pancakes usually were fluffier and tasted better! But that recipe is for another time.
-
![]()
How to Make Crepes | High Protein Recipe
For many years, we called crepes pancakes because those were the only ones we made. It wasn't until I was teenage that I realized that pancakes were thick and moist. Now I'm sure to distinguish between the two because I've learned that for some people crepes are definitely not pancakes! One day a couple years ago, I invited my family (several siblings and their spouses and kids) for 'Grandpa's Pancake Breakfast'.


Lunch
-
![]()
How to Make A Hummus Chicken Bowl
This recipe for a chicken hummus bowl was such a winner in our home, we have since made it often with great success! One thing that will make preparing this dish even faster is to use store bought hummus or make it from a can. I make mine from scratch so I have to plan ahead when I made this.
-
![]()
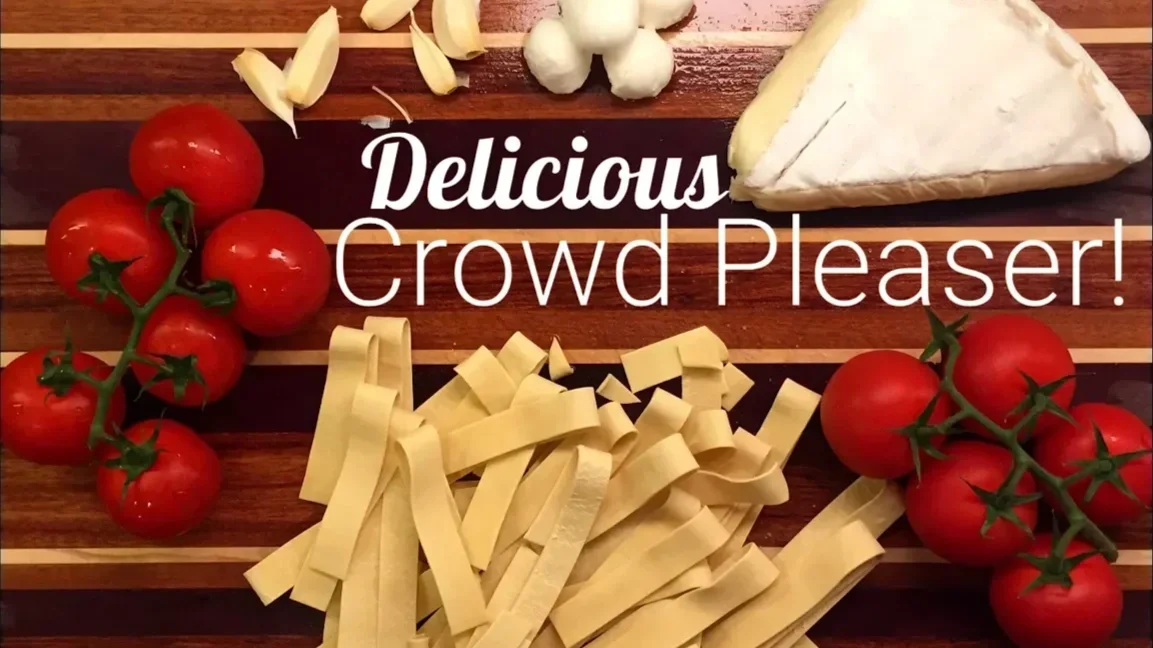
Caprese Piadine Recipe
I’d say that a good portion of the recipes I make are inspired by restaurant food we have had and liked well enough to recreate at home. Today’s recipe is inspired by the Caprese Piadine from a northern California Italian restaurant called Tomatinas.
-
![]()
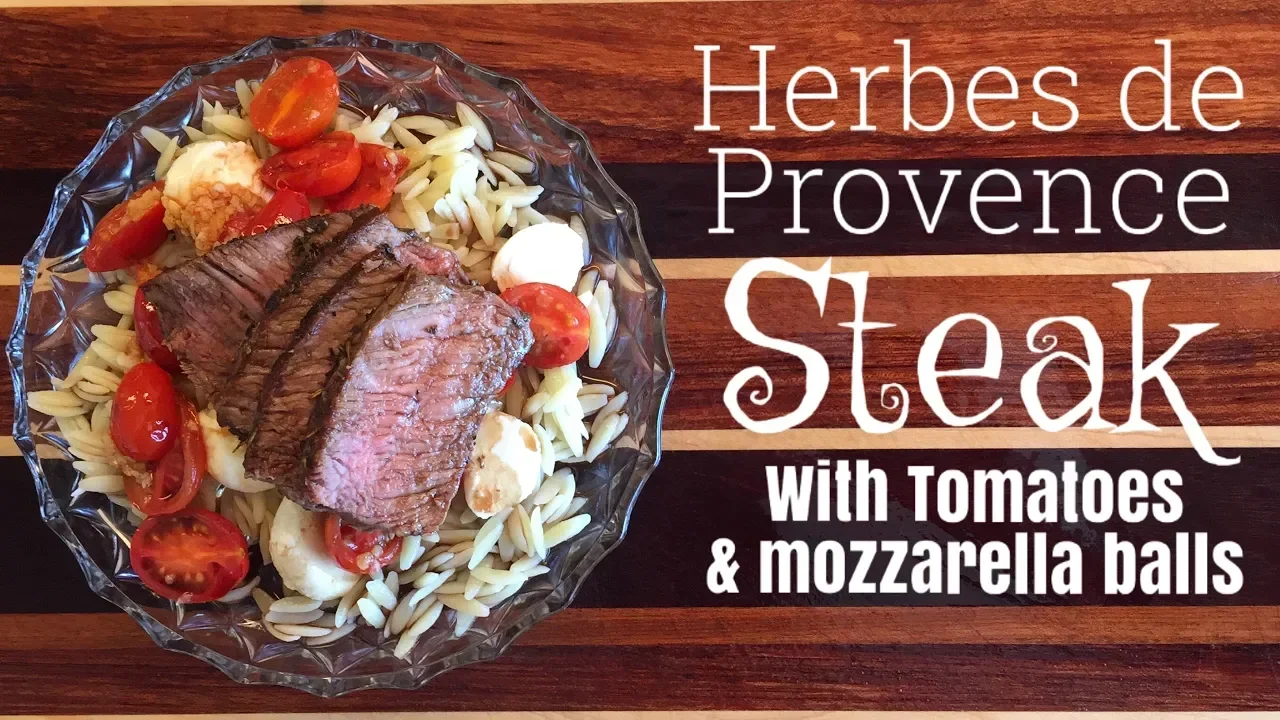
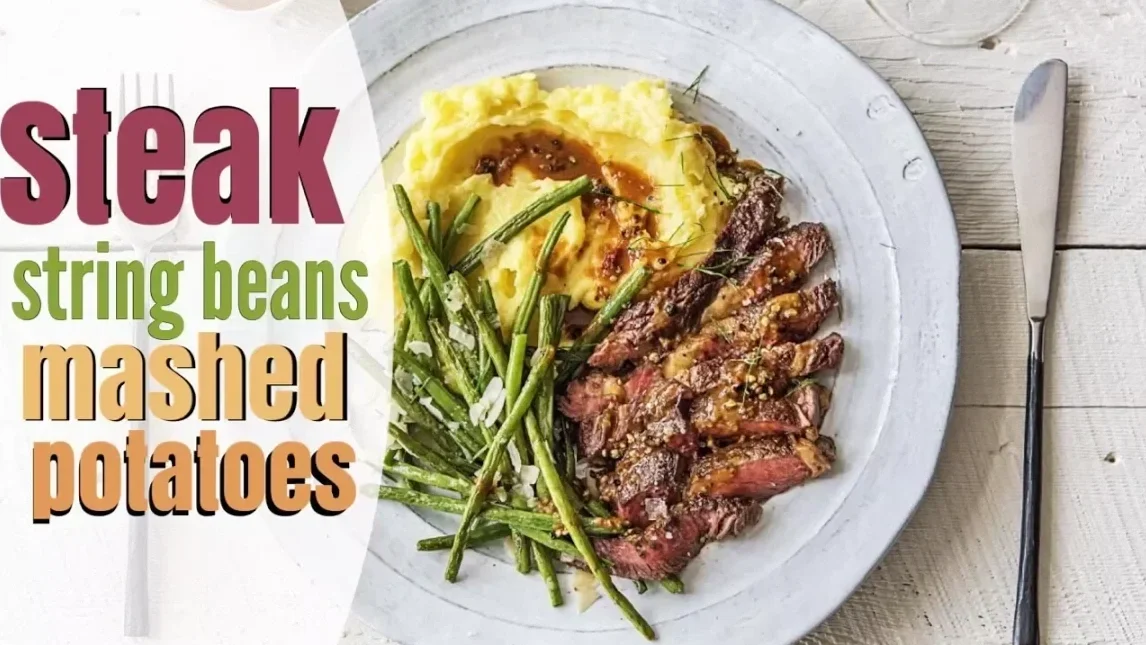
Herbs De Provence Steak with Tomatoes & Mozzarella Balls
We didn't do a Hello Fresh subscription for the convenience of having food delivered to our home, I did it for two unrelated reasons. First, I used it as a means to do a cooking class for my homeschooled children, and second, I used it as a means to learn new recipes.
-
![]()
How to Make Thin Crust Pizza
It's practically a universal favorite: pizza. And how could you go wrong with bread and cheese?! Well, I'm sure there are many ways, and I have alternatives down below if you are opposed to using dairy or genetically modified wheat. But in the meantime, this pizza is a hit, not just for adults but for kids, too!
-
![]()
Pasta with Garlic, Tomatoes, & Brie Cheese
This is one easy, tasty recipe that's sure to become a family favorite! If you don't believe, you must try it!! This vegetarian meal and easily become by omitting the brie cheese. No need to substitute the dairy, the tomatoes, garlic and basil add tons of flavor!


Persian
-
![]()
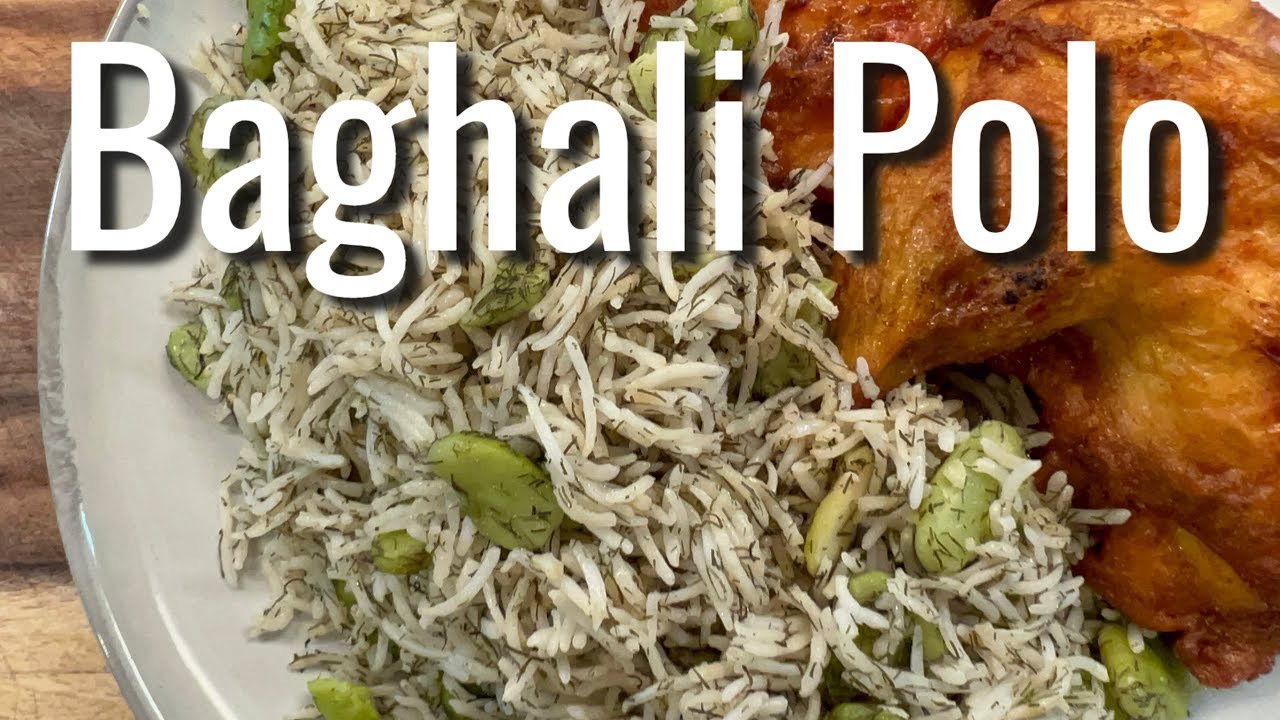
Baghali Polo | Persian Rice with Dill Weed and Fava Beans
Nearly all my Persian recipes come from my friend Teyebeh who often gets from her mom, and I'll take a good guess and assume she gets them from her mom.
-
![]()
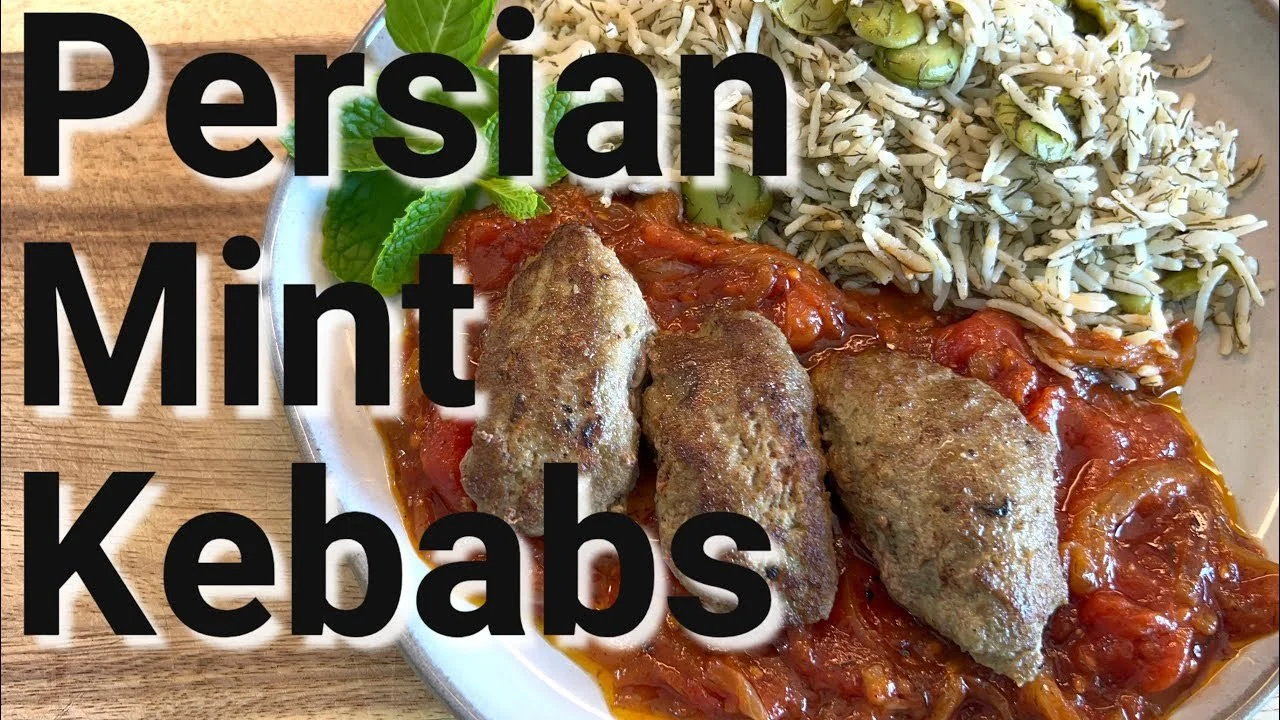
Persian Mint Meatballs
This recipe is from the book The New Persian Kitchen by Louisa Shafia. We do a lot of cooking anyway, but especially with our homeschooling. While doing our ancient Persia lessons, we got this and other Persian cookbooks to try some new recipes.
-
![]()
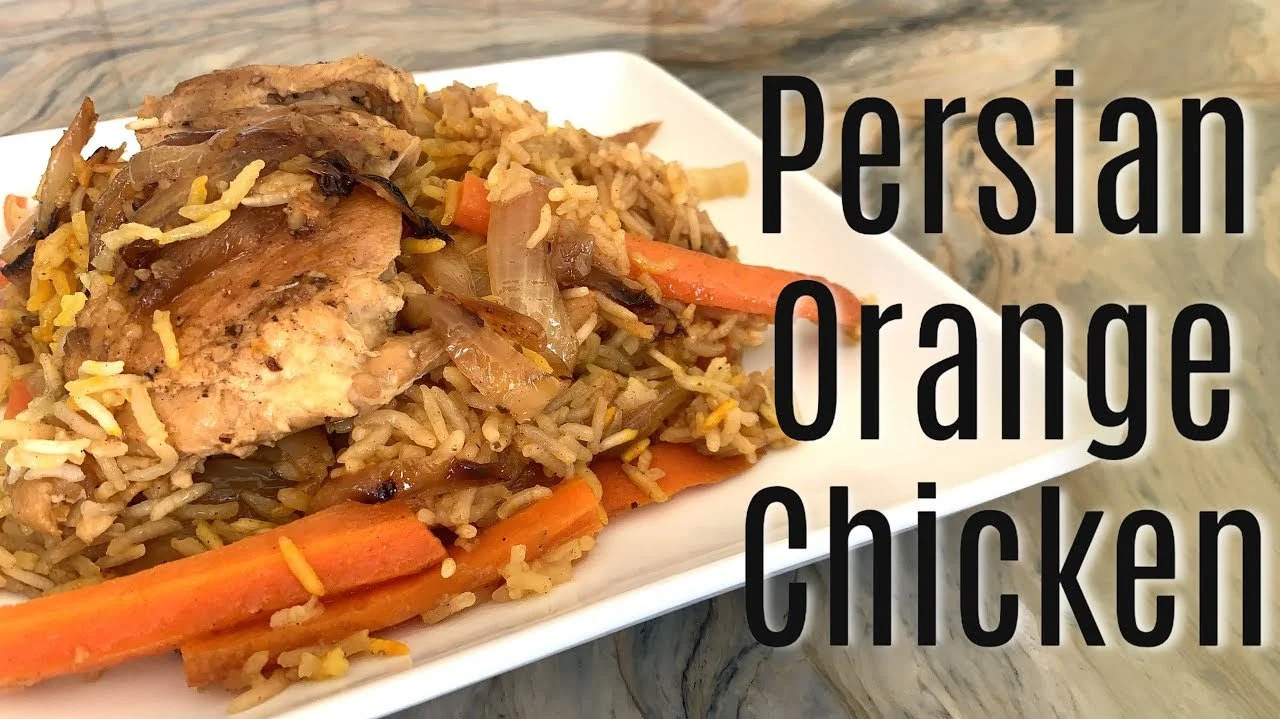
Orange Chicken Koresh | Iranian Cooking
I do love adding sweet to savory and even like orange flavored Chinese chicken, but I didn't seem to like this dish quite as much. However, my 18-year-old son said it was the best chicken I ever made. So the following day, I made the recipe again and cut down on the orange accents.
-
![]()
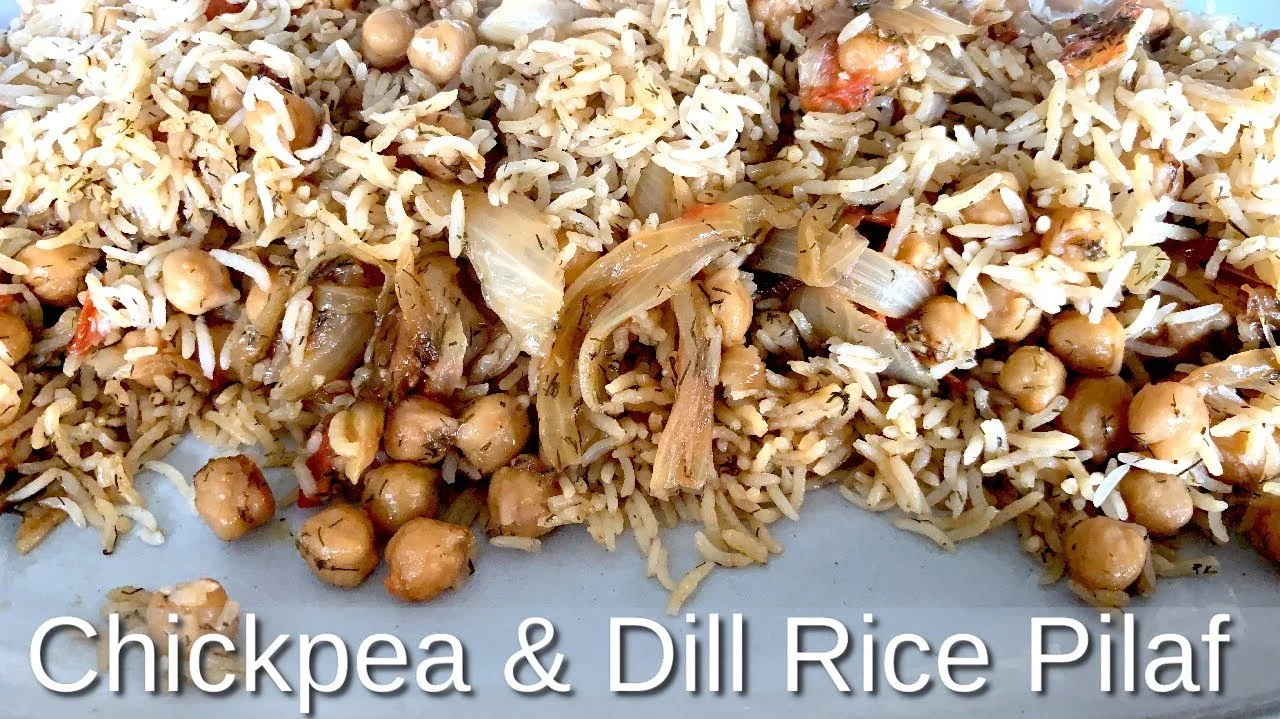
Chickpea and Dill Rice Pilaf | Iranian Cooking
We paired it with orange chicken koresh which is a sweet dish which probably would be better balanced with a plain rice dish, but my children loved the combination. Both recipes are from the book The Silk Road Gourmet by Laura Kelley
-
![]()
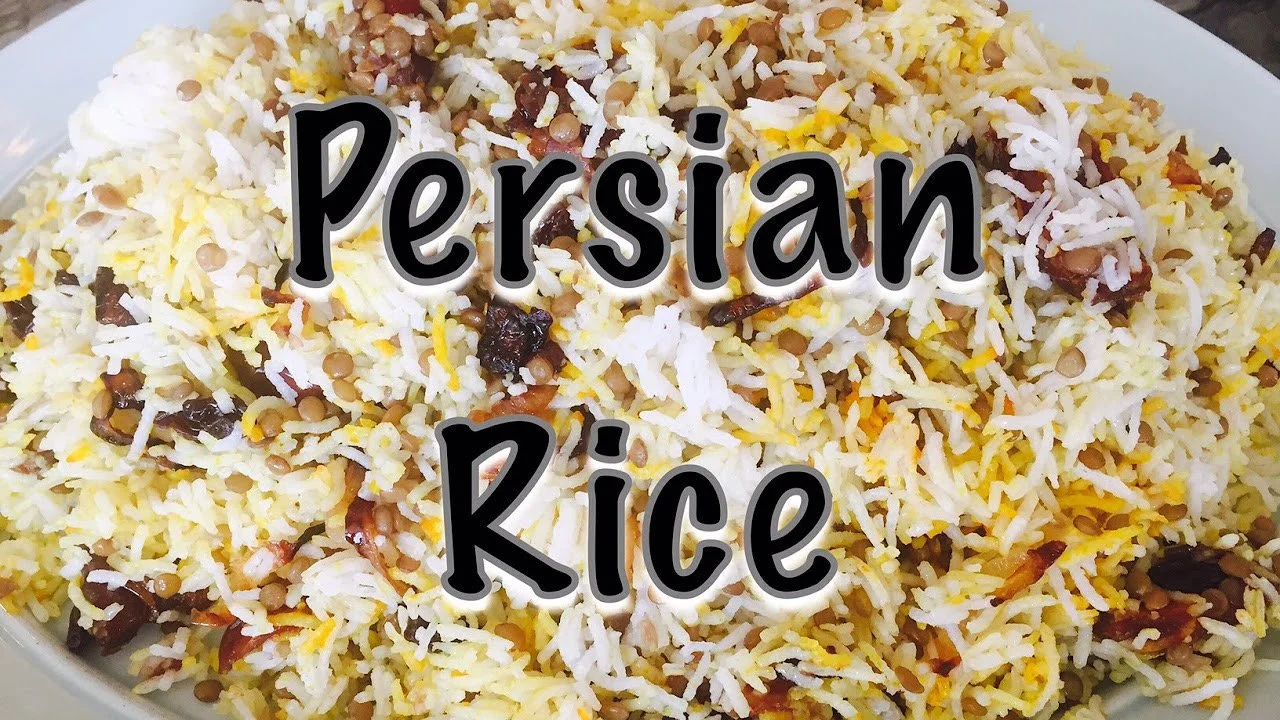
How to Make Persian Rice | Adas Polo
This has got to be the best tastiest rice in the world!! I'm not a fan of rice, but this is one rice dish, I'll gladly eat. Packed with dates, currants, lentils and fried onions, what's not to love?! I season mine with olive oil, grapeseed oil, salt and saffron. Occasionally if I make a whole roasted chicken to go along with this rice, I'll add my secret ingredient: pan drippings!
-
![]()
Turmeric Chicken for Adas Polo | Persian Recipe
Did you know turmeric is so good for you? Aside from being an antioxidant, it's full of other other benefits for your body and brain. I tend to overdo my turmeric consumption, and this is one chicken recipe that's full of it! This chicken dish perfectly accompanies Adas Polo, Zeresh Polo and Baghali Polo.
-
![]()
How to make Cucumber Salad | Persian Recipe
This is one of the most refreshing salads you'll ever taste! What I love about Persian food is that the ingredients are simple, flavorful and nourishing. Salad Shirzi or Cucumber Salad as I like to call it accompanies many Persian meals. It's one of two salads you'll typically find on Persian menus, and this one is so easy to make, you'll wonder why you don't have it all the time!!

Indian
-
![]()
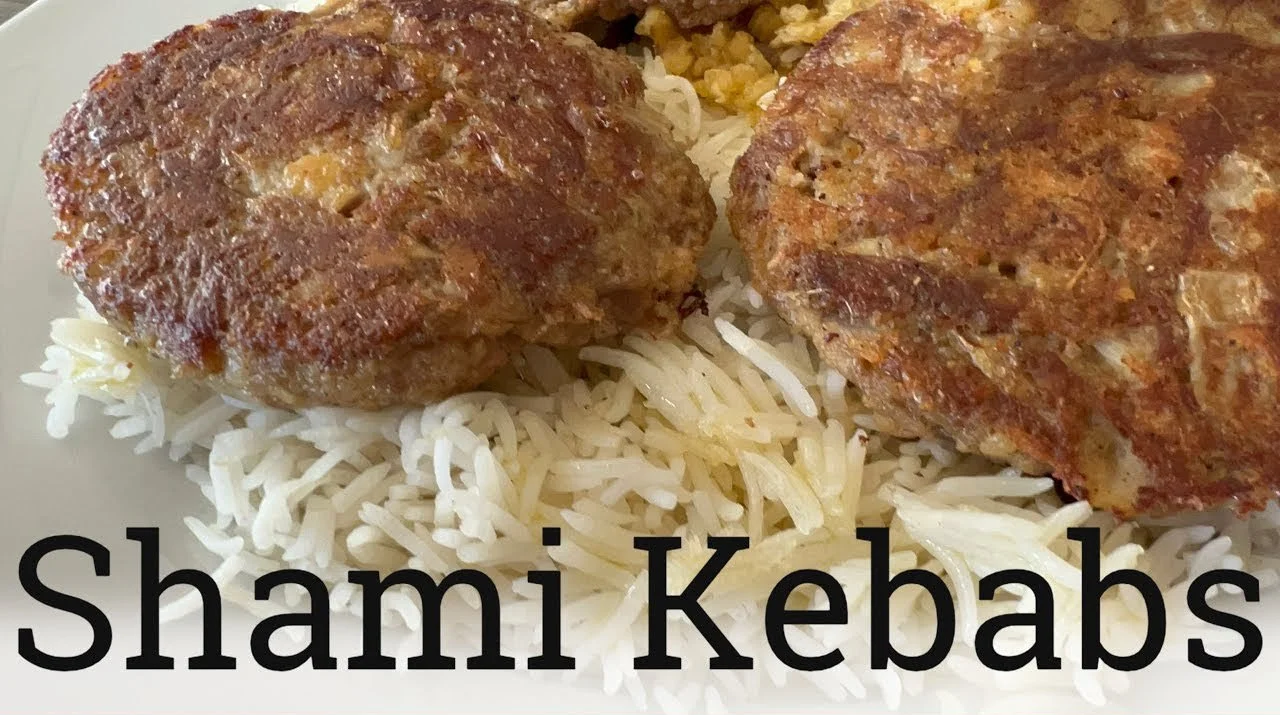
Shamee Kebabs
I made a huge batch of shami kebabs! You can cut this recipe down quite a bit, but whenever I make these, because they are so labor intensive to begin with, I make a huge batch and freeze them for easy meals.
-
![]()
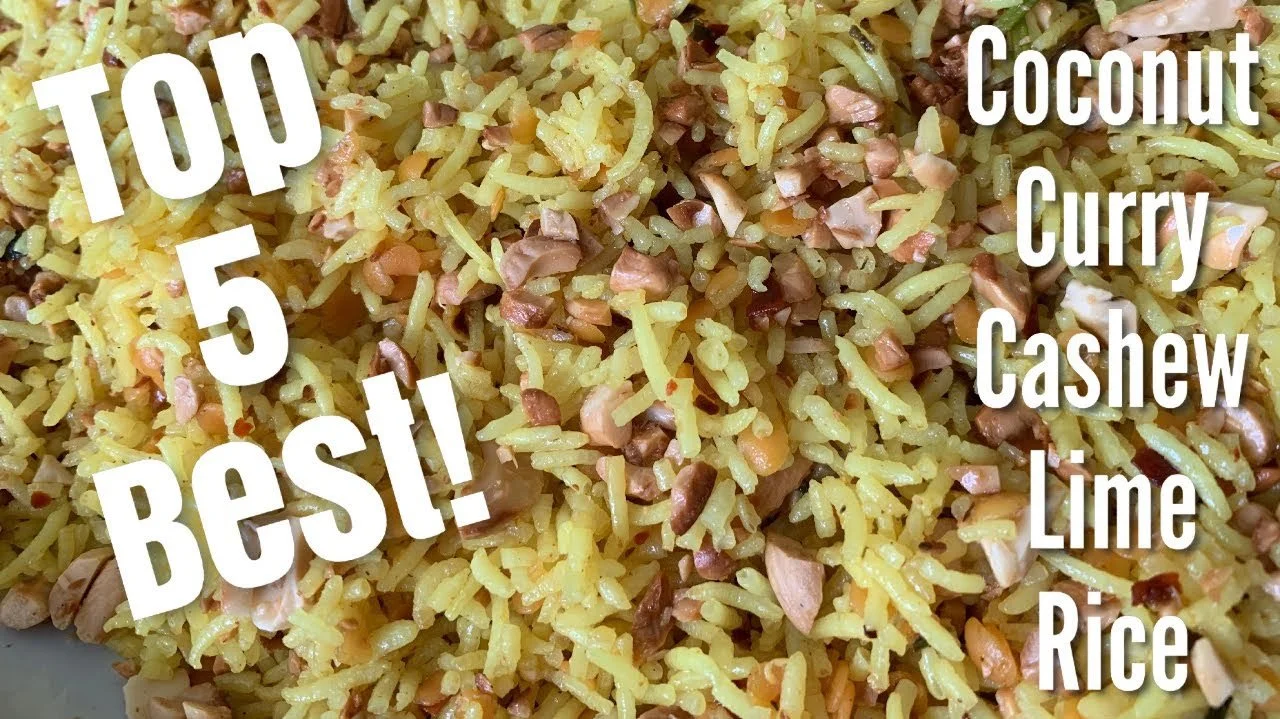
Coconut, Cashew & Curry Rice with Lime
I'm may not be a fan of rice by my family is! Being married to an Indian, I quickly learned how to make the perfect basmati rice from my mother-in-law. Thereafter, I sort of stalled in my skills for rice making and for years made simple basmati rice.
-
![]()
Keema | Ground Beef
If you're in a pinch to make dinner, I recommend learning this recipe! It's my fast version to making Indian ground beef (keema). It's usually served with rice, which could take 15 minutes to make, so if you are really short on time, serve it with naan which you can find in the frozen section of many grocery stores.
-
![]()
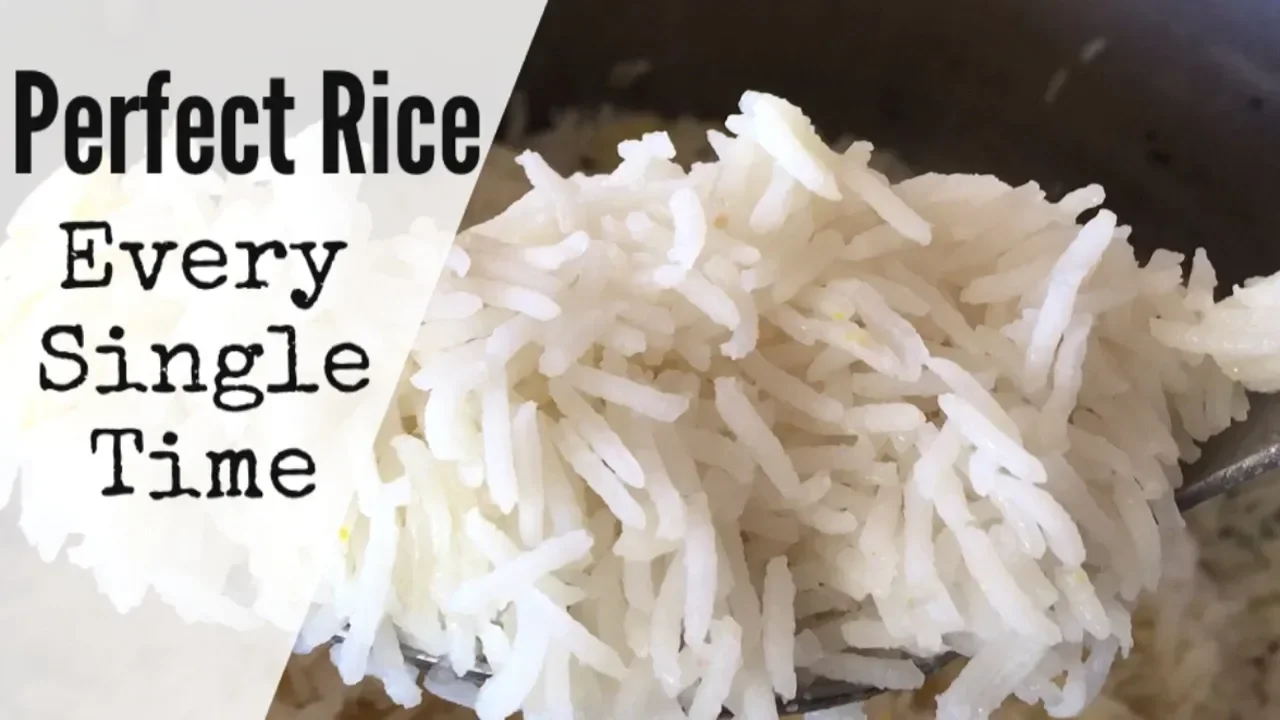
How to Cook Basmati Rice
There are three things I want my children to know how to cook well: Rice, fried onions, and eggs. It seems silly, I know, but these three simple recipes are often easily messed up and can be tricky at times. Today, I’m making basmati rice. I learned this method from my mother-in-law and have made it this way for many many years.
-
![]()
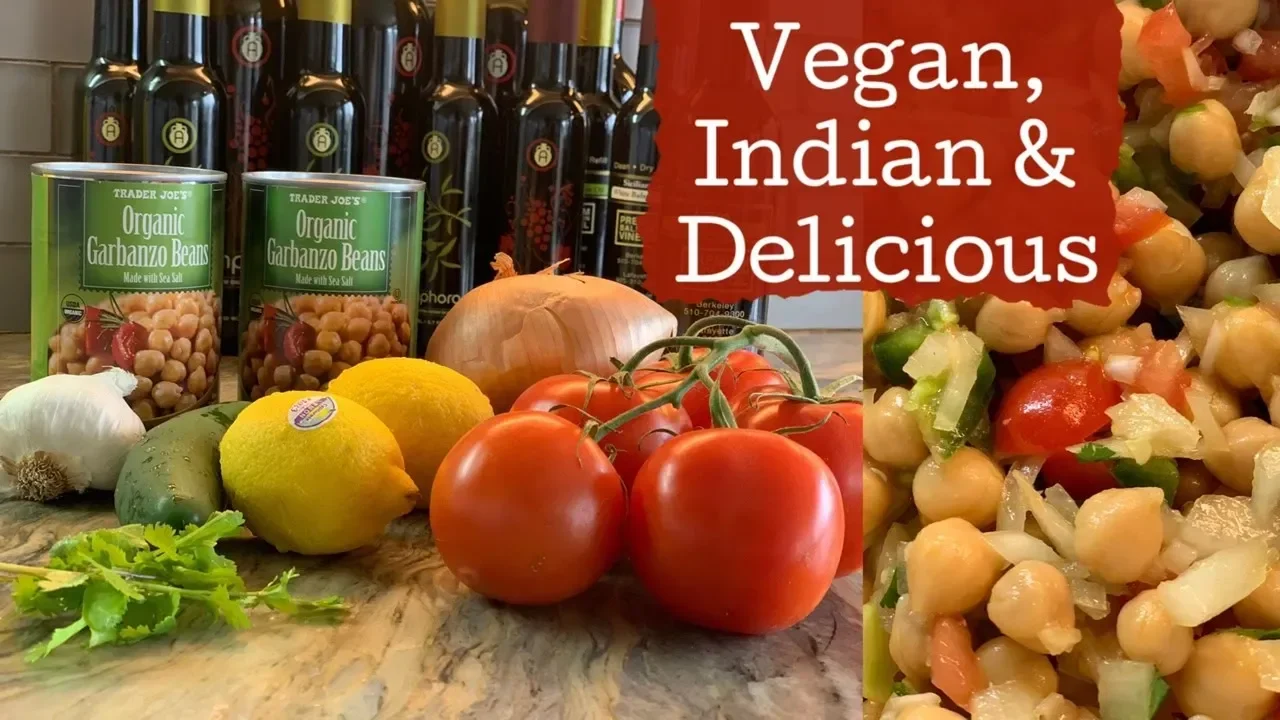
Garbanzo Bean Salad | Cholay | Chana Chaat
There are some dishes I tend to make just during Ramadan. This is one of them. It's an Indian inspired recipe was shared with my by my sister-in-law who knows how to make good food, fast! I even have a secret shortcut to this recipe that you can find on the blog post that accompanies this video tutorial.
-
![]()
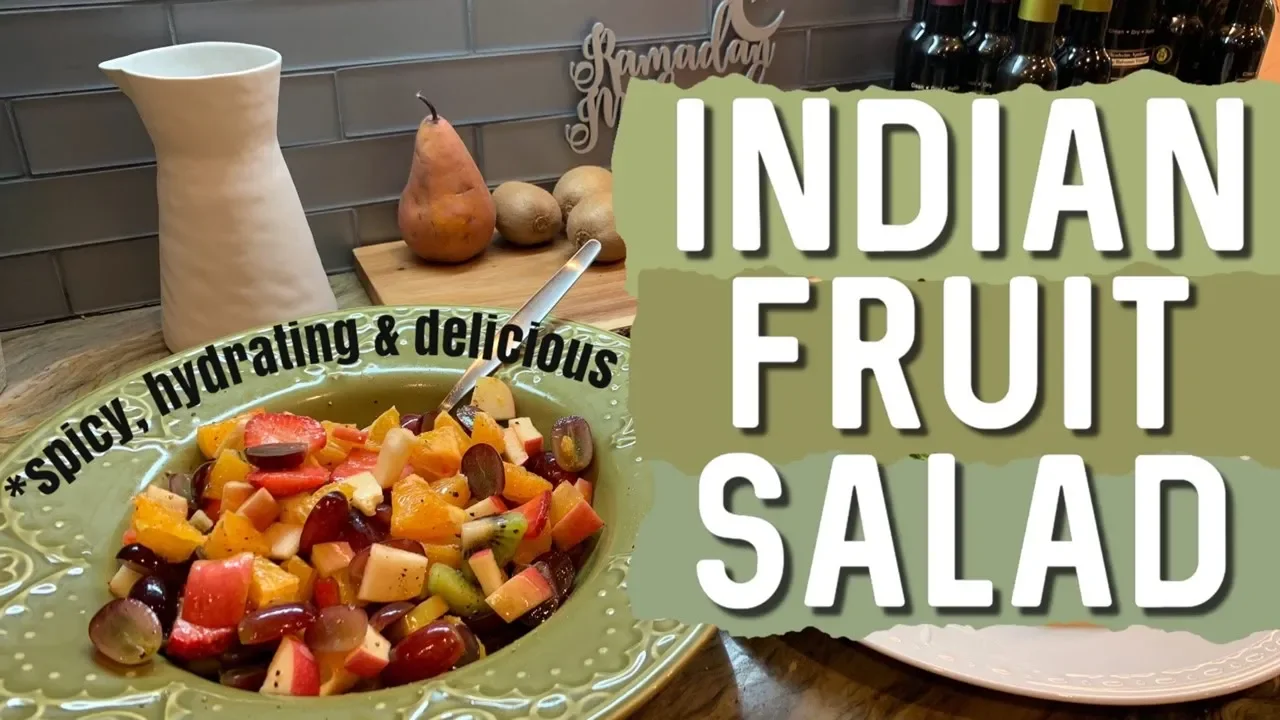
Indian Fruit Salad | Fruit Chaat
If you've never tried fruit salad with spices, I encourage you to try this. You fruit will get a kick out of it, and so will you! You'll impress your taste buds with cayenne, salt and pepper mixed with sugar and the sweetness of seasonal fruit and fresh juice. The recipe is on my website at the blog post that accompanies this video.
-
![]()
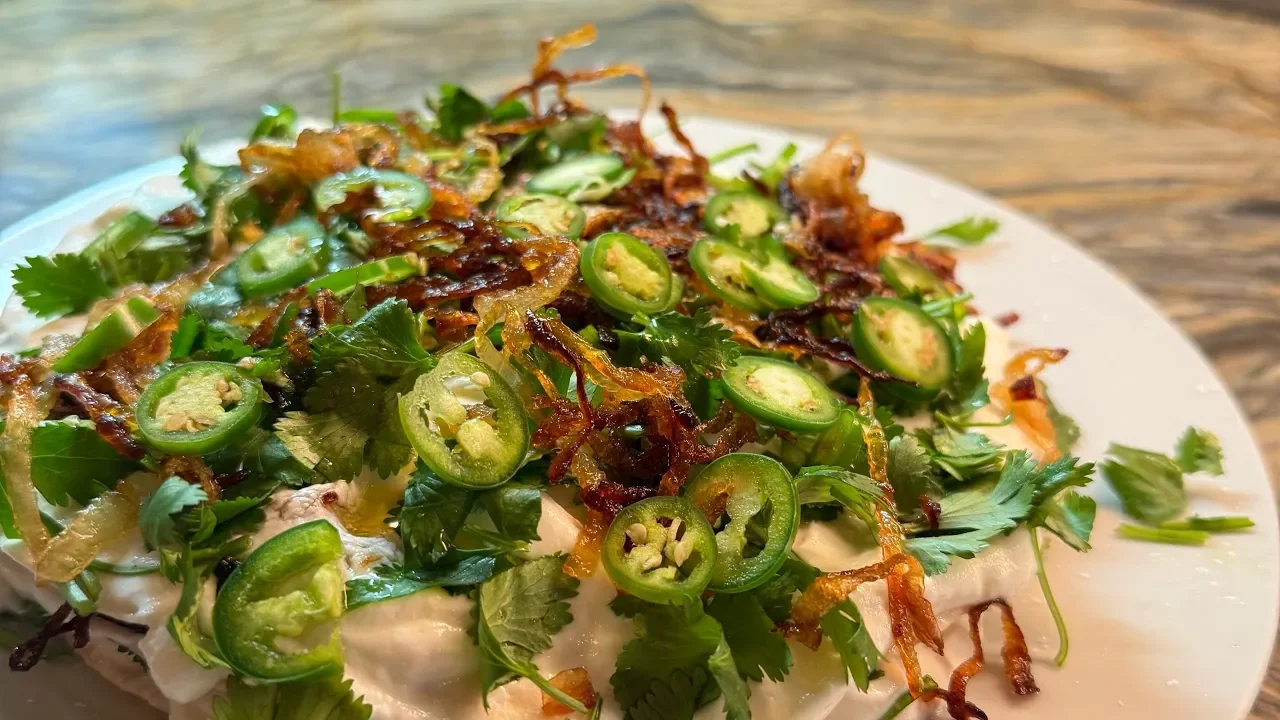
Yogurt Tortilla | Hyderabadi | Dahi Pulki
Dahi Pulki or Yogurt Tortilla is a family favorite, especially during Ramadan. We like to break fast with fruit chaat and this layered tortilla dish that's thick with yogurt and fried onions. While this appetizer is a Ramadan family favorite of ours, you could really have it any time of year. It's simple to make and other than frying the onions, it's really fast too.
-
![]()
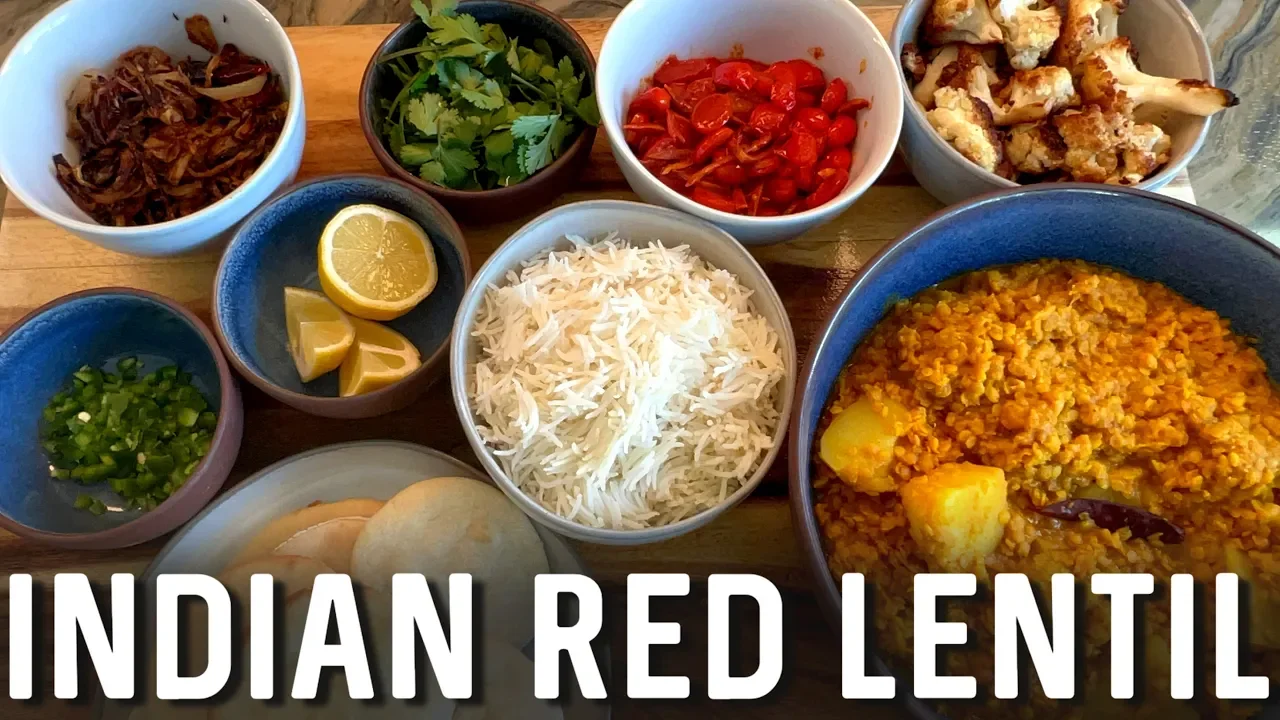
Indian Red Lentil Daal | Dahl Recipe
Are you looking for a tasty, filling vegan meal? Try Indian Daal! It's fast (if you use my fast recipe), nutritious and delicious. For this recipe, I included many toppings and garnishes we love to include when making Daal, but only if Daal is going to be the main dish rather than a side dish because all these extras that I show take a long time to make.
-
![]()
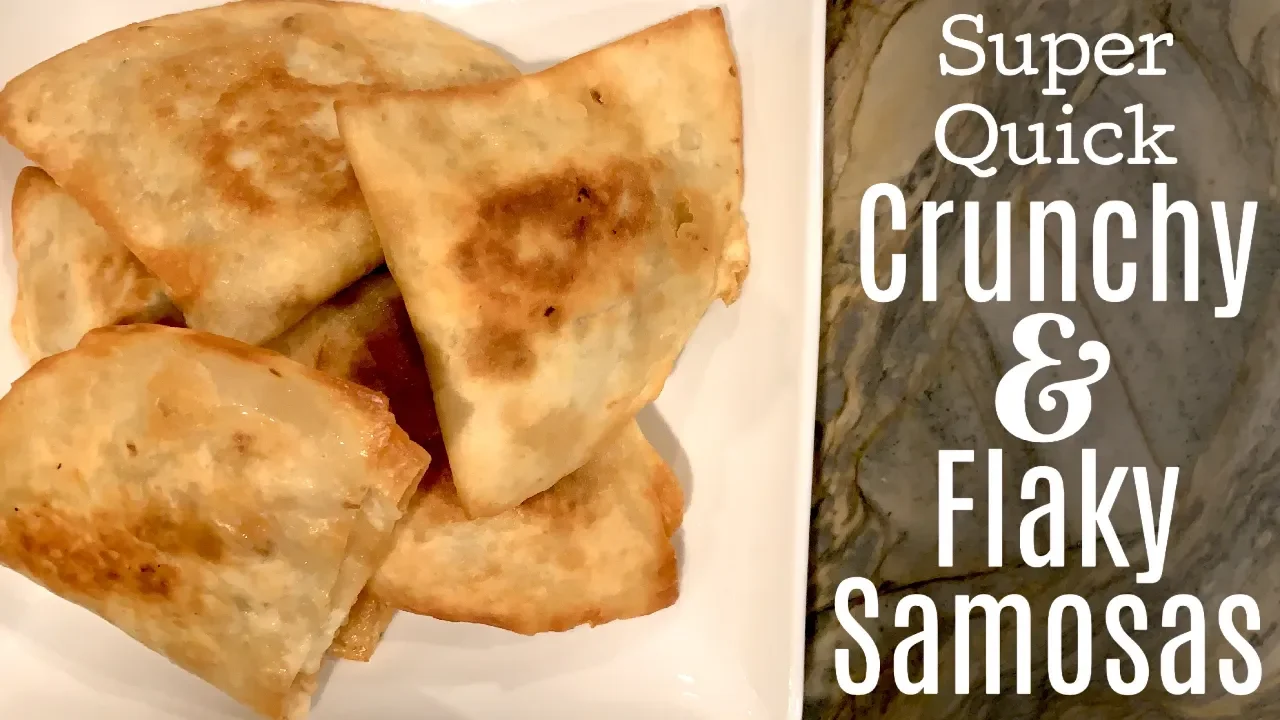
How To Make Samosas
So the thing is that I only make these during Ramadan, but really, you can make them any time of year. This year, I didn't make them once for Ramadan. And now that Ramadan is over, I'm making up for lost time and turning out samosas like it's nobody's business. This recipe utilizes leftover ground beef or freshly made with a sprinkling of Indian spices and good old fashioned Mission Tortillas.
-
![]()
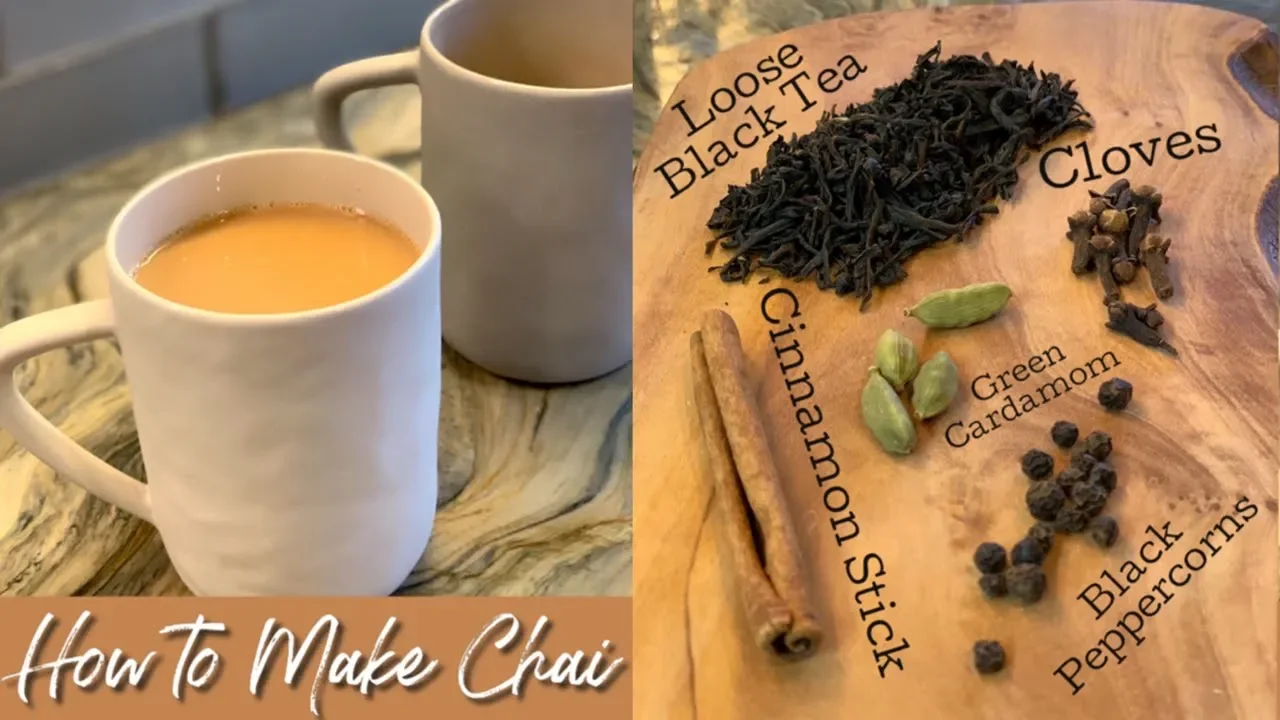
Chai Tea
I've been both praised and despised for my tea. Praised because it always tastes so good, cursed because it's so strong that my tea drinkers are usually up until the wee hours of the morning, tossing and turning because they can't sleep. So with caution and fair warning, here's my tea recipe (which is a combination of tea recipes from my sister in law and a couple of close friends)

Moroccan
-
![]()
How to Make Moroccan Spicy Green Beans
I've seen green beans in tomatoes in many different cuisines so I don't immediately think of these are being Moroccan, but I have to admit, while I enjoy eating this one, I have never made it before or any variation of it!
-
![]()
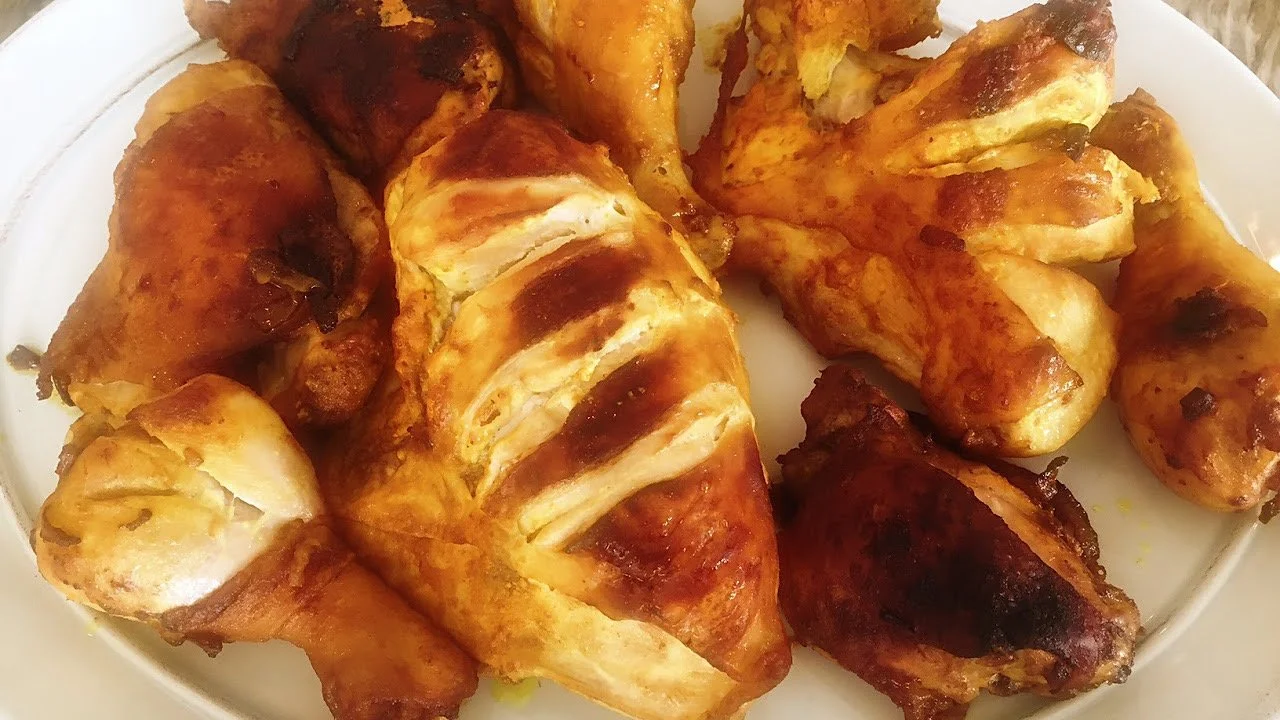
How to Make BBQ Moroccan Chicken in the Oven
I'm still kicking myself for overcooking this recipe. Just five minutes less and it would have been just right. So my first tip is mind the grill or oven when you are making this. I opted to broil the chicken in the oven rather than grill them or barbeque them. I was a little rushed so I also decided not to skewer them.
-
![]()
How To Make Moroccan Harira Soup
This Moroccan soup became an instant favorite for my family and friends. I highly recommend you give it a try. It's an easy recipe that's harty, filling, nutritious, and delicious. You can serve it as an appetizer or as the main meal; we've done both.
-
![]()
How to Make Buried Vermicelli | Moroccan Recipe
This recipe, Buried Vermicelli, is from the book Arabesque A Taste of Morocco, Turkey and Lebanon by Claudia Roden. I loved this recipe!! It's than the Moroccan food I typically make so I was excited to explore pairing orange water with cinnamon and sugar for a slightly sweet take on a pasta and chicken dish.
-
![]()
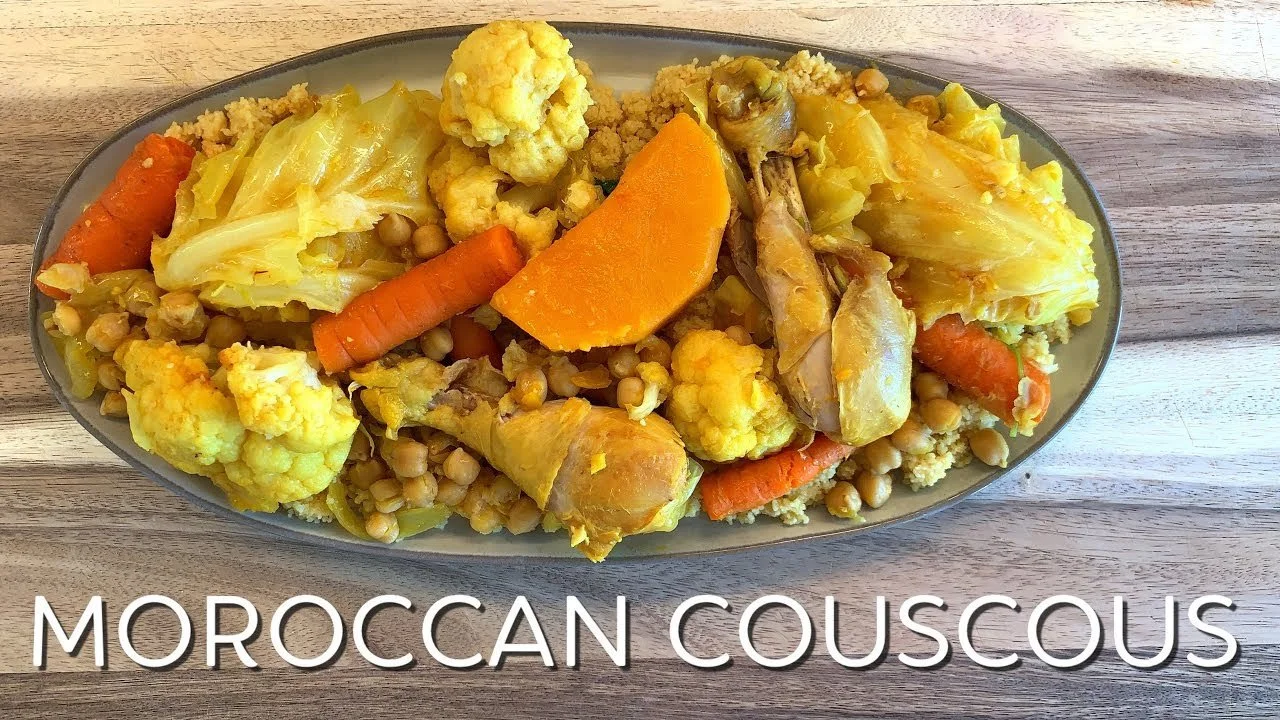
Moroccan Couscous
This is one of my favorite recipes of all time! It's so warming, nourishing and healthy; it's perfect for cool autumn days or for a cozy dinner with friends. I have my dear friend, Laura, and her husband to thank for sharing this recipe for me.
-
![]()
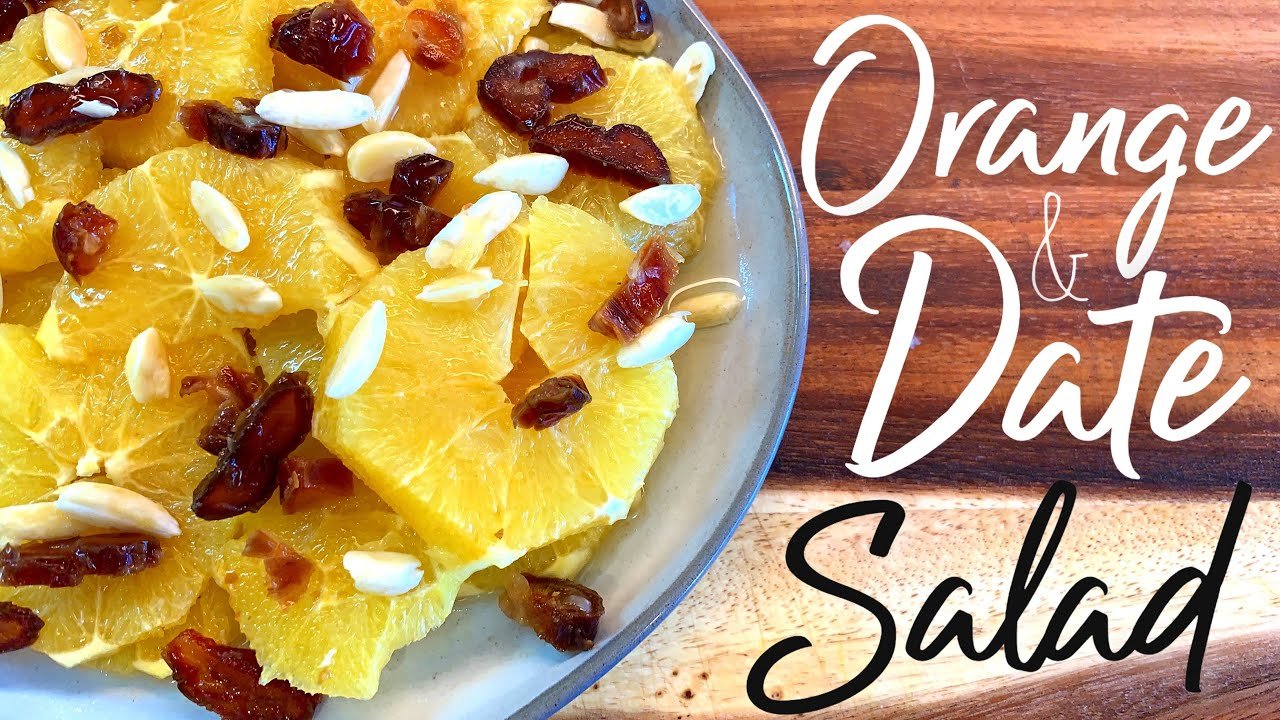
Orange and Date Salad
What a great way to end (or start) a meal than with sweet seasonal oranges garnished with dates and blanched almonds with a drizzle of lemon. The key to the success of this recipe is sweet seasonal oranges! We live in Southern California and our oranges are delicious!
-
![]()
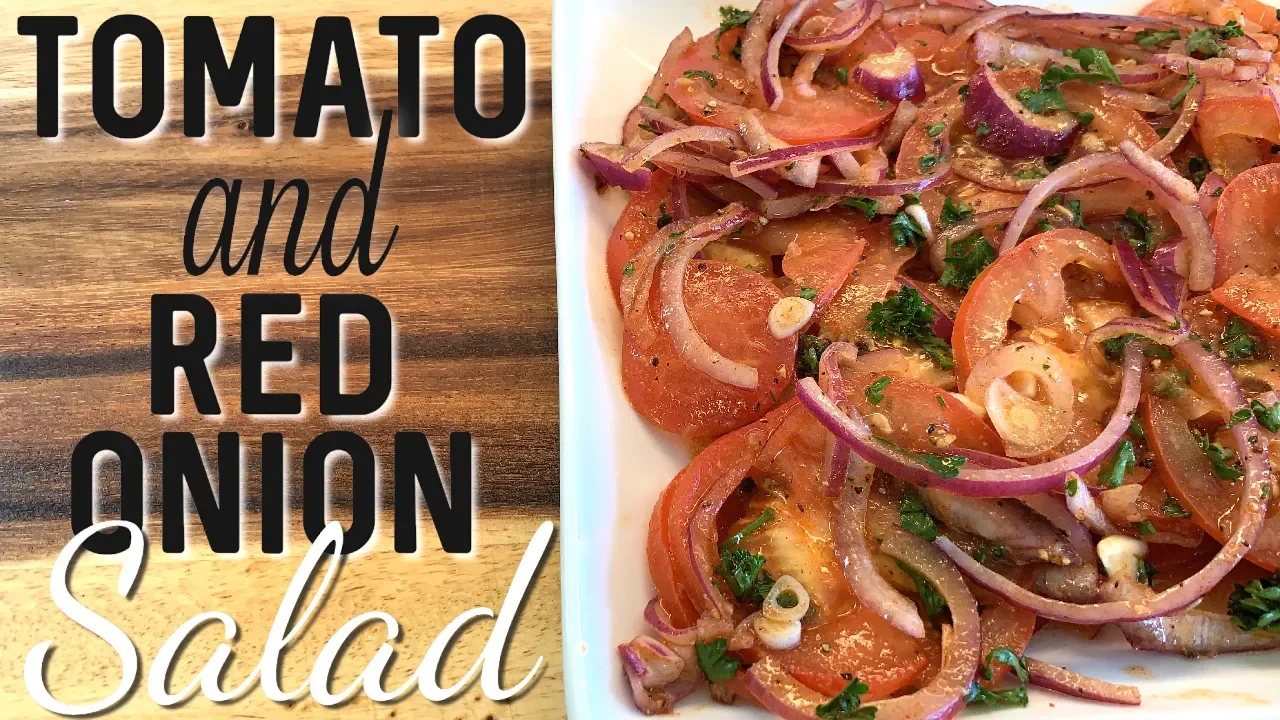
Moroccan Tomato and Red Onion salad
I love a good salad, and while I prefer more in my salad than just tomatoes and red onions, this Moroccan salad makes the ideal side dish to a main entree. I paired it with BBQ chicken and spicy green beans. This side dish was part of a mini Moroccan feast we made for our lessons on Ibn Battuta and North Africa.
-
![]()
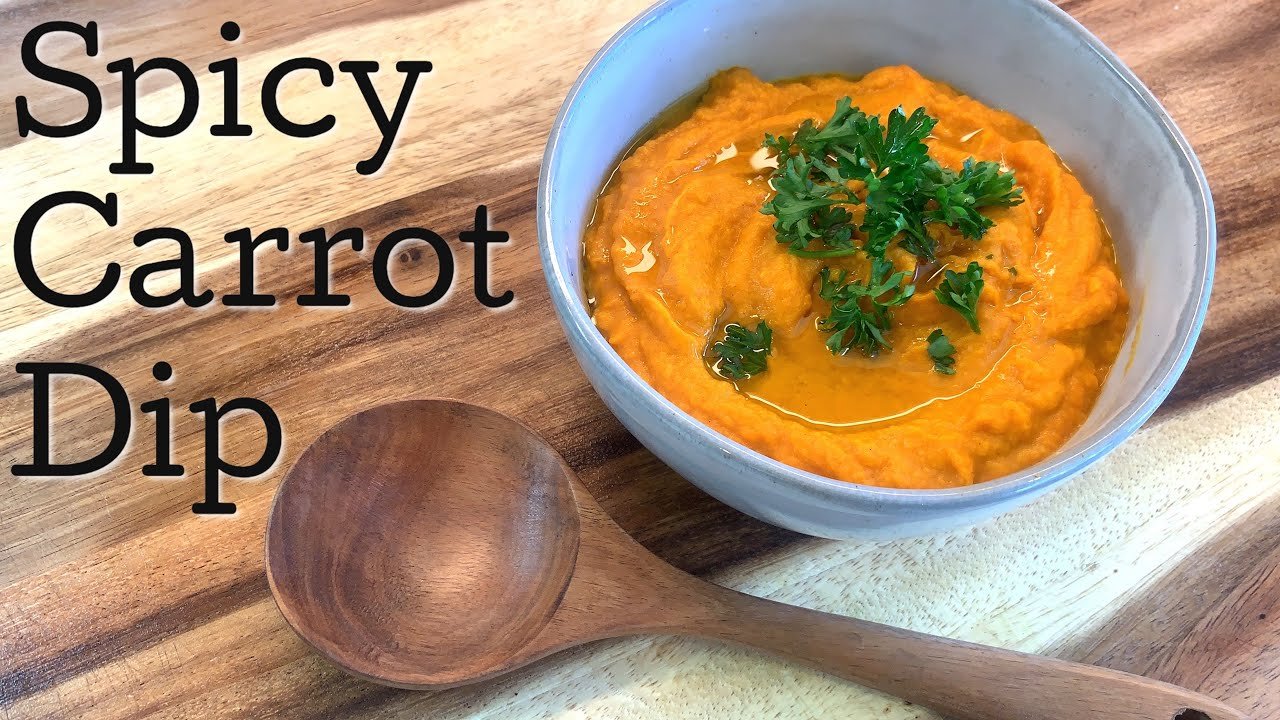
Spicy Moroccan Carrot Dip
We often head to the kitchen when doing our homeschool unit studies as this adds flavor to our lessons. Sometimes we simply cook a single recipe, other times, like today, we cook up a whole feast! But this was mini feast and included dishes you might not immediate think of as Moroccan. When I think of Moroccan food, I think of tagine, couscous and harira.
-
![]()
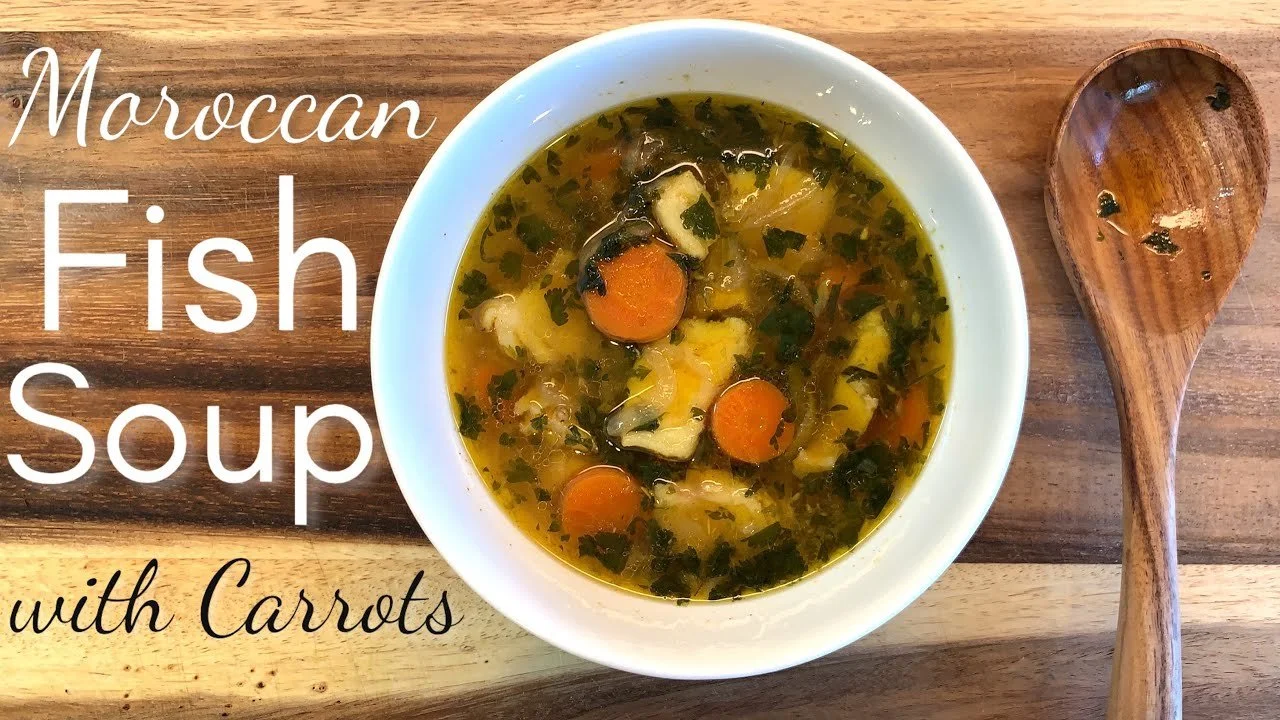
Moroccan Fish Soup
We almost always cut our recipes in half when we are trying something new. That way we can explore new cuisine without worrying if we are going to waste anything if we don't like it. For this recipe, that was a mistake!! As soon as I was done making it, and we started sampling it, it was nearly gone before I had completed the rest of the meal. I hustled to defrost more Alaska cod, and my 14-year-old son helped chop the ingredients we needed for this simple, yet wholesome, warming and delicious soup.


Silk Road Recipes
-
![]()
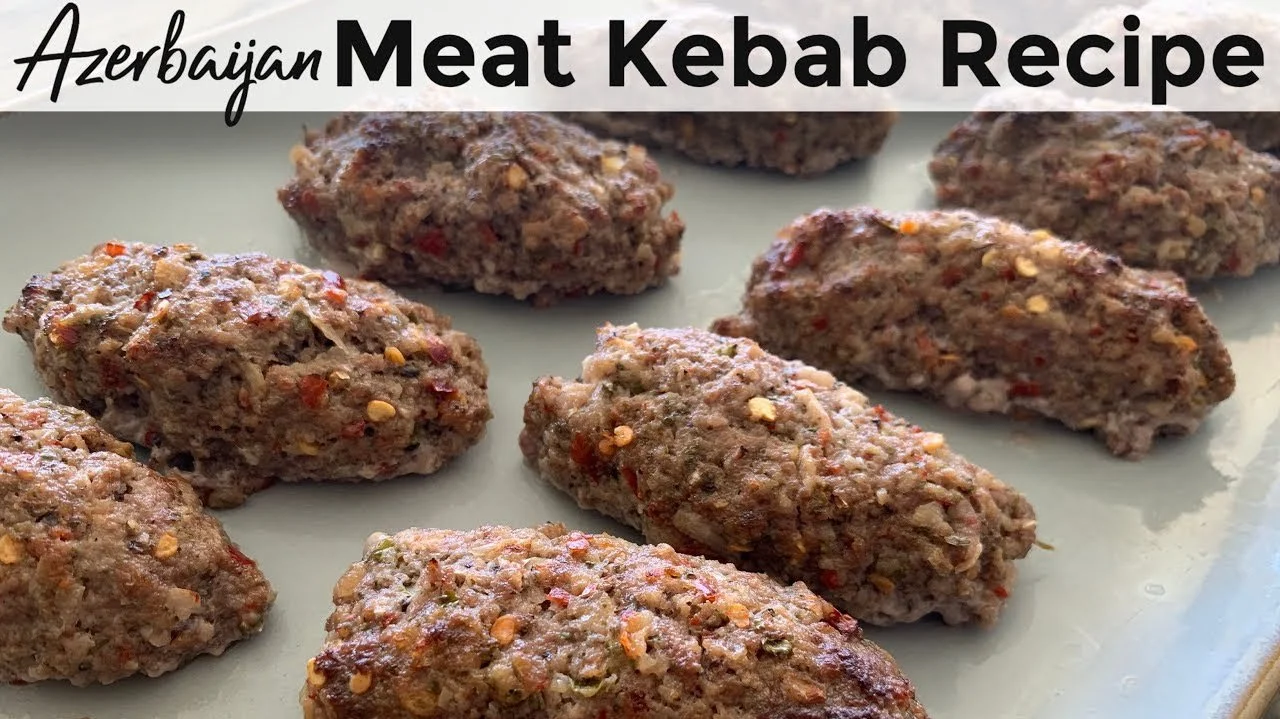
Azerbaijan Meat Kebabs with Mint | The Silk Road Gourmet
So far these are the best kebabs I've made my family. We got the recipe from The Silk Road Gourmet, a cookbook that brings recipes from the Silk Road to the modern cook. The book covers nine different regions: Republic of Georgia, Armenia, Azerbaijan, Iran, Afghanistan, Pakistan, Bangladesh, India and Sri Lanka.
-
![]()
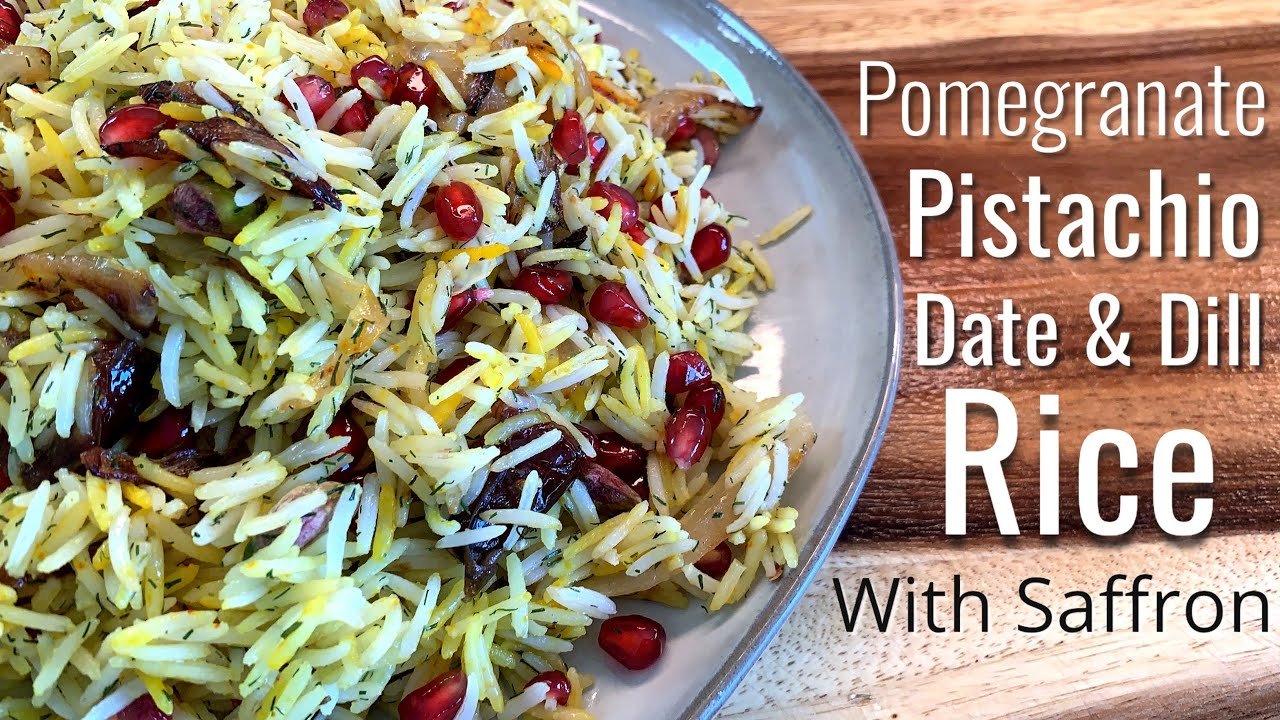
Pomegranate, Date & Pistachio Rice
This is one of our favorite recipes!! I've only added fried onions to the recipe as well as a sprinkle of saffron. If you don't have fresh dill, I've swapped it out for dried dill on many occasions. We pair this with a rack of lamb. We got this recipe from the Martha Stewart Living magazine and it's become on of our favorite recipes ever!!
-
![]()
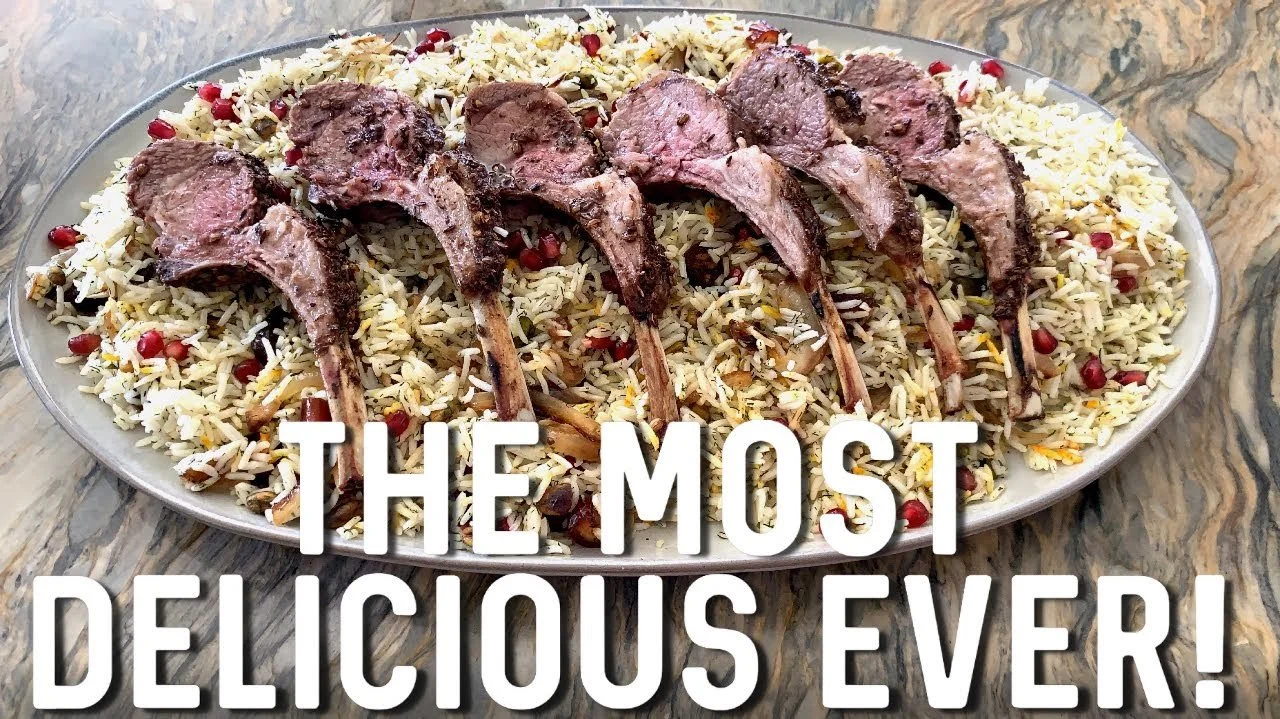
Silk Road Lamb Recipe | Amazingly Delicious and Easy!
This recipe is hands down my family's favorite recipe of all time. There's never enough even when I double the recipe. It's just one of those special treats that we can only do once in a while because a rack of lamb is quite pricey. For me too, it's one of the most delicious recipes I've ever had.
-
![]()
How to Cook Ground Lamb
I've altered a recipe we love from the Martha Stewart Living magazine which is an herbed rack of lamb that is paired with a pomegranate rice. We love that recipe so much we cook it often. One day, I made the pomegranate rice but didn't have anything except ground lamb. So, this is the recipe I came up with to pair with the rice.
-
![]()
Asian Inspired Salmon
There's a local fish market restaurant my family loves. They serve simple, delicious and healthy fish dishes with your choice of sauce. It's really the sauce that characterizes each dish, and one of our favorite is the Asian inspired sauce that has our family returning often to this restaurant.
-
![]()
Asian Chicken & Broccoli
Lunchtime is usually our main meal. While this quick Asian inspired chicken and broccoli is a smaller meal with no sides, it is quick, filling and delicious. This meal takes less than 30 minutes from start to finish (minus clean up). It's also a forgiving recipe, as long as you have soy sauce, you can get creative with your spices and vegetables. You can even sub out the chicken for tofu and make this vegan.
-
![]()
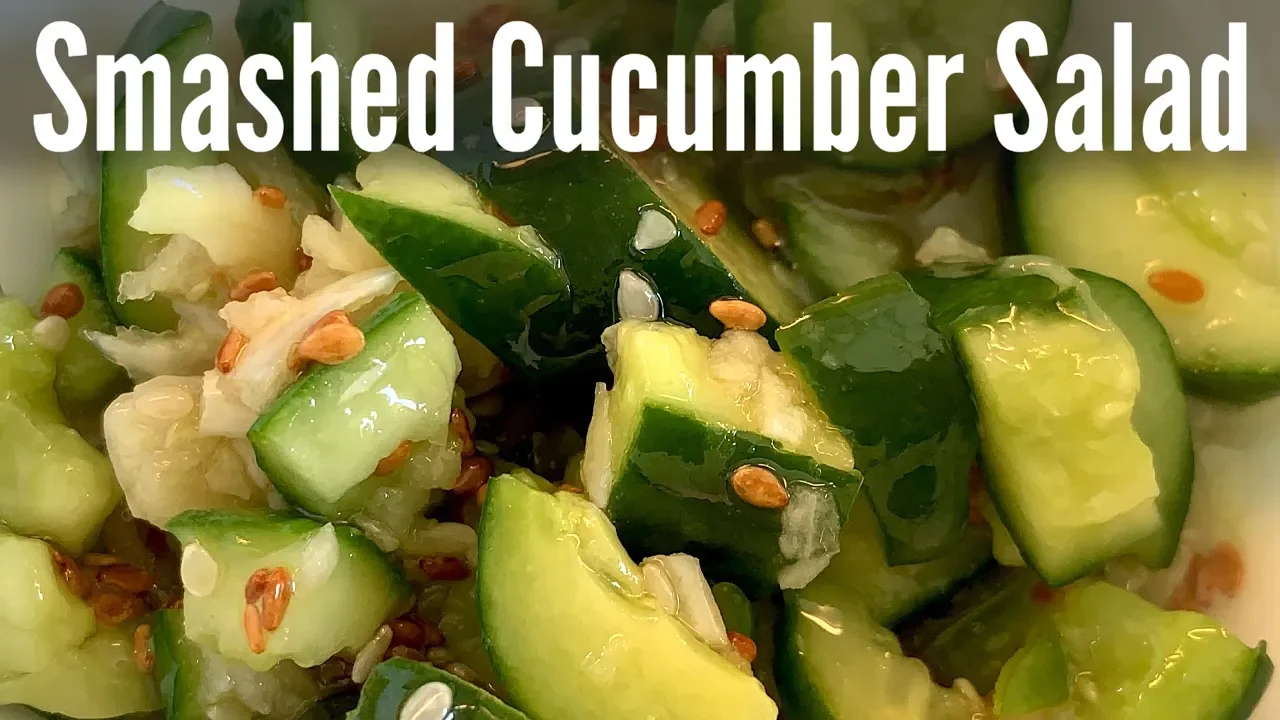
Smashed Cucumber Salad | Garlic and Sesame Seeds
I've been on the hunt for a cucumber salad recipe that tastes just like the one I love from a local Shabu Shabu restaurant. While this one is so tasty, it's not quite the same. My 10-year-old daughter, however, loved it soooo much and asks me to make it everyday. This recipe is super easy and quick, but it will take time to chill to allow all those flavors to mix and develop. For that reason, you may want to make this in the morning or the night before, or how we made it where we only let it chill for about an hour or less.

Dinner
-
![]()
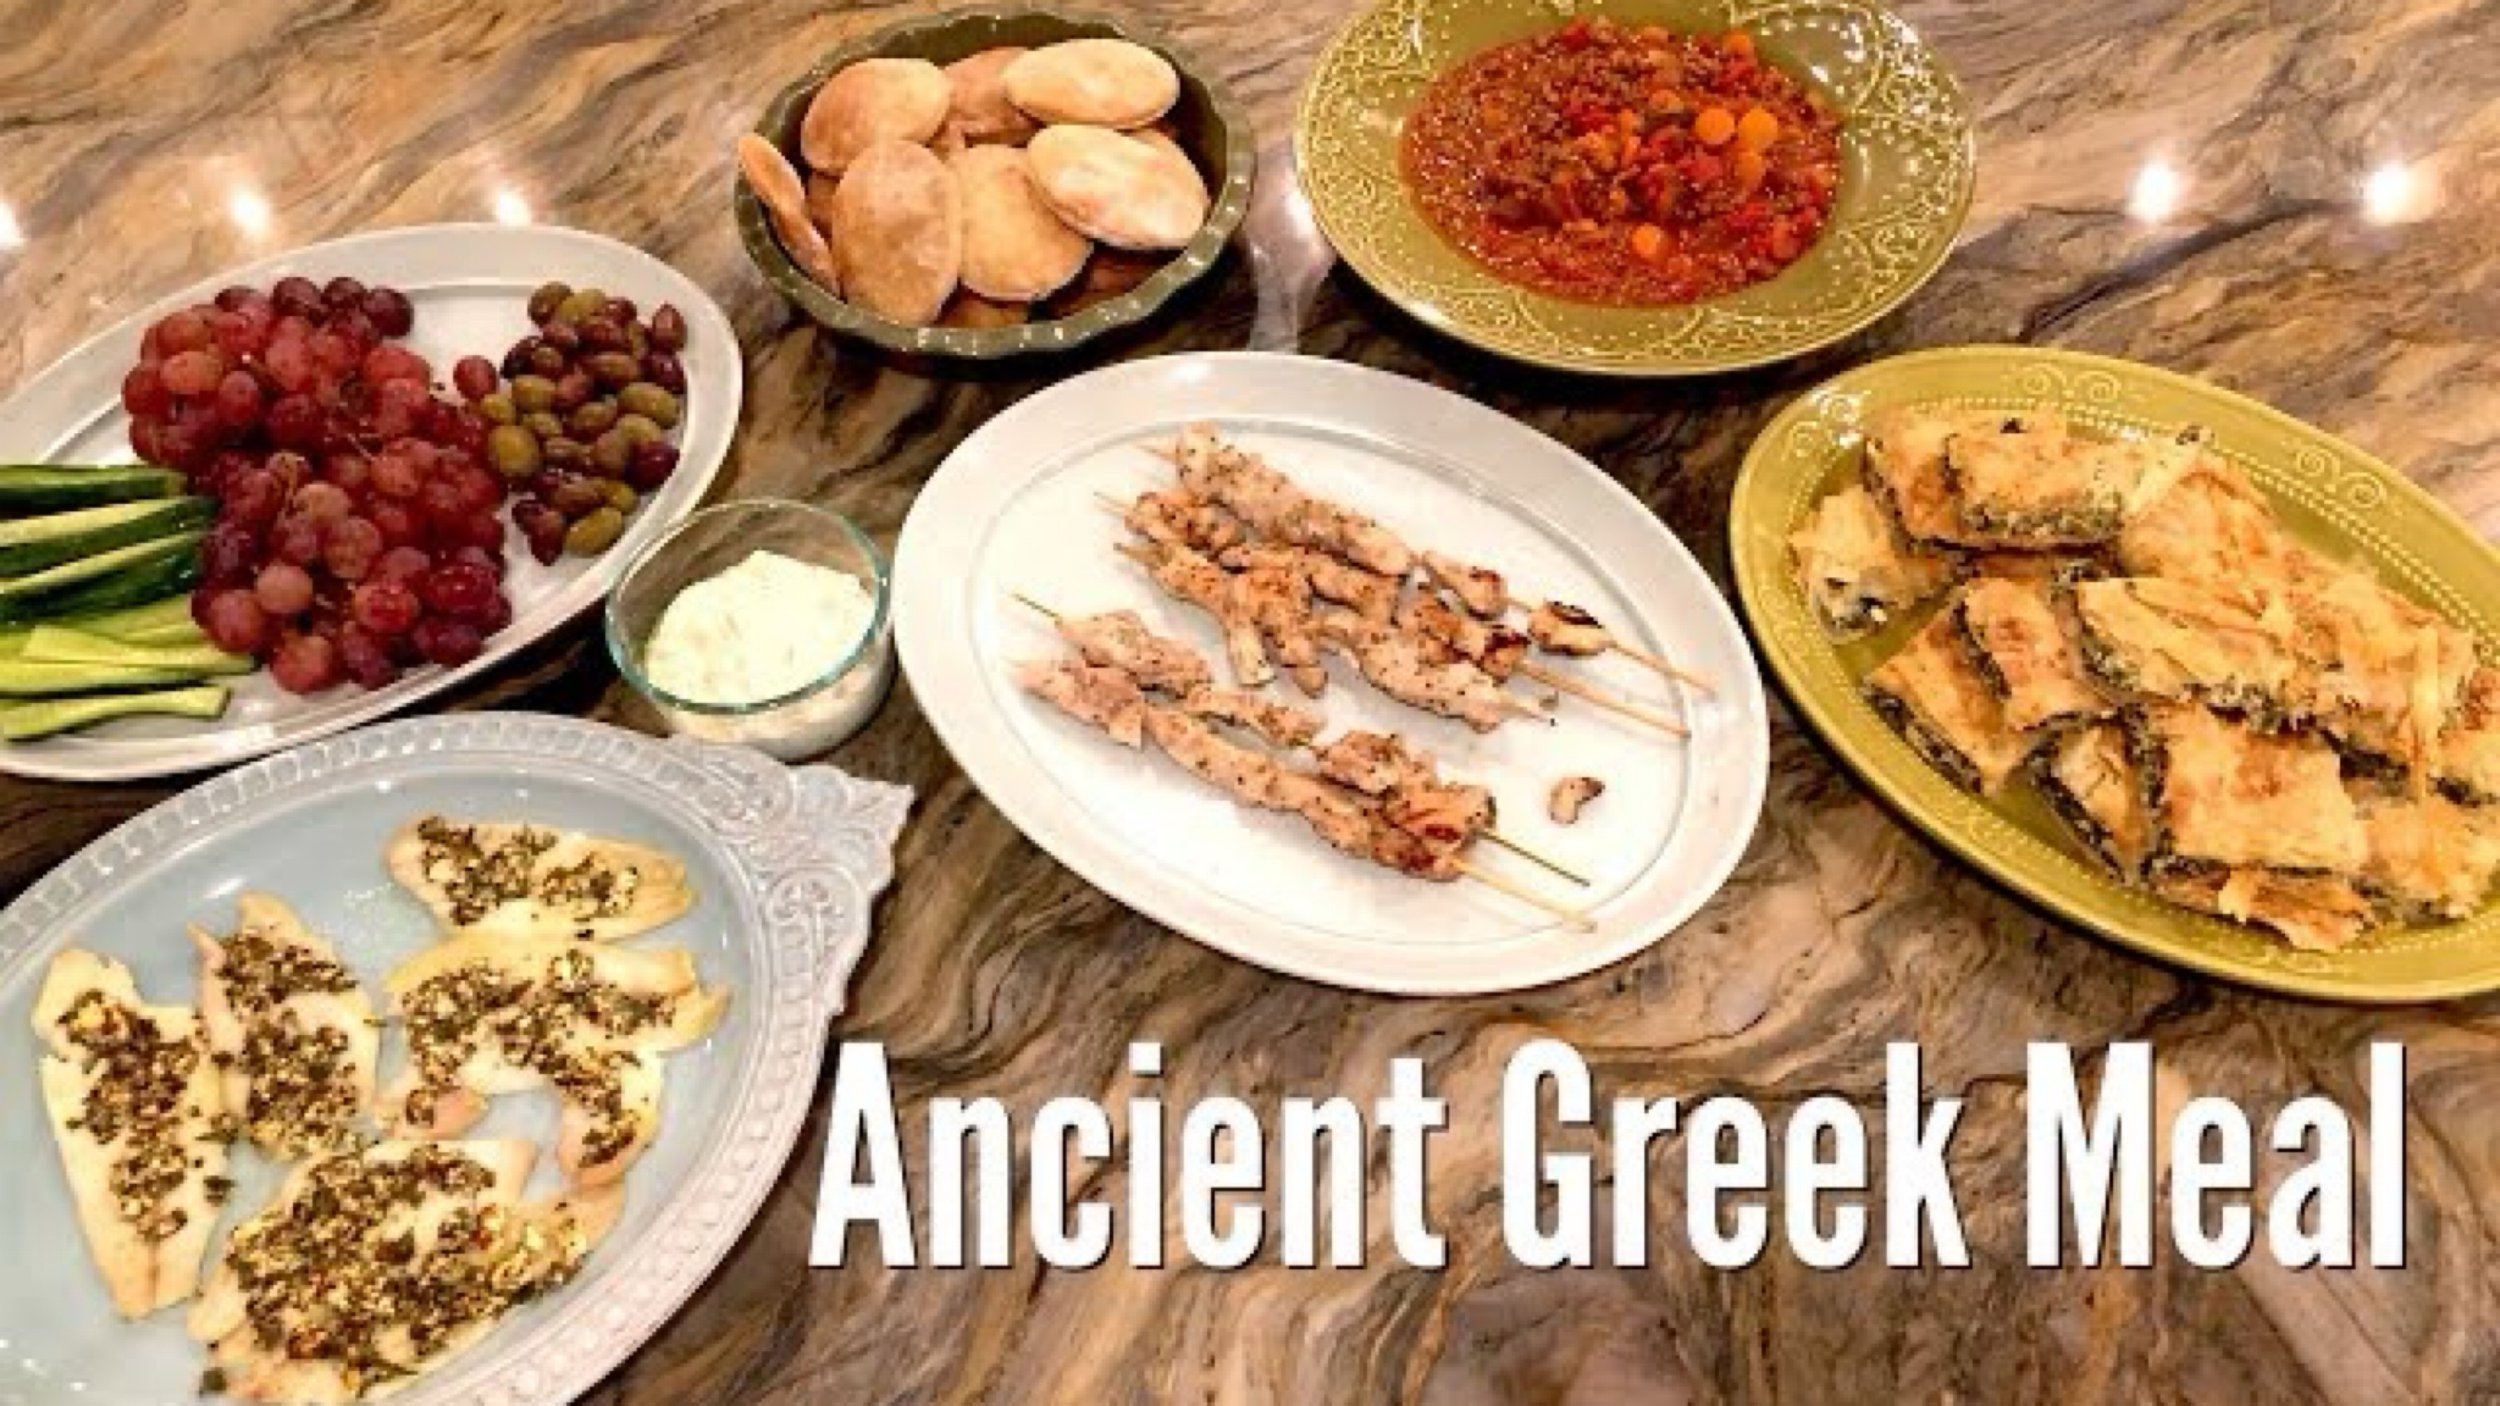
Ancient Greek Meal
What better way to learn about a time period in history than to eat your way through it! That's just what we did during our Ancient Greece main lesson block. With the help of Food and Cooking in Ancient Greece by Clive Gifford, we baked, cooked and grilled an authentic and tasty Ancient Greek meal.
-
![]()
Chicken Kebabs | Ancient Egyptian Meal
Today’s dish is chicken kebabs, and it turned out to be our favorite recipe from the book. We continue to make this dish! We made some alterations from the original recipe which calls for yogurt, but because my son has severe dairy allergies, we omitted the yogurt.
-
![]()
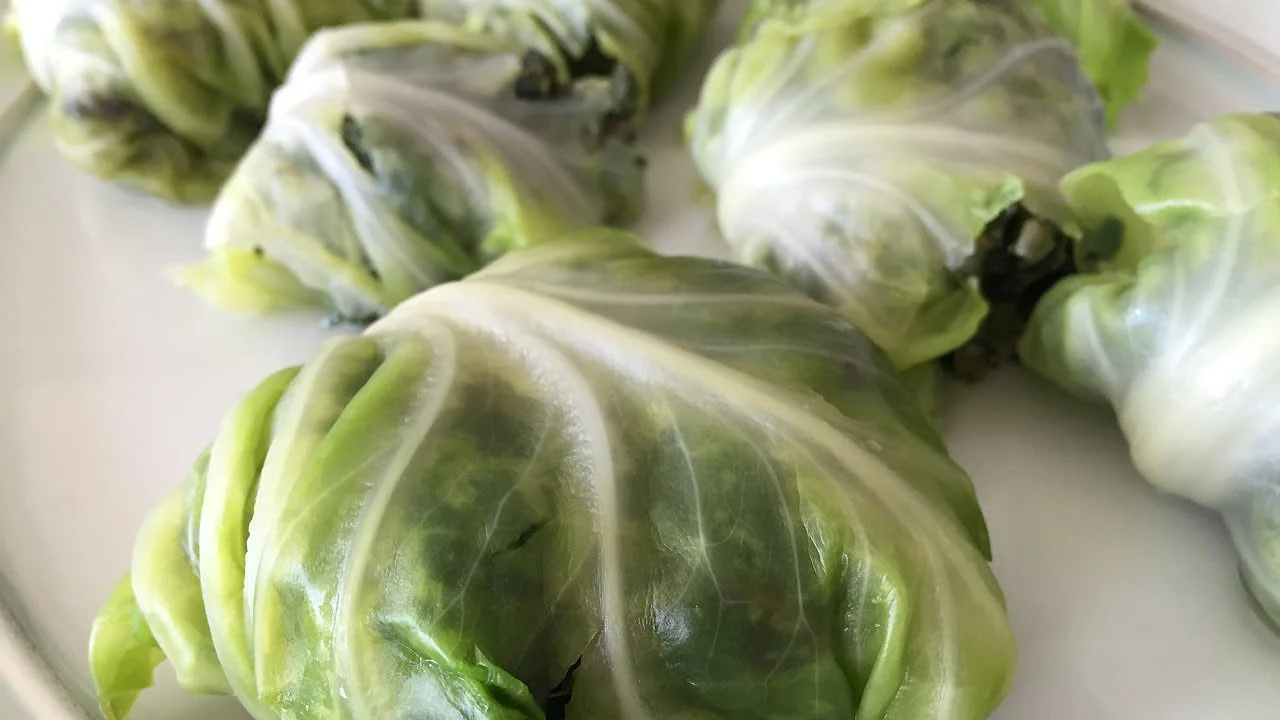
How to Make Stuffed Cabbage Leaves | Ancient Egyptian Meal
Today’s dish is stuffed cabbage leaves and it tasted surprisingly delicious. This vegan dish disappeared very quickly and considering it’s packed with spinach, this healthy side dish is one to add to any meal or as an appetizer on its own.
-
![]()
Nigerian Fried Rice
Few family recipes are all around crowd pleasers. There's usually at least one person who doesn't like something I cook. Usually that person is me. And yes, I'm not a fan of this dish...well at first that is. I'm not a rice fan (except for Zeresh and Adas Polo and a new pomegranate rice), so biryani and kibsas don't interest me.
-
![]()
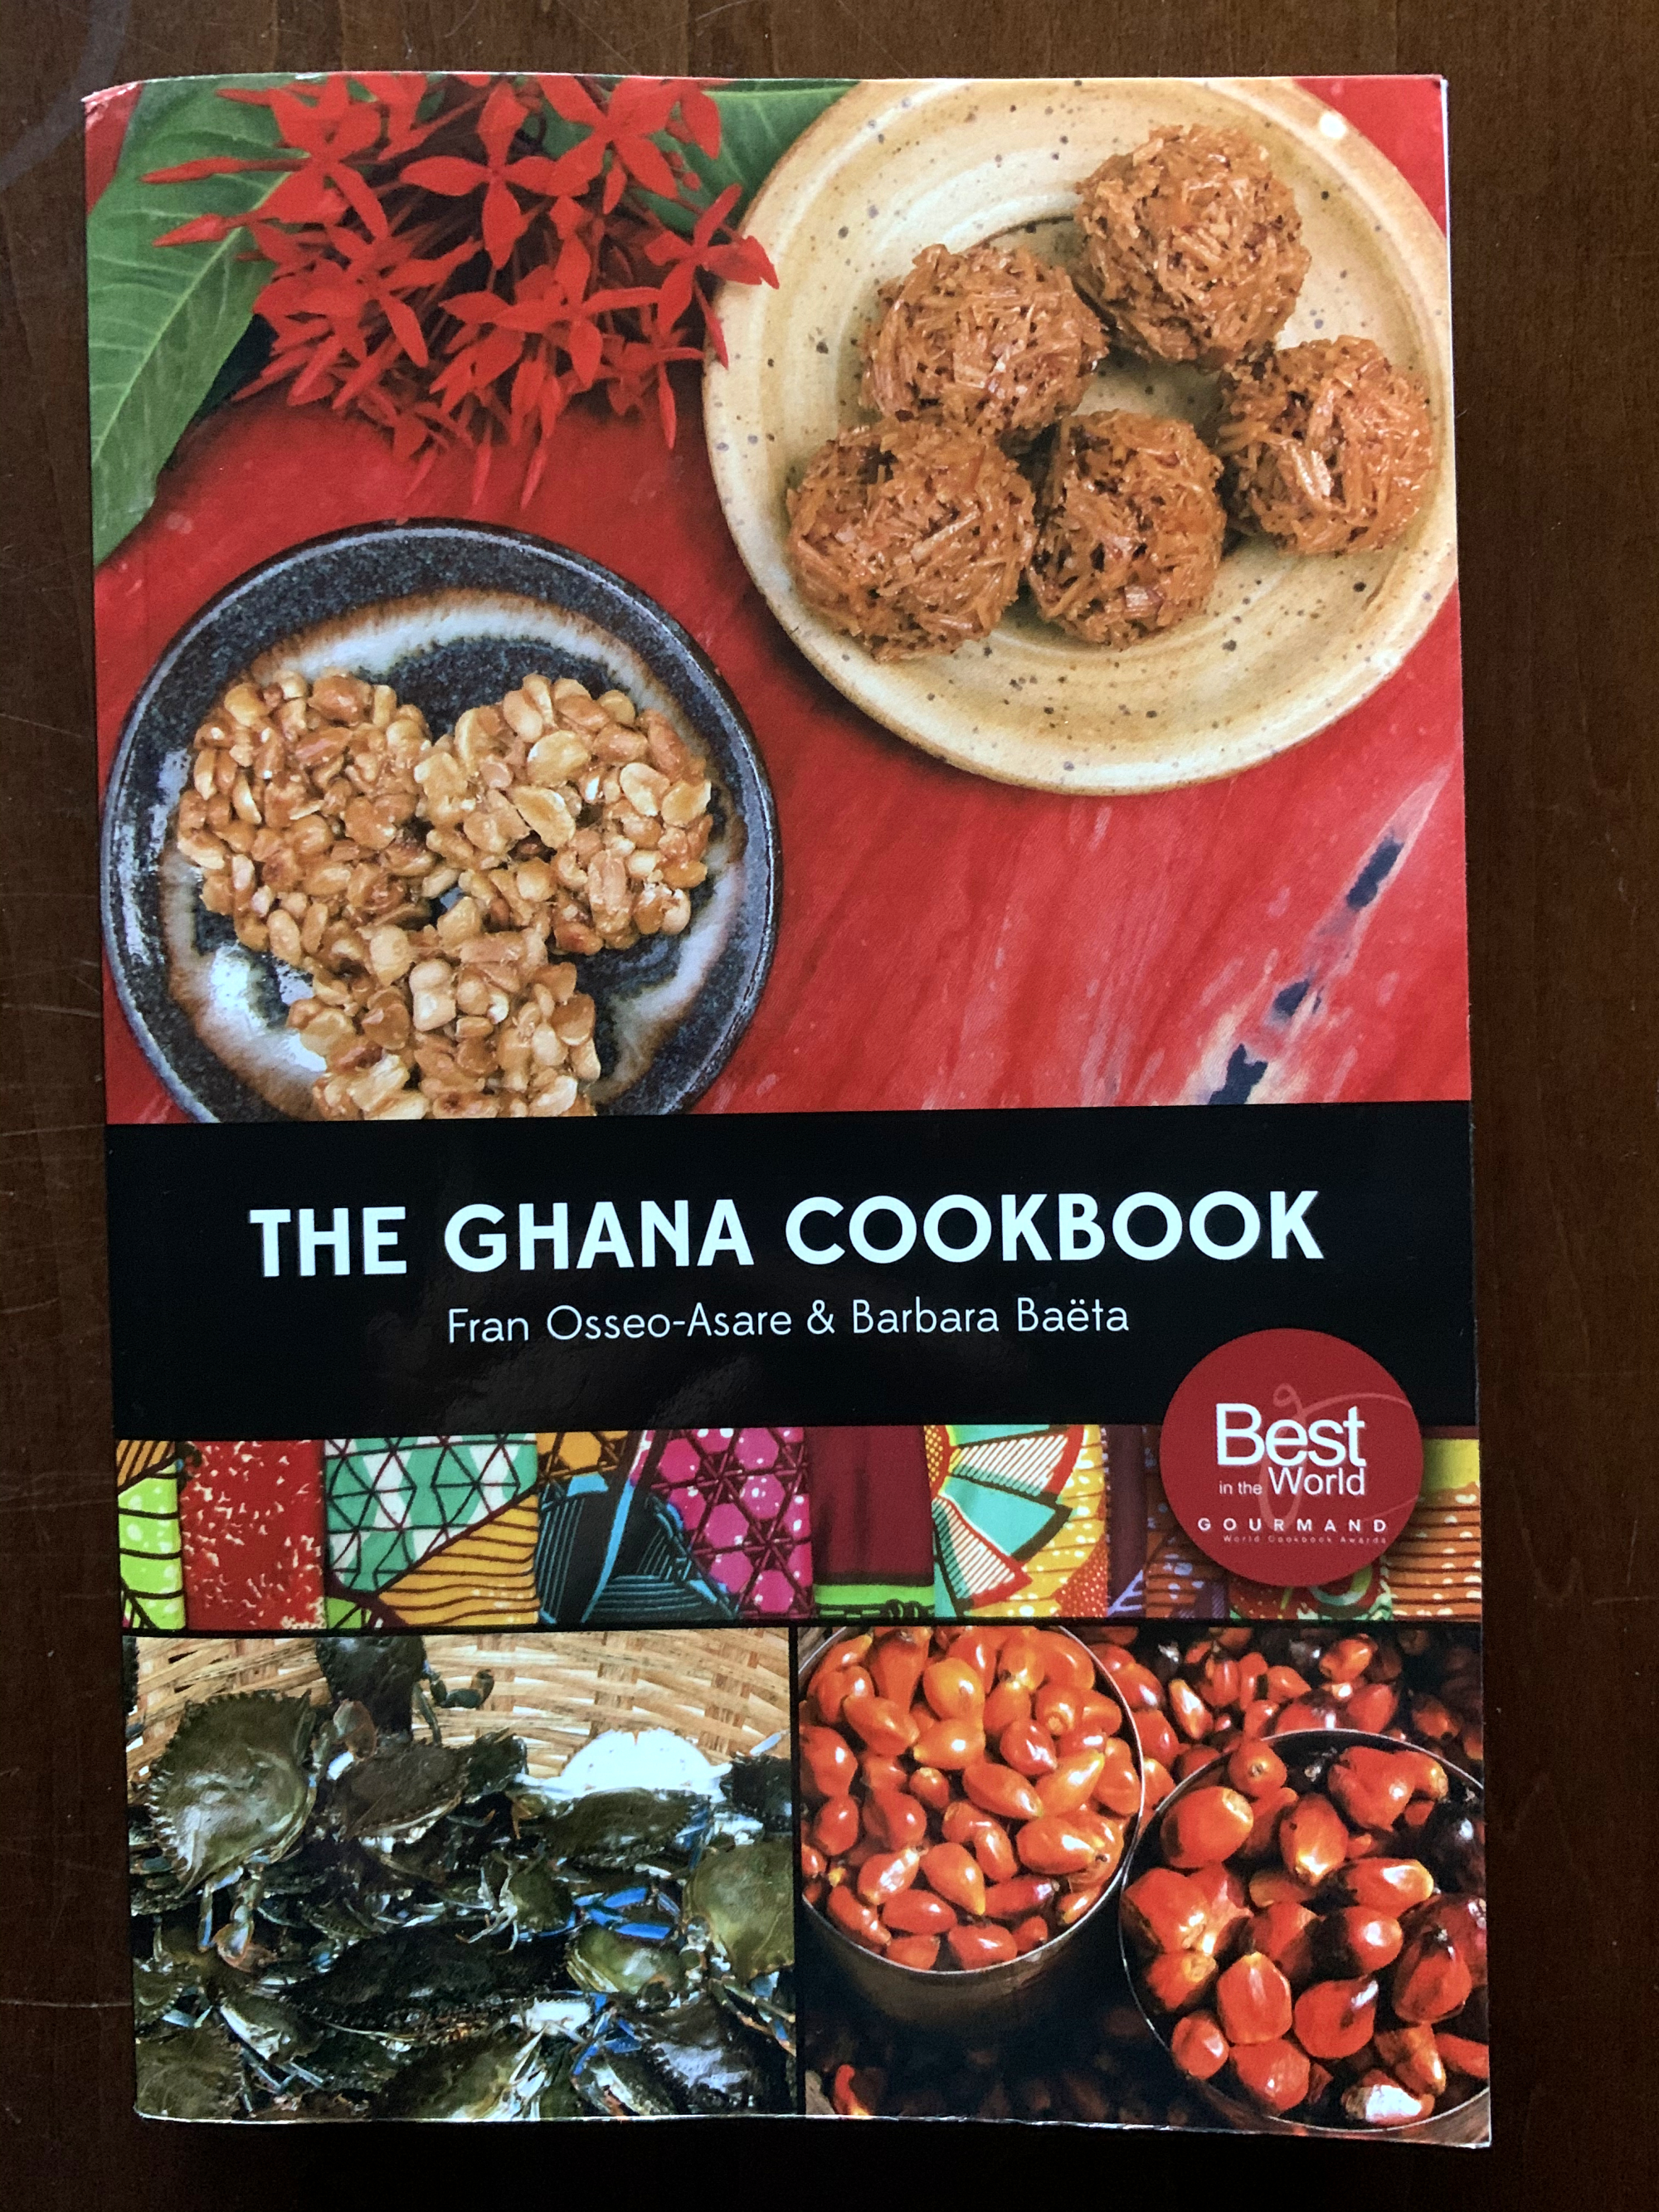
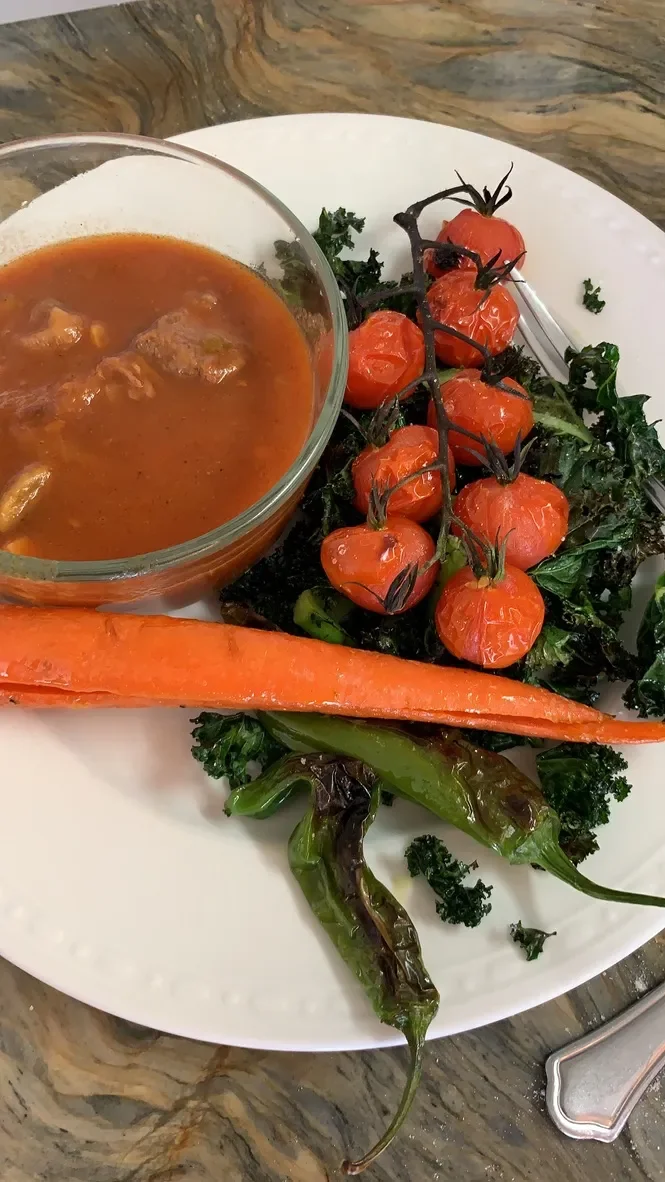
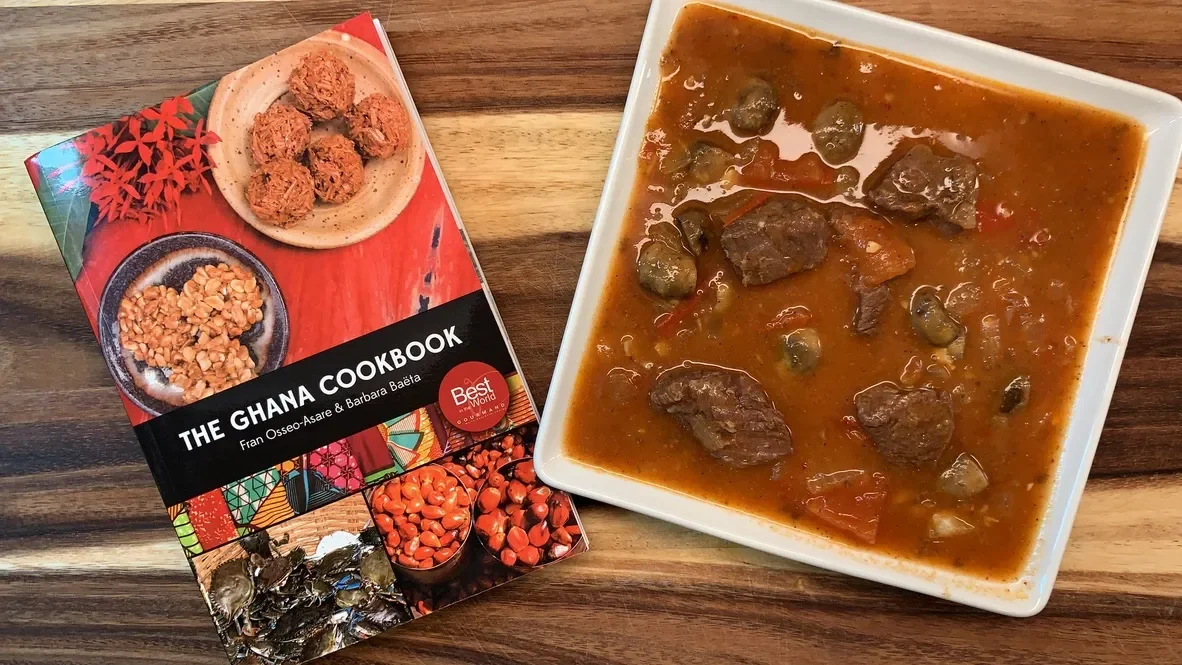
Ghana Mushroom Stew
Whenever we do our history main lesson blocks for homeschooling, we always do our best to include some historical or regional recipes to enhance our lessons. While I attempted to look for historical Malian food, we ended up buying two modern cookbooks, one on Ghanaian food called The Ghana Cookbook and one on Senegalese cooking called Senegal by Pierre Thiam.
-
![]()
Vegetable soup in a Pumpkin
This is a show stopping center piece that tastes great and looks amazing! Add drama and intrigue to your dinner party with this perfect-for-fall vegetable soup served in a pumpkin. It's actually easier than you'd think to make, is the perfect meal or appetizer for large groups and warms you to the bone on cold autumn nights.
-
![]()
Tortilla Soup Recipe
Tortilla soup is a family fall and winter favorite because it's so warming, hearty and delicious. It's also super fast! Not only can you make the soup in about 30 minutes, while it's simmering, you can garnish the soup with cilantro, avocado, pepper jack cheese and fresh homemade tortilla chips.
-
![]()
Chipotle Cilantro Rice
When I was younger, I found a lot of cooking inspiration from the restaurants we used to frequent. If I could make it at home, we could enjoy those dishes more often and save money. Sometimes it works, other times it's just acceptable and other times it fails! This Chipotle inspired Mexican rice is my version of the rice you can find at this chain restaurant which we have been going to for years.


Hello Fresh Meals
-
![]()
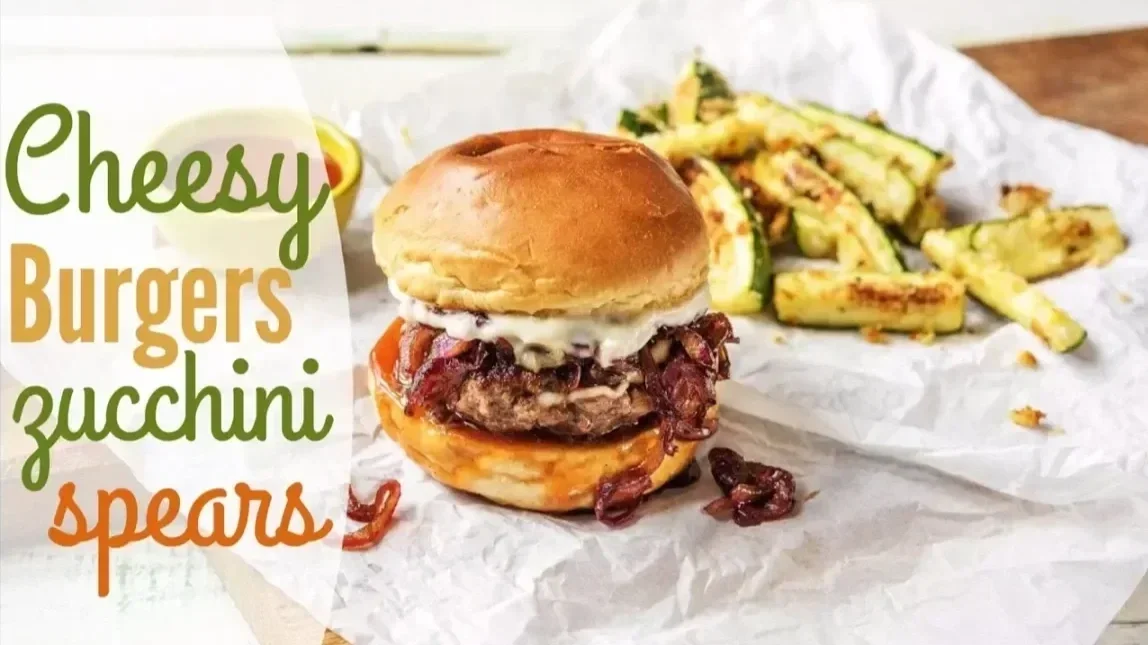
Melted Pepper Jack Cheese Burgers with Zucchini Spears
After receiving a free box from Hello Fresh, we decided to try the service out because we liked it so much and were impressed with the recipes and quality of the food. We soon realized that this food subscription box would work perfectly for our homeschool cooking class and the added perk is that it has enlivened our menu and brought our cookbook to life!
-
![]()
Peppered Rib Eye Steak with Green Beans and Truffle Potatoes
We ordered the box for two people with three meals, so a total of six meals for about $60. At $10 a meal, some would argue they could just eat out or buy far cheaper food from the grocery store and feed three times as many.
-
![]()
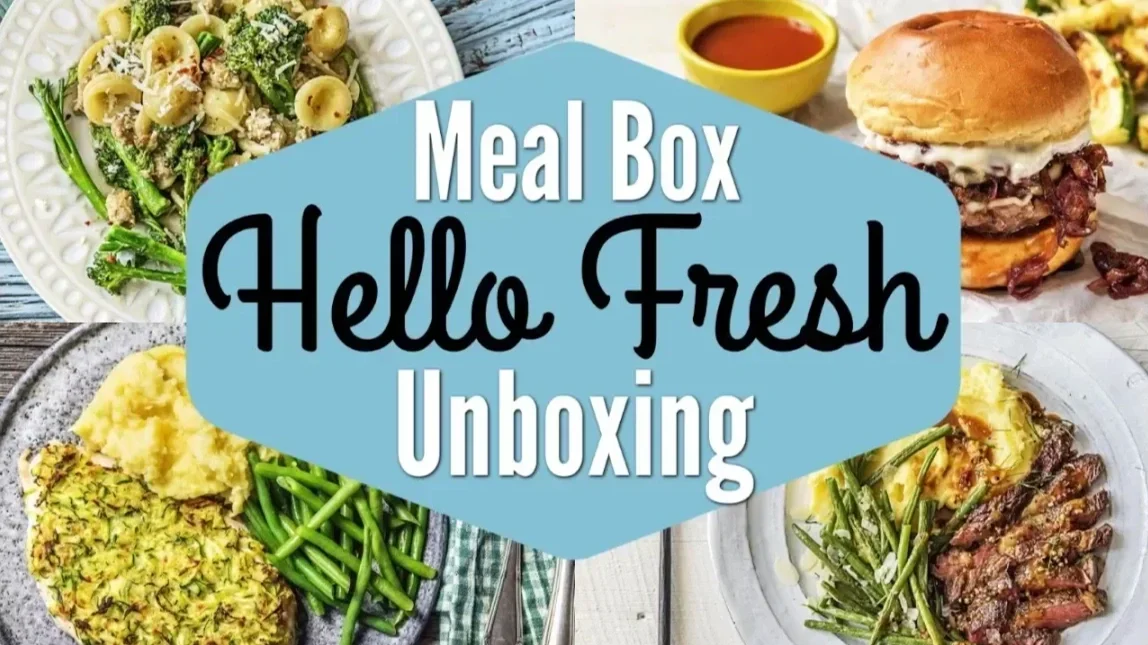
Hello Fresh Unboxing | What's In A Meal Box?
While both statements are true, what that won't do is inspire you to cook, try new ingredients and recipes and enliven your menu with new recipes. For me, $60 is a cooking class for the kids and me, delicious meals, new recipes and ingredients we get to try and most importantly, we now have several new recipes that we cook often, love and have become family favorites.
-
![]()
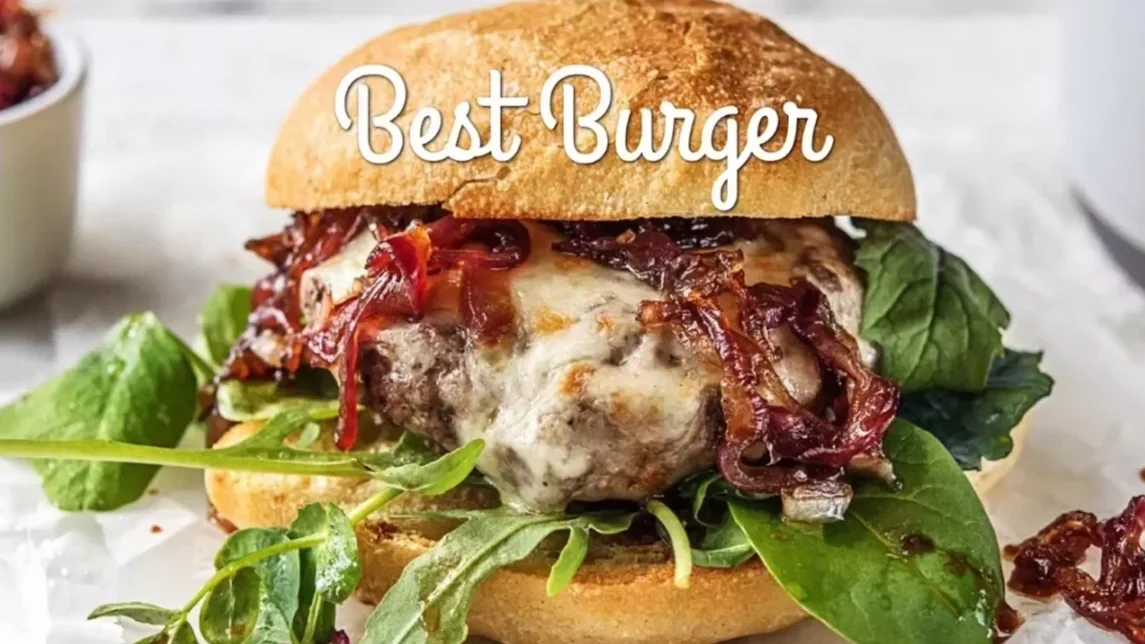
Italian Ciabatta Cheeseburger
The salad was so good that I kept eating it while we cooked, and by the time the burgers were ready, there was hardly any left to serve. The simple dressing, made with tomato paste, balsamic vinegar, and garlic, was perfectly tangy and flavorful, and I’ll definitely be making it again. My son sliced the ciabatta rolls while I shaped and seasoned the burger patties, which we grilled for a few minutes on each side before topping with cheese.
-
![]()
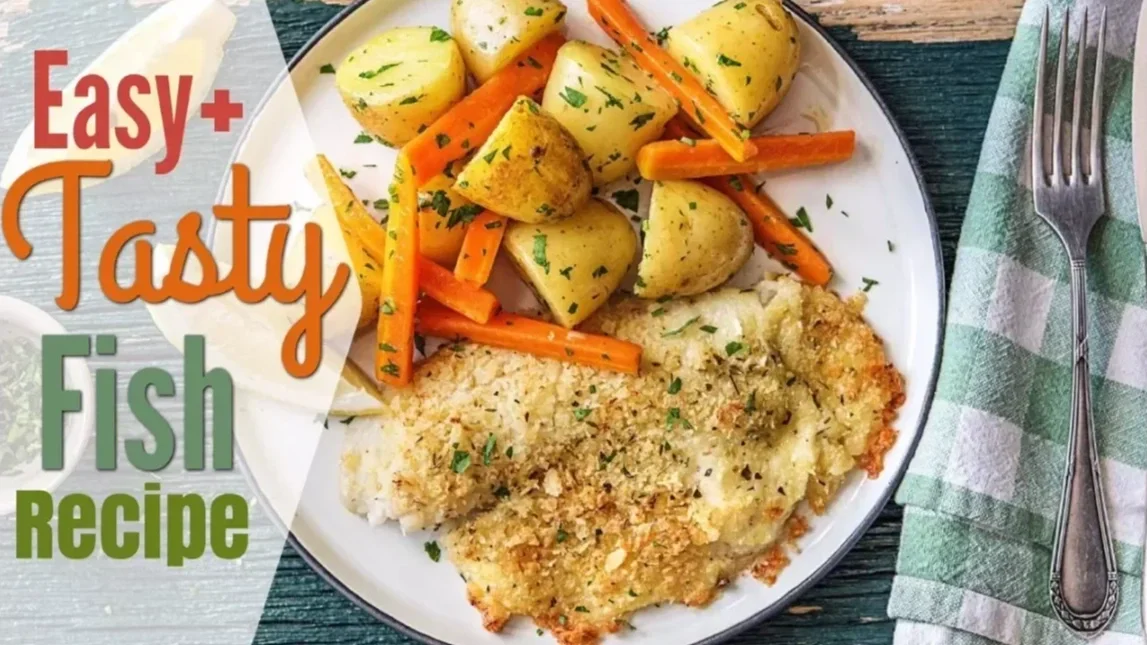
Parmesan Crusted Fish
We’re currently on our fourth HelloFresh box, and it has been a great way to try new recipes and decide which ones to add to our family’s regular meals. We use the subscription as part of our homeschool cooking class, and my six-year-old daughter and ten-year-old son helped with chopping, cleaning, and preparing ingredients. It’s been a fun and practical way for them to learn cooking skills and how to follow recipe directions in the right order.
-
![]()
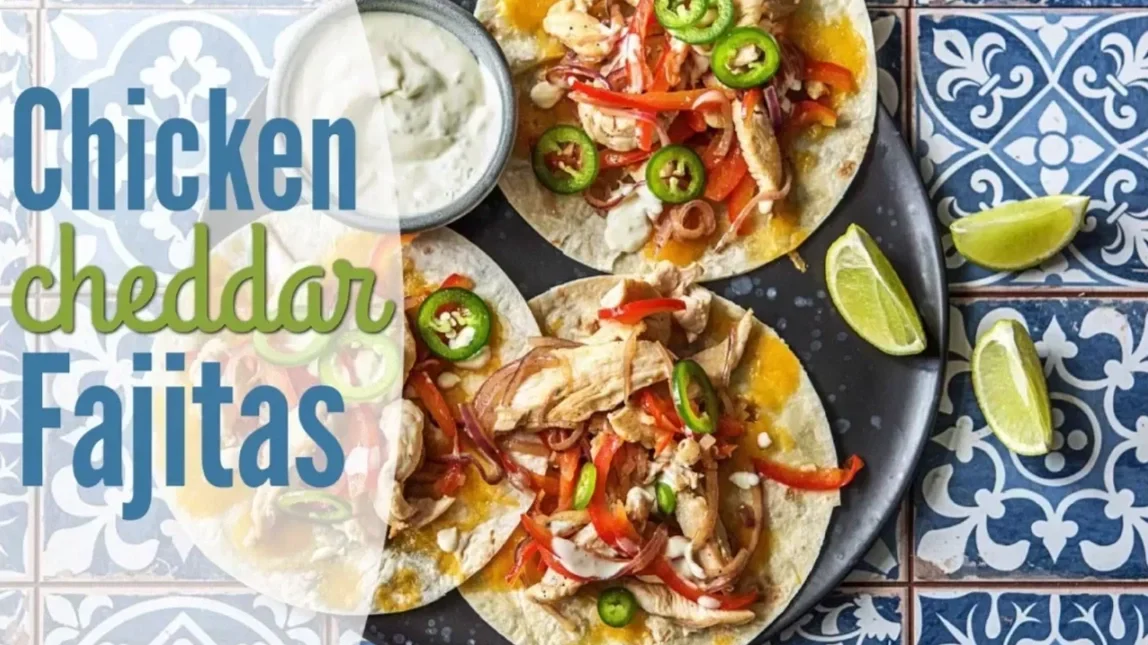
How to Make Chicken Cheddar Fajitas
Saute onions and bell pepper with oil and half seasoning pack. Add chicken and continue cooking until done. Squeeze half lime into small bowl and let sit with sliced jalapenos. Squeeze other half lime into dish with sour cream. Sprinkle cheddar cheese on tortillas and warm in the oven until cheese is melted. Top tortillas with chicken filling and marinated jalapenos. Drizzle sour cream on top and serve.
-
![]()
Hello Fresh Unboxing | Review
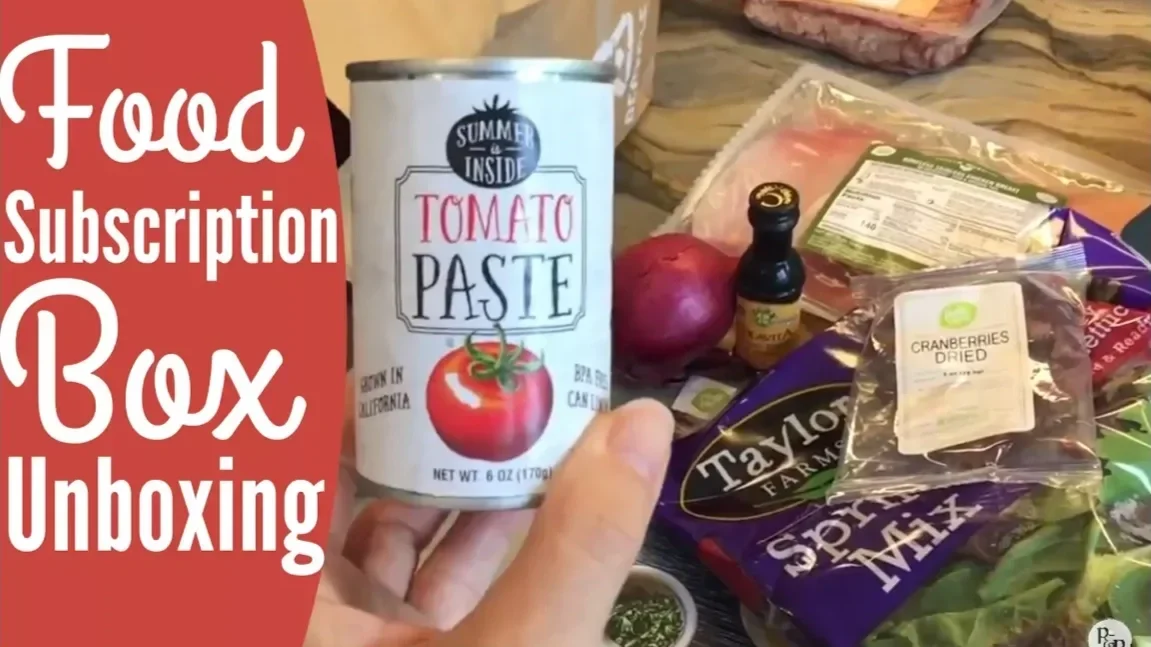
HelloFresh is a meal subscription service that delivers all the ingredients and recipe cards for three meals, each meant for two people, though I find the portions generous enough to feed more. The box arrives well packed with cotton insulation, two ice packs, and neatly organized bags for each meal, plus a section for meats and fish.
-
![]()
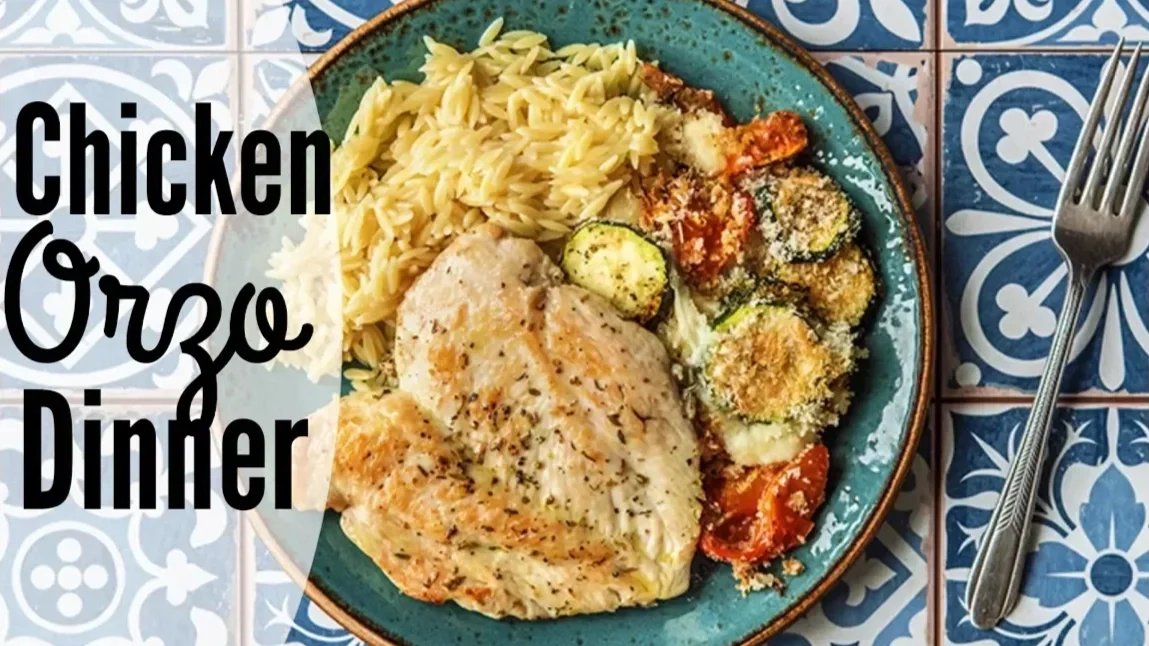
Chicken Orzo Dinner with Grilled Cheesy Vegetable
Today's recipe is easy and inspires anyone to eat more vegetables. The chicken and pasta are simple, but the zucchini is what takes this meal over the top. You'll want to make this just for the grilled zucchini with browned parmesan cheese.
-
![]()
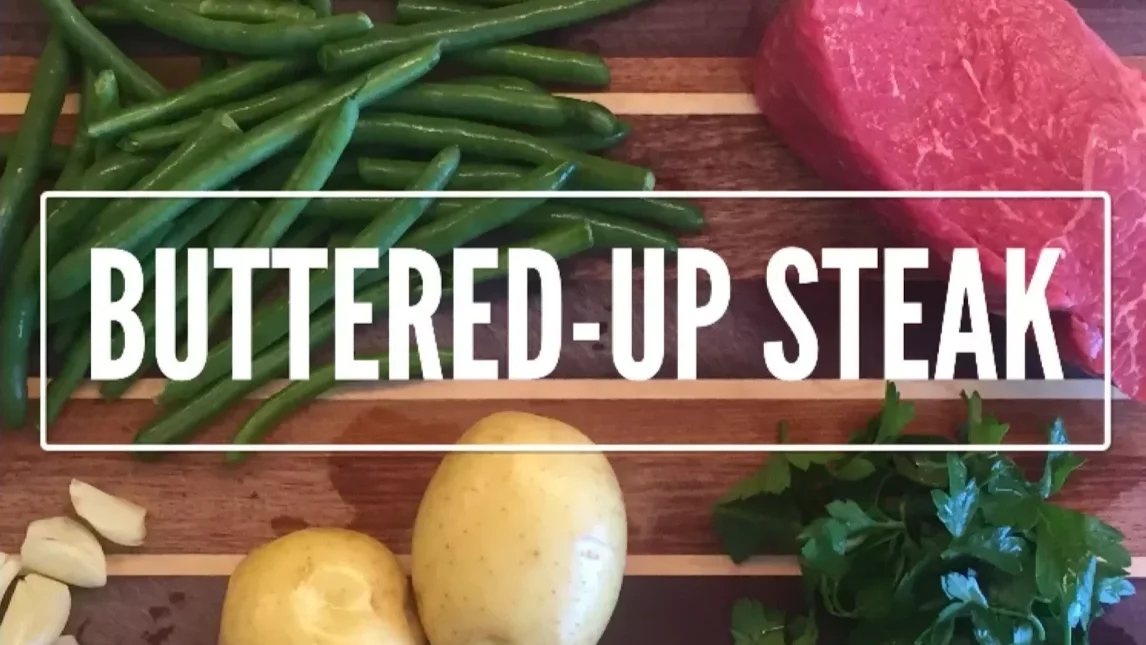
Buttered Up Steak
Today's recipe is definitely a new family favorite. I love the steak topping and have already made this one again. The potatoes are easy and tasty and a great alternative to French fries.
-
![]()
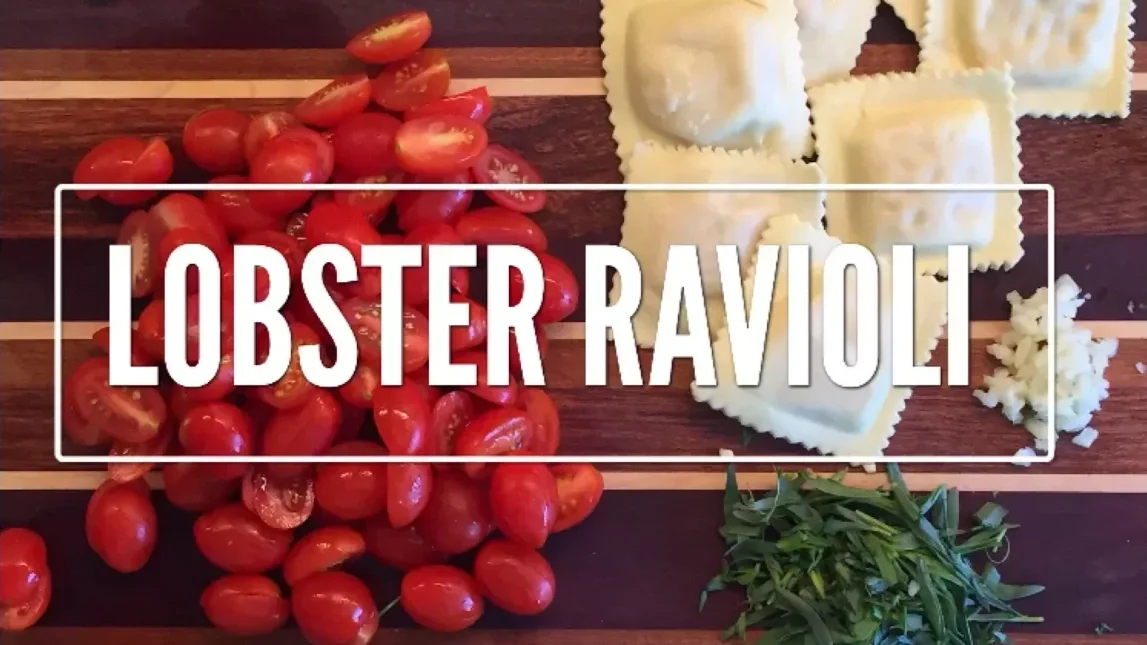
Lobster with Ravioli
Today, I'm showing you how we made Lobster Ravioli. Put water on for ravioli, and cook ravioli. Cut tomatoes in half. Smash garlic. Roughly chop tarragon. With a drizzle of oil, cook tomatoes and garlic for a few minutes, then add shrimp and cook until done. Add salt and pepper to taste.
-
![]()
Hello Fresh Unboxing
This box included three meals: Lobster Ravioli and Shrimp, Buttered-Up Steak, and Winner Winner Chicken Orzo. Each meal came in a labeled paper bag with all the ingredients neatly organized except for the meat, which was stored separately between two large ice packs inside the insulated box. The packaging was impressive, keeping everything cold and fresh, with cotton insulation on all sides.


Main Dishes
Main Dishes
In our family, our main meal of the day is lunch which I serve around 1pm on most days. I am currently cooking for a family of six, which includes three young men plus my husband. Even my young growing daughter is eating more like an adult now. So when I cook lunch, I make sure, that it’s enough for a full and filling lunch with leftovers for a light dinner. Some recipes lend themselves better to this than others. Soups and rices tend to keep well on the stove to be munched on later in the day. Salads and some meats don’t do so well. In our home, I leave the food out until it’s been eaten or it’s the end of the day. The following are some of our family’s favorite meals. You can see what we pair these main meals with by checking out the blog posts on soups, appetizers, rices, desserts and drinks.
Ancient Greek Meal
What better way to learn about a time period in history than to eat your way through it! That’s just what we did during our Ancient Greece main lesson block. With the help of Food and Cooking in Ancient Greece by Clive Gifford, we baked, cooked and grilled an authentic and tasty Ancient Greek meal. We did take a couple liberties when ingredients couldn’t be sourced. We also made spanakopita which wasn’t in the book and though it’s a modern addition, it’s a tasty one!
All recipes except spanakopita are in the book. We made a few changes to the barley cakes. The recipe that follows is my own:
Ingredients:
1 cup Trader Joe’s multigrain pancake and baking mix
1 cup white flour
1 cup Jovial brand gluten-free flour
3 tablespoons honey
3 tablespoons butter
1/4-1/2 teaspoon salt
1/2 packet of yeast (about 1/4 of a teaspoon)
2 tablespoons of cream
up to 1 1/2 water
Combine all ingredients and mix well. No kneading necessary. Cover and let sit for 2-4 hours until dough has risen. It may not double size because of the gluten-free flour. Using warm water will speed up the process.
Once the dough has risen, turn it out onto a floured surface and roll it out to about 1/8 inch thick. Using a circle cookie cutter, cut circles and place on a tray lined with parchment paper. Bake for 9 minutes or until the puff up and turn golden at 430 degrees.
Spanakopita recipe:
16 oz thawed and drained chopped spinach
4 eggs
10 oz feta cheese
1 teaspoon dill
pepper
1 medium chopped onion
Mix ingredients together.
On a sheet tray with raised sides, lay two sheets of phyllo dough and brush olive oil, repeat three times. Lay filling and spread evening. Layer another two sets of phyllo dough. Score top and drizzle olive oil. Bake at 325 degrees for 55 minutes.
Check out the other videos in our Ancient Greece Main Lesson Block. You can also see our Ancient Roman meal, Ancient Egyptian Meal and a recent Astronomy lesson which included food. Who doesn’t like mixing food and education!
Check out our last main lesson block Astronomy unit. Find great hands-on projects by watching our Nature-Watch kit videos.
Chicken Kebabs | Ancient Egyptian Meal
For our Ancient Egypt unit study we decided to make some ancient Egypt inspired dishes using the book “Food and Cooking in Ancient Egypt” by Clive Gifford and illustrated by Paul Cherrill. You can find the book at Rainbow Resource. Today’s dish is chicken kebabs, and it turned out to be our favorite recipe from the book. We continue to make this dish! We made some alterations from the original recipe which calls for yogurt, but because my son has severe dairy allergies, we omitted the yogurt.
Recipe:
3 chicken breasts-cubed
1 onion-grated
3-6 cloves of garlic-mashed
2 tablespoons cumin
1 teaspoon cayenne
1 teaspoon Aleppo pepper
1 teaspoon paprika
salt
In a blender add all ingredients except chicken. Toss chicken with mixture until well mixed. Place on baking tray and bake for 15-20 minutes on broil or 450 degrees uncovered. You can also cover it. You may choose to marinate the chicken, but we didn’t. You can also put the chicken on skewers and grill it, but we didn’t. You can serve this with rice and yogurt. But, you guess it, we didn’t! Instead we served it with Stuffed Cabbage and Dukkah Dip, and finished it off with Date Balls.
Serve with stuffed cabbage as a side dish. Or check out the whole Egyptian Meal.


How to Make Stuffed Cabbage Leaves | Ancient Egyptian Meal
For our Ancient Egypt unit study we decided to make some ancient Egypt inspired dishes using the book “Food and Cooking in Ancient Egypt” by Clive Gifford and illustrated by Paul Cherrill. You can find the book at Rainbow Resource. Today’s dish is stuffed cabbage leaves and it tasted surprisingly delicious. This vegan dish disappeared very quickly and considering it’s packed with spinach, this healthy side dish is one to add to any meal or as an appetizer on its own.
Recipe:
1 head of cabbage (leaves carefully removed)
1 bag of frozen spinach (12 oz.)
1 onion sliced
3 cloves of garlic (or more!)
1/3 cup of raisins or currants
1 tablespoon of sesame oil
1/2 teaspoon of ground coriander
1 teaspoon sesame seeds
Boil cabbage leaves for 5 minutes or less, just until they are soft. Set aside. Slice onion and saute it with oil and garlic. Add spinach, coriander, sesame seeds and raisins and continue to cook for about 5 minutes. Scoop about 1-2 tablespoons of mixture into each cabbage leaf and gently fold over the flaps and flip it over onto a serving platter so all the flaps are tucked under. Serve as an appetizer or with this chicken recipe, or catch up on the whole Ancient Egypt Cooking Playlist.


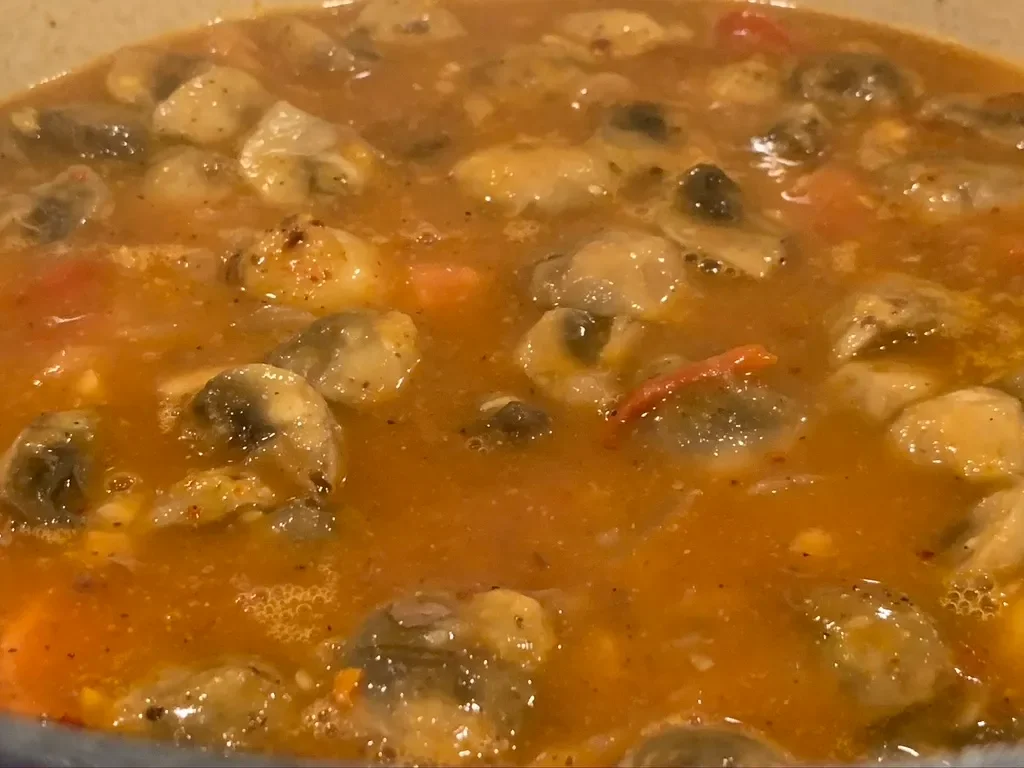
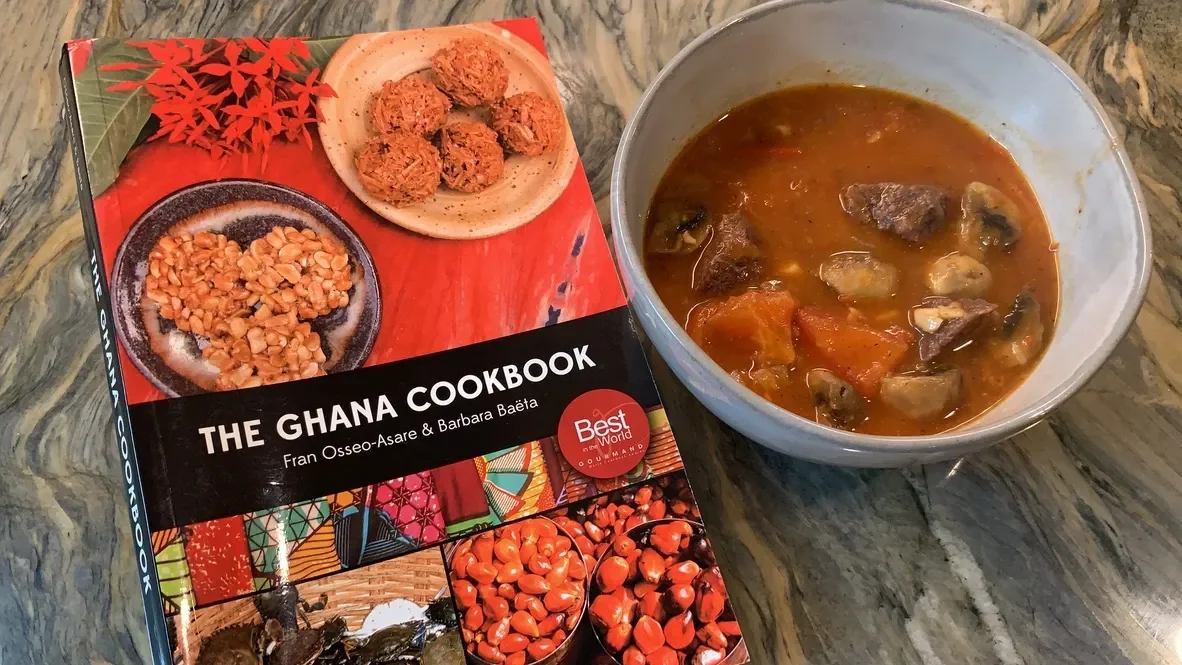
Ghana Mushroom Stew
Whenever we do our history main lesson blocks for homeschooling, we always do our best to include some historical or regional recipes to enhance our lessons. While I attempted to look for historical Malian food, we ended up buying two modern cookbooks, one on Ghanaian food called The Ghana Cookbook and one on Senegalese cooking called Senegal by Pierre Thiam. My goal is to try a minimum of two recipes from each cookbook I get for our unit studies and for the Ghana cookbook, we cooked Mushroom Stew about 10 times! We love this recipe so much, and granted I’ve made some alterations to the recipe and maybe some shortcuts as well, but overall, I feel we’ve stayed pretty true to the recipe and in the process tried something new.
Preferably, I wanted recipes that included ingredients we didn’t readily use in our own cooking so we could get a feel for the region. While this recipe doesn’t do that, I think bringing in some staples from a region allows you to truly try something new. All places will usually have a meat, grain and vegetable that is heavily relied upon as well as spices that are common. What we learned through our Silk Road unit study is that spices traveled the Silk Road, later known as the Spice Route by sea, so some spices that are quintessential in West Africa may have originated in China or India! Since making this recipe, my West African friends have told me that you can serve this over rice or another grain. We typically ate it like a stew and it was just right for chilly falls and springs.

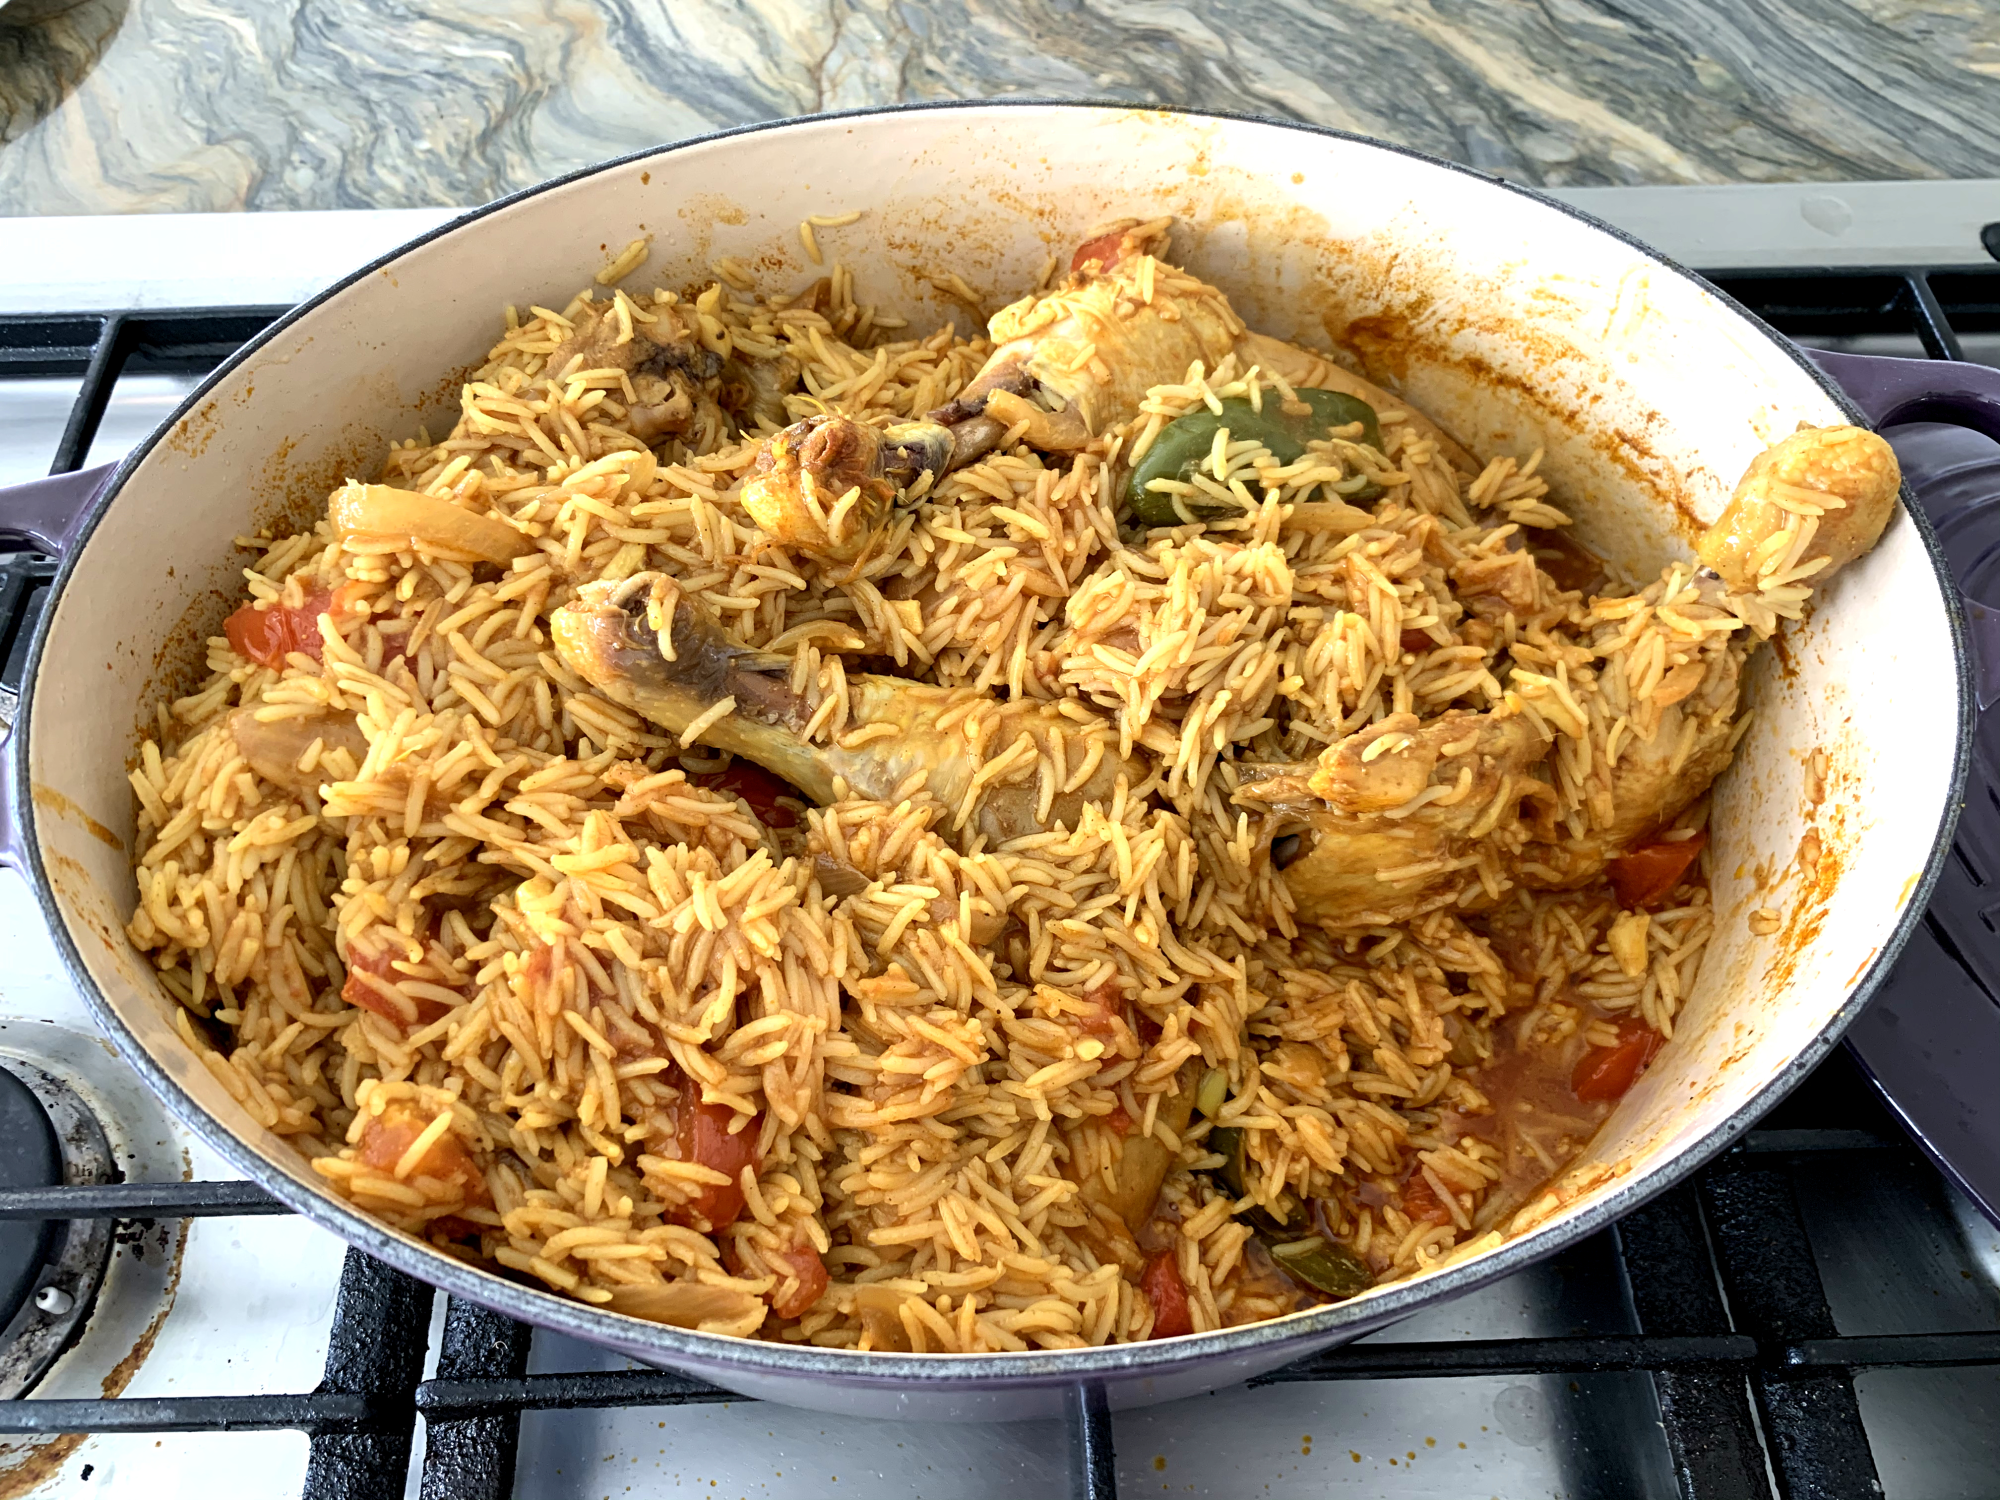
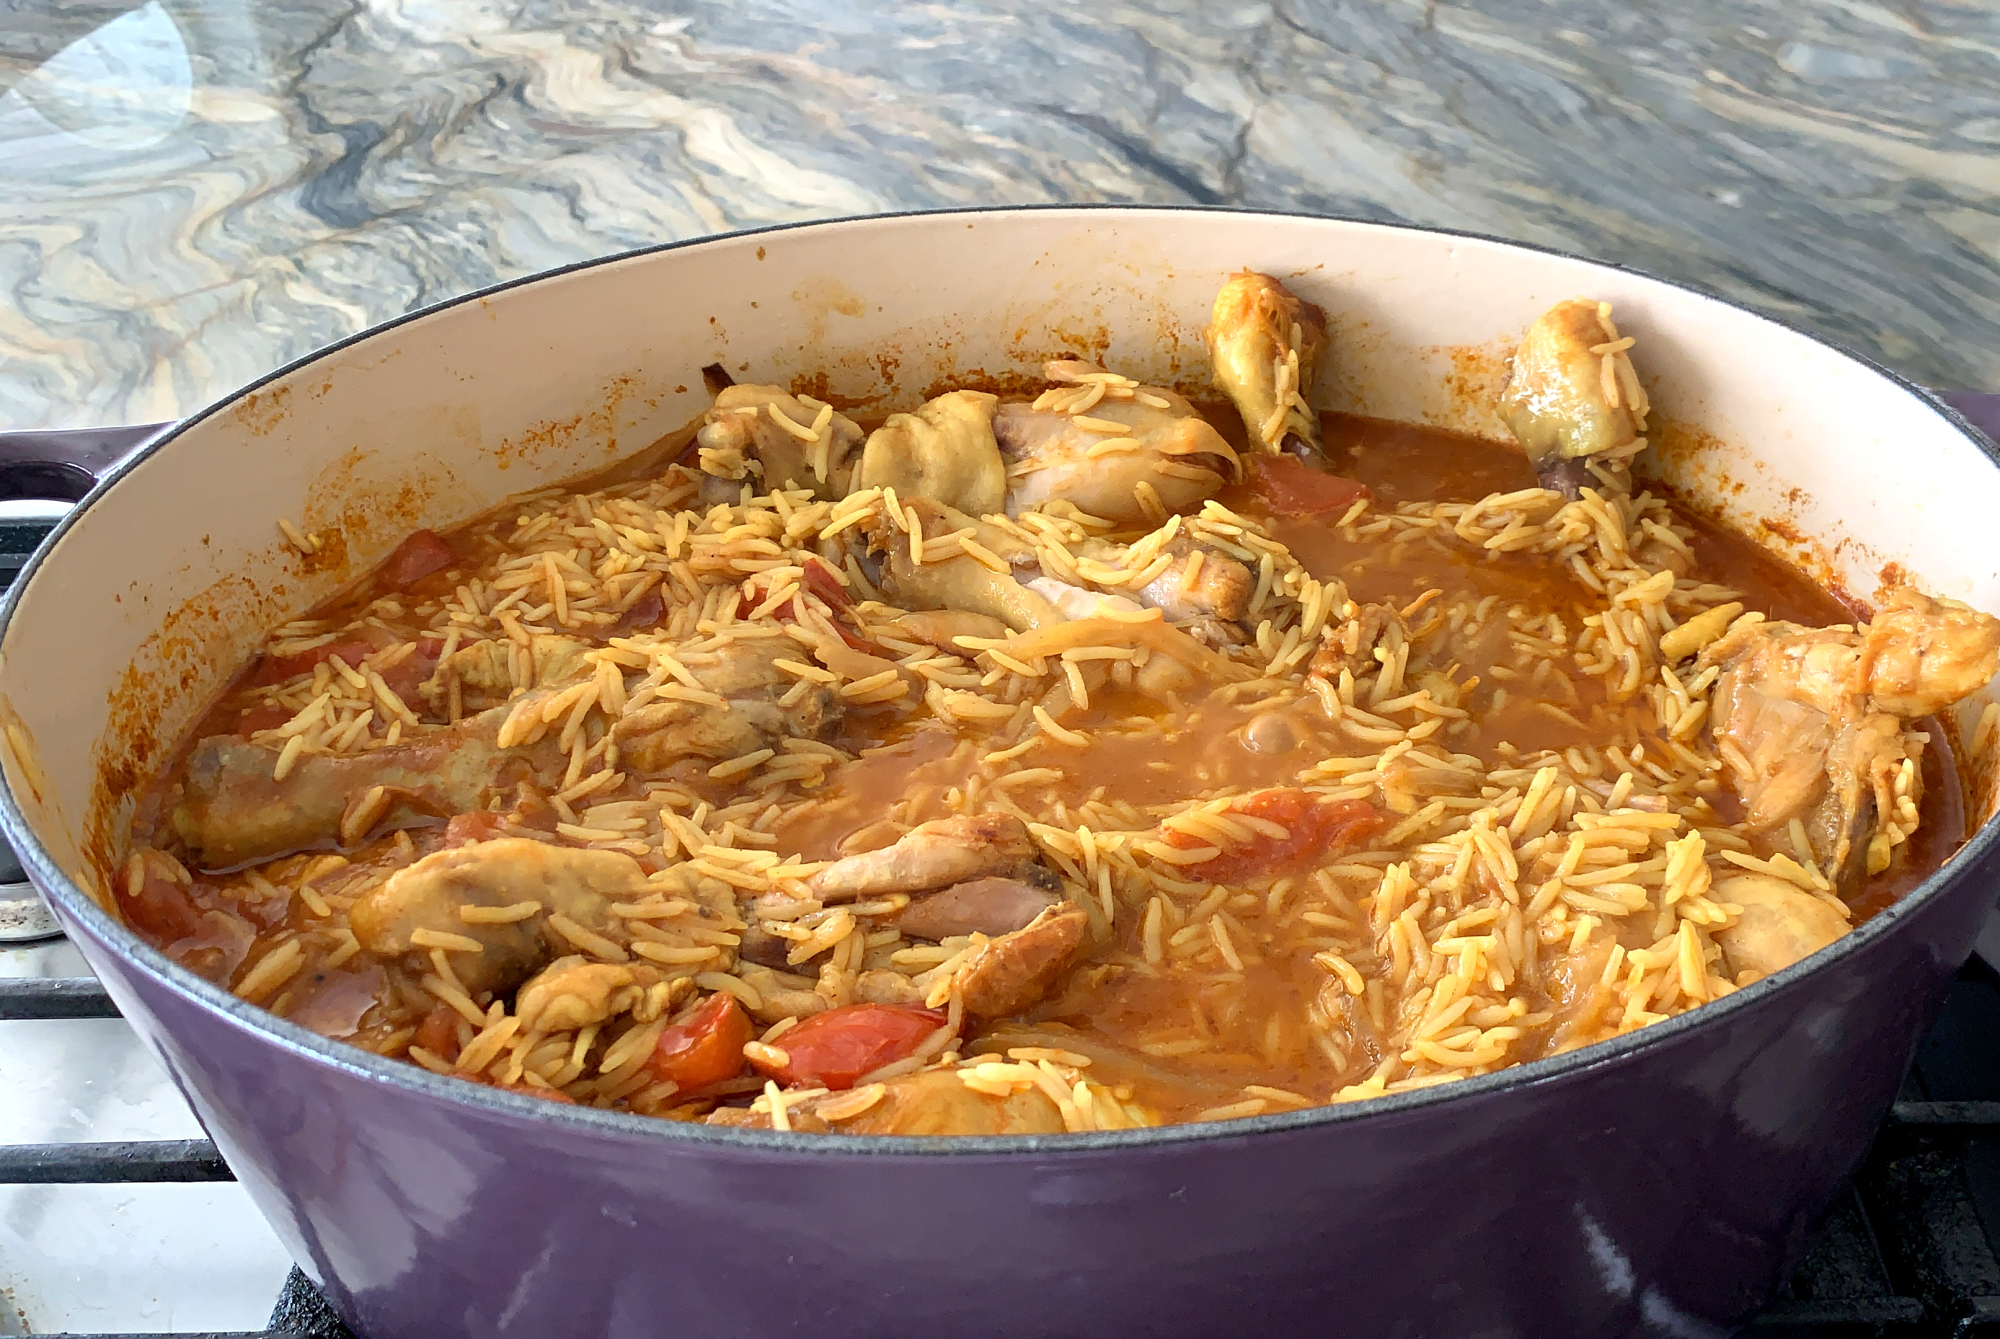
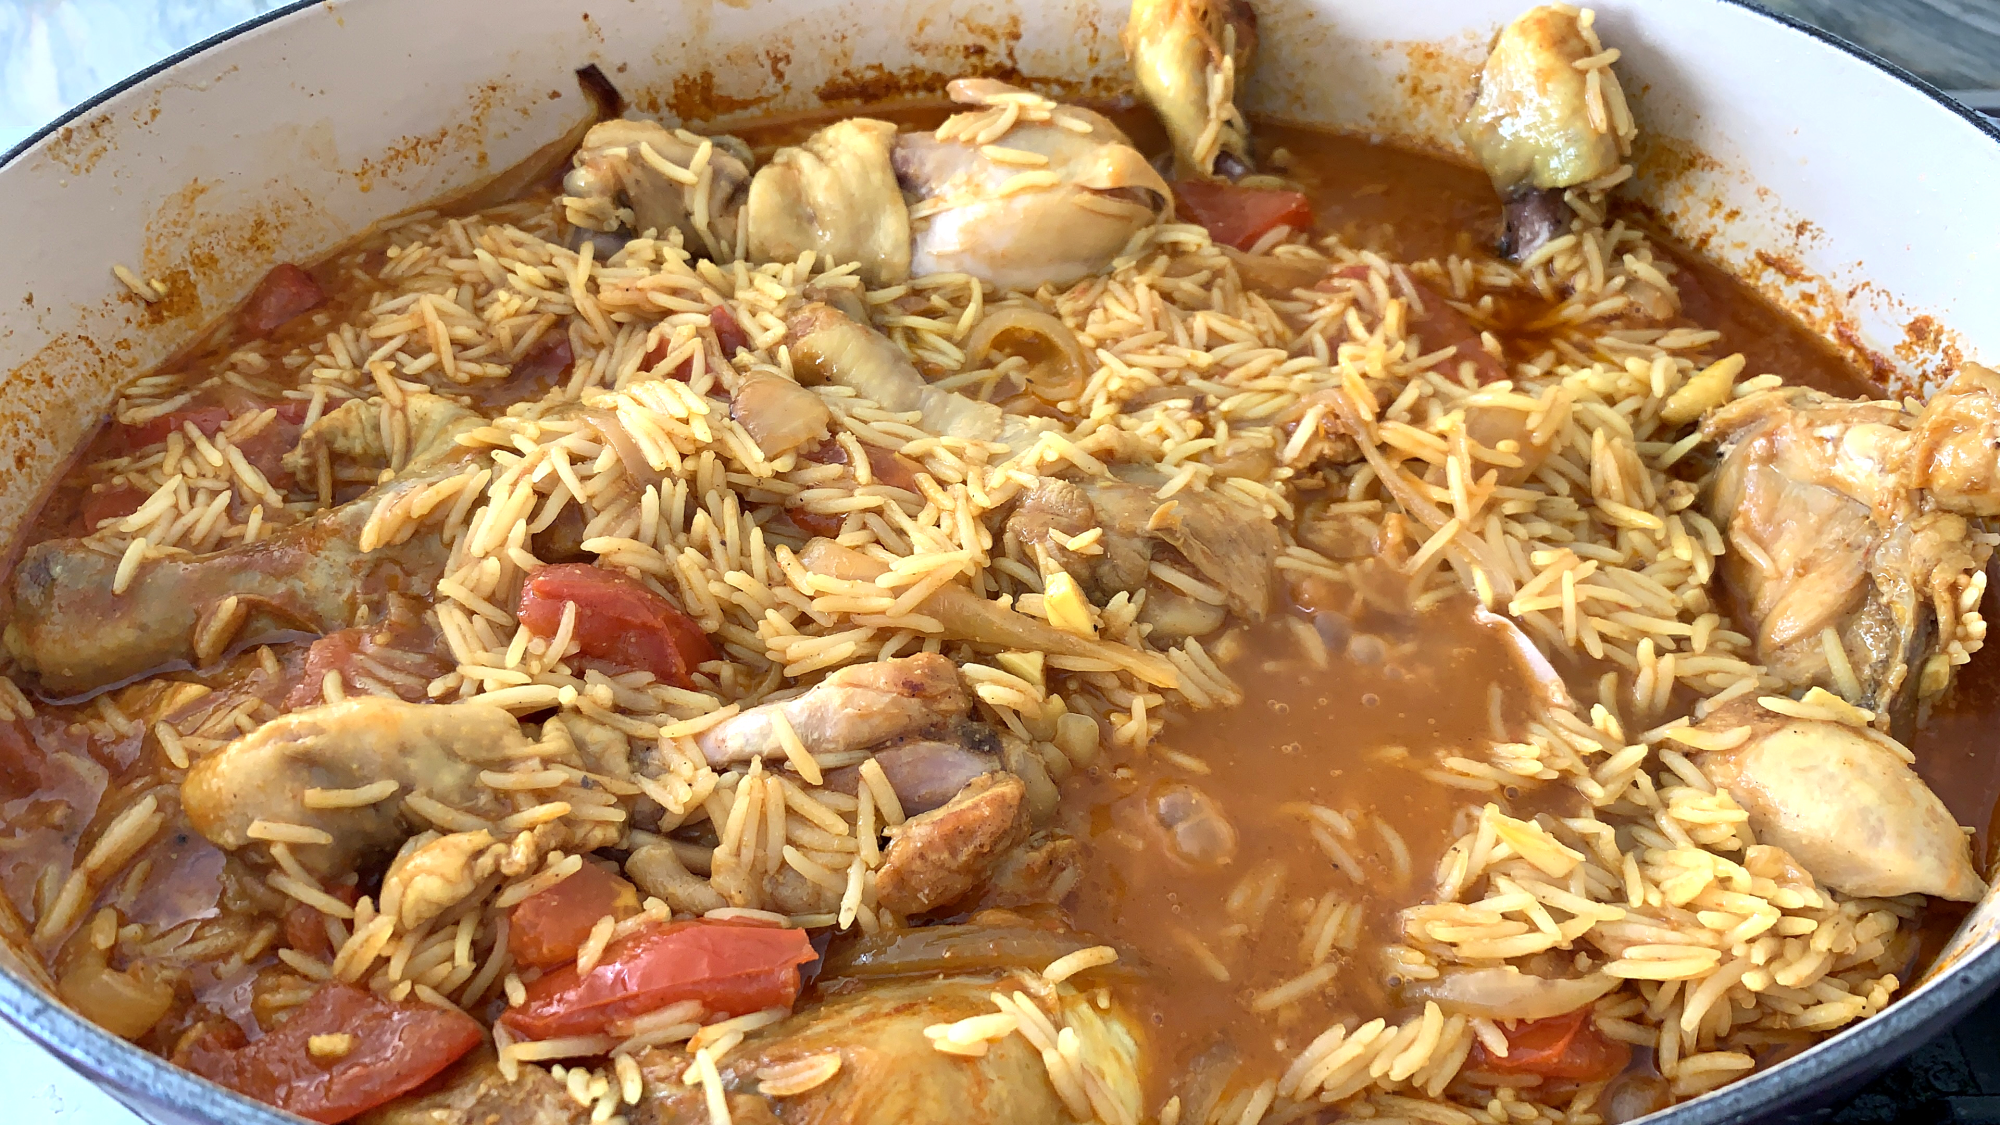
Nigerian Fried Rice
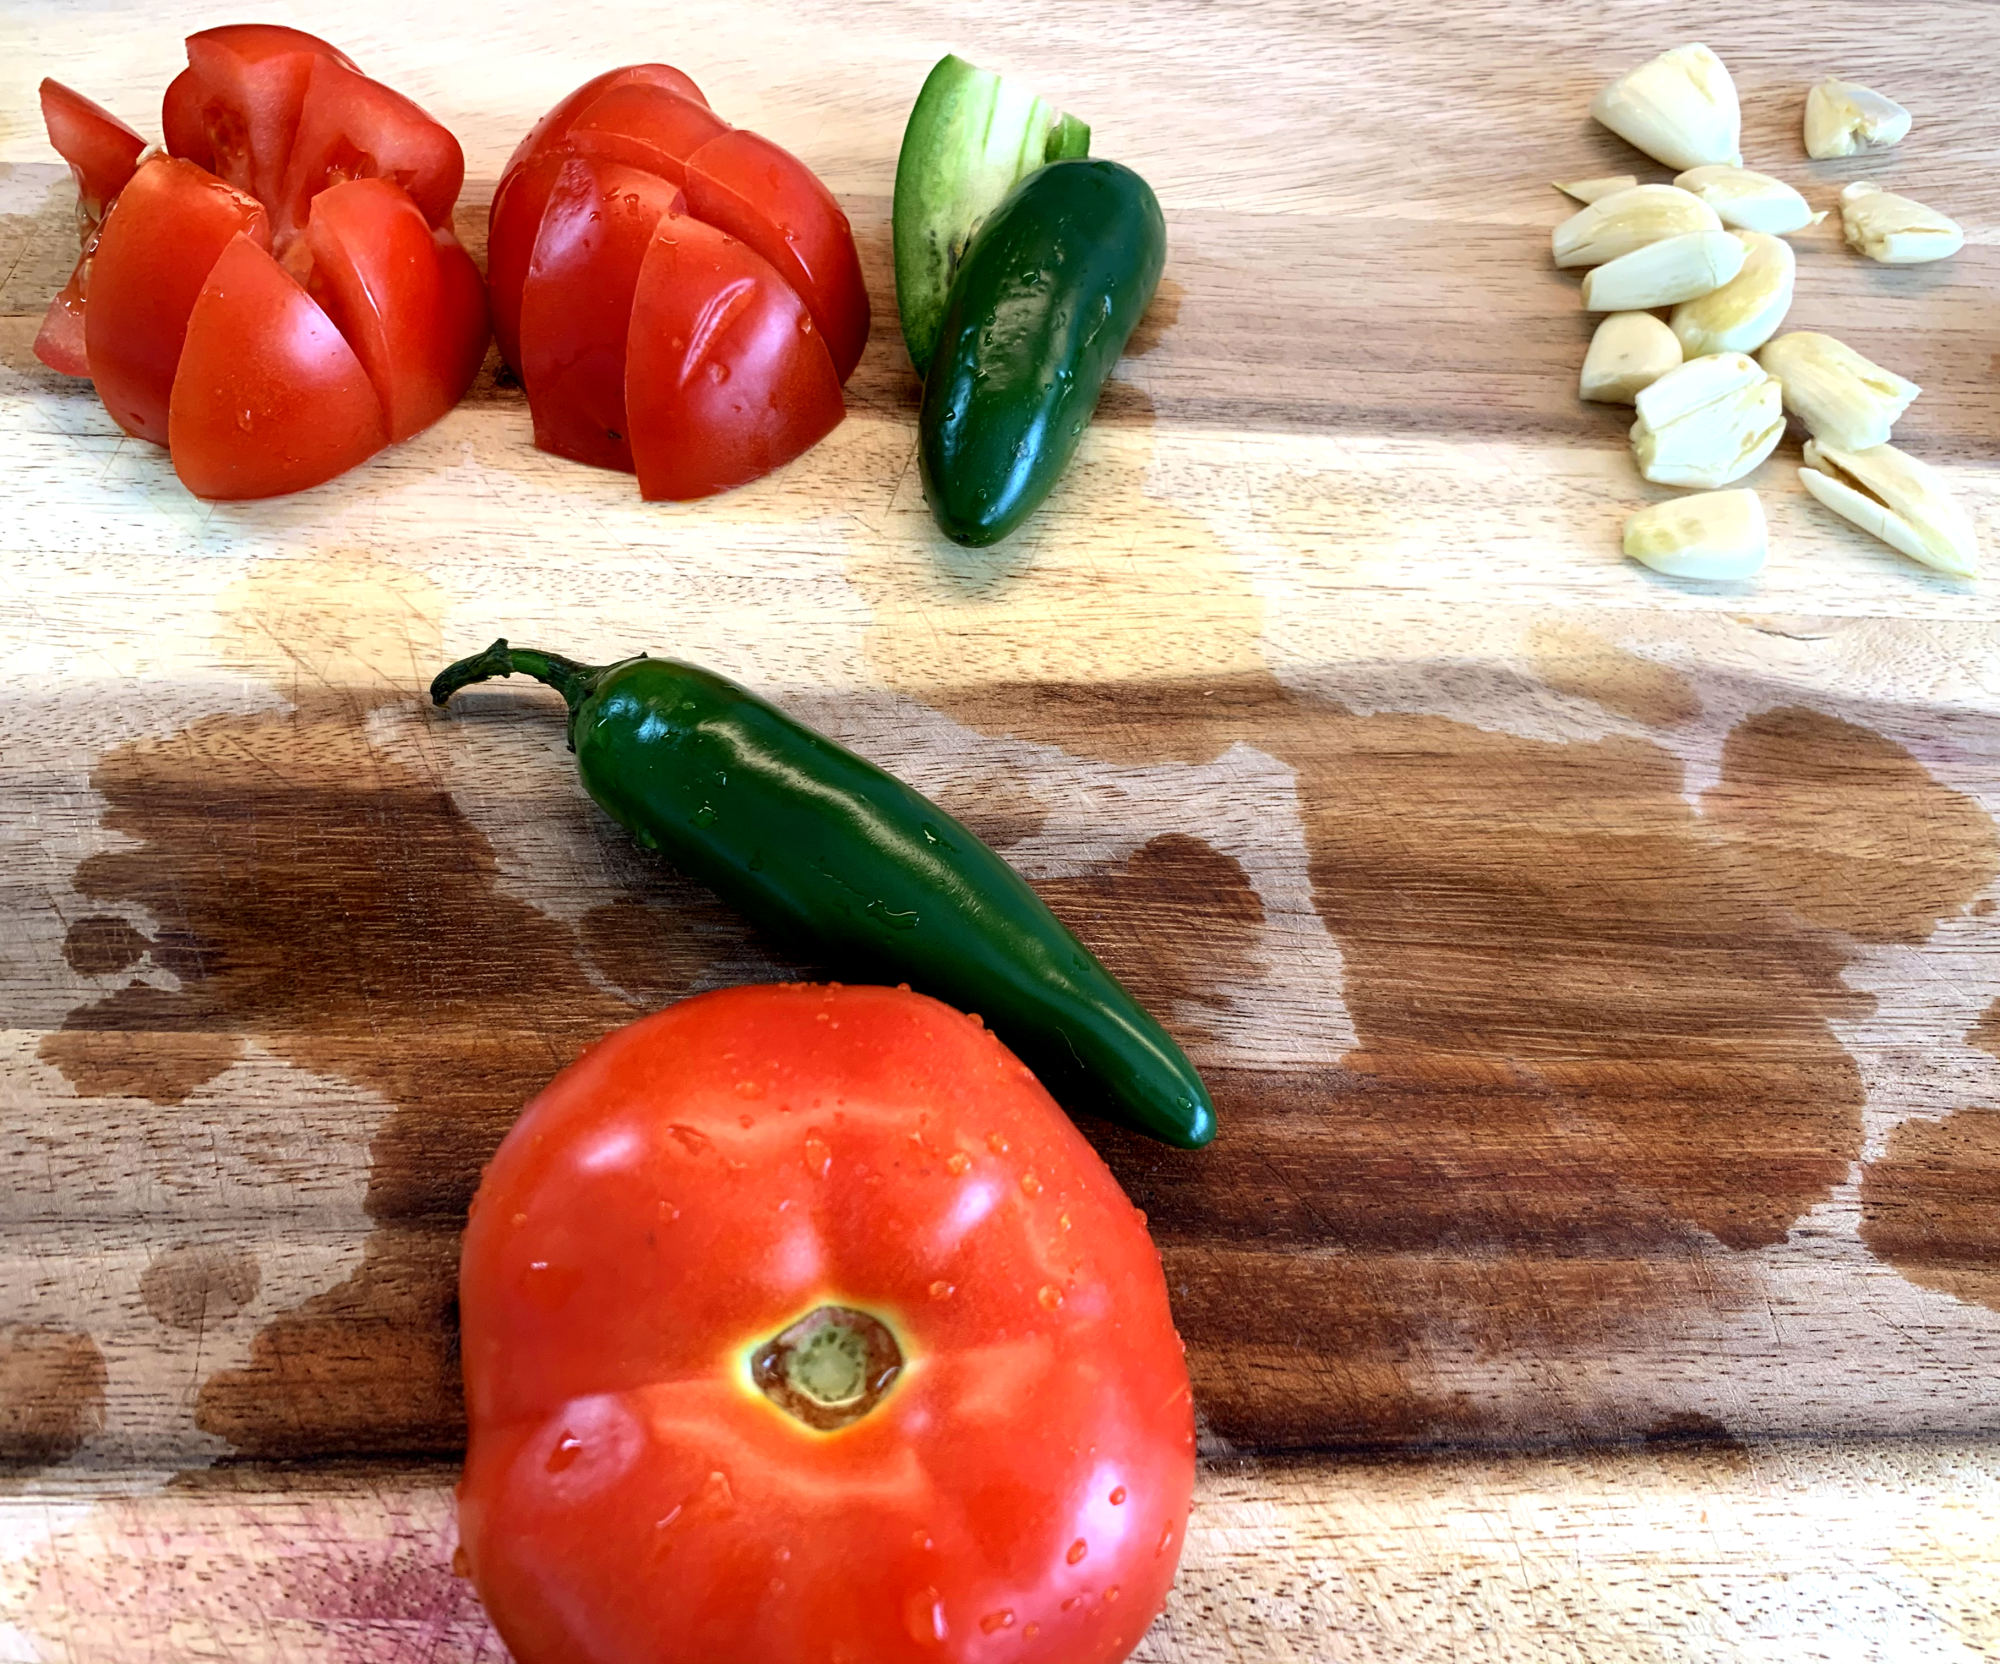
Few family recipes are all around crowd pleasers. There’s usually at least one person who doesn’t like something I cook. Usually that person is me. And yes, I’m not a fan of this dish…well at first that is. I’m not a rice fan (except for Zeresh and Adas Polo and a new pomegranate rice), so biryani and kibsas don’t interest me. This dish is similar to a biryani or kibsa in the sense that it’s a one pot meal in which the rice will cook with the rest of the vegetables and meat. It’s so easy to make, but it does take over an hour to cook. It takes about 15 minutes to brown the onions and add the tomatoes, spices and other ingredients (that also includes prep time as I chop and prep while the onions are cooking), then 30 minutes to cook the chicken, and another 30 minutes to cook the rice with the chicken. But once it’s done (and if you cook it in a pot big enough), you’ve got food for a dozen servings! This recipe was adapted from the book called Nigeria by Patricia Levy. While we did take some liberties with this recipe, I do believe in capturing the essence and spirit of a historic or regional meal. As these are part of our homeschool lessons, the experience is the primary goal, accuracy is secondary and trying new ingredients is somewhere in there! Actually, I love the idea of trying new foods, but sometimes the pain of finding them often means we are using alternatives which are part of our daily diet and that seems to defeat the purpose. For this meal, I used 6 drumsticks and 4 leg quarters. I seasoned with cumin, curry powder, salt, and onion and garlic powder. I used about 7 cups of water and 4 cups of rice. I added 3 large tomatoes (but I would have preferred more), plus two jalapenos which were medium spicy. I think it would have been tastier if I used chicken or vegetable broth, but I didn’t have any. I also used parboiled basmati rice which I find holds up really well to these kinds of dishes where the rice is soaking with the meat or vegetables. I also used my cast iron large oval pot from Le Creuset which helps ensure even temperatures.
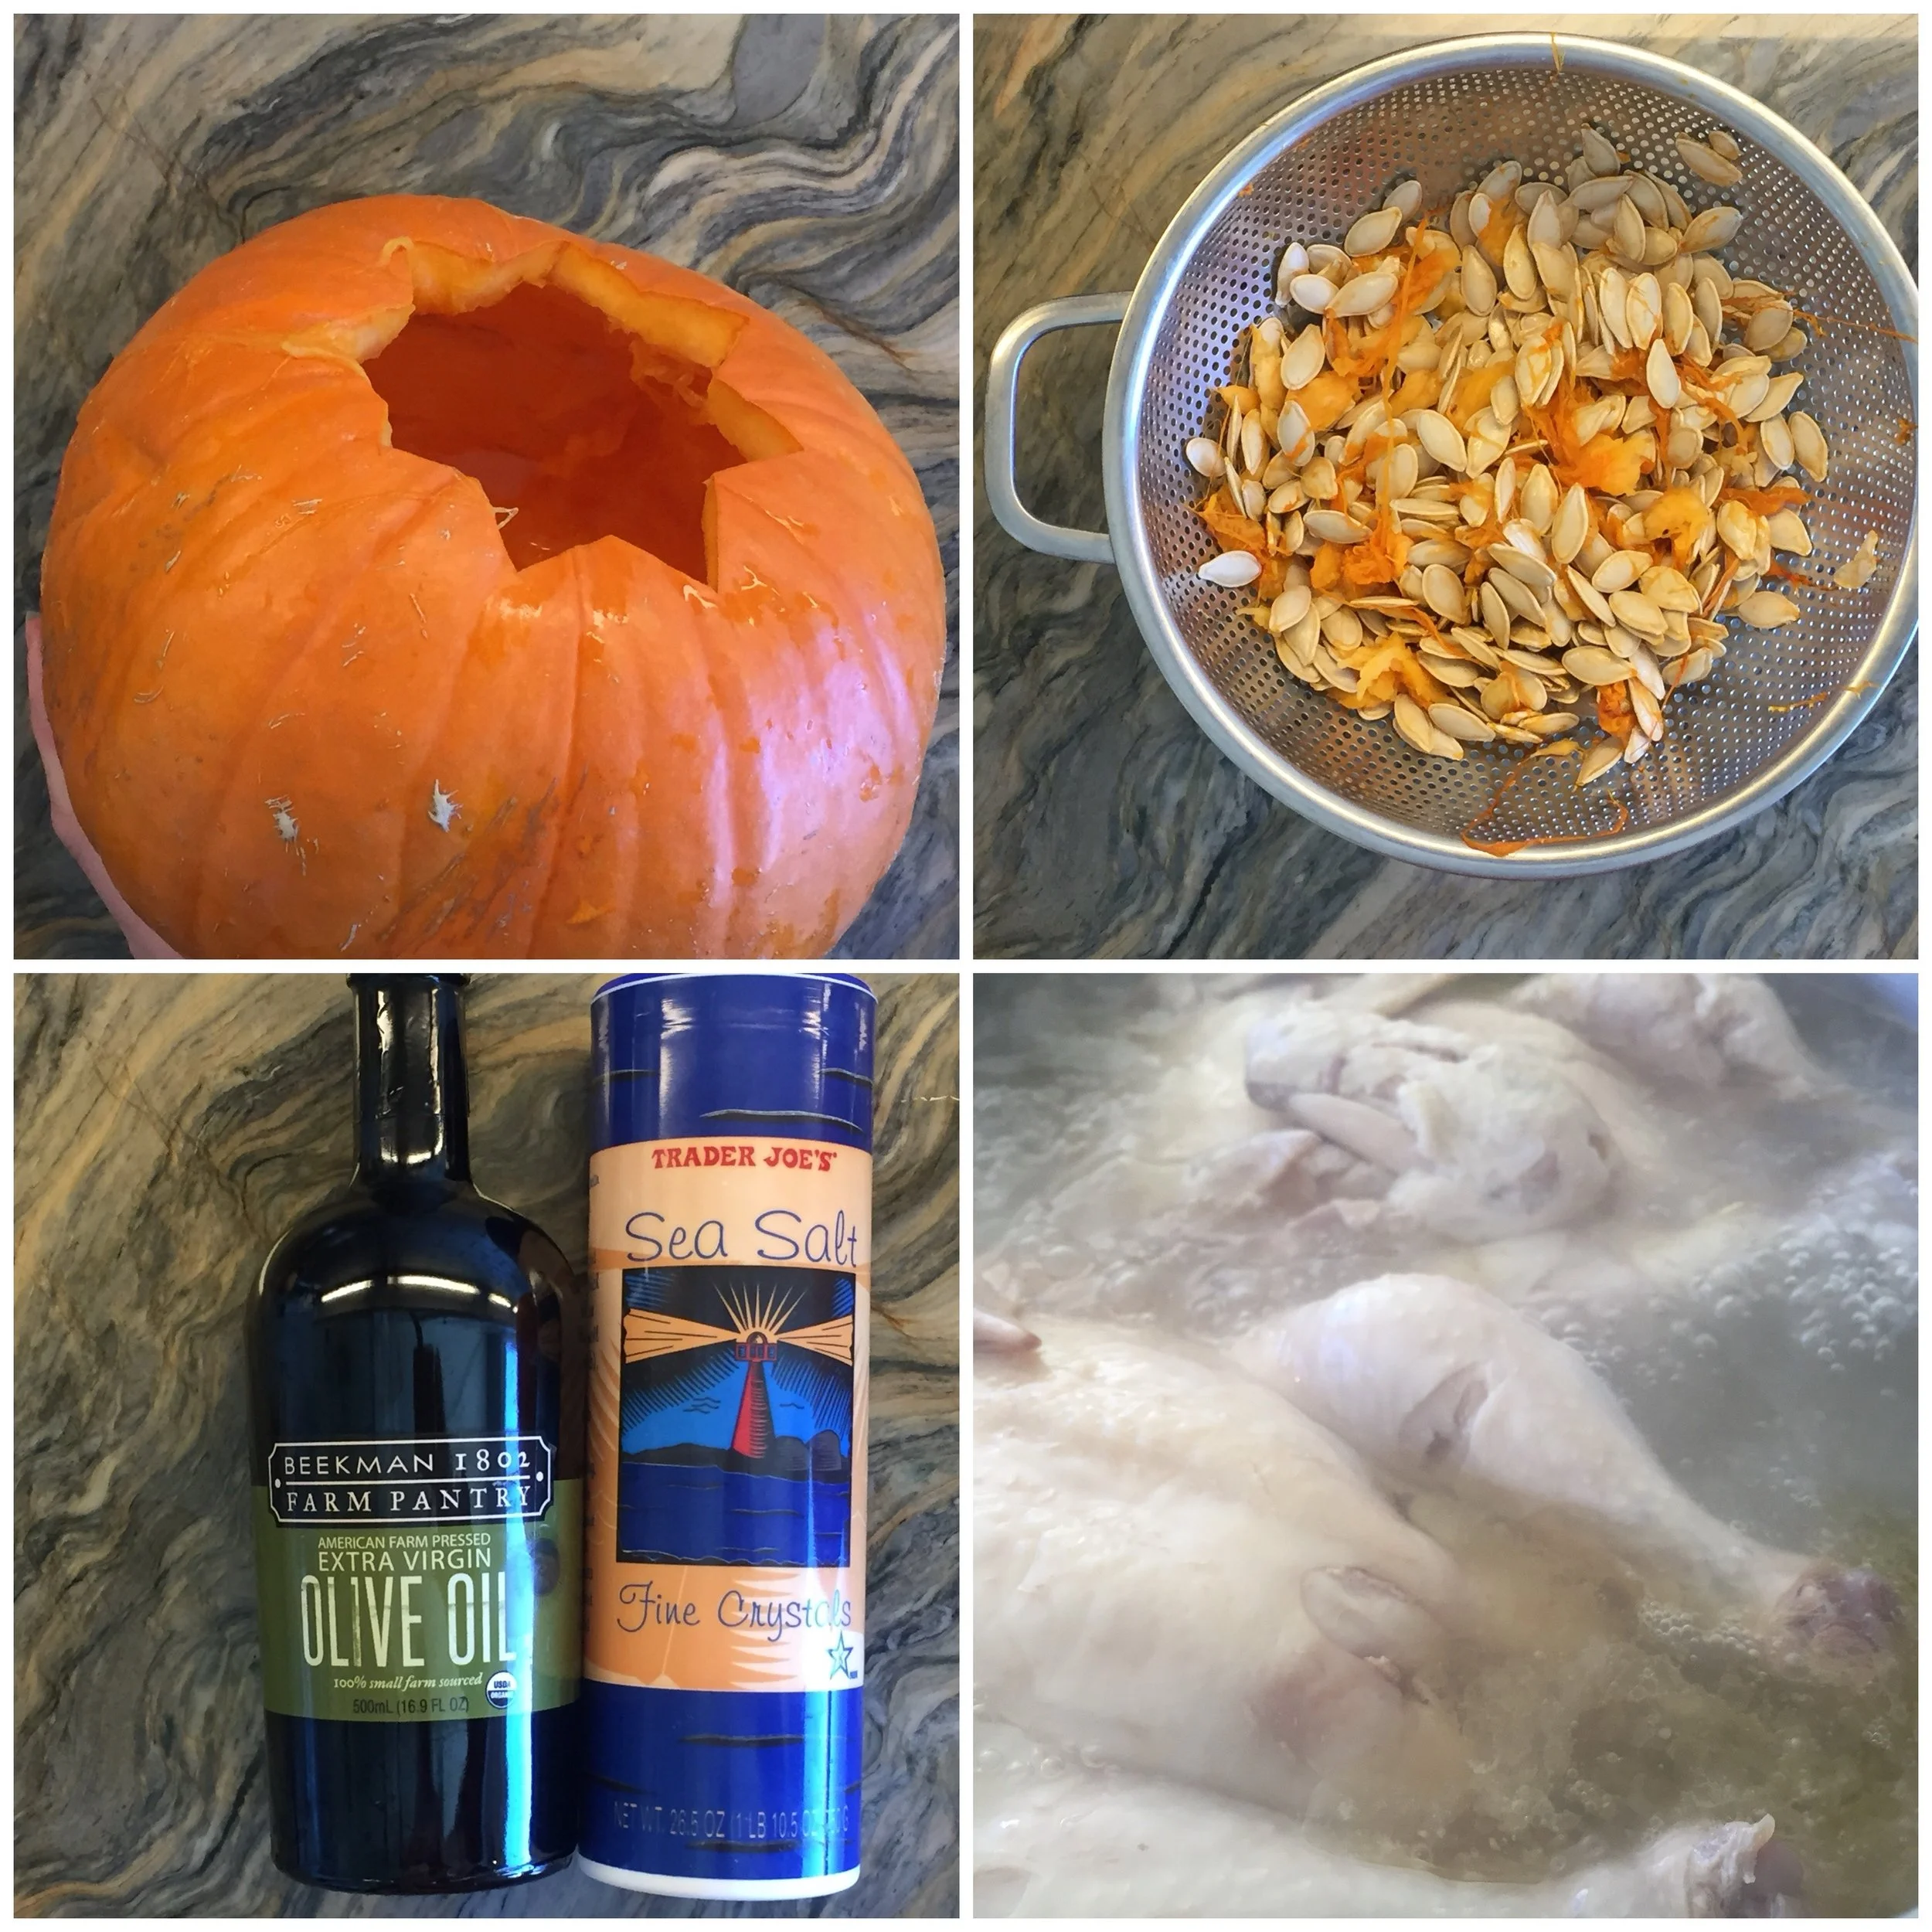
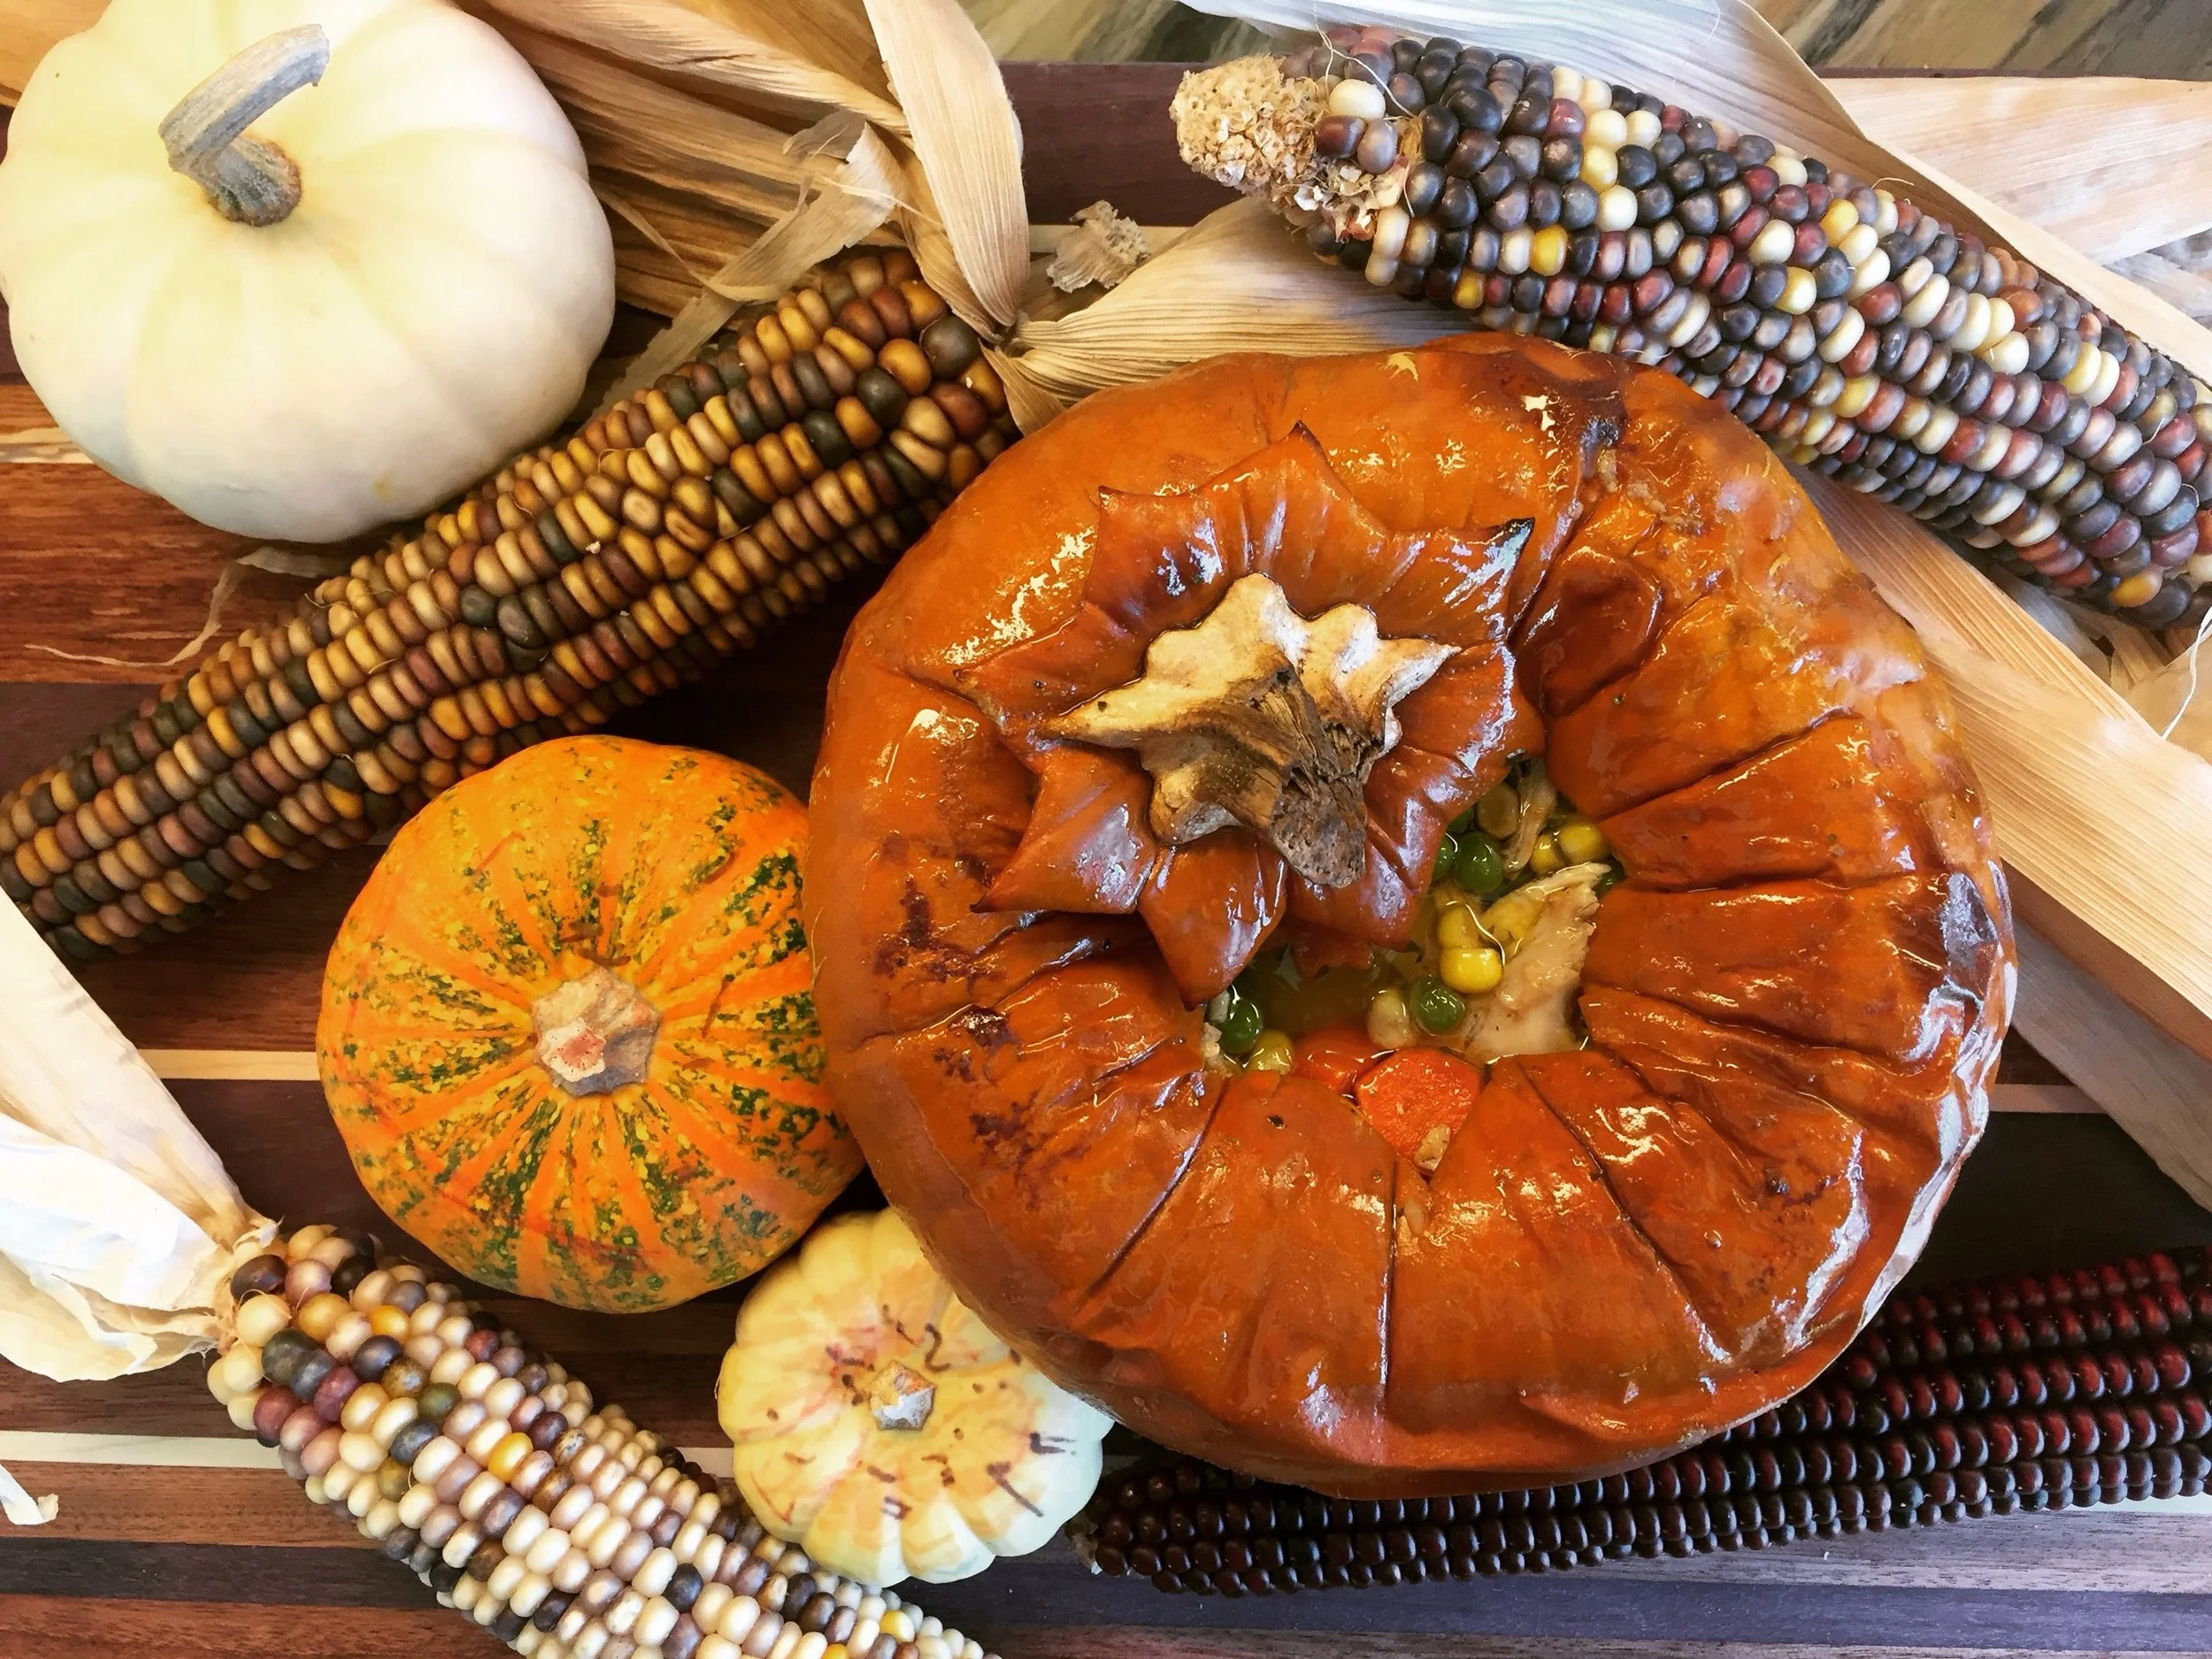
Vegetable soup in a Pumpkin
This is a show stopping center piece that tastes great and looks amazing! Add drama and intrigue to your dinner party with this perfect-for-fall vegetable soup served in a pumpkin. It’s actually easier than you’d think to make, is the perfect meal or appetizer for large groups and warms you to the bone on cold autumn nights.
You can make this recipe vegan friendly by omitting the chicken, and you’ll barely notice the loss because this soup is naturally flavorful. Adding chicken makes it a complete meal. Cooking your whole chicken in water gives you a flavorful broth that’s ready for the tender vegetables. It’s lightly seasoned with salt, pepper, cayenne and parsley, but you could add any variety of seasonings.
Recipe:
1-2 whole chickens
2 onions
4-5 medium organic potatoes
1 bag of organic onions
1 bunch of organic celery
1 bag of organic peas
1 bag of organic corn
1 teaspoon of fresh ground black pepper, cayenne and dried parsley.
Salt to taste
Directions:
In a large pot, simmer 1-2 whole chickens with skin on, in enough water to cover the chickens completely (the chicken will float to the top, but that’s okay, you can rotate it midway). Bring chicken broth to a high simmer and cook until the meat falls away easily (about 1 hour).
Meanwhile, cut the top off a medium or small pumpkin. Remove the seeds and fibers. Drizzle olive oil and sprinkle salt on the inside, rotating the pumpkin to coat the inside. Add some olive oil to the outside and rub over the pumpkin. Place in a pre-heated 450 degree oven and bake for 25-35 minutes. Don’t overcook the pumpkin or it won’t hold up to the soup.
Meanwhile, dice and sauté two medium onions. Lightly brown with olive oil and salt. Add sliced carrots and let cook for a few minutes. To that add sliced celery and continue to sauté for a few minutes. Lastly, add peeled and diced potatoes and cook for a few minutes.
Check on and remove pumpkin from oven if done.
Check on chicken. If it pulls from the bone easily, remove the chicken from the broth and let it cool in a strainer. To the broth, add all the vegetables, the bag of corn and peas and the seasonings. Let cook for about 10 minutes on a medium simmer.
Meanwhile, debone the chicken and add it to the soup.
Prepare pumpkin by placing it on a serving dish and spoon vegetable soup into the pumpkin.
Serve remaining soup in a separate dish. This is a perfect way to use up any uncarved pumpkins from Halloween!
Don’t toss those seeds, though! They can be easily roasted up with salt and olive oil for a tasty healthy snack.
This recipe perfectly accompanies our Colonial Times unit study.

Caprese Piadine Recipe
I’d say that a good portion of the recipes I make are inspired by restaurant food we have had and liked well enough to recreate at home. Today’s recipe is inspired by the Caprese Piadine from a northern California Italian restaurant called Tomatinas. While it doesn’t taste exactly the same, it’s so close that you might be convinced it is!
Here’s the pizza dough/bread dough recipe that I’ve been using for ages! The video tutorials are as follows:
Here’s the original bread recipe that I’ve used since 2006. It’s simple and foolproof. It’s a quintessential kindergarten tradition in Waldorf schools to have fresh baked bread.
Since making bread, I’ve found that homemade pizzas were the logical next step, especially since I have a son who has dairy allergies, and by making our pizzas at home, I can make him a dairy free alternative that’s sure to be safe. Over the years, I’ve found that making “Pizza Puffs” are not just crowd pleasers, they’re super easy!
It was my husband who requested a thin crust pizza, and so this fancy adult version was created. I love adding veggies, brie and chicken to our flat thin crust pizza and I also like omitting the traditional marinara sauce for a white sauce or simply olive oil and garlic.
For more recipes, check out my complete playlist for all the recipes that are inspired by others and perfected in my kitchen.
Here’s the recipe for our version of Caprese Piadine with hot steak.
Start with a pizza dough or bread dough. Here’s a quick tutorial. You can also buy pre-made pizza dough or pre-made pre-cooked pizza crust.
Pizza dough recipe:
1 tablespoon sugar (I use brown sugar)
1/2 teaspoon of salt
1/4 teaspoon of yeast
2 cups of warm water
4 cups of flour
Mix ingredients together in a non-metal bowl (ceramic or plastic) with a wooden spoon (don’t use metal).
Add a loose fitting lid (optional, add oil to dough so it doesn’t dry out).
After it has doubled in size (2-4 hours), shape it into medium-sized balls using your hand that have been oiled with olive oil to keep the dough from sticking.
Bake for 12 minutes at 430 degrees on an oiled pan or in a pan lined with parchment paper.
For 6 servings:
3 medium to large vine ripe tomatoes
8 oz mozzarella balls, sliced
1-2 heads of Romain lettuce
1-1.5 pounds of sirloin steak
4 oz of pesto (more is better!)
balsamic vinegar
salt
olive oil
Marinate thinly sliced steak with 2 tablespoons balsamic vinegar, 1 tablespoon olive oil and 1.2-1 teaspoon of salt. Store in refrigerator for 30 minutes to 4 hours.
Thickly slice tomatoes and place on a greased baking tray or on parchment paper. Drizzle with olive oil and sprinkle with salt. Broil on high for up to 20 minutes. Keep on eye on this!! They go from not done at all to burnt in a matter of minutes.
Wash and set aside several stalks of romain lettuce. Slice mozzarella balls.
Roll out about 1 cup of dough onto a floured surface and roll into a thin crust. Place on a parchment paper lined baking tray and bake for 8-10 minutes at 475 degrees. You can bake the dough with a thin layer of pesto or add the pesto after it is baked.
To a hot pan, add a drizzle of oil and cook the marinated steak. You can bring the streak to room temp before cooking. It only needs about 5 minutes. Cover and set aside until ready to assemble.
Layer mozzarella slices, roasted tomatoes, and romain lettuce onto pesto lined piadine. Tops with steak and a drizzle of balsamic vinegar. Fold in half and enjoy!
Did you try this recipe? Use the hashtag #pepperandpine and tag me on Instagram, Twitter or Facebook! I love seeing what you come up with.
Tortilla Soup Recipe
Tortilla soup is a family fall and winter favorite because it's so warming, hearty and delicious. It's also super fast! Not only can you make the soup in about 30 minutes, while it's simmering, you can garnish the soup with cilantro, avocado, pepper jack cheese and fresh homemade tortilla chips.
Check out this super easy recipe:
Tortilla Soup
(Inspiration from the soup at El-Torito and my friend “L”)
Ingredients:
2 lbs. chicken breast cut into bite-sized pieces
3-5 limes
1-2 oranges
1 bunch cilantro
1 head of garlic, crushed
Cumin, salt, pepper, cayenne pepper, turmeric all to taste
2 jalapeños
2 onions (quartered and sliced)
1 bag of carrots cut into thin slices
1 bag of frozen corn
4-6 medium sized russet potatoes
1 large can of crushed tomatoes (non-seasoned)
1 bag of corn tortillas
2 avocados
Pepper jack cheese
Corn oil (or canola)
Directions:
Directions: Marinate chicken by placing chicken pieces in a large shallow bowl. Add the juice of 4 limes and 2 oranges, crushed garlic, and all spices (enough to thoroughly coat chicken; you can always add more spices as the soup cooks). Let sit for no more than 30 minutes (the lime juice will ‘cook’ the chicken, so do not marinate overnight). In the meantime, brown the onions for about 10 minutes so they are translucent but not crispy. Next, over medium to high heat, add enough oil to coat bottom of a large bottom soup pot. Brown chicken by removing chicken from marinade and carefully placing into hot pot (reserve marinade for later). Add to the chicken the browned onions, remaining marinade, jalapeños, carrots and 10 cups of water. Bring water to a boil and cook for 5 minutes, then add potatoes and another 10 cups of water. Bring to a boil and add corn and can of tomatoes. Cook for about 20-30 minutes then check flavor and consistency, add more water if needed, or salt, etc. Add chopped cilantro (1⁄2 a bunch) in the last 5 minutes of cooking to retain a more vibrant green color). When you are ready to serve, cut up avocado, slice pepper jack cheese and slice limes. In a frying pan, add 1⁄2 inch of oil and bring to medium-high heat, add one layer of sliced tortilla and fry till golden on each side. Plate soup by ladling a large serving into a ‘pasta’ style bowl, top with sliced cheese, avocado slices, a sprig of cilantro. Lastly, add crisp tortilla chips vertically into soup (like a pyramid) and serve hot.
Hana’s Tip: When serving the soup, add the tortilla chips hot out of the frying pan for a dramatic ‘hisss’. To speed the process of making tortilla soup, heat water in a separate pot while the chicken is marinating. This soup keeps well for a few days, but the tortilla chips are best when they are freshly fried.
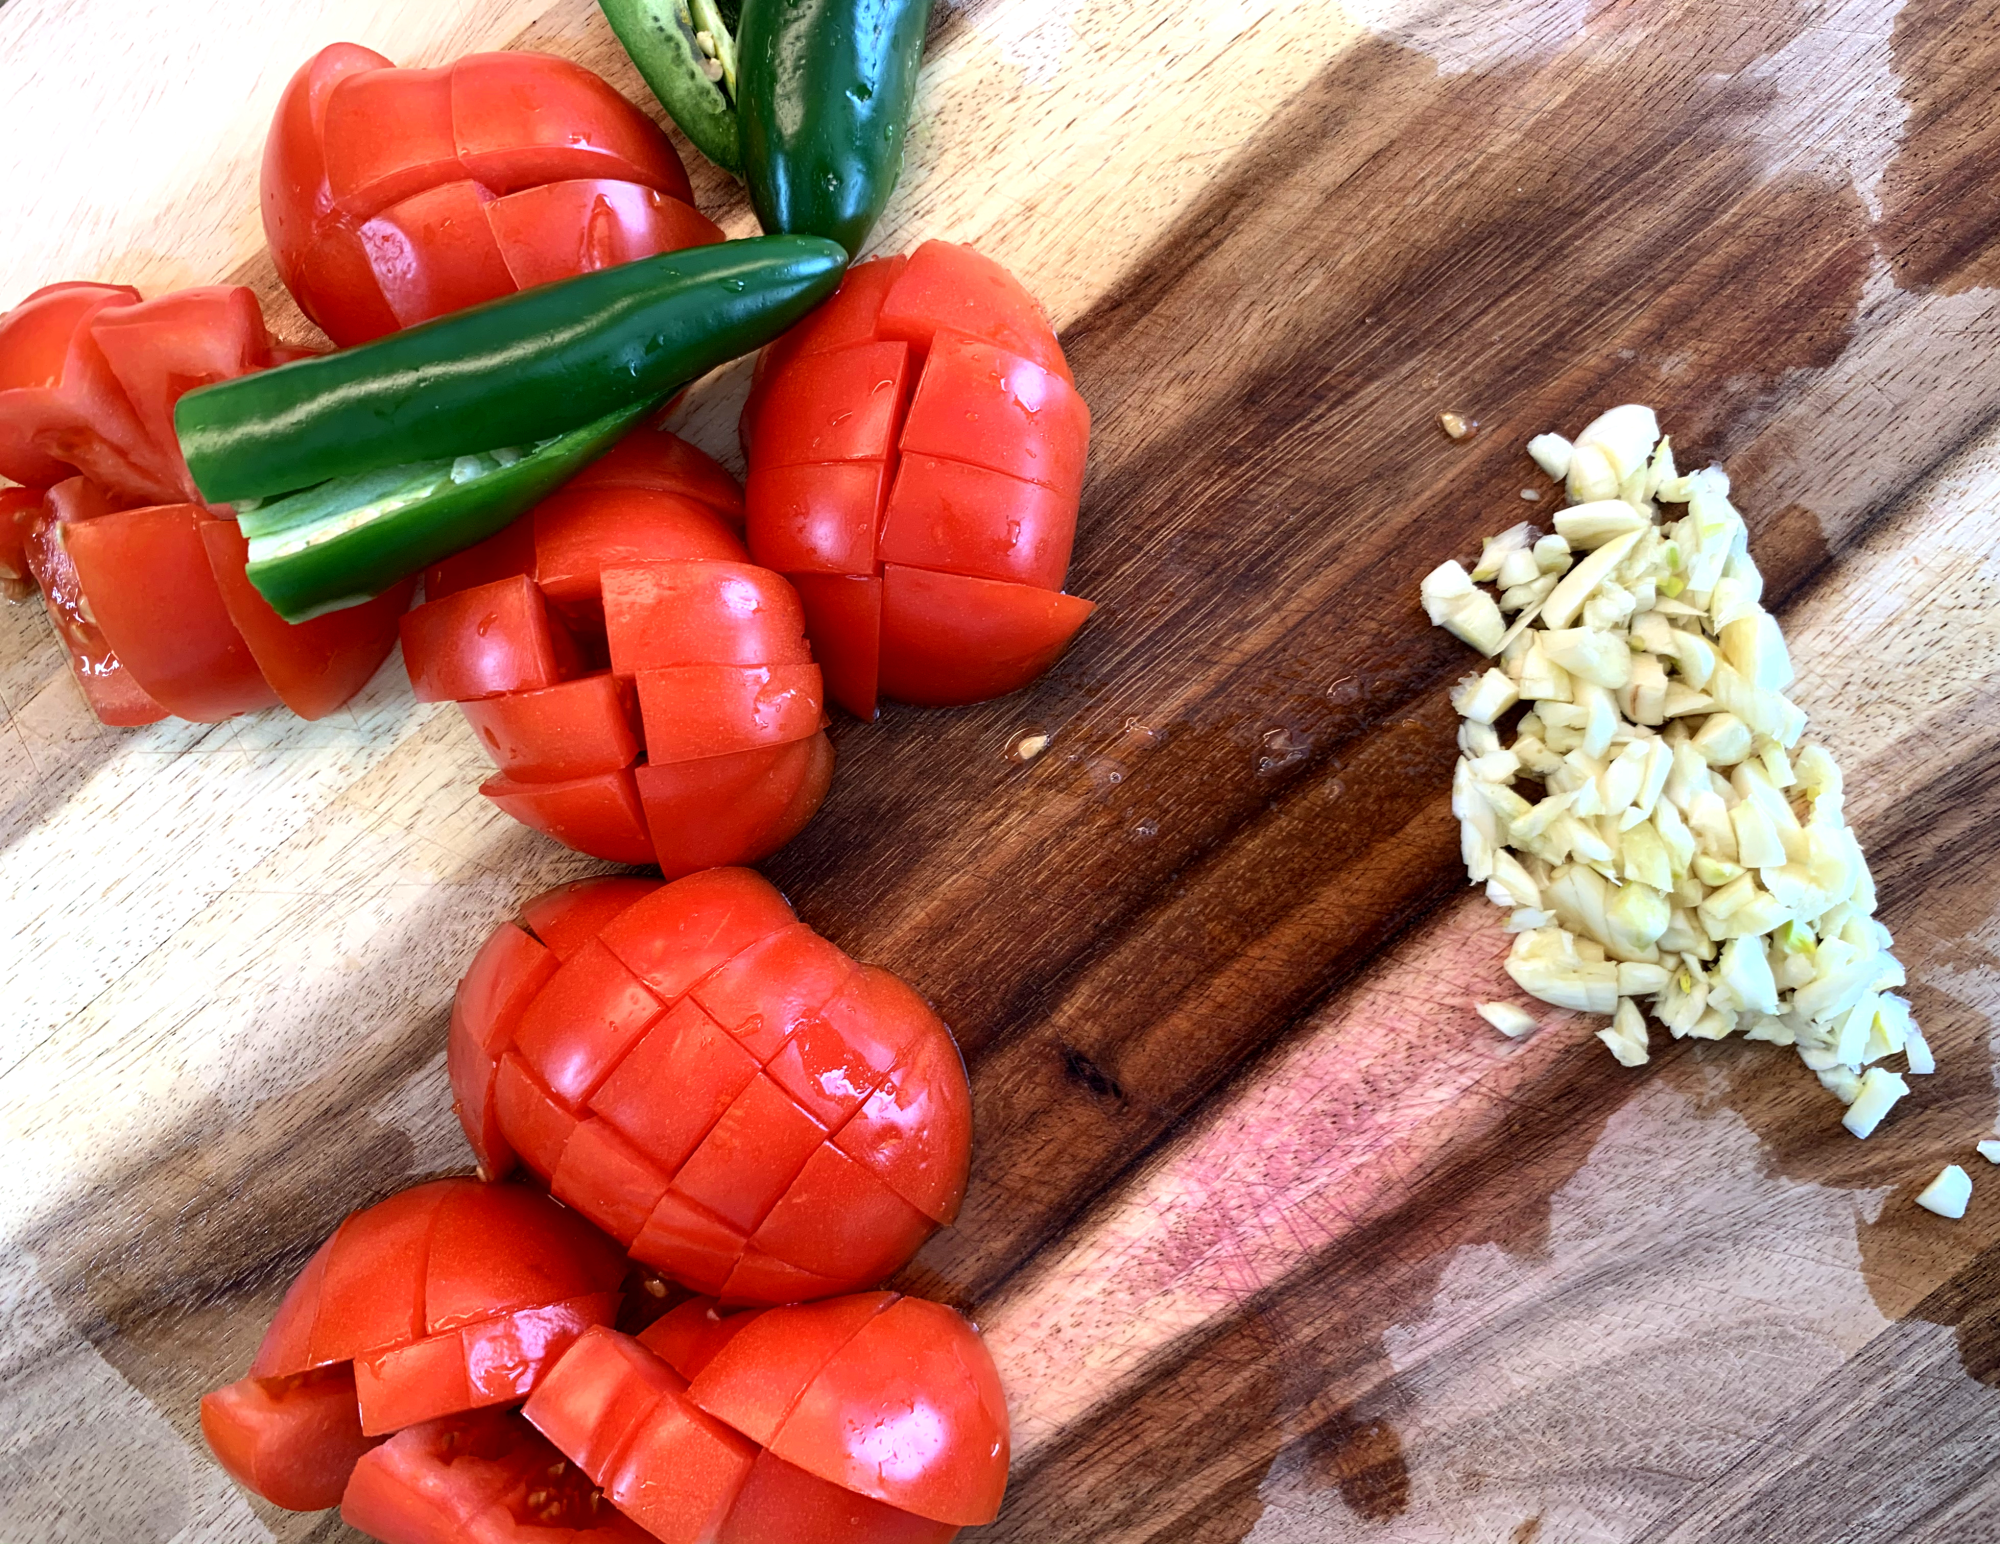
Herbs De Provence Steak with Tomatoes & Mozzarella Balls
I tried a food subscription services and while I never intended it to be a long term subscription, we ended up using it far more than I expected. We didn’t do a Hello Fresh subscription for the convenience of having food delivered to our home, I did it for two unrelated reasons. First, I used it as a means to do a cooking class for my homeschooled children, and second, I used it as a means to learn new recipes. Well, it worked! Not only did we learn new recipes, some of them are now family favorites, we also learned techniques that we still use today. I was introduced to new ingredients that have become staples and found a joy to cooking that’s mixed with excitement and anticipation.
The herbed steak with balsamic vinegar, sautéed tomatoes with garlic and mozzarella balls is mouth watering and delicious and filling. This is one dish we can easily overeat. Pace yourself! Serve with extra tomatoes and just a minimal amount of orzo pasta for a healthier alternative, or skip the pasta entirely and place it all over a bed of fresh or wilted spinach. Rather than mix it all together and top it with steak as the recipe suggests, I keep everything separate and let the children (and the adults) assemble to their liking. For some that’s extra tomatoes (me!), for others it’s no cheese. How ever you like it, I hope you’ll share it with me. You won’t be disappointed.
Recipe: 2 cups of orzo pasta 1-1.5 pound of sirloin 1 pound of sugar plum or similar tomatoes 1 head of garlic balsamic vinegar, salt, herbes de Provence, fresh parsley, olive oil
In a large pot, heat several cups of water. Once it boils, add pasta and salt. Cook until al dente, about 7 minutes. Season sirloin steak with salt and herbed de Provence. Grill until desired doneness. Cover and let sit for 10 minutes. Cut tomatoes in half. Smash garlic. Sauté tomatoes on high heat for 1 minute with a drizzle of olive oil. Add garlic and salt and remove from heat. Cut mozzarella balls in half. Time to assemble! Add a layer of pasta, topped with mozzarella balls and tomatoes. Top with sliced steak and a drizzle of balsamic vinegar.
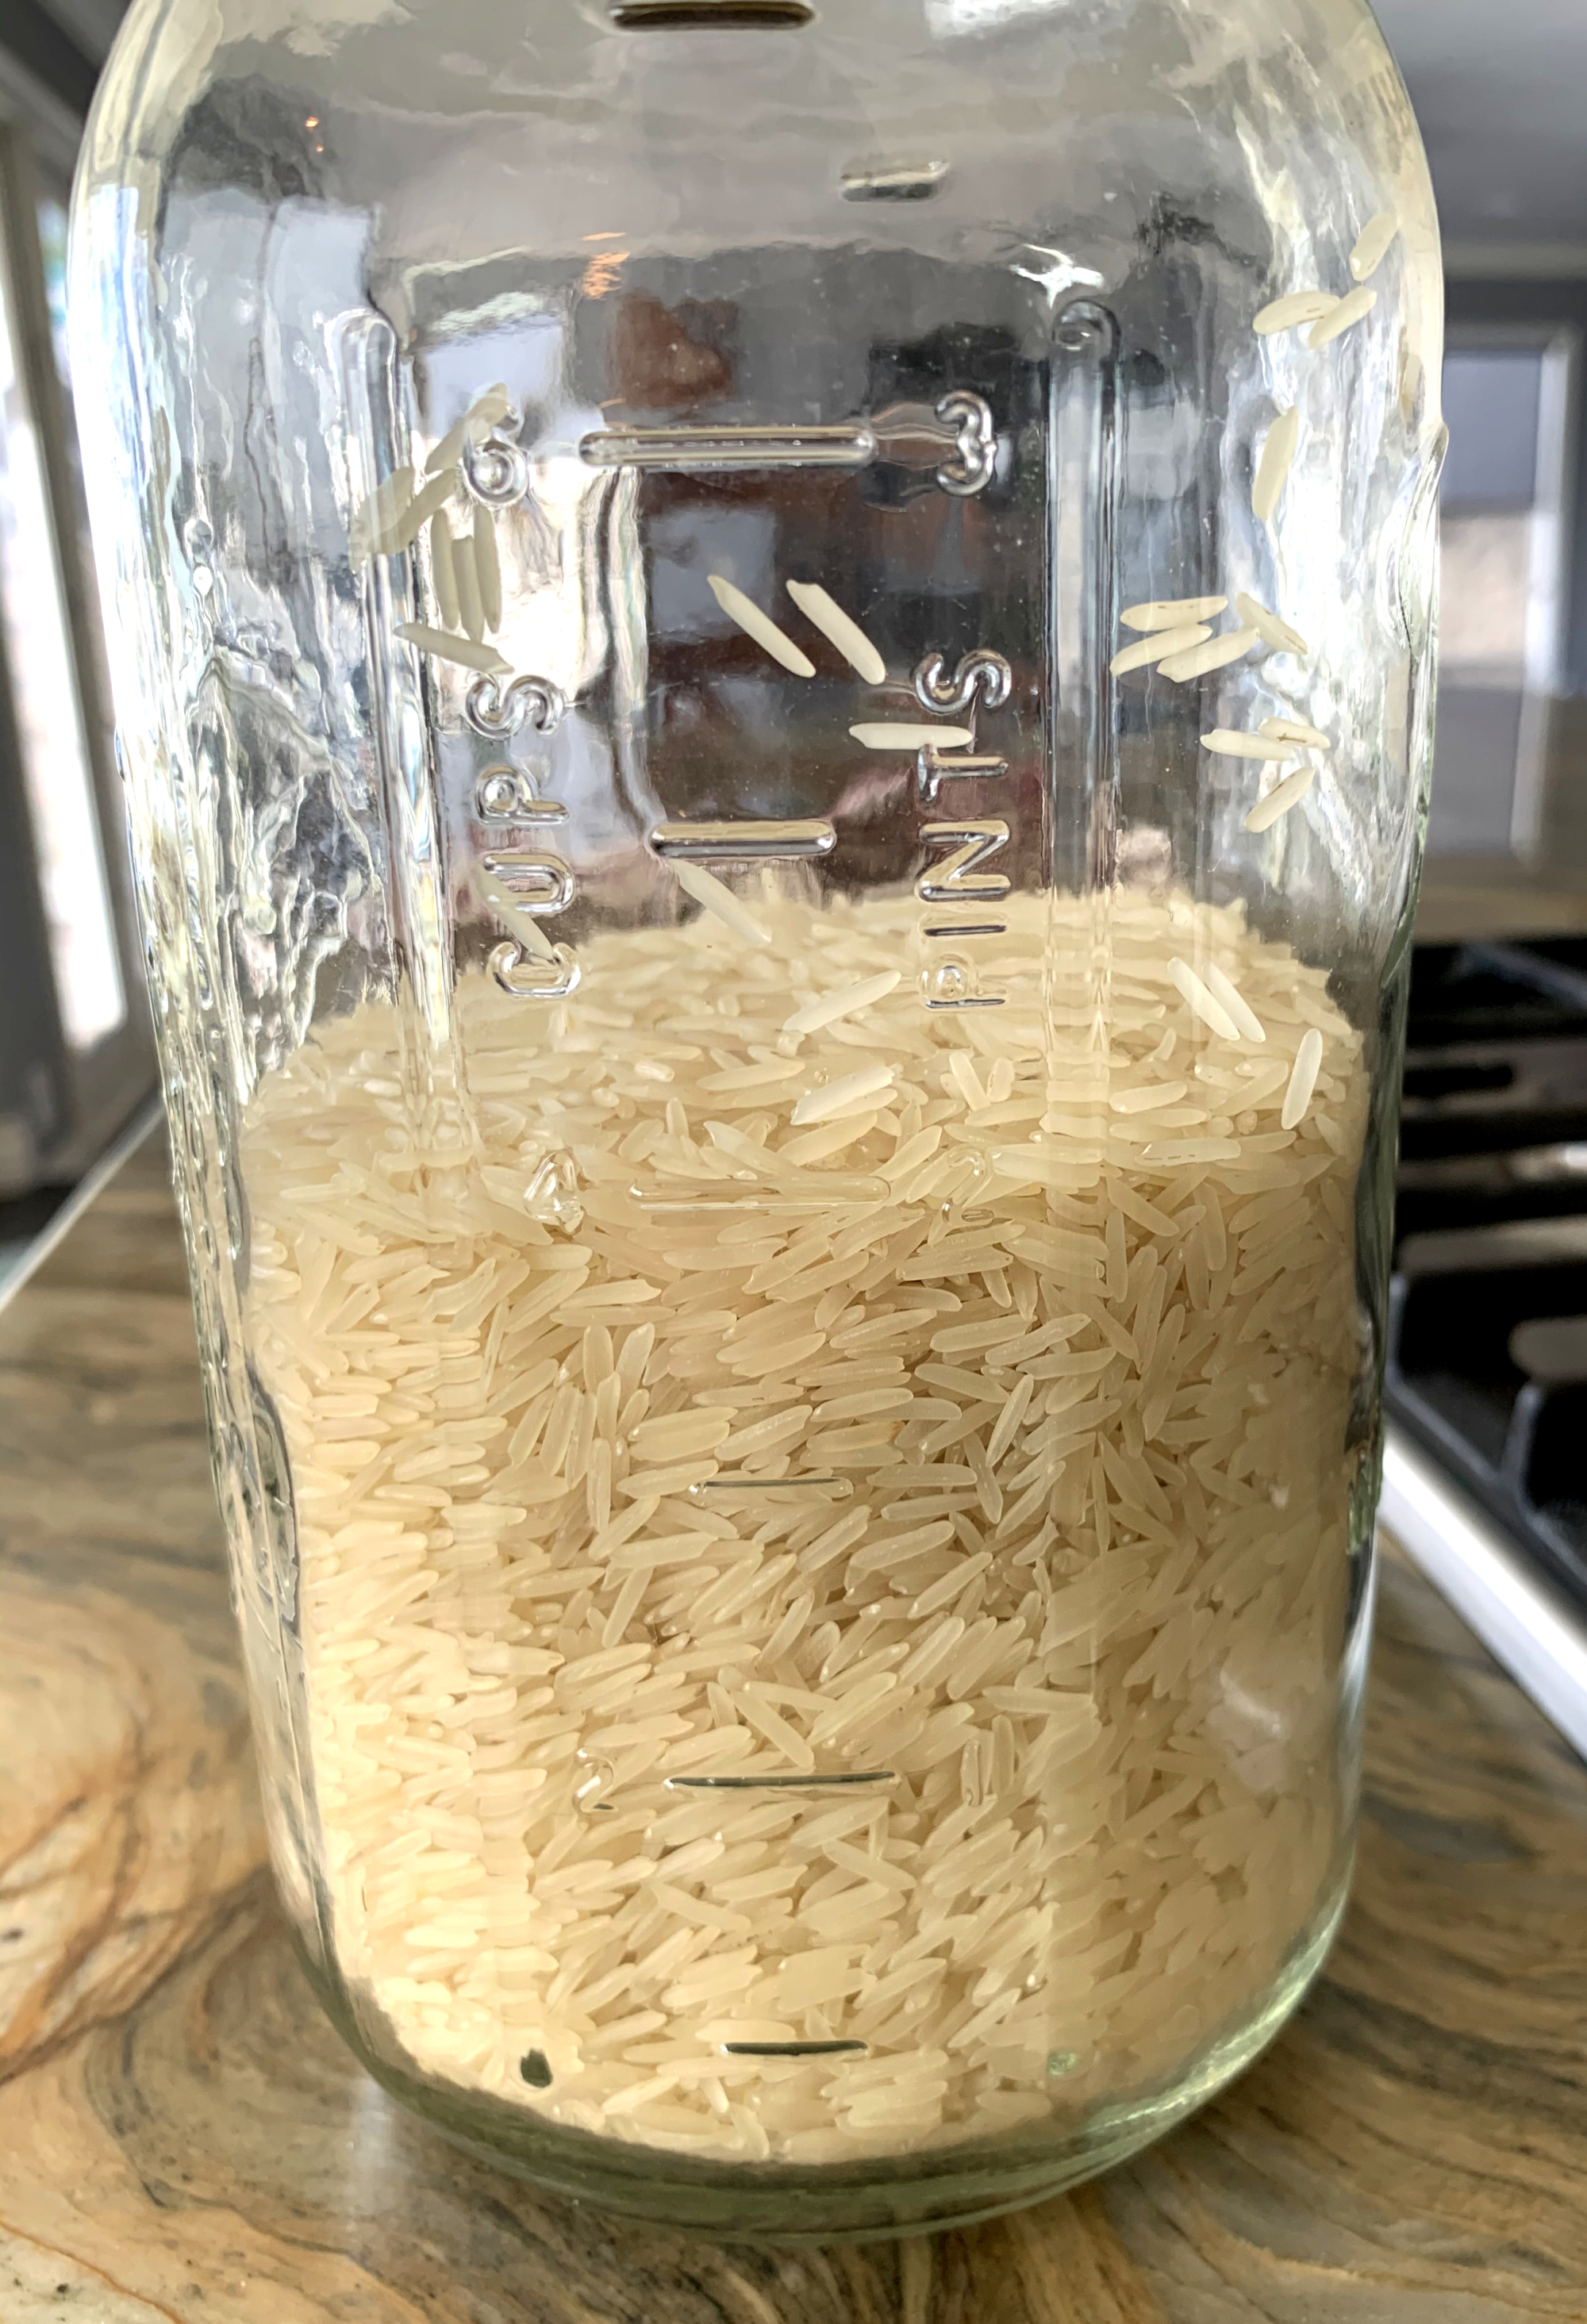
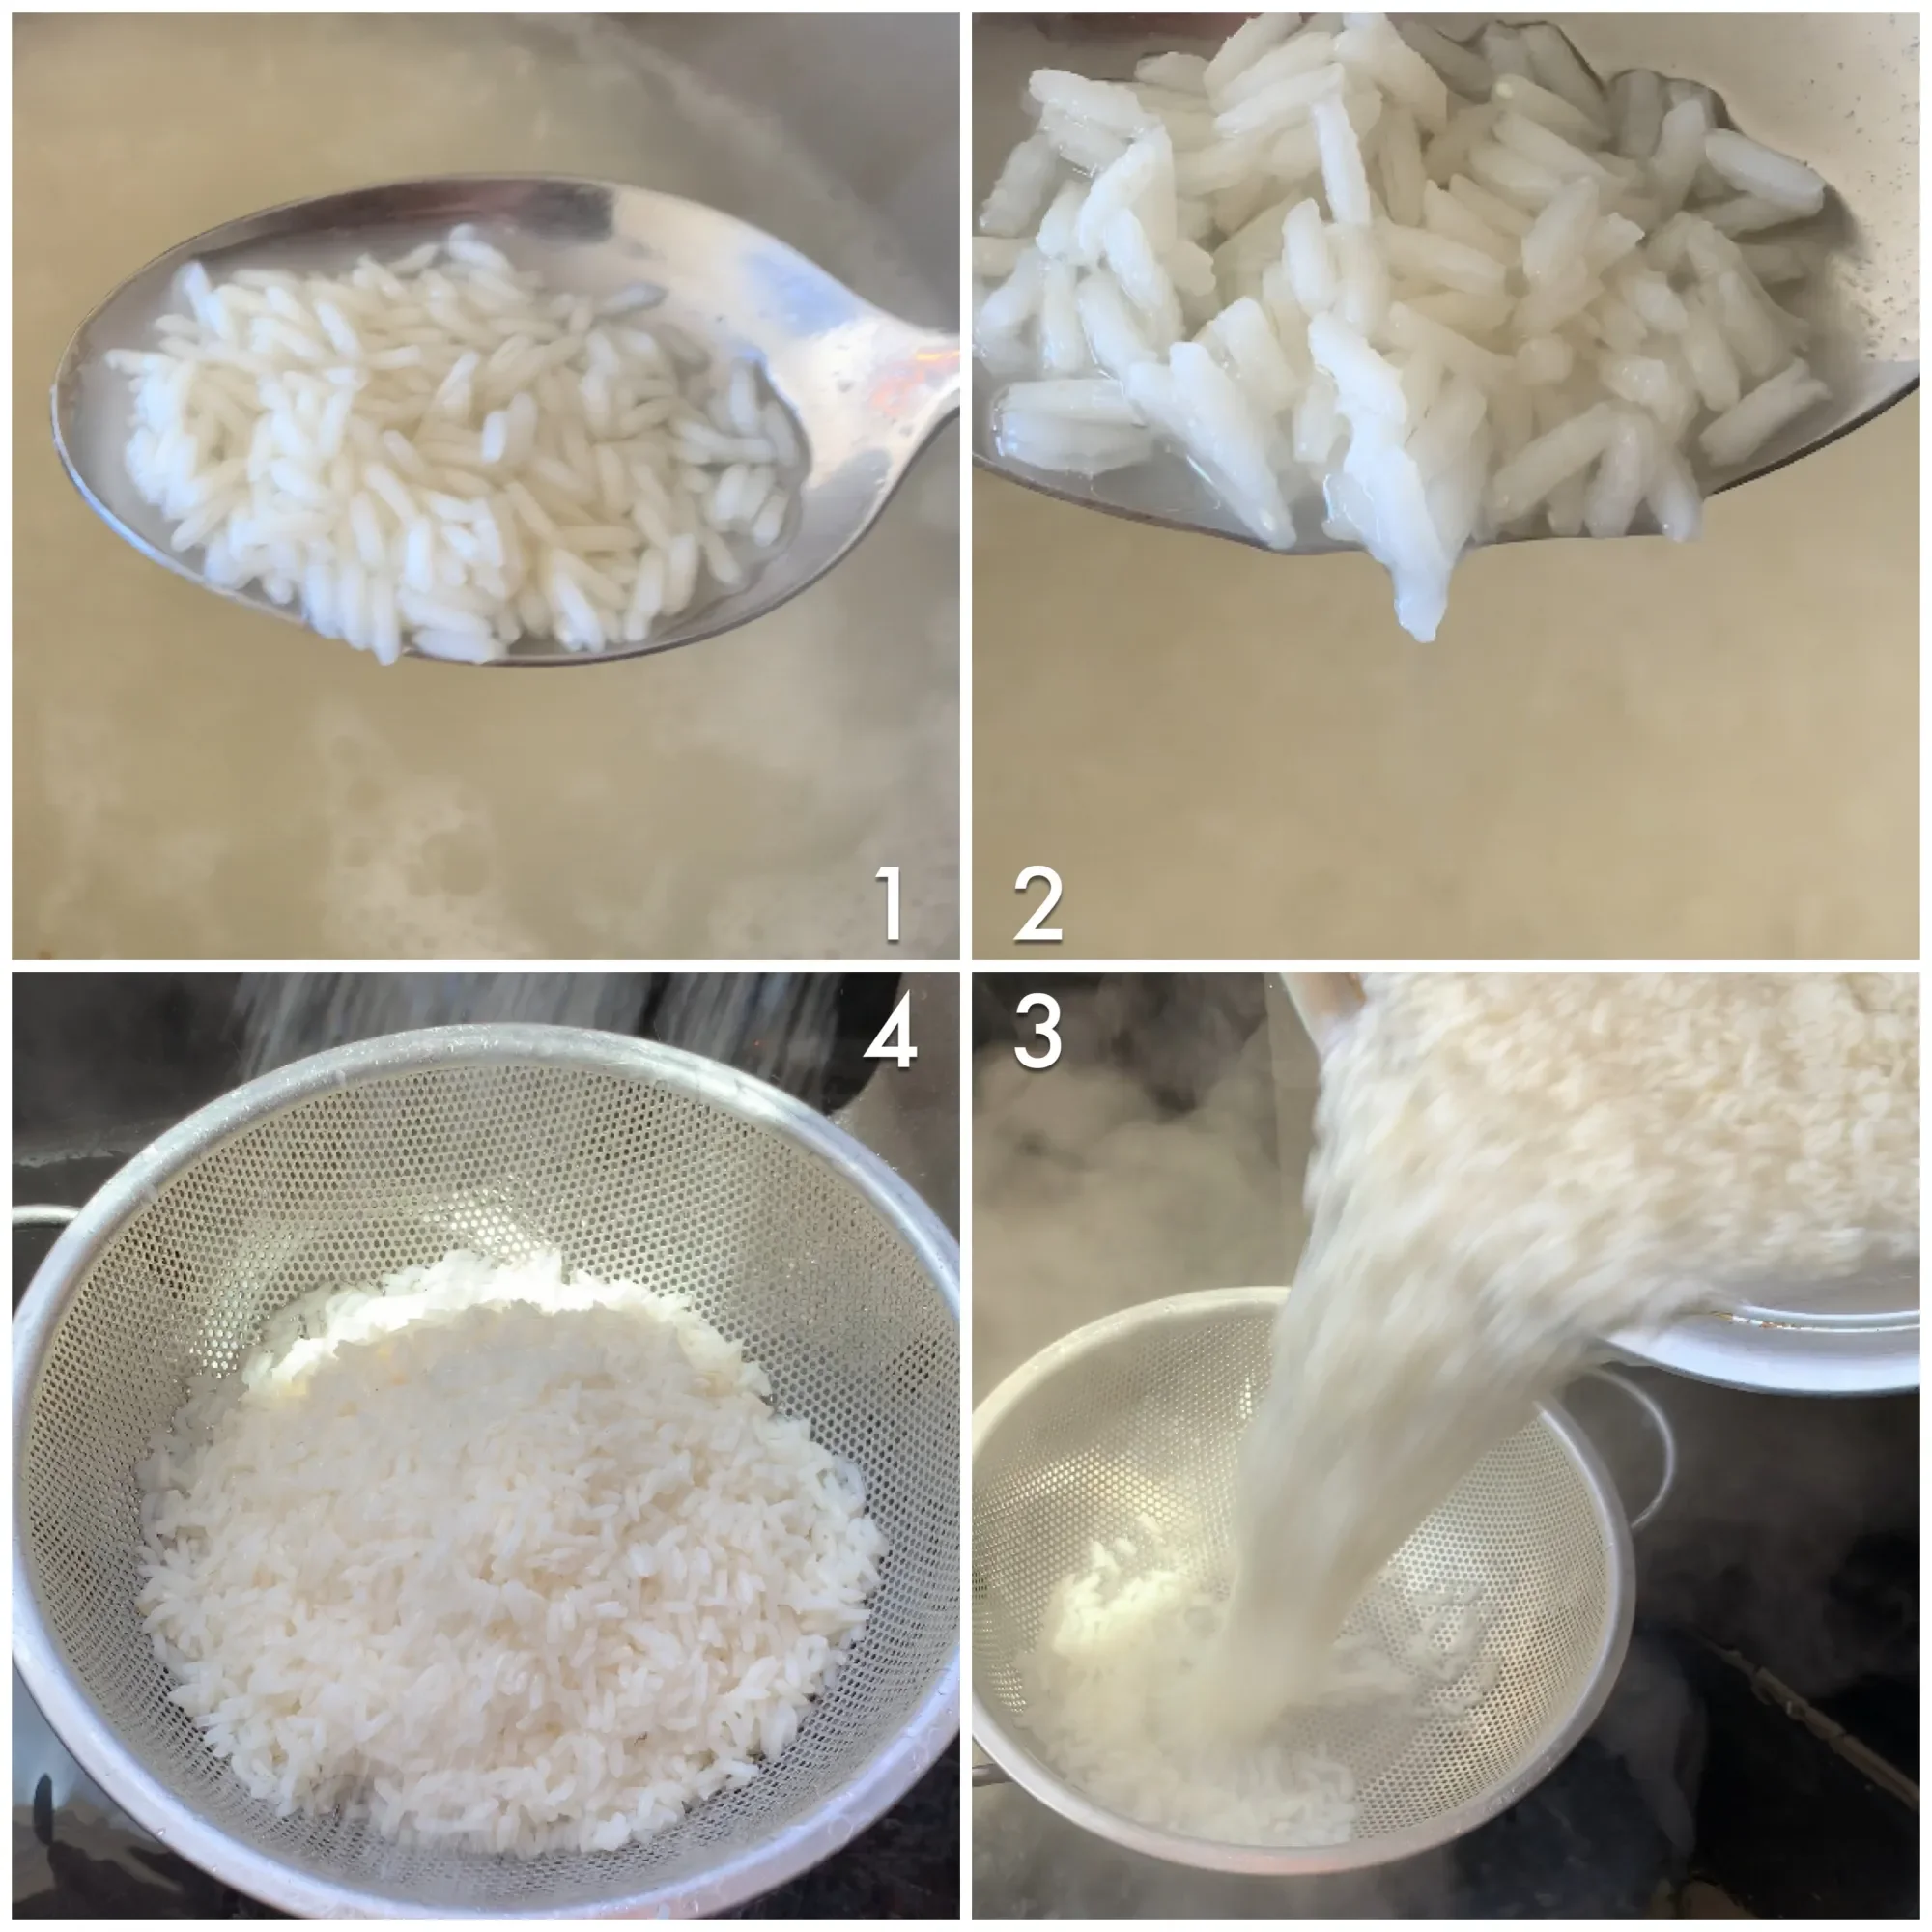
Mexican Rice | Chipotle Cilantro Rice
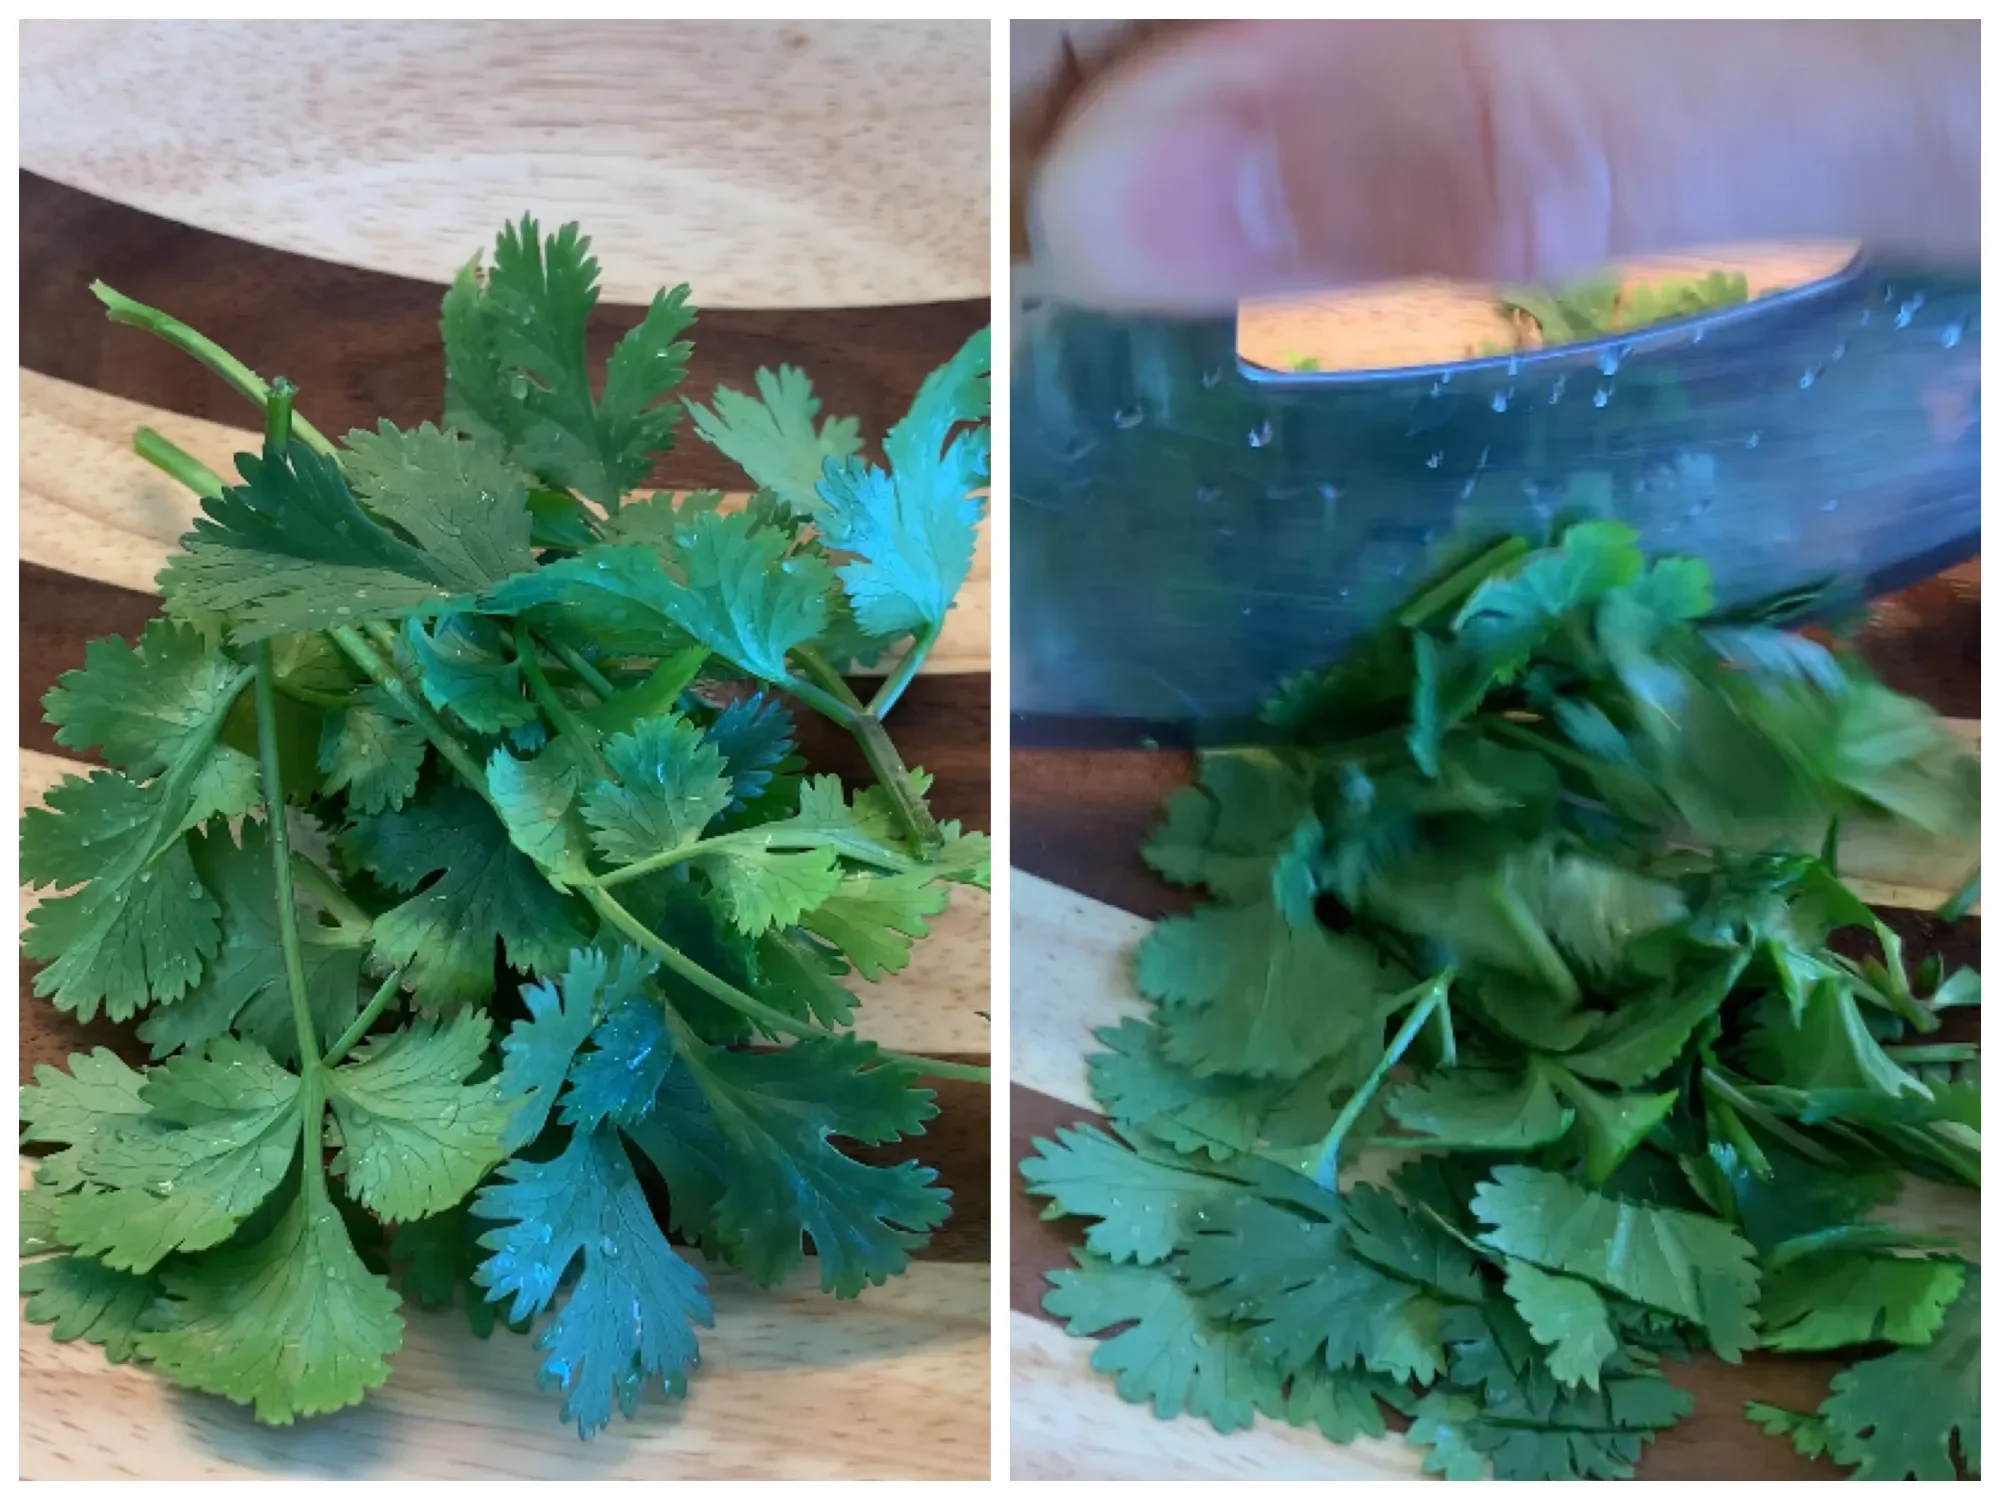
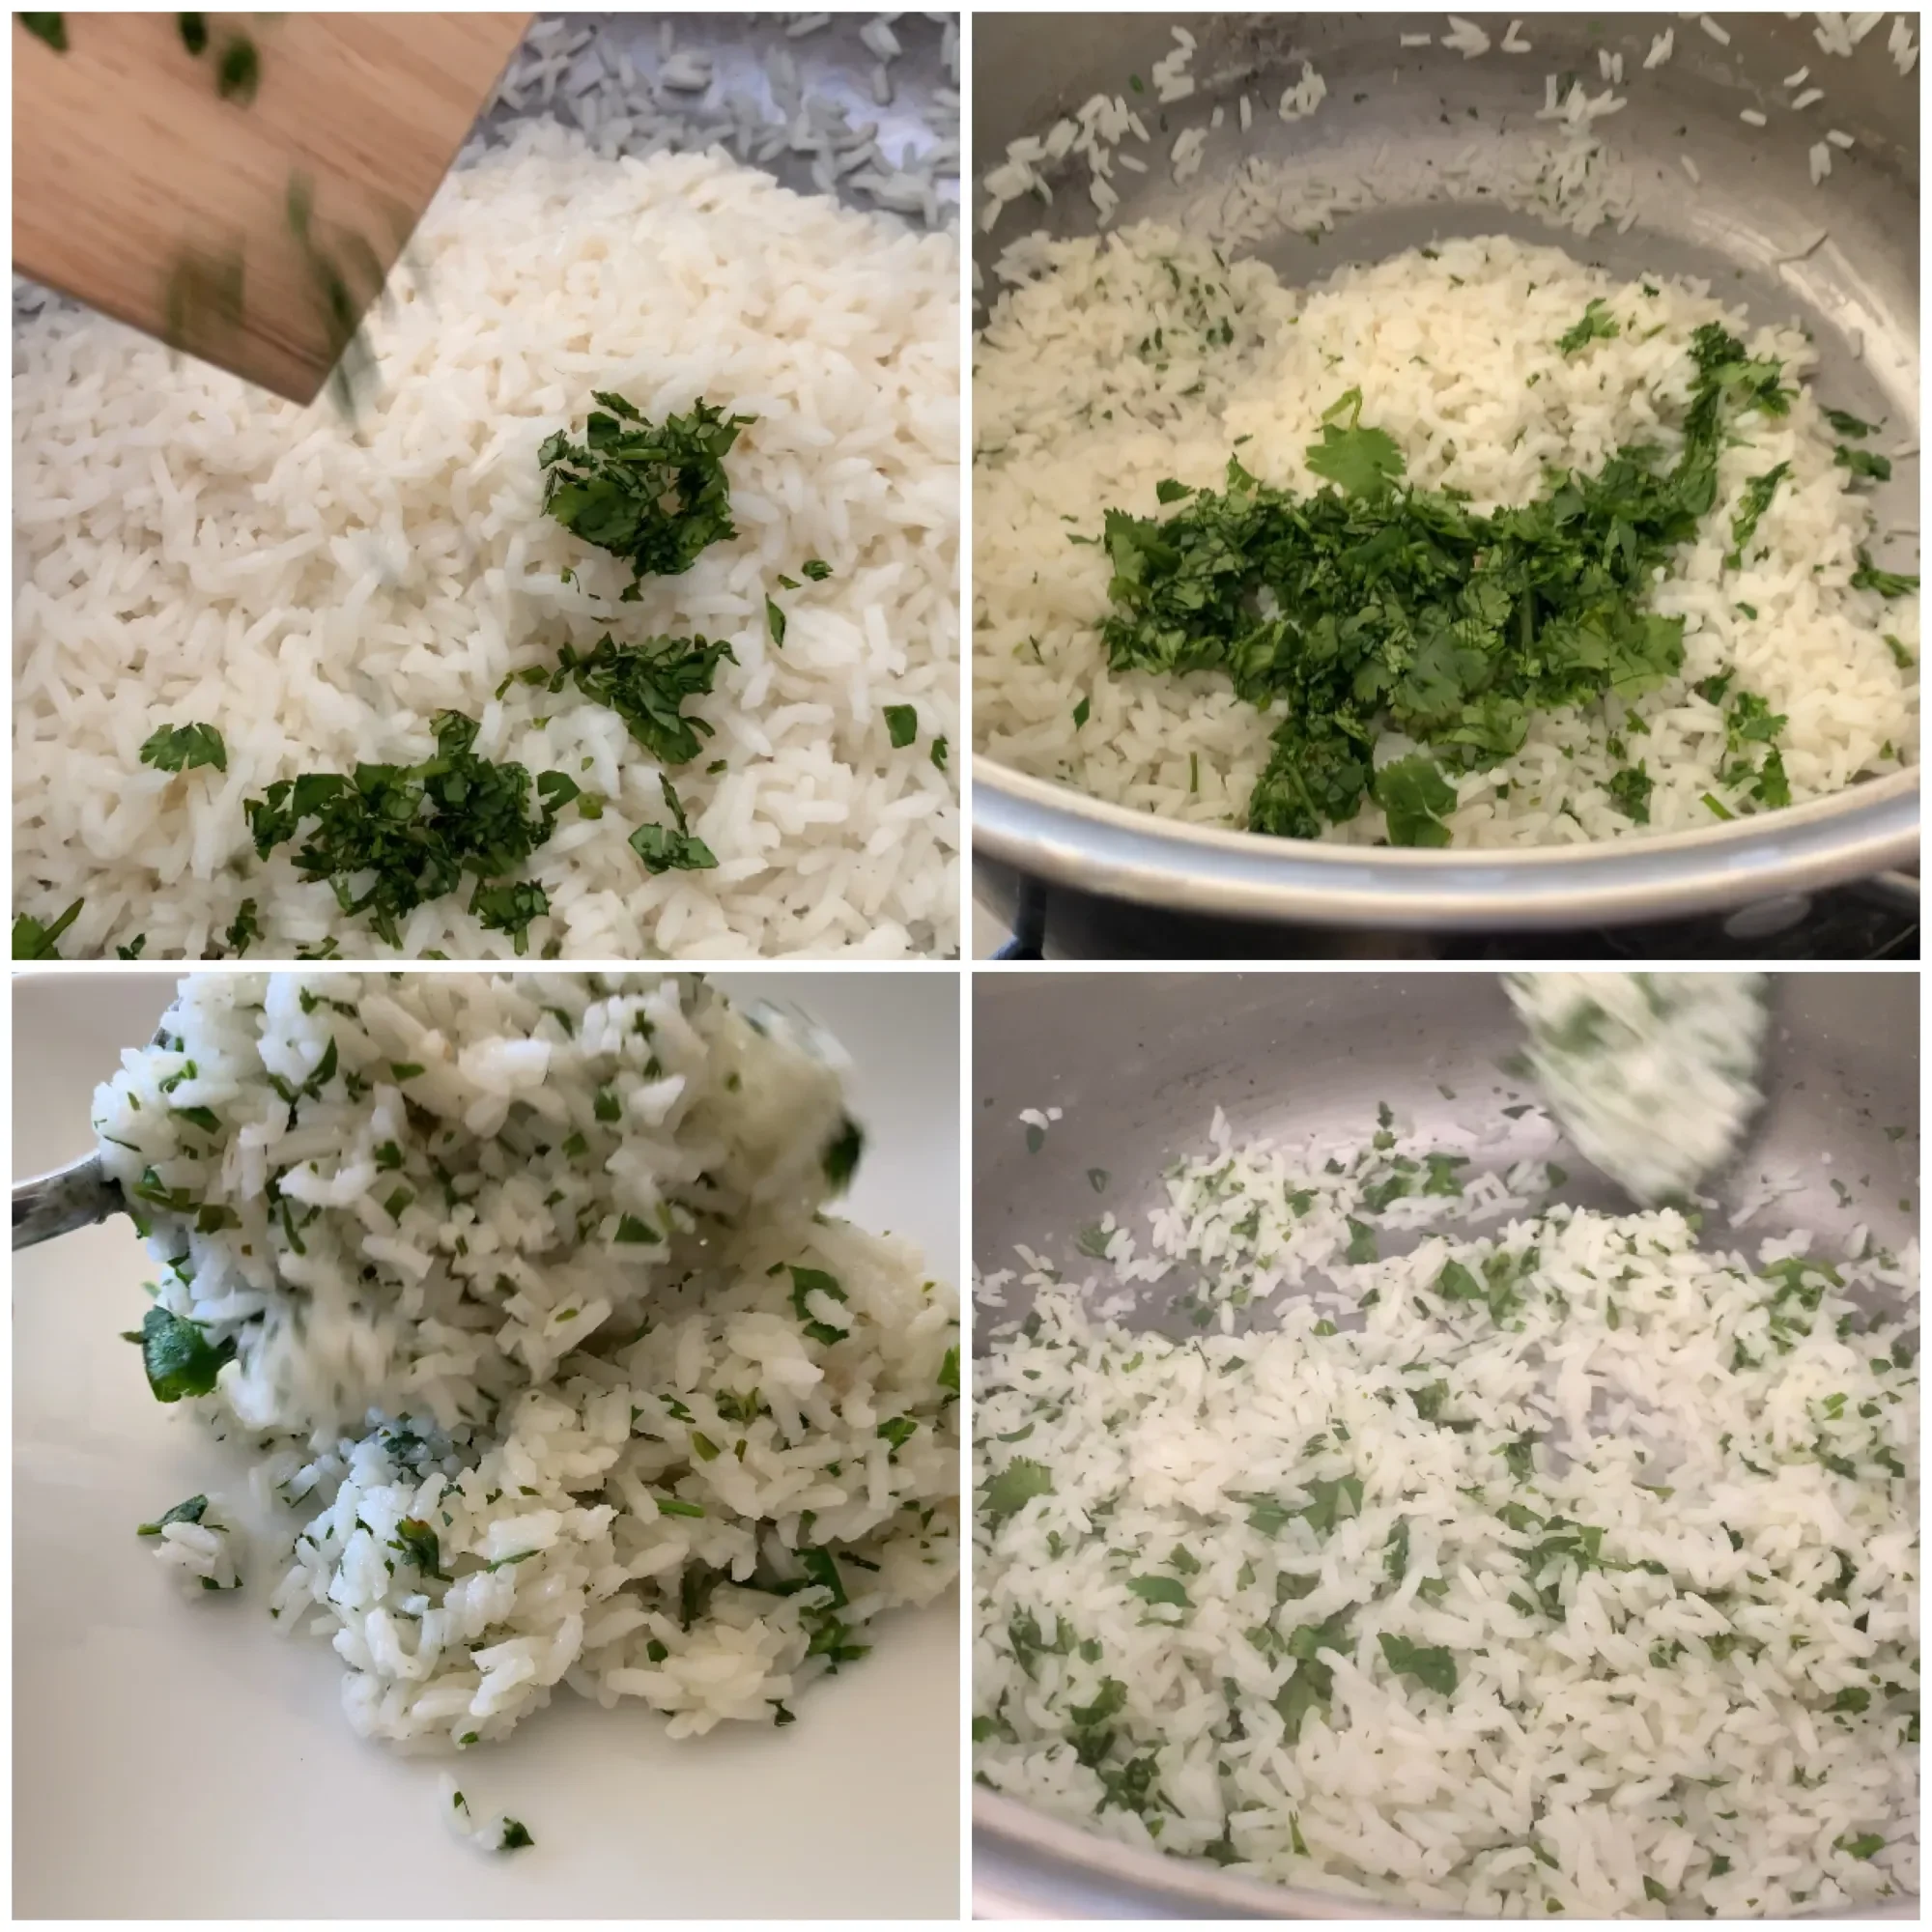
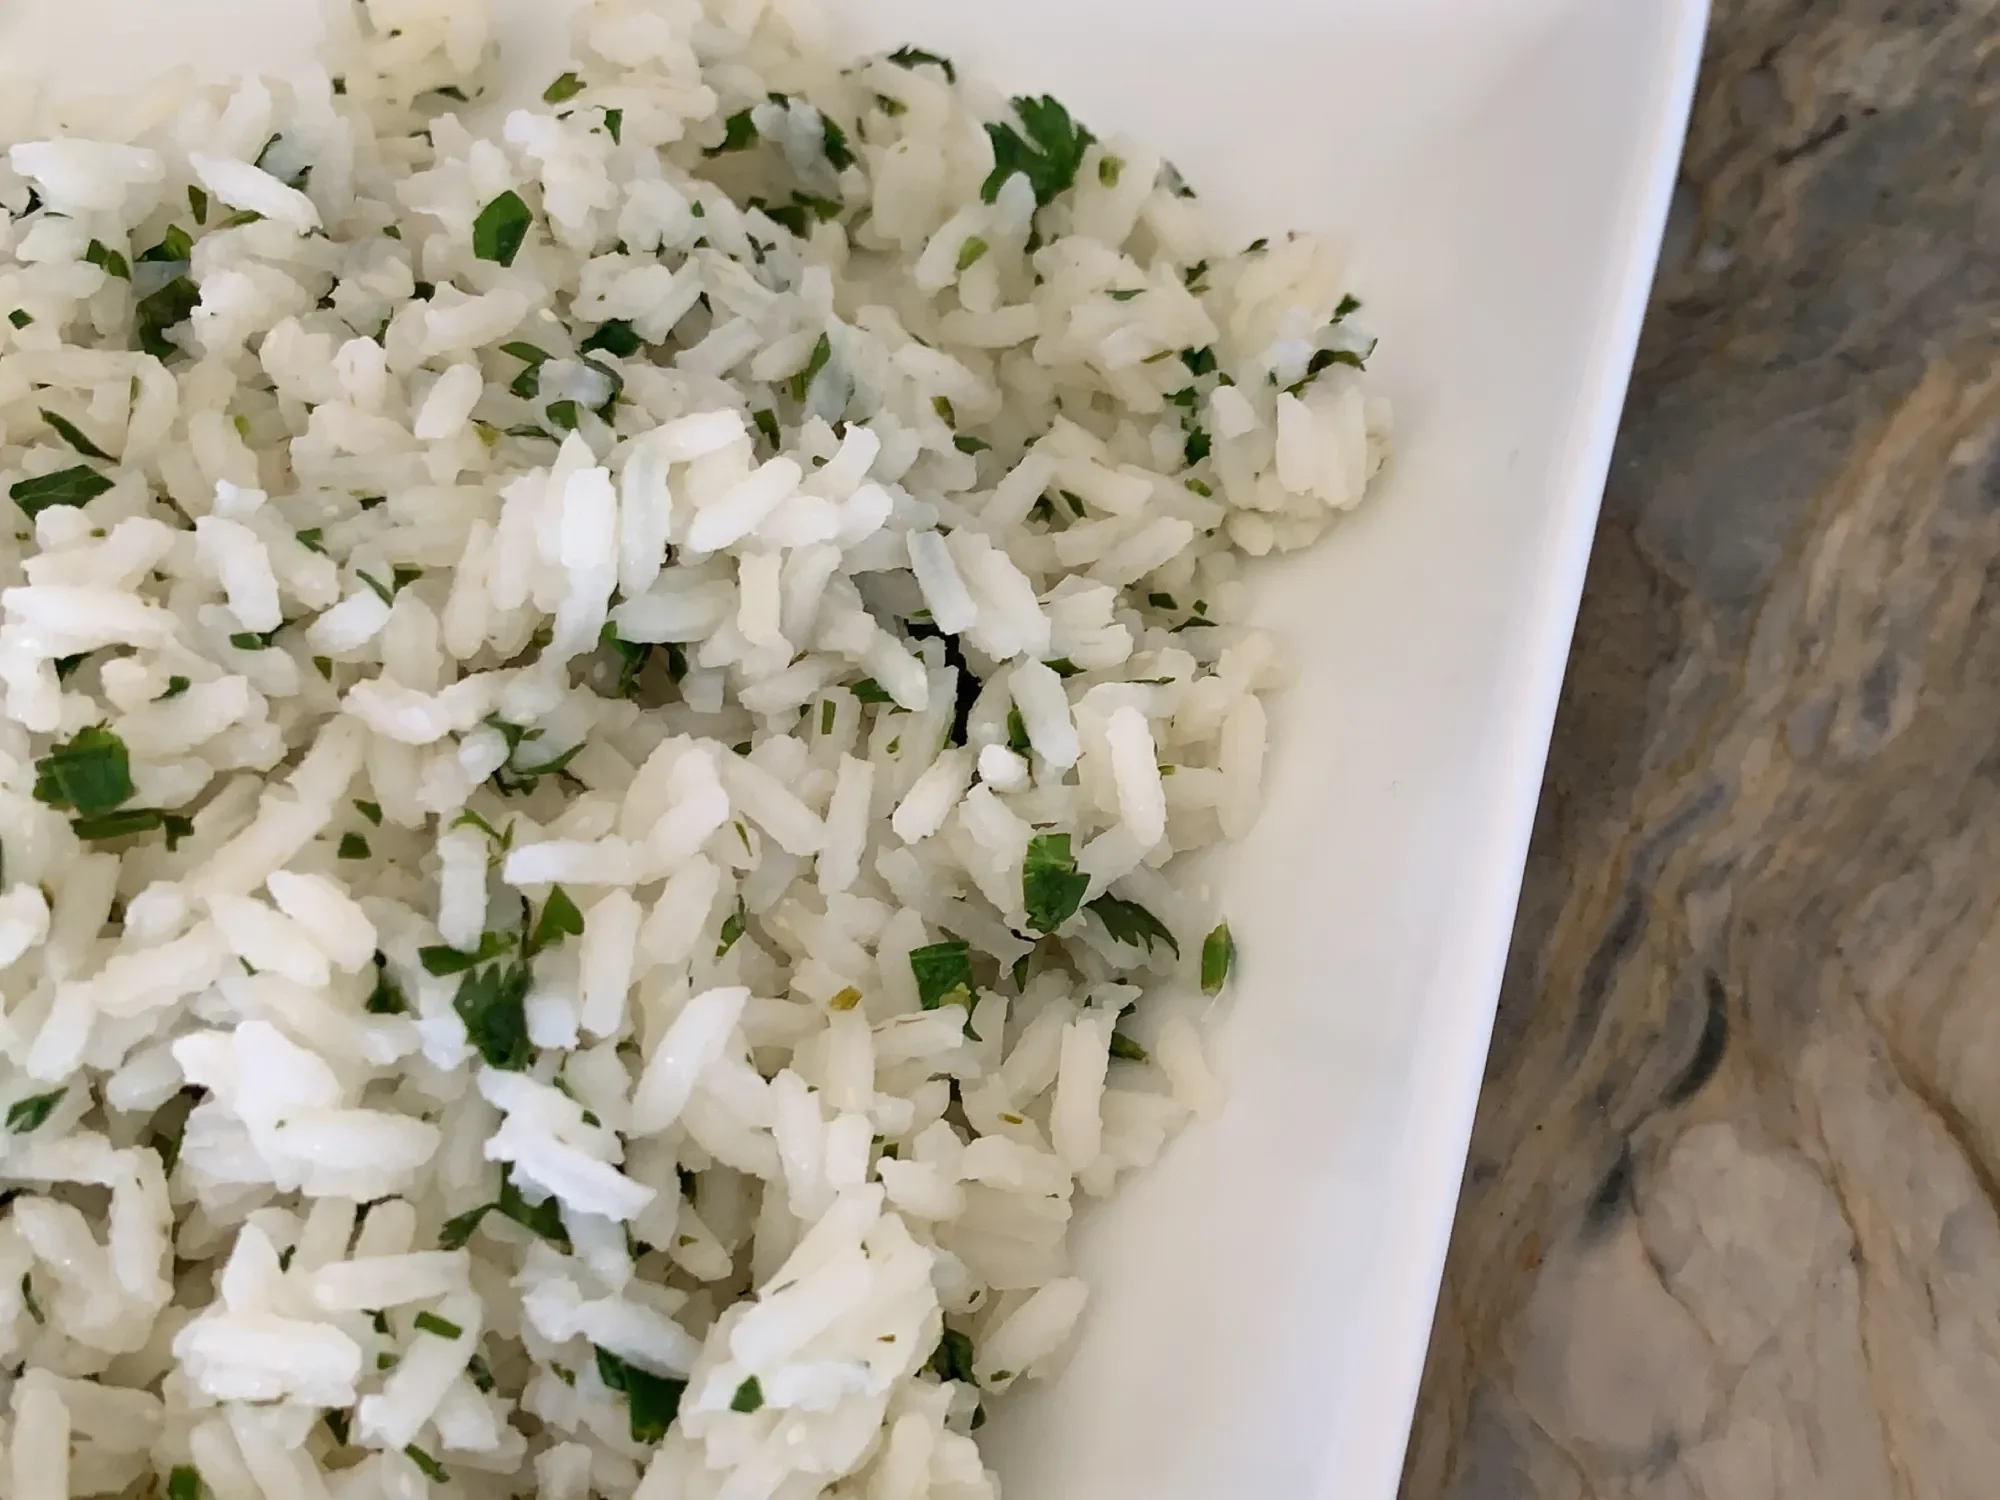
When I was younger, I found a lot of cooking inspiration from the restaurants we used to frequent. If I could make it at home, we could enjoy those dishes more often and save money. Sometimes it works, other times it's just acceptable and other times it fails! This Chipotle inspired Mexican rice is my version of the rice you can find at this chain restaurant which we have been going to for years. While I would make this with any rice I had on hand (which is mostly basmati), occasionally, I buy Mexican rice or sticky rice for a recipe. The main ingredients that distinguish this rice are cilantro and lime. You can add lemon as well. I season mine with salt and add a splash of olive oil. You need quite a bit of cilantro and you don't want to add it too soon as it will lose some of its vibrant green color, so add the cilantro after the rice is cooked.
I tried a different way to cook this Mexican rice, as I typically use a rice steamer for Mexican and sticky rice. I tried to cook it the same way I cook basmati rice which is similar to how you would cook pasta. You fill a pot with a lot of water and bring it to a boil. Then you add the rice, making sure there's plenty of space for the rice to move around in the water and cook. Once it's al dente, you drain the rice. Mexican rice is shorter and fatter than basmati rice and the final cooked rice is softer, chewier and more starchy (or at least has a stickier consistency). Once the rice is drained, add it back to the pan the toss it with lemon and lime juice, salt and a drizzle of olive oil. Add chopped cilantro and toss again being mindful not to break the rice.

How to Make Granola
Ever want your house to smell like a home? Bake! The sweet smells of food cooking warm the hearts of all around. It’s one thing I wanted my children to remember about their childhood: their mama cooking and the house smelling like someone cared for them. Short on time, but still want that feeling? Try baking granola. It’s easy and smells glorious and the perk is that you’ve made a fast healthy snack to be enjoyed over fruit and yogurt.
The following recipe makes just enough to fill a 64 oz (8 cup) Mason Jar. Ingredients: 2 cups of raisins, 1/3-1/2 cup of honey, 1/2-3/4 cup of coconut oil, 2 cups almond meal, 3 cups oats, 1/2 cup sliced almonds, 1/2 cup pecan pieces, 2 teaspoons cinnamon
Directions: Mix raisins, honey and coconut oil until all the raisins are coated. Add almond meal and coat all the raisins. They may clump together a bit, but be sure they are completely covered to ensure they don’t get burned while baking. Add remaining ingredients and mix thoroughly. Add more coconut oil if the mixture is too dry. Add more honey if you prefer your granola sweet. Spread evenly on a baking tray and bake for 10 minutes at 350 degrees. Check after 10 minutes then bake another 5 minutes. If they raisins are protected, you can bake for a total of 20 minutes. You can omit the raisins while baking and just add them after the granola is baked. I have a convection bake oven which ensures even baking. You may need to rotate your tray to ensure even baking. Let it cool a bit before eating otherwise it will be warm and soft. Let it cool completely (at least an hour) before transferring it to an airtight container for storage. Label with the date it was baked. Store is a cool dry pantry. While I don’t know how long it will actually last, my guess is not as long as store bought granola, especially if there is still moisture when you store it. Use your best judgement as to the safety of storing and eating home prepped food.
How To Make Buttermilk Pancakes From Scratch
For years, there were some recipes I just thought you had to use a box to make them. Like buttermilk pancakes. I can't remember when it was that I started making my own, but it wasn't that long ago. First, I experimented with vegan options because I have a son who is allergic to dairy. At the same time, I make the non-vegan version. What I found was that the vegan pancakes usually were fluffier and tasted better! But that recipe is for another time. The following recipe for my buttermilk pancakes is definitely not vegan. I make these often because they are so easy and quick. I also make them small so I can cook 4-6 pancakes at a time. This helps with portions as it's easy to give just one or two small pancakes to a child and older children or adults can stack several and drizzle them with honey or maple syrup. Also, when I make them small, it means everyone can eat hot pancakes off the griddle at the same time.
Here's the recipe:
Mix the following dry ingredients:
2 cups of flour (I use white flour), 3/4 teaspoon of baking powder and 1/4 cup of brown sugar. To the dry ingredients, add 3 eggs, 3 tablespoons melted butter and 2 cups of buttermilk. Mix until smooth. On a hot pan (medium to hot), add coconut oil. Add about 1/3 cup of batter to the pan, making room for as many small pancakes your pan can handle. Flip them when they are golden brown and crispy around the edges. Top with butter and syrup and fresh fruit. Enjoy!
Pasta with Garlic, Tomatoes, & Brie Cheese
This is one easy, tasty recipe that's sure to become a family favorite! If you don't believe, you must try it!! This vegetarian meal and easily become by omitting the brie cheese. No need to substitute the dairy, the tomatoes, garlic and basil add tons of flavor!
This recipe was shared with me by my friend Laura. Thank you, Laura!!
Recipe:
Toss the following ingredients and let sit for 10 minutes:
One wedge of soft brie
Up to 10 small pearl tomatoes or 12 oz of cherry tomatoes or 3-4 Roma tomatoes
Several cloves of mashed garlic (the more the better!!)
Handful of chopped basil
Salt and pepper to taste
Drizzle of olive oil
Top with your favorite pasta. I used an egg enriched fettucini.
Optional: add cut up pieces of mozzarella balls.
Level: Easy
Duration: less than 20 minutes
How to Make Thin Crust Pizza
It's practically a universal favorite: pizza. And how could you go wrong with bread and cheese?! Well, I'm sure there are many ways, and I have alternatives down below if you are opposed to using dairy or genetically modified wheat. But in the meantime, this pizza is a hit, not just for adults but for kids, too!
Before I give you this super simple crowd pleasing recipe, I want to share with you a healthier alternative to using genetically modified wheat. A few years ago, I learned about Einkorn flour, an ancient wheat. Though it is substantial more expensive, if you are having any health issues related to eating wheat, this might help. Do be sure to speak to your healthcare professional before trying Einkorn wheat if you are sensitive or allergic to wheat. Now for the dairy. You can use a vegan alternative to cheese, but in my experience, my son (who is severely allergic to dairy) and I have found that a cheese free pizza is actually really tasty. In this case the garlic sauce could be topped with chicken and cherry tomatoes or sun dried tomatoes. Yum!
Check out my most requested recipe here (it's for pizza puffs).
Dough Recipe:
2 cups warm water (if you can't easily put your finger in the water, the water is too hot)
4 cups of flour
1/2-1 packet of yeast
1/2 teaspoon of salt
1 tablespoon of brown sugar (optional)
Mix wet ingredients, then mix in flour. Avoid using metal bowls and utensils. Cover and let rise for 2-5 hours. It will be a wet dough.
Toppings and sauce:
Clean and cut two double chicken breasts into fajita slices
On high heat, cook chicken with a drizzle of oil (I use grapeseed oil). Season with salt, garlic powder and fresh garlic (optional).
Do not over cook. Set aside.
For the sauce: Mash two heads of garlic and mix with 2 tablespoons of olive oil.
Once the dough has risen, cover a sheet pan with parchment paper. Using your hands, spread out a thin layer of dough. It's sticky and will get all over your hands. If you prefer, you can roll it out, but you'll need to add flour. Both results are tasty.
Top dough with garlic/oil mixture. Add a thin layer of 'fancy' cheese like parmesan, fontana, asiago and provolone. Add layer of chicken. Top with a final thin layer of mozzarella cheese. You can top with sliced jalapeños or chives if you wish.
Bake for 11-13 minutes at 430 degrees. I have a convection bake oven which reduced the time of cooking and provides even cooking. Rotate on racks for even cooking if you have trouble cooking your pizza evenly and thoroughly.
Want more recipes? I have an assortment of cooking tutorials!
How to Make Crepes | High Protein Recipe
For many years, we called crepes pancakes because those were the only ones we made. It wasn’t until I was teenage that I realized that pancakes were thick and moist. Now I’m sure to distinguish between the two because I’ve learned that for some people crepes are definitely not pancakes! One day a couple years ago, I invited my family (several siblings and their spouses and kids) for ‘Grandpa’s Pancake Breakfast’. First off, when my brother-in-law arrived he remarked how my sister also called crepes pancakes, too. He broke down all the ways crepes are not pancakes and recalled his confusion one day when my sister made him pancakes (crepes) and he explained they weren’t. So I guess it’s a family thing to call them pancakes. How ever you eat this sweet breakfast treat, you may be surprised at some of the toppings my family enjoys. When my grandfather used to make these, the table would be spread with over a dozen toppings ranging from classics like honey, syrup and jam to nuts, cream and…hot dogs! Yep, hot dogs with a drizzle of honey rolled into a crepe was pretty tasty! He also had canned and fresh fruit and beef patties. How ever you dress your pancake, er I mean crepe, you’re sure to enjoy topping it to this recipe.
This recipe is a modification on a family heirloom recipe. One reason why I love it is because it calls for so many eggs. If you need a high protein crepe, this is the one.
Recipe/Directions:
In a standing blender (I use the NutriBullet) add:
12 eggs
2/3 up of flour
3 tablespoons melted butter
3 tablespoons brown sugar
1/4 cup cream (optional)
up to 1 cup of water (I use about 1/2 to 2/3)
Blend for about 10 seconds. Batter should be thin like milk.
Pour about 1/3 cup of batter onto a hot butter pan (medium to medium high heat). The crepe should cook quickly, about a minute on one side and less than 30 seconds on the flip side.
Top with your favorite topping


