Bird Unit Study
Bird Unit Study
While, we tend to follow the Waldorf pedagogy, there are times that I put together a unit study, which is uniquely different from a main lesson block. Main lesson blocks are developmentally appropriate, and supportive of the child’s emotional, spiritual, and mental development. A unit study is a concentration of a single subject for a short period of time. When putting together a unit study, you may choose to collect resources that include other subject areas to make your unit study more robust.
When I’m doing a unit study, I’m not necessarily trying to include other subject areas, but I am cognizant of including the following: nonfiction books with plenty of illustrations or photographs, picture books, novels or fiction or historical fictions that I can read aloud to my children, activity books, cookbooks or recipes, kits, field trips or classroom opportunities, biographies, and games. I may not be able to include all of these categories, and they may differ from unit study to unit study, but I do look for lessons that are engaging for my students whether they be hands-on lessons or lessons that pique the curiosity.
Our bird unit study serve students from kindergarten through fourth grade easily, and with a few additional lessons can serve the fifth grade student very well. If you want to include a unit study on ornithology, you may be able to develop a unit study for middle school or even ninth grade.
When putting together a unit study, I specifically look for Charlotte Mason inspired Living books. I find that a lot of nonfiction picture books fit very well with our unit studies and satisfied the category of Living books for me. Living books are resources that are generally written by a single author or by authors who are passionate about a subject area. That passion is seen through the words and pictures of the book.
I love including picture books with all of our unit studies and main lesson blocks. They’re not always used in the traditional sense, however. You would think that my children love to look at the pictures when I’m reading, but more often than not you’ll find them playing as I read aloud, even from a picture book. But the pictures serve as art inspiration for many of our lessons. But other resources serve as art inspiration as well. The Professor Noggin bird trivia games, the Anamalium postcards and the Into The Forest game all served as illustration inspiration for these units.
Birds Unit Study
-
Homeschool Haul
We've come to the end of the school year and with that, the last homeschool haul of the year. While I'll still have other hauls planned for the following year, they won't be as extensive as the ones you've seen in the past. Needless to say, we have more than enough resources for this year and the years to come, and for next year, we have something different planned with our funding.
-

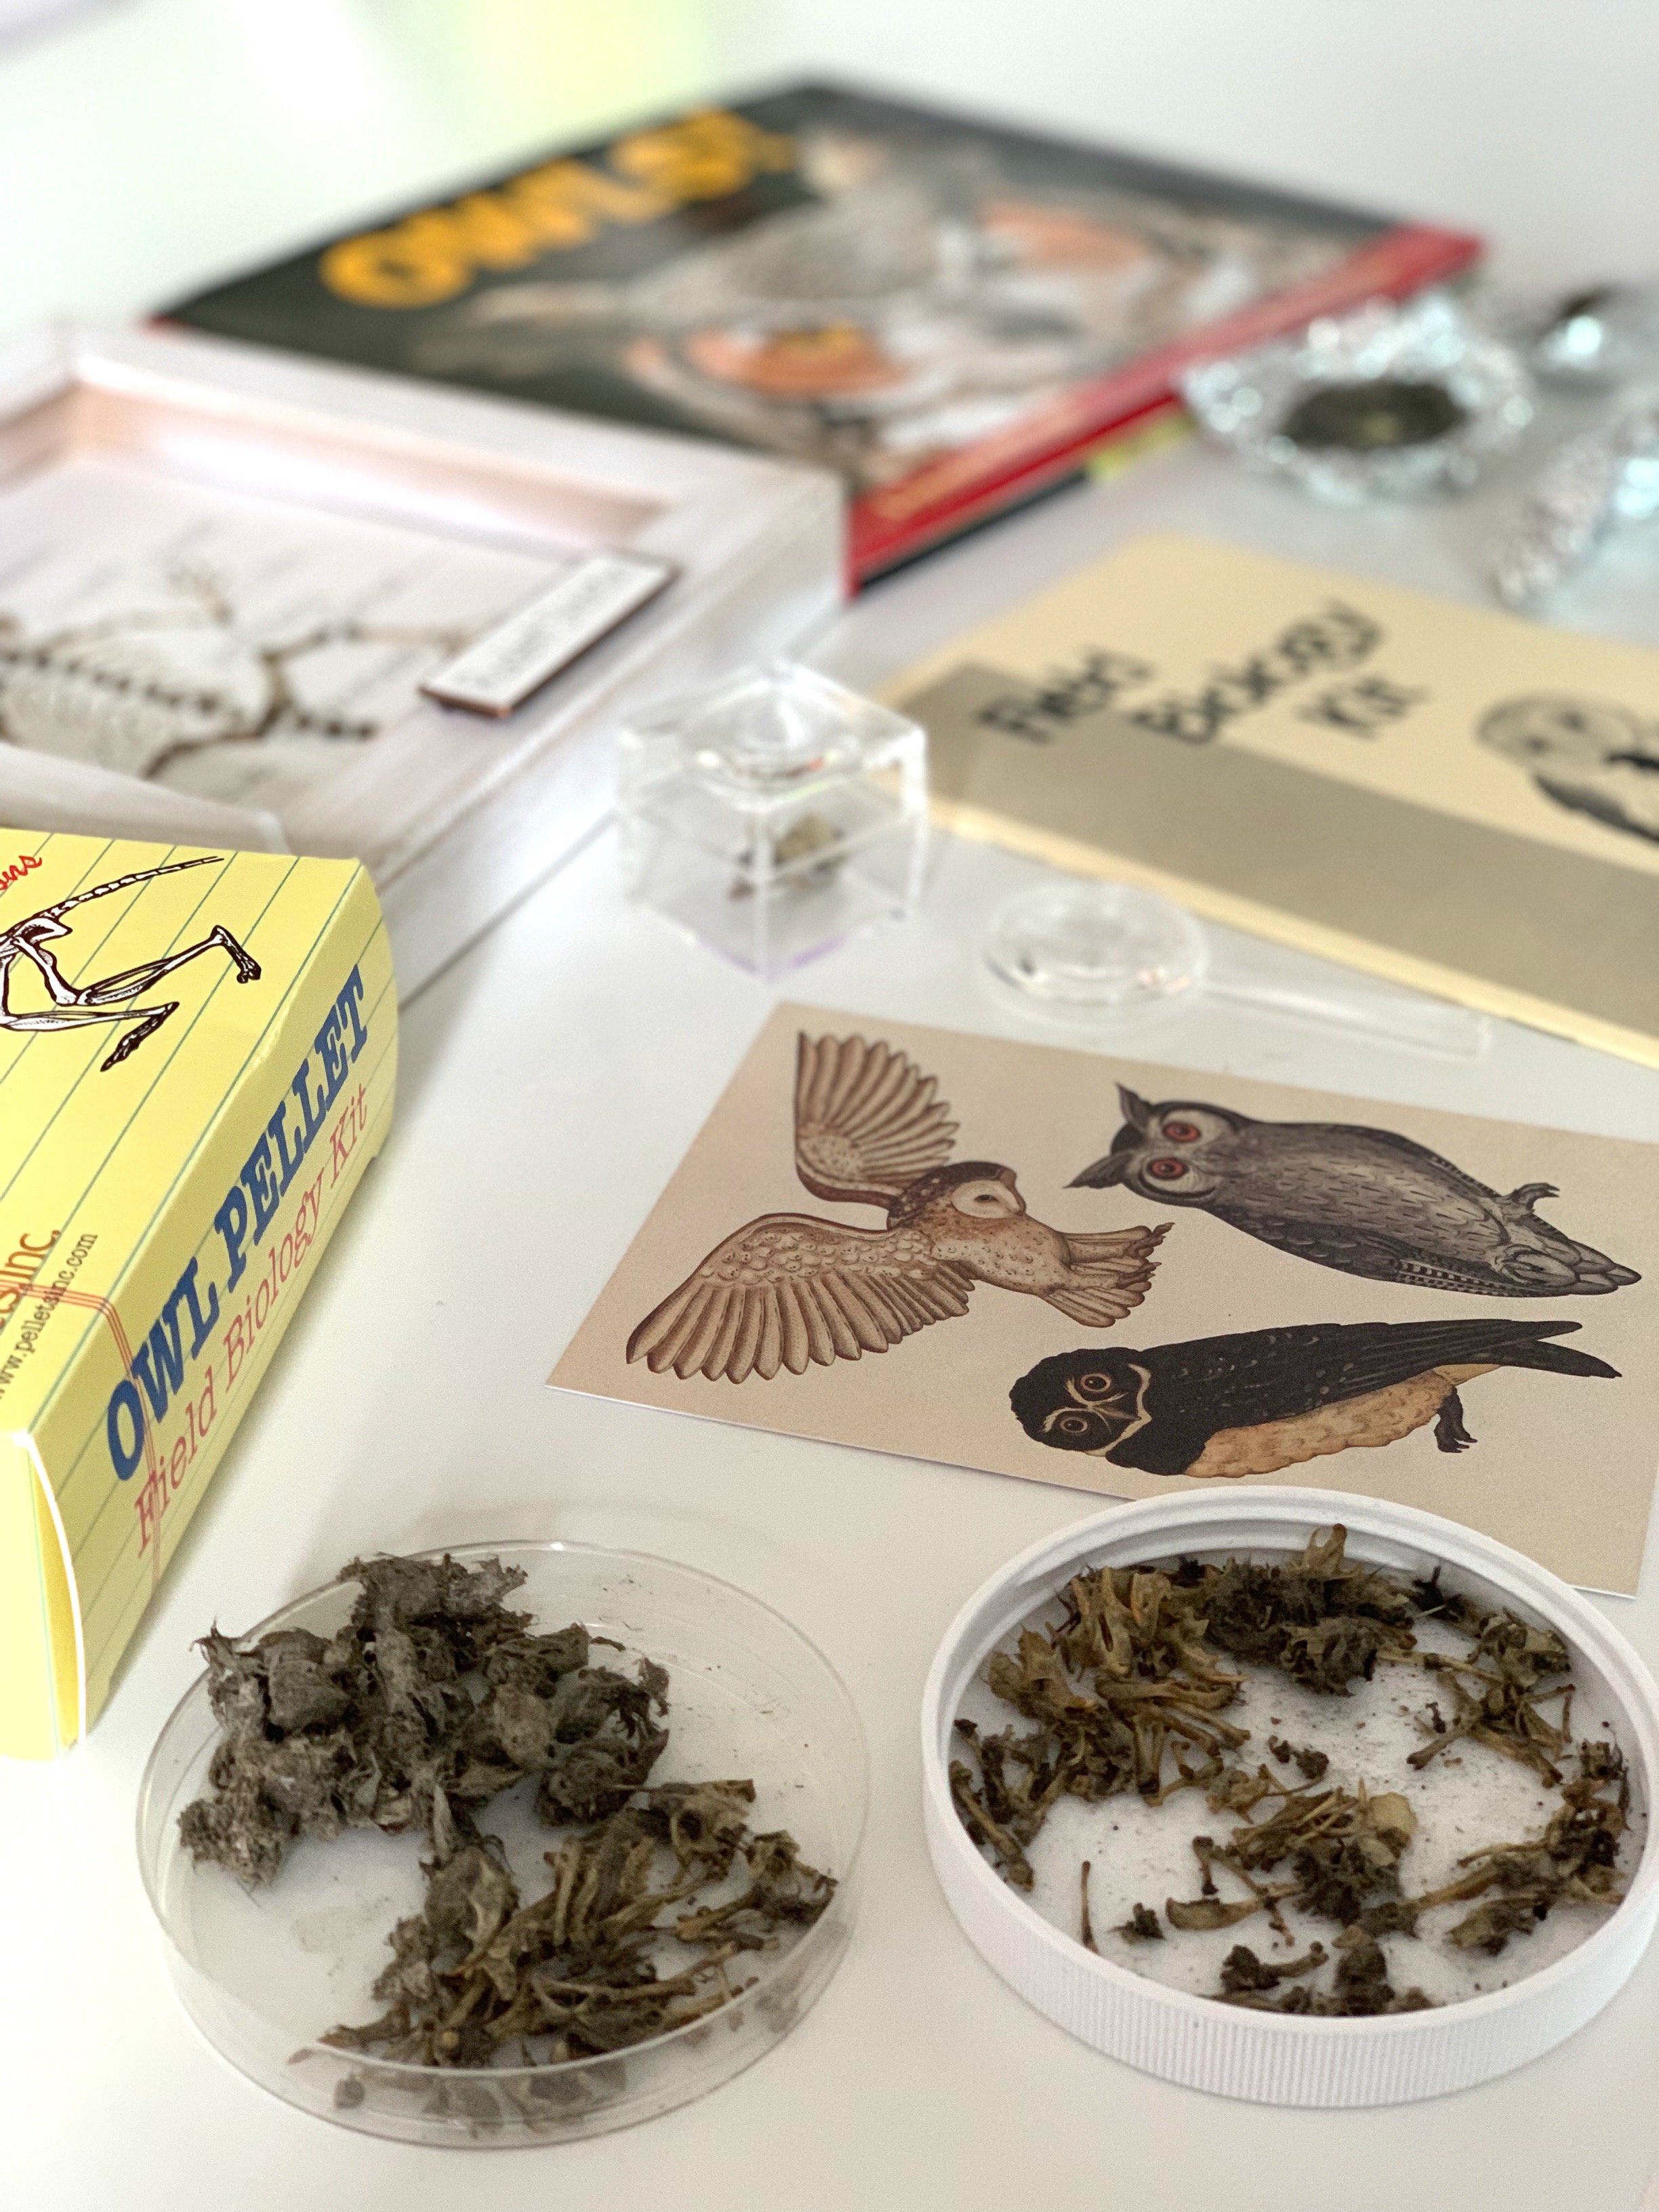
How to put Together a Unit Study | Birds
There's always excitement when I put together a new unit. It's the same excitement you might feel at the start of the new homeschool year. I love looking for new resources and assembling a nice balance of books and activities. It's not always fun though. Sometimes I hit creative roadblocks or in other cases, I'm overwhelmed by too many choices.
-
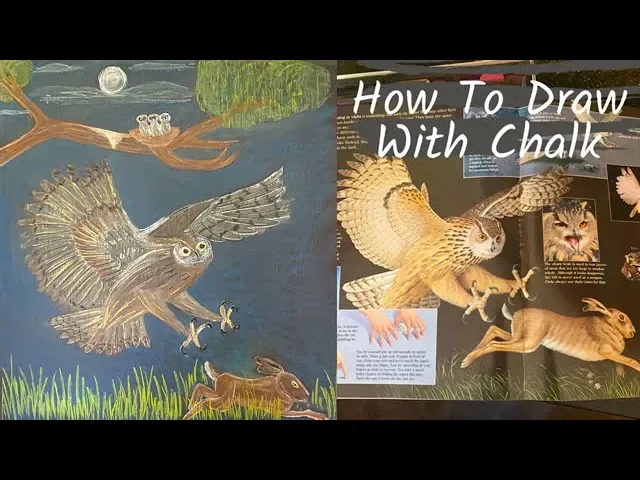
Chalk Drawing
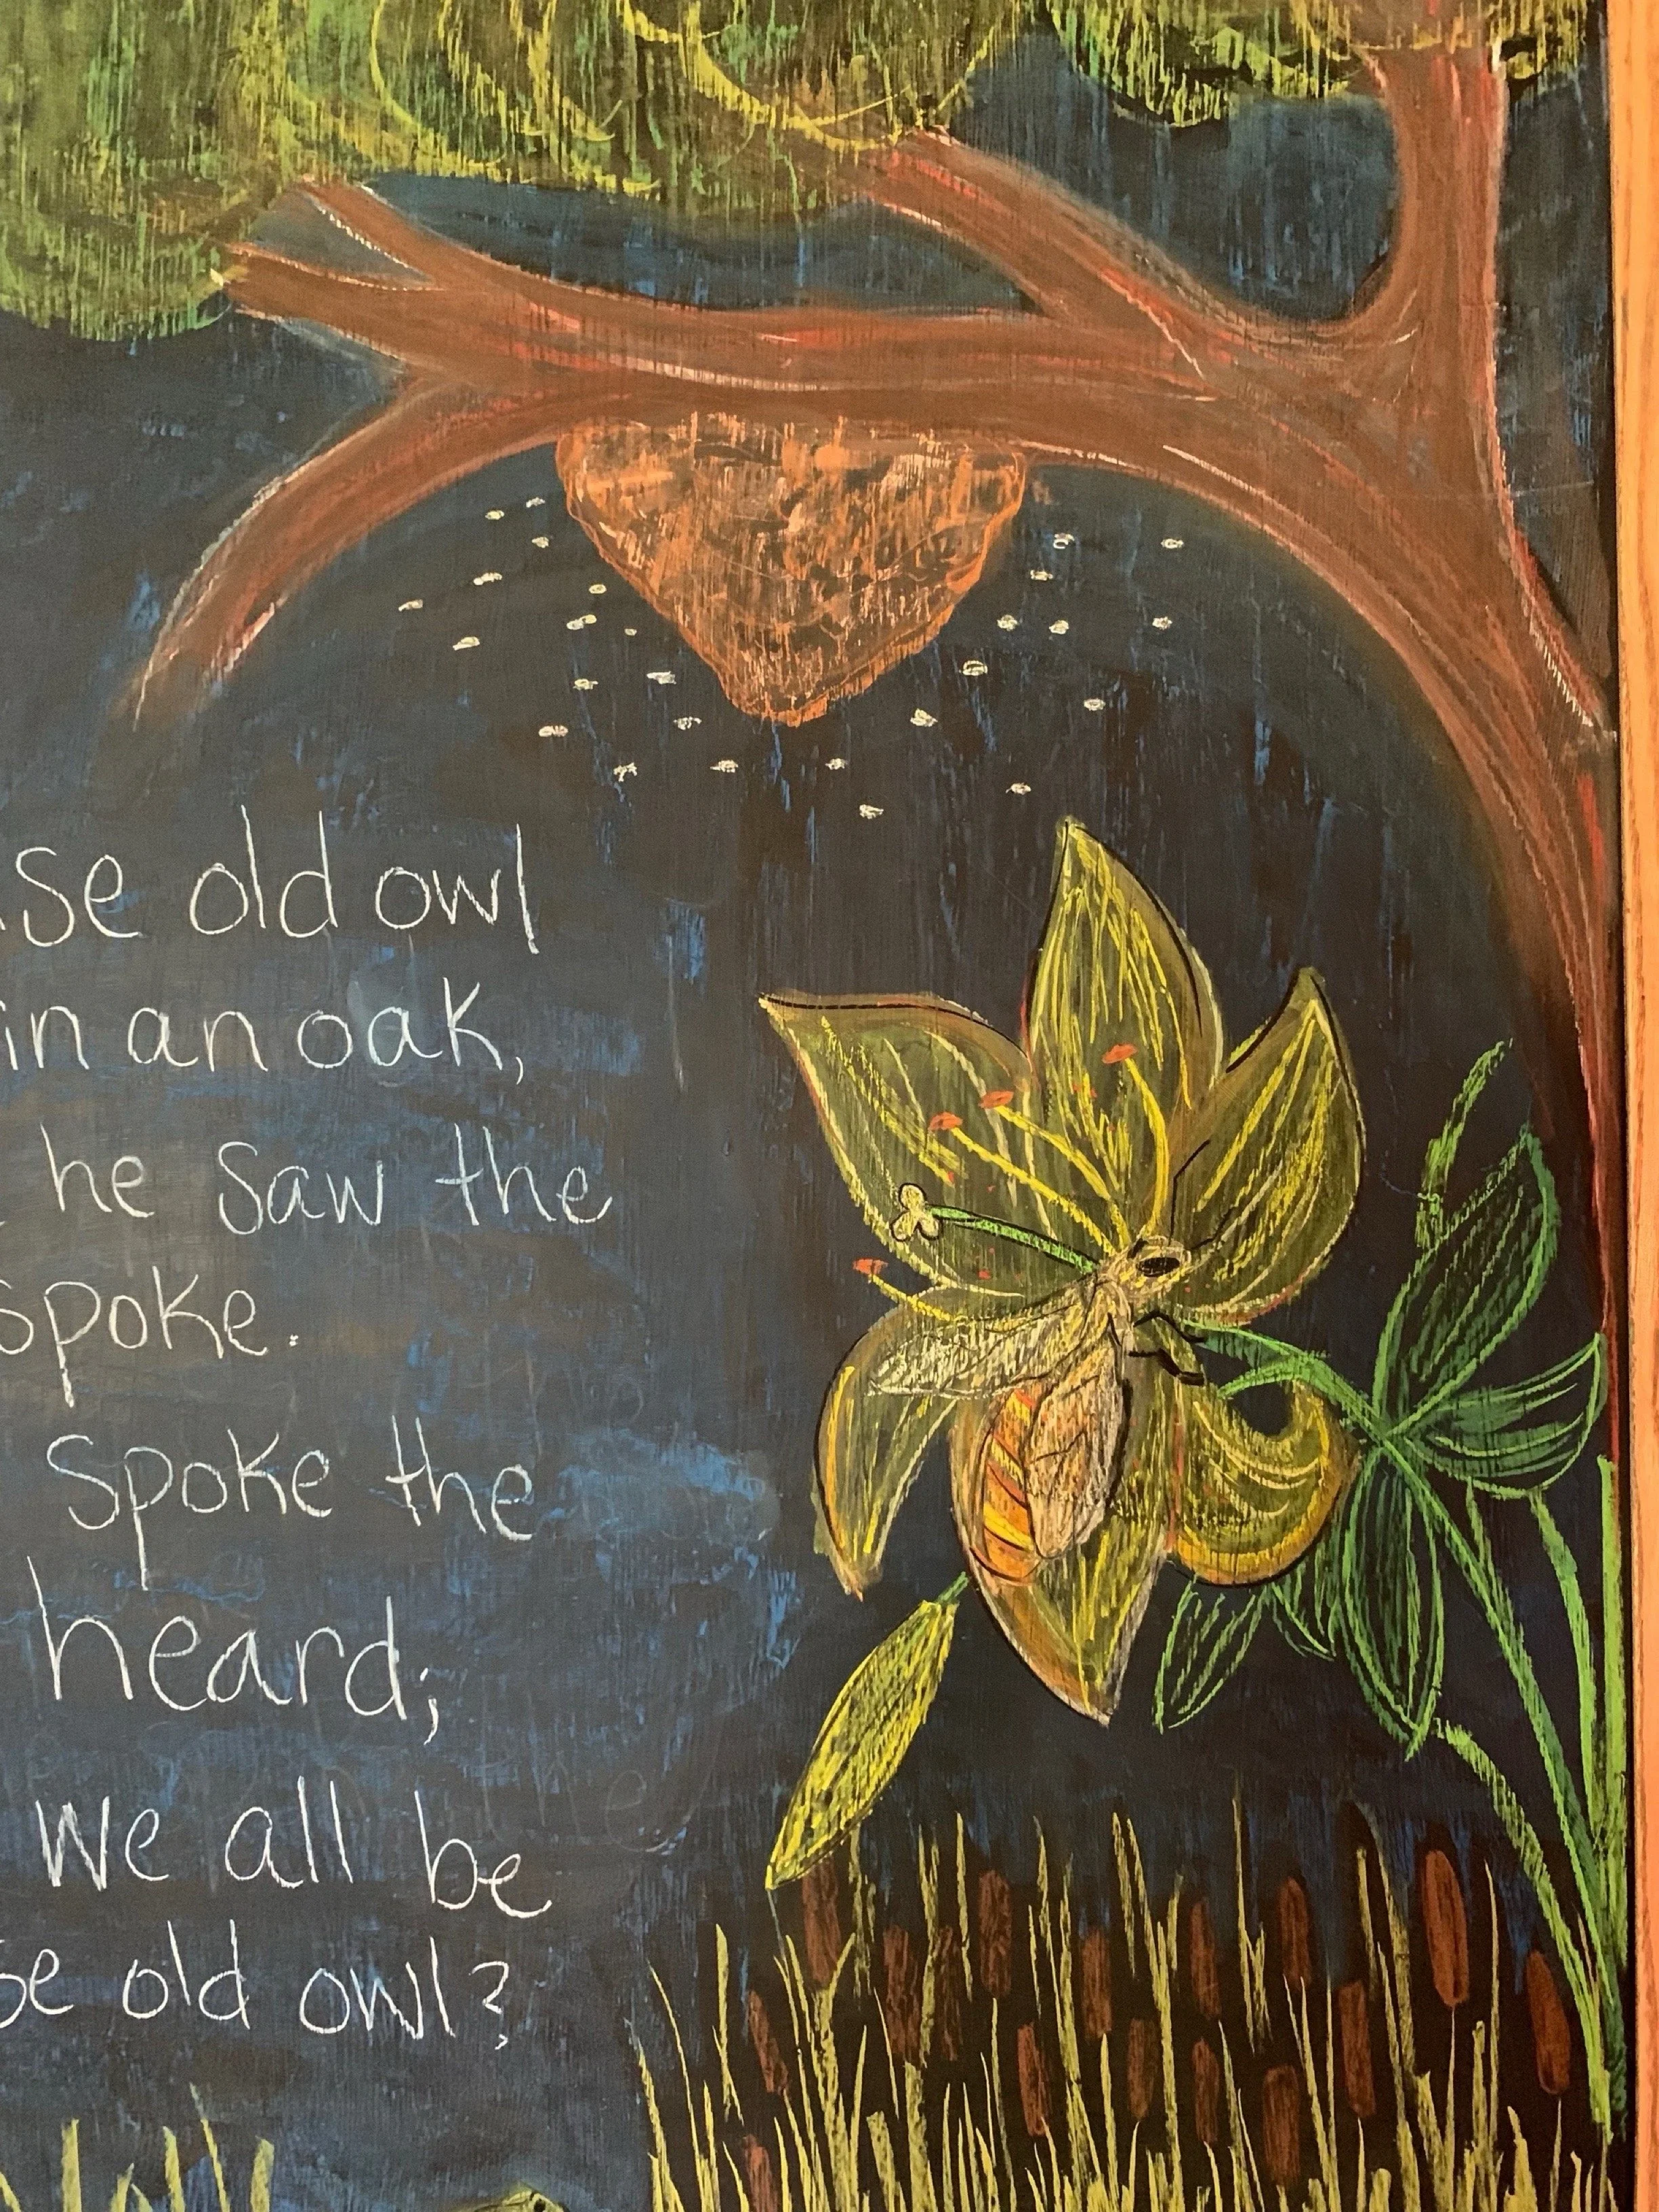
Not every new unit or main lesson blocks gets a new chalk drawing and in some cases, one chalk drawing serves for several units as this one does. This chalk drawing has the image of an owl, the life cycle of a frog and a bee and beehive.
-
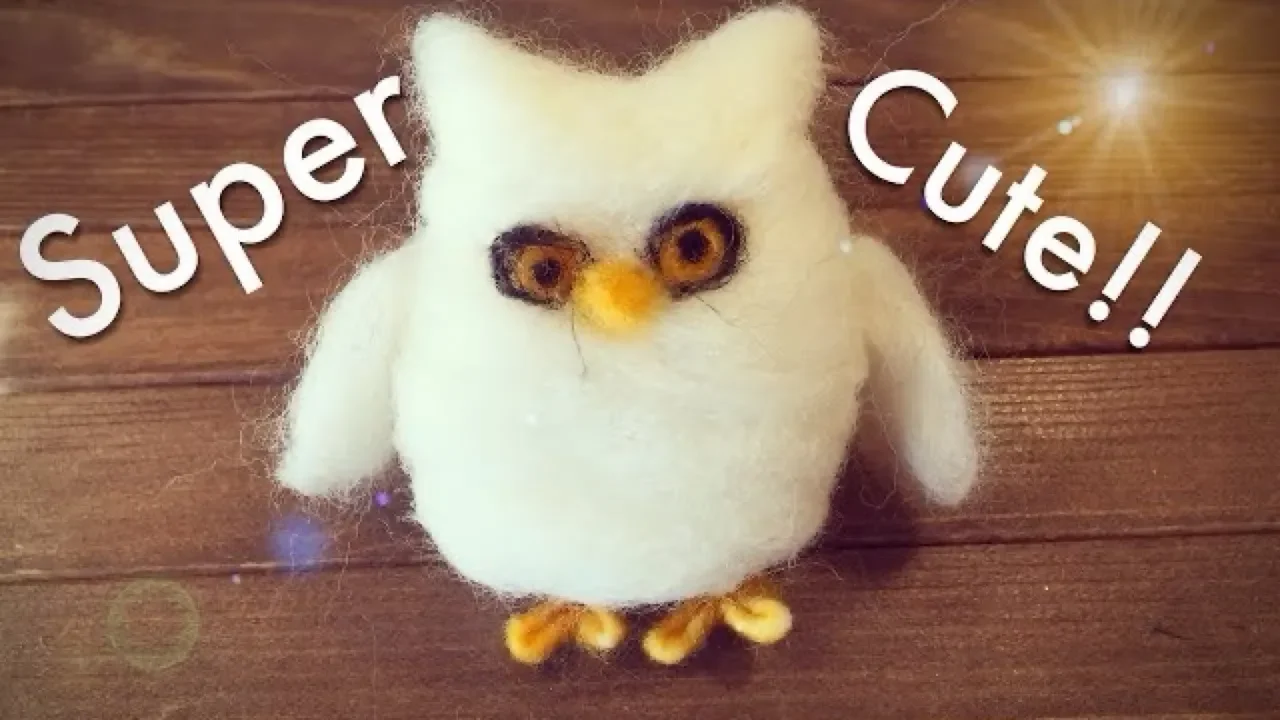
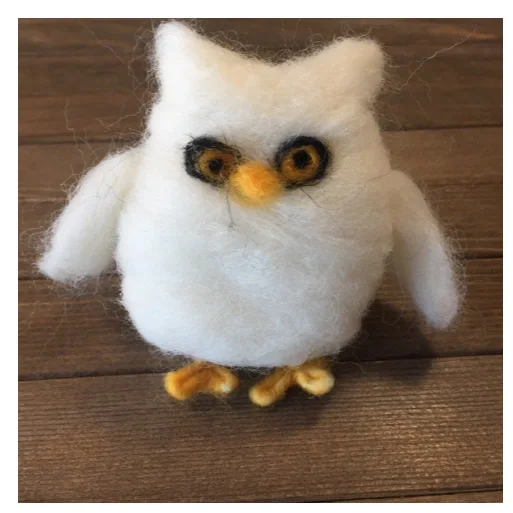
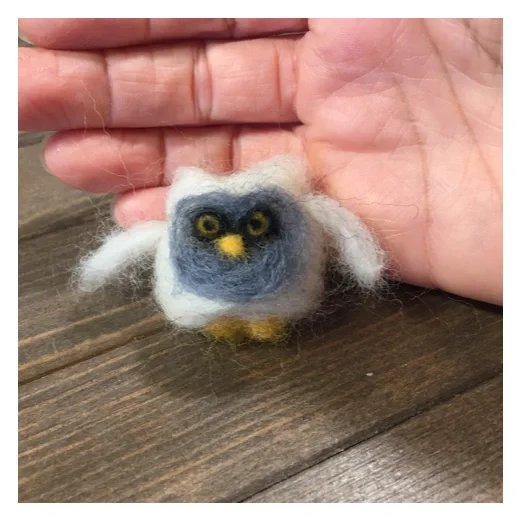
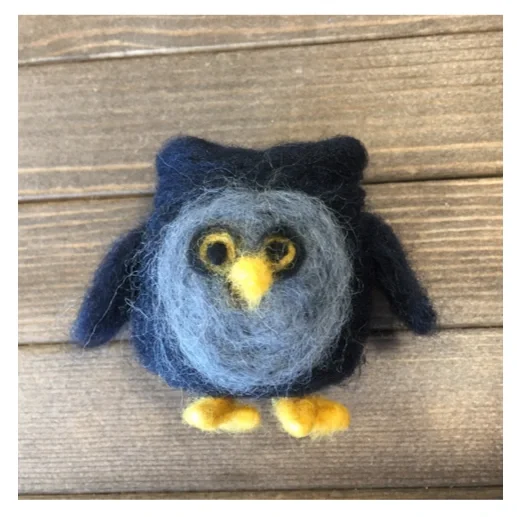
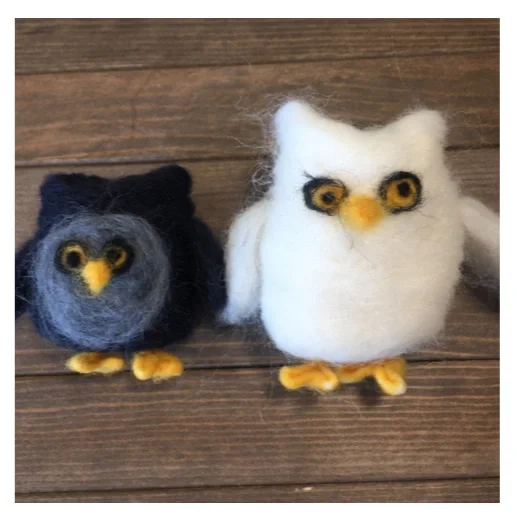
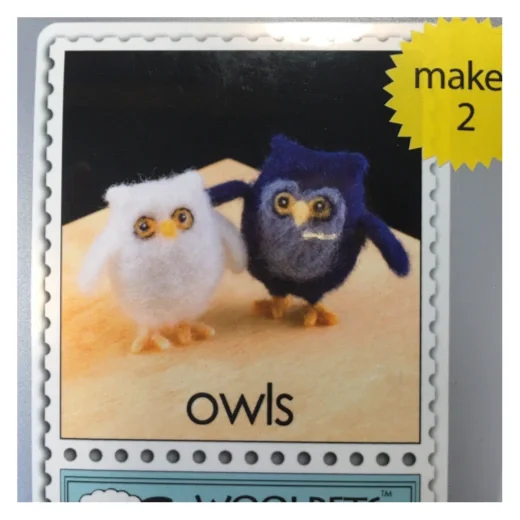
Felting For Beginners | How to Make a Felted Owl
WoolPets are the best kits for beginners looking to try wool felting. The kits are also an amazing value, you can get at least 4 owls from this kit (the package says 2), and if they are a bit smaller, you can get 6 adorable owls :)
-
How to Make Bird Egg Replica | Mini and True to Size
After making egg replicas using chicken eggs, I decided I wanted to make something that was a little more accurate. I wasn't sure how to go about doing this project, but my Instagram family really came through. You always do :)
-
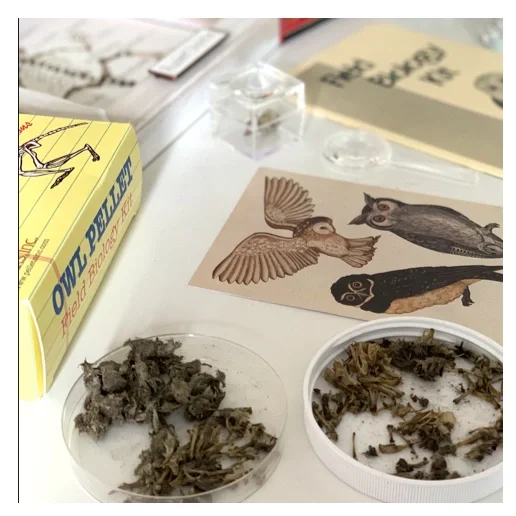
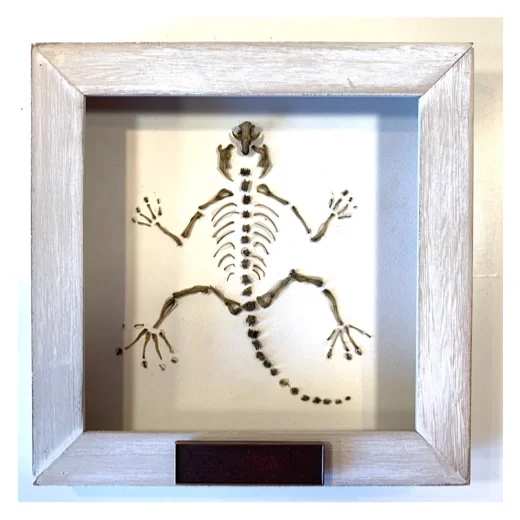
Owl Pellet Dissection | Full Rodent Skeleton
If you’ve never done an owl pellet dissection before, fair warning, it can be hard to stomach this activity. We took this project to the next level by assembling a complete rodent skeleton out of the remains we found in the owl pellet. While that wasn’t our initial intentions, I’m really glad we did so, and I found it to be the most educational part of this project.
-

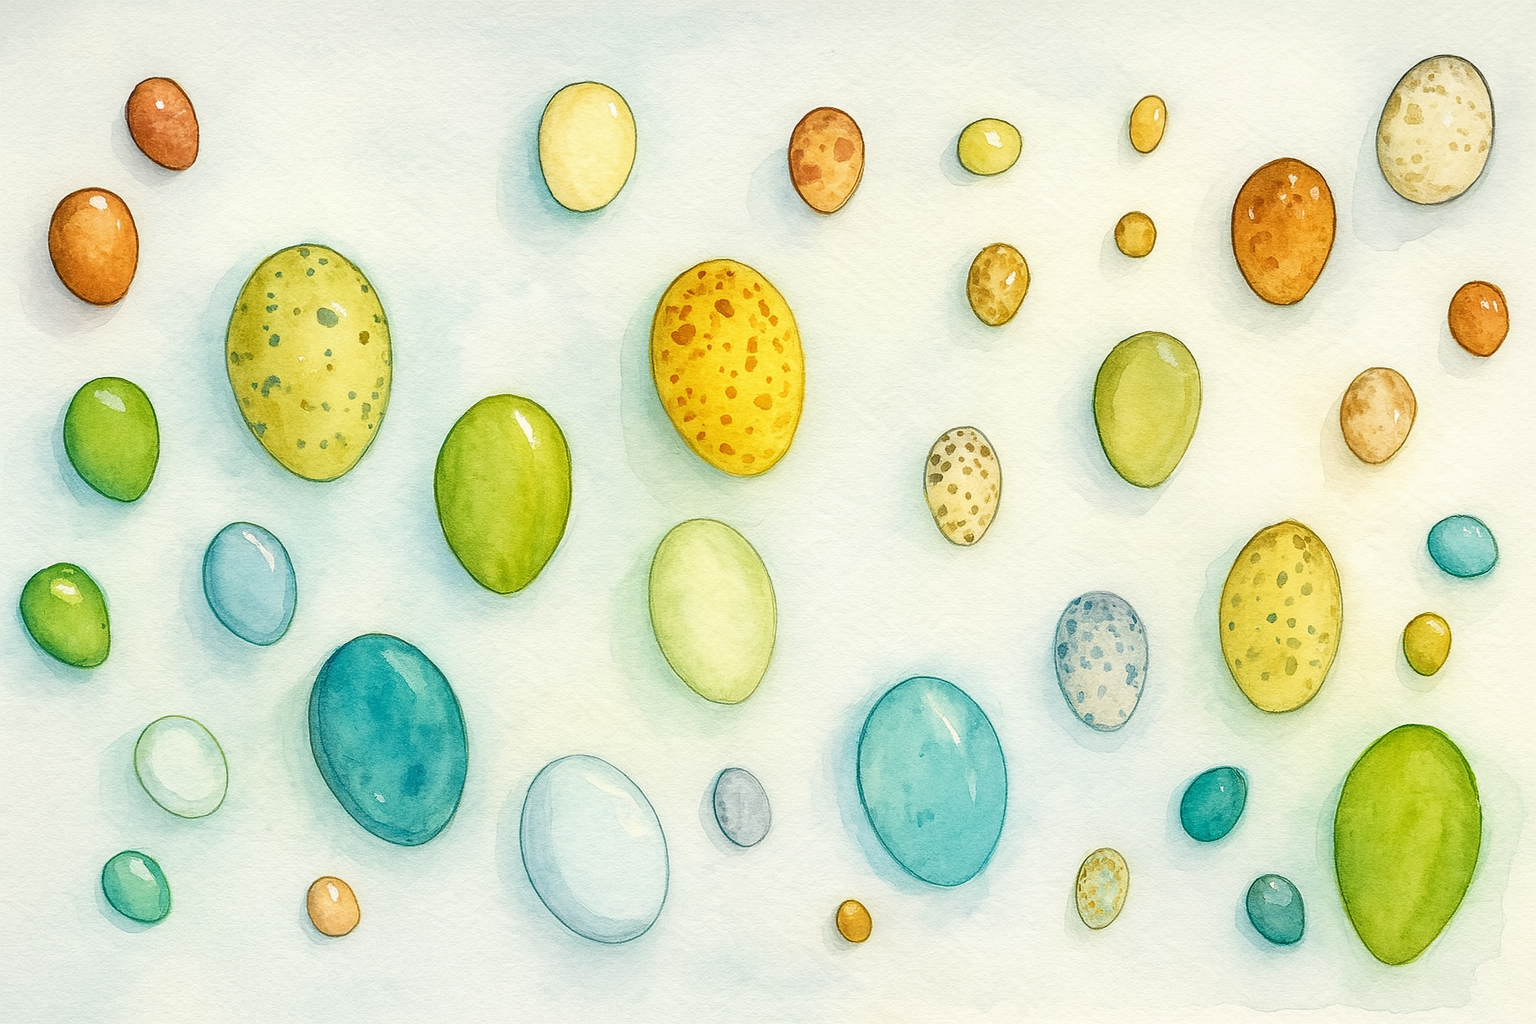
How to Make Bird Egg Replicas
While reading the book Birds, Nests and Eggs by Mel Boring, I had a moment of inspiration and thought it would be a fabulous hands-on project to create egg replicas of the birds we learned about in the book using chicken eggs.
-
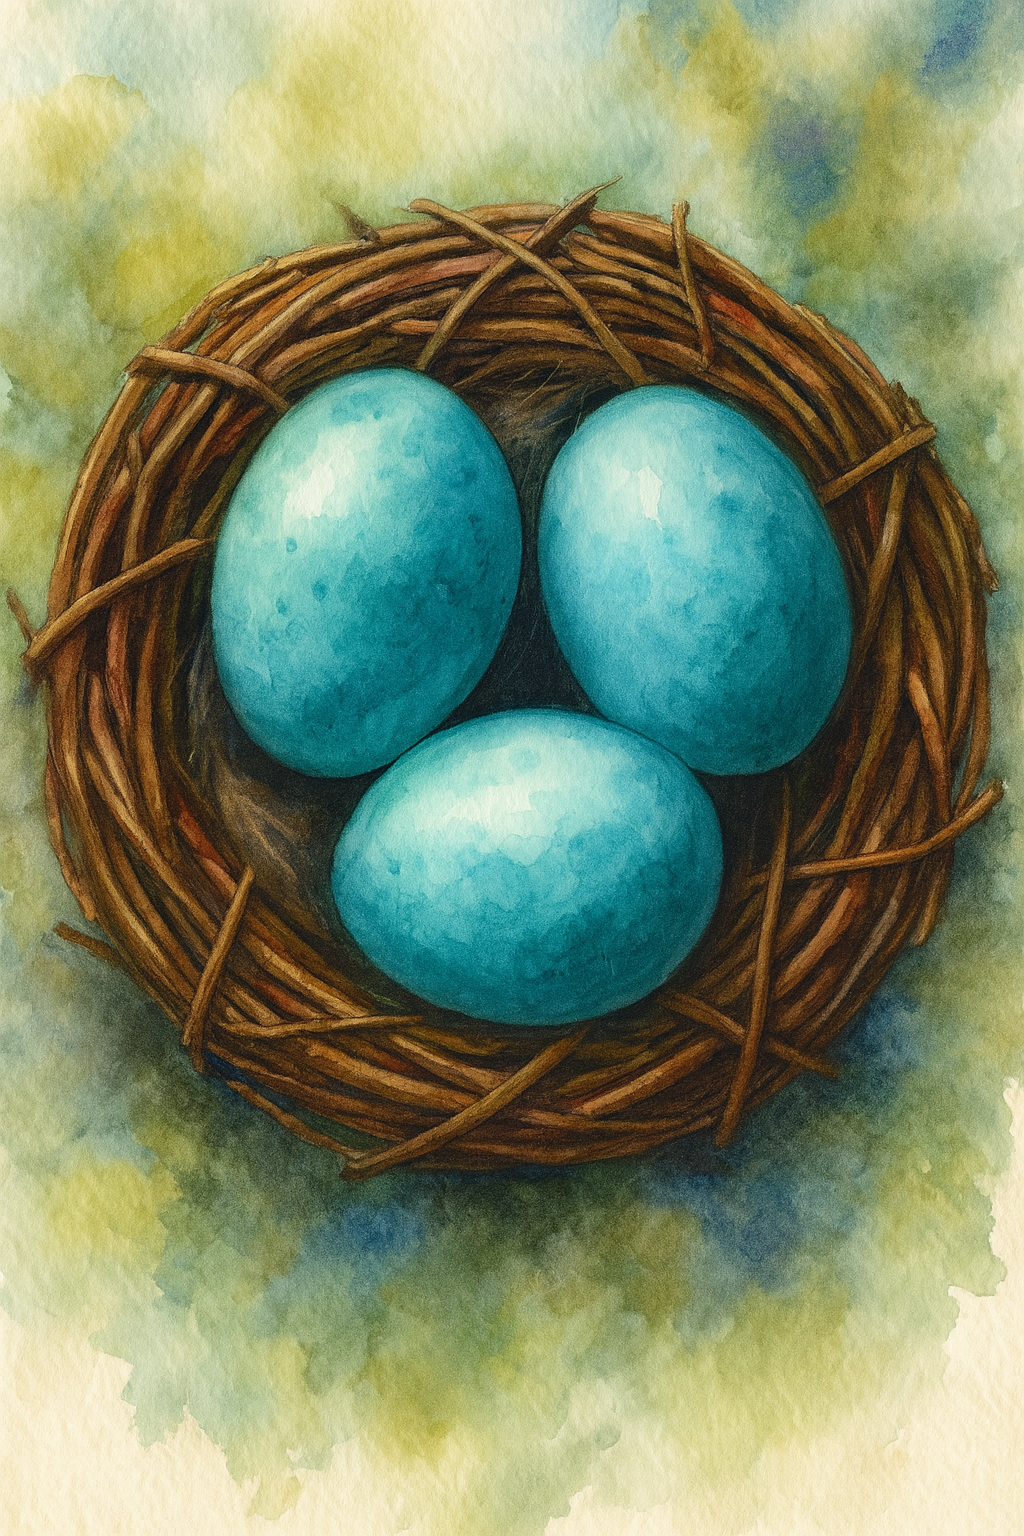
Bird Unit Study | Eggs
Any excuse to pull out our art supplies for a project is a good reason! I love adding art and color to our unit studies, and this is one project I'm sure you'll love to try. This project was inspired by the book An Egg is Quiet by Dianna Aston and Sylvia Long.
-
Trivia Cards For Bird Unit
We love our Professor Noggin's Trivia Cards, so making our own was not just a fun way to make a game we know we'll love but it was also a great way to add essential skills to our lessons: research, synthesis of information, handwriting and drawing.
-
How to Make Bird Egg Replicas
This project was inspired by the book An Egg is Quiet by Dianna Aston and Sylvia Long. It's a beautifully illustrated book with a two-page spread on various eggs in gorgeous watercolors varying in size for accuracy.
-
Bird Unit Study | Art & Science Lesson
There's a difference between an art lesson and an artistic representation of a lesson. Some lessons include narrations or dictation and some lessons include some art or handwork or hands-on project. While these activities always take longer, they are often more impactful, and meaningful.
-

How to Make Nature Study Flashcards | Homeschool Bird Unit Study
For years now I've noticed that our science units lack substantial written narrations. While some of our science units may include a fair amount of writing, most don't and we end up with unit after unit with the same blank main lesson book.
-
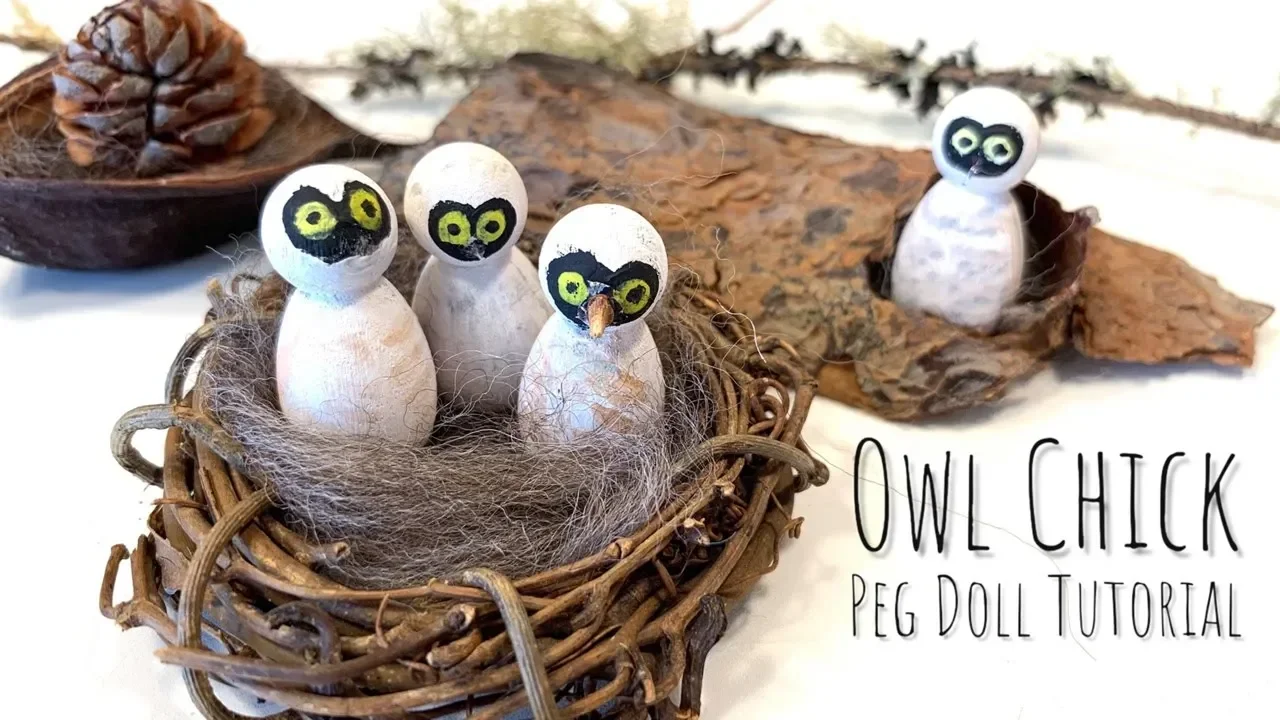
Owl Peg Doll Tutorial
Finding hands-on projects for our unit studies and main lesson blocks brings me so much joy, especially when we can make adorable owl peg dolls like these. They were pretty simple to do, but had their challenges.
-
How to Make Nature Journaling Cards
We're on a roll with these nature cards. But this project is different. This time, because we are at the tail end of our unit (pun intended), I'm the only one who did this project. It's for a couple reasons that I didn't encourage the children to partake in this project.
-
Egg Dissection | Live Homeschool Lesson
Sometimes we overlook the simplest projects because they don't seem obvious. Like this one: An egg dissection. Most of us have and eat eggs so the thought of dissecting one often passes right by us, but what a great, easy and affordable project this is!
-
Owl Feather Watercolor
Whenever possible, I incorporate art into our lessons. It's not a art lesson, rather it's a science lesson that's artistically depicted. Sometimes art is the perfect medium for a lesson and when it comes to nature science, I can't think of a better choice. Each spring, we pull out our nature units, and I find that our main lesson books are either wholly empty or filled with magnificent watercolors.
-
How To Needle Felt A Bird | For Beginners
Needle felting a bird is probably one of the easier animal felting projects you can do. Especially when you felt it out of one large piece of wool batt and simply shape the head rather than needle felting a head separately and adding it on to the body of the bird.
-
Owl Drawing Tutorial
Whenever possible, I incorporate art into our lessons. It's not a art lesson, rather it's a science lesson that's artistically depicted. Sometimes art is the perfect medium for a lesson and when it comes to nature science, I can't think of a better choice.
-
Art and Science
Although I'm not an artist, I still enjoy drawing, painting and other art expressions. But everyone has an inner artist we can all nurture. I wanted to share the tips that might help you enjoy the art process and help you be more satisfied with your artwork.
-

Family Reading Crate | Build Your Library
What if you could cozy up on the couch surrounded by a stunning library and be handed one book after another that is sure to delight you and your kids. Sounds too good to be true? That's exactly what you'll be getting each month with Build Your Library's family book subscription crate.
-
Games and Art | Into the Forest
After many of you saw these Into The Forest game pieces, you asked about the game, where to find it, and if we liked it. The thing is that at the time, we weren't playing the game, we were only uses the beautiful cards for drawing inspiration for our nature studies.
-
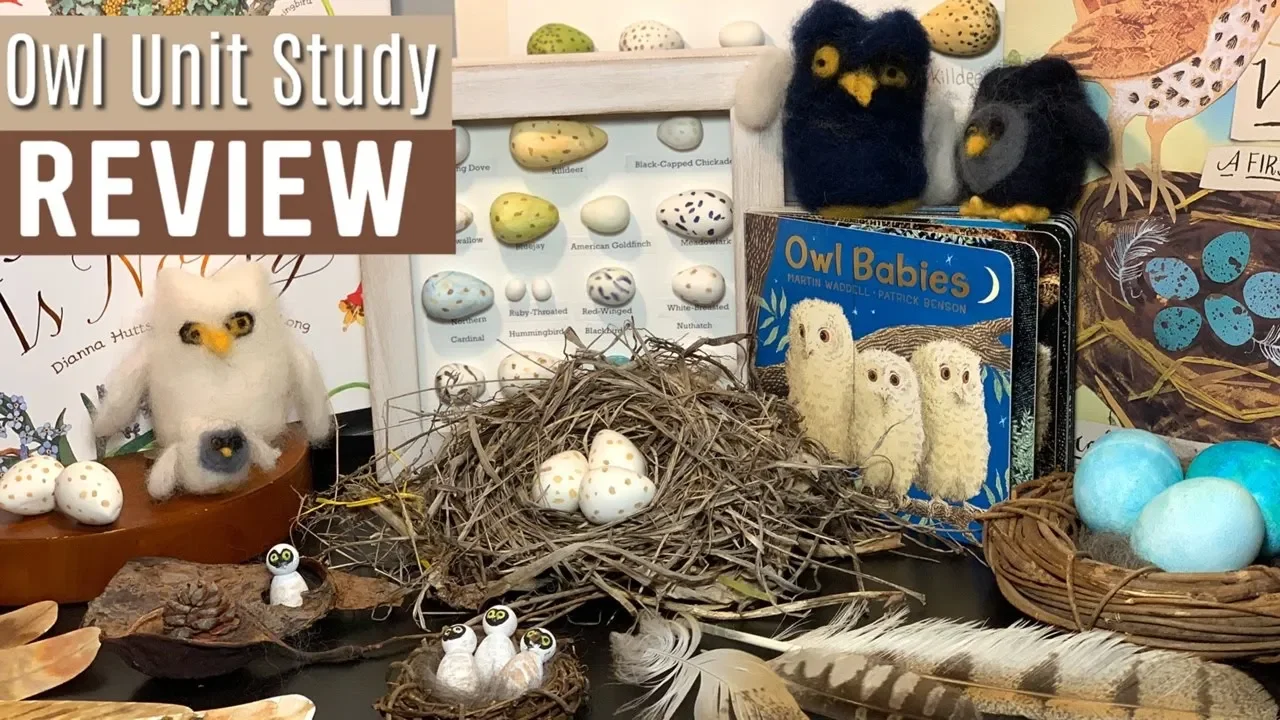
Bird Unit Study Review
There's always one more project I think of when a unit is over, but being able to stop at a high point during a unit is a skill in and of itself that I continually strive for! Now that our unit is officially over and the projects and hands on activities are all complete, it's time to access how everything went.
Bird Unit Study
Homeschool Haul
We’ve come to the end of the school year and with that, the last homeschool haul of the year. While I’ll still have other hauls planned for the following year, they won’t be as extensive as the ones you’ve seen in the past. Needless to say, we have more than enough resources for this year and the years to come, and for next year, we have something different planned with our funding.
Today’s haul is from Rainbow Resource, A Child’s Dream and Amazon.
While some products are new, many are repeats of things we love and have used in the past like the Professor Noggin’s trivia games, the Texas beeswax and the felt, yarn and ribbons from A Child’s Dream.
New for us which I’m excited to try out are the Mushroom kit (we got a similar one from Gardener’s), the Flower Press from A Child’s Dream and the Owl Pellets Kit from Rainbow Resource. These materials will be used for our Spring Nature units as well as our Middle Ages unit.
Why buy books when you can get them from the library? It’s a question I get often, since I tend to buy our books for homeschool rather than check them out from the library. But it wasn’t always like that. I used to check them out from the library in the past, too. Why the change? And is it right for you? In case you don’t know, we homeschool in California through a charter school. Each year we are allocated funding to buy educational supplies or take academic classes. I started buying our homeschool books rather than checking them out from the library when it became increasingly difficult to source all the books I wanted. Not to mention, I couldn’t guarantee I would get all the books in time for our units and main lesson blocks. Then there would be some we wanted to keep longer than the check out period and overall these challenges caused a lot of stress. So, I decided to change all that. I started buying the books we wanted to use for our units, even if we only used them once (though really we’ve used these books multiple times). I found that I could find a wider variety of books from book sellers online than at my local library, even with transfers. Aside from the ease, there’s one more major reason why we buy our books rather than check them out. I love having the opportunity to support these authors, publishers and illustrators. The books I buy are not best sellers, but we need them to be available, and we want more! By my small efforts to support and share them, I hope we keep on getting amazing, beautiful and inspiring books to use in our homeschool.
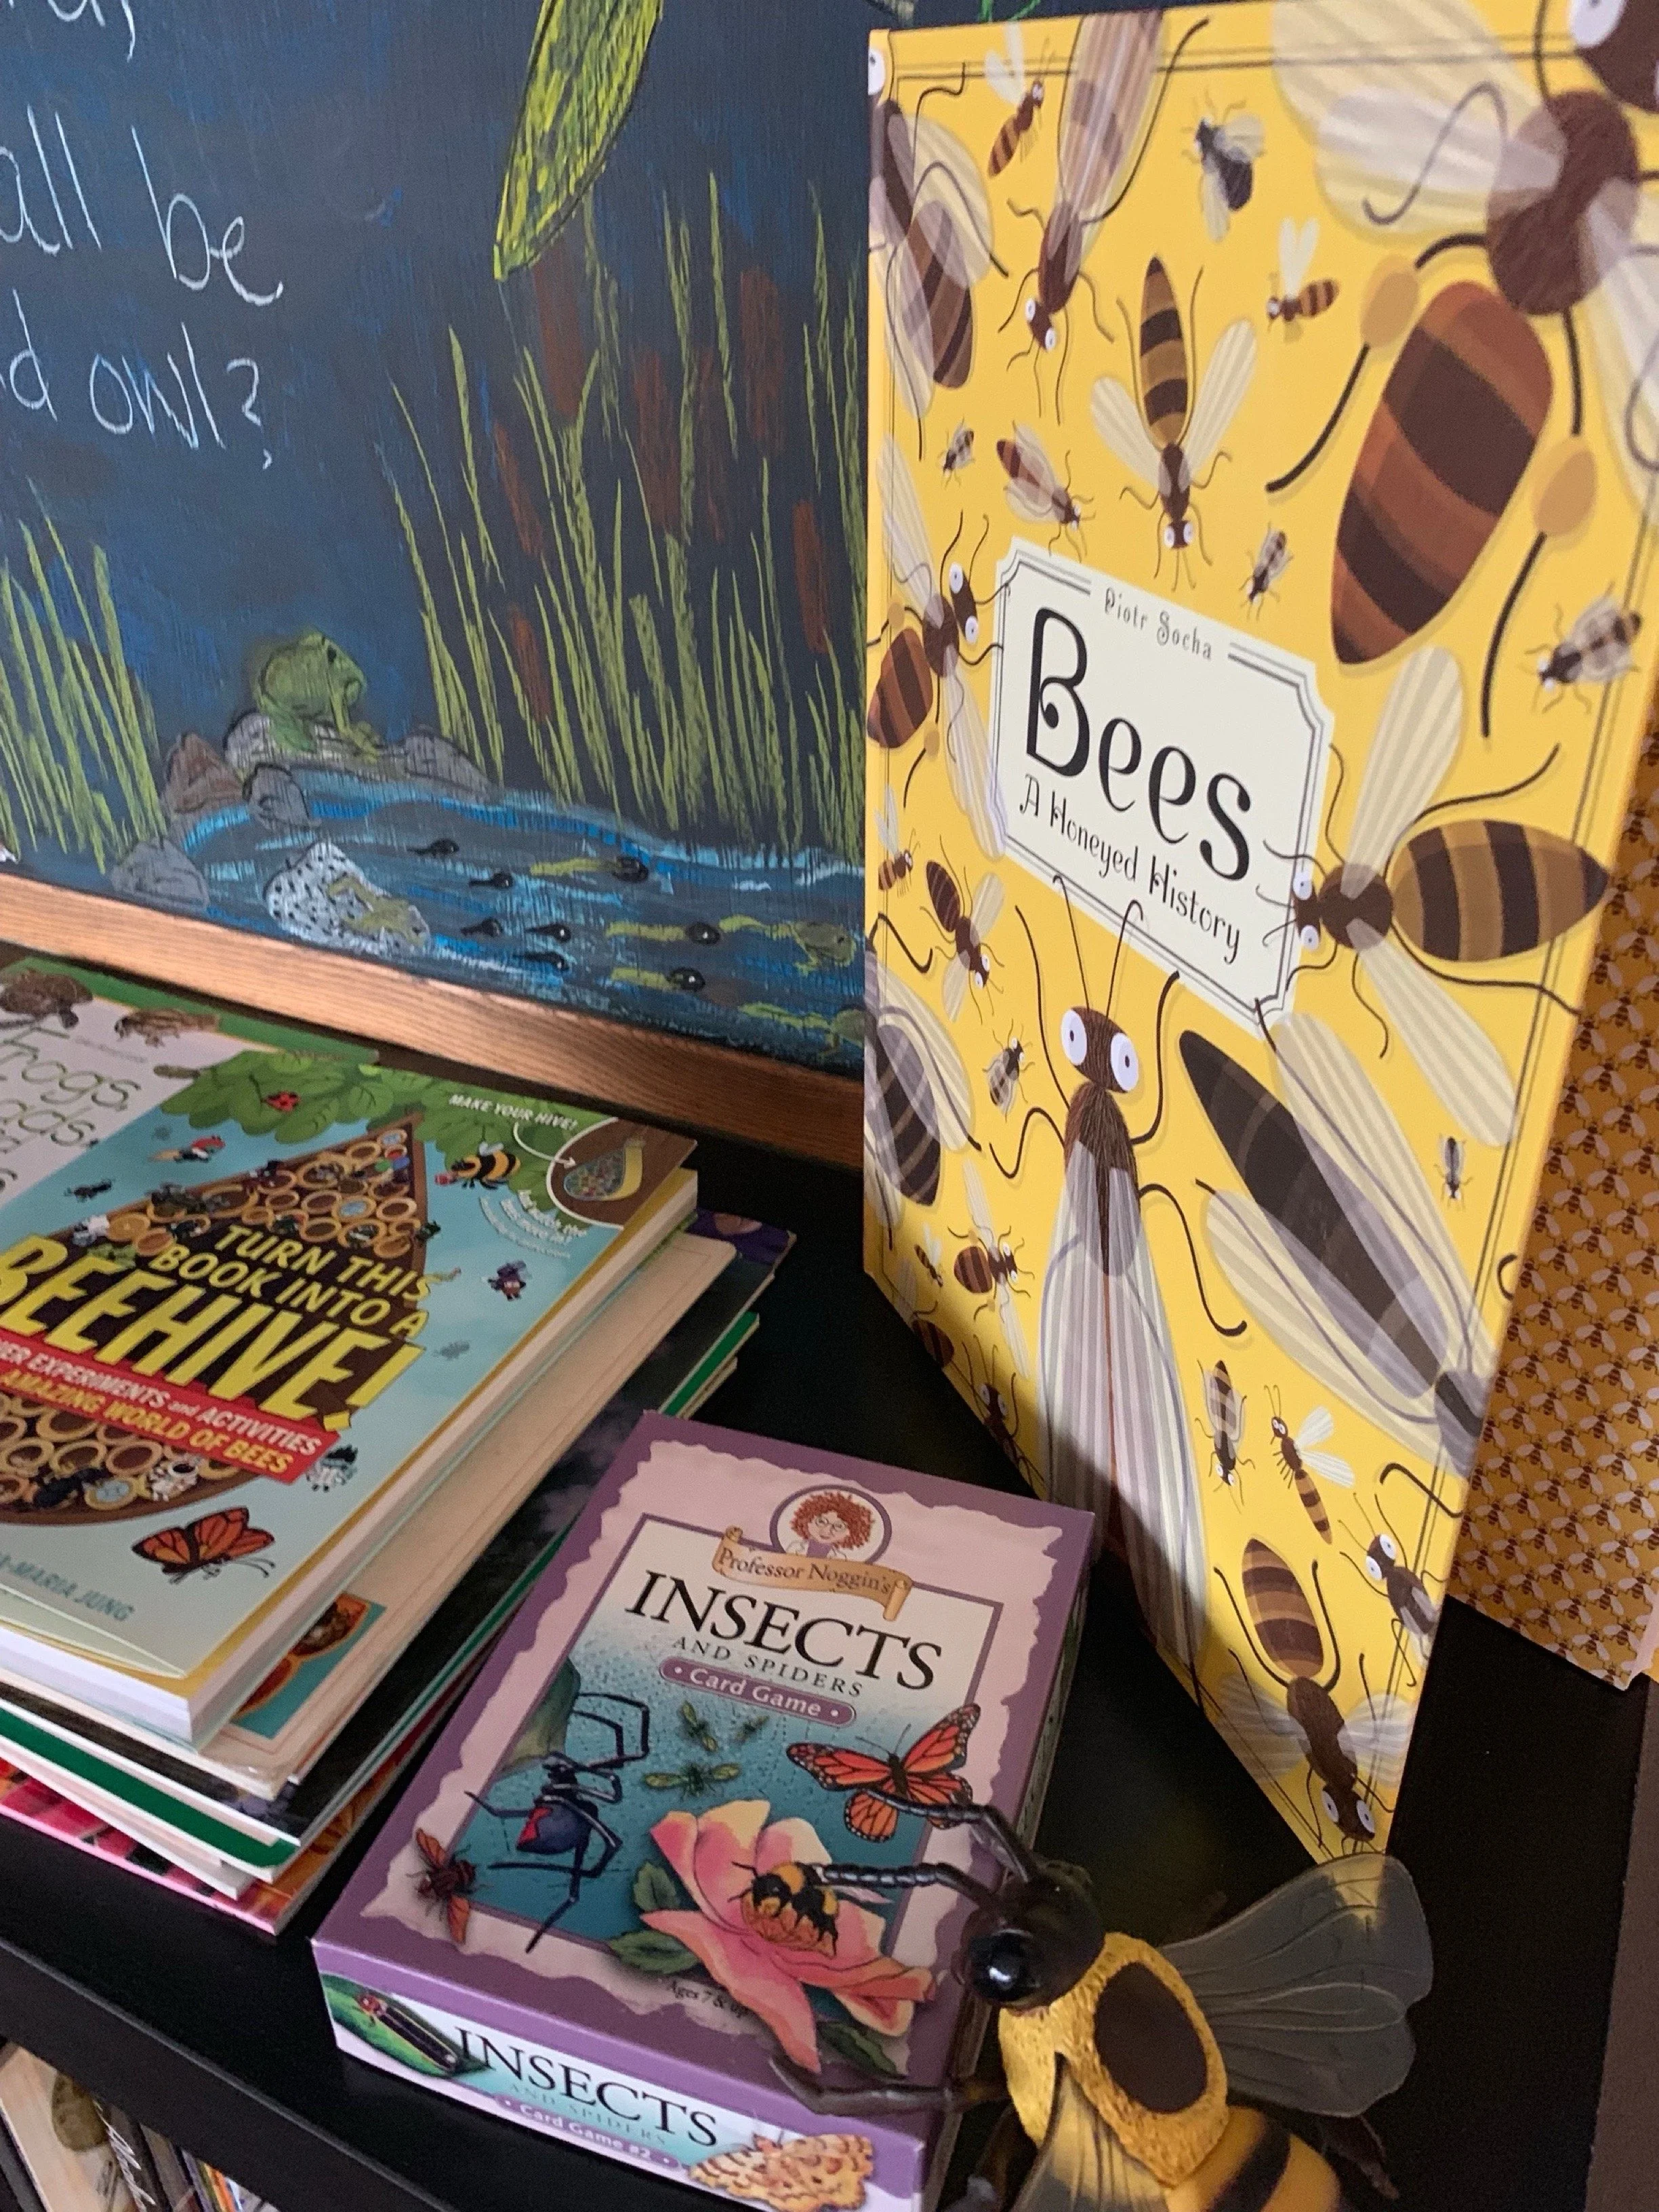
The books today are from Amazon. We bought Bees, A Honeyed History, Sea Bear, Whales, and Illustrated Celebration, Lovely Beasts, and many more.
We plan to use these books for our spring units. While we’ve already done one on Bees and Honey, Botany and Butterflies, if we do anymore lessons in those units, we’ll add the lessons to the video playlist.
If you want to know who inspired part of this book haul, head over to Lacy Arrowsmith’s instagram!
There's always excitement when I put together a new unit. It's the same excitement you might feel at the start of the new homeschool year. I love looking for new resources and assembling a nice balance of books and activities. It's not always fun though. Sometimes I hit creative roadblocks or in other cases, I'm overwhelmed by too many choices.
In general this is what I look for when putting together a unit:
-Non-fiction books with a lot of illustrations or photographs
-Picture books
-Novels or fictions or historical fictions (if it's a history unit) that I can read aloud to my children
-Activity books
-Cookbooks or recipes
-Kits
-Field trip or class opportunities
-Biographies
-Games
For this unit, I also got a set of flashcards that were gorgeous, but I don't know how I'm going to incorporate it into the unit. That happens sometimes, I find things that are beautiful and in the very least, they become drawing inspiration.
For this unit, I had a number books. In fact, most of my units have a lot of books, but for this unit, I didn't have a lot of projects planned and I got no kits except the Owl Dissection Field Biology Kit. Thankfully, a lot of project ideas came from the books we read. I love it when that happens. And thankfully, we have a lot of creative art supplies on hand, so when the inspiration hit, we were ready!
You can see the other projects for our Owl Unit Study.
Check out the complete Bird Unit Study playlist.
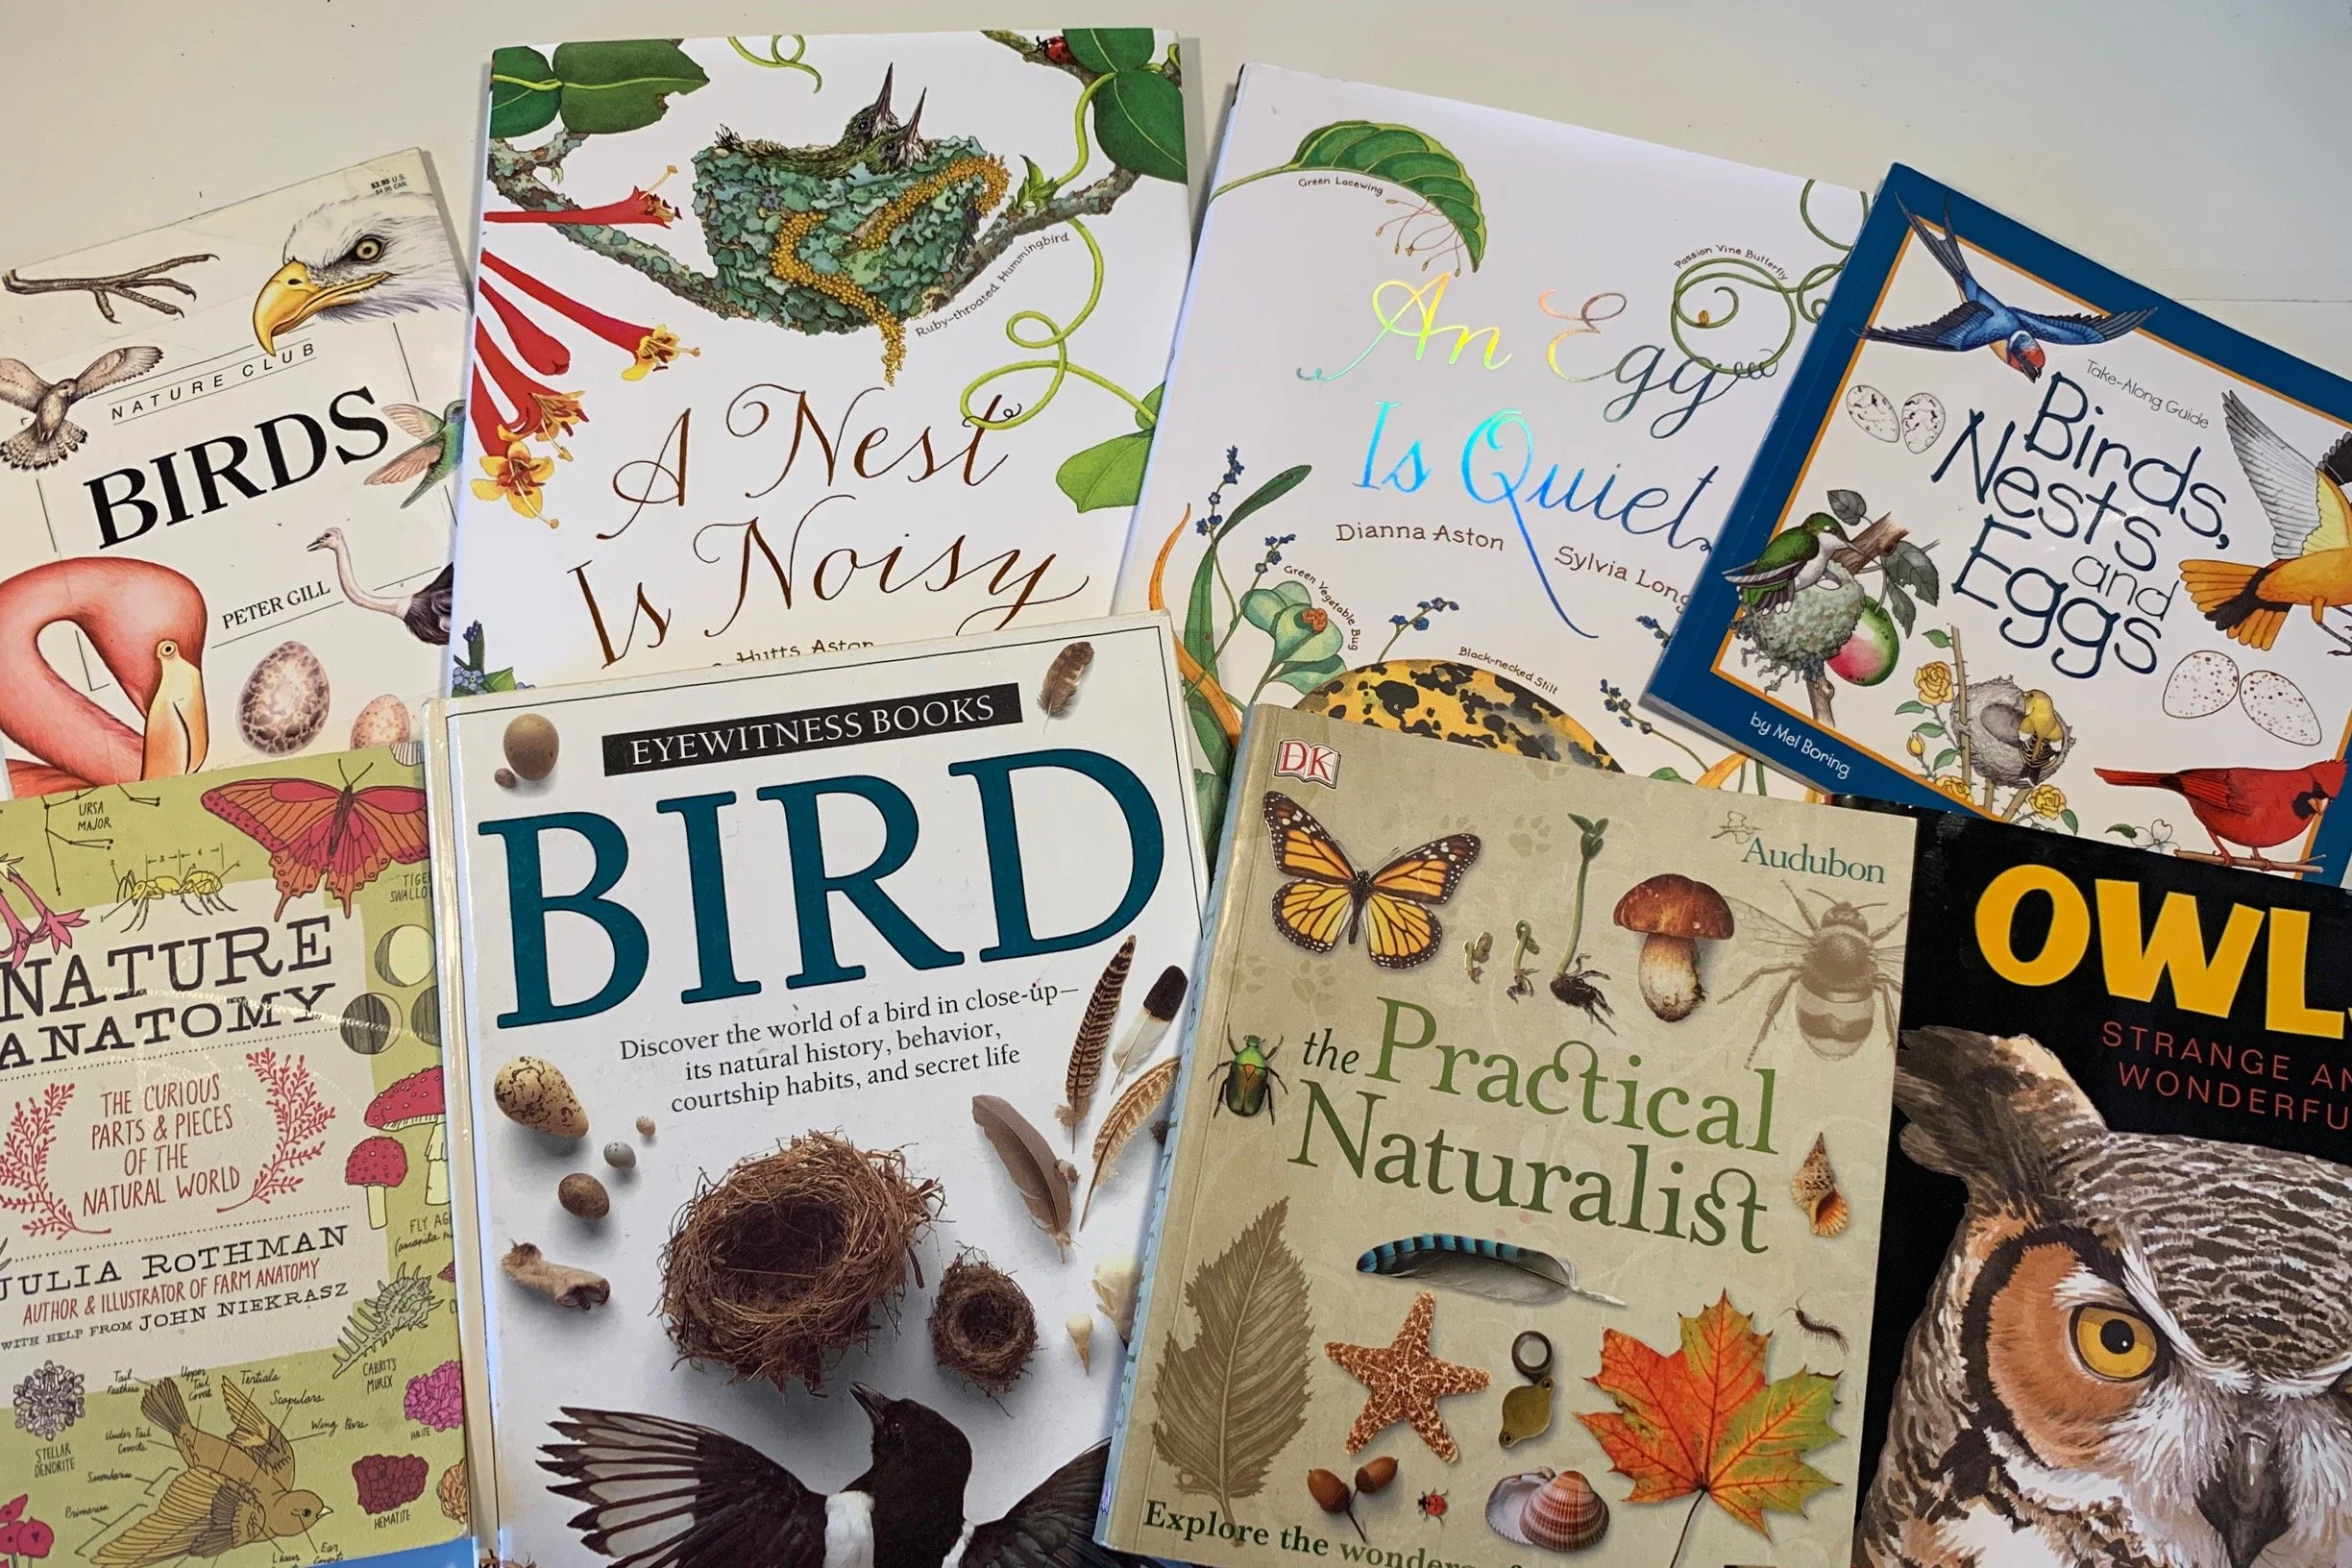
Here's a list of the books we used for this unit:
Birds, Nests and Eggs by Mel Boring,
A Nest is Noisy by Dianna Aston,
Arrowhawk A True Survival Story by Gabi Swiatkowska,
The Desperate Adventures of Zeno and Alya by Jane Kelley,
An Egg is Quiet by Dianna Aston,
Outside Your Window First Book of Nature by Nicola Davies,
Summer Birds: The Butterflies of Maria Merian by Margarita Engle,
United Tweets of America: 50 State Birds Their Stories,
Their Glories by Hudson Talbott,
Nature Anatomy: The Curious Parts and Pieces of the Natural World by Julia Rothman,
Practical Naturalists by DK Publishing,
Curiositree: Natural World: A Visual Compendium of Wonders from Nature by AJ Wood,
The Spider and the Doves: The Story of the Hijra by Farah Morley, Birds by Peter Gill.
We also used Professor Noggin's Birds of North America Trivia game and Sibley Backyard Birding Flashcards: 100 Common Birds of Eastern and Western North America, as well as Animalium postcards.
Check out our complete Owl Unit Study with videos on how we put this unit together, the resources we used and the projects we did. You can also check out our larger Bird Unit Study which includes more projects and resources.
How to put Together a Unit Study
Birds


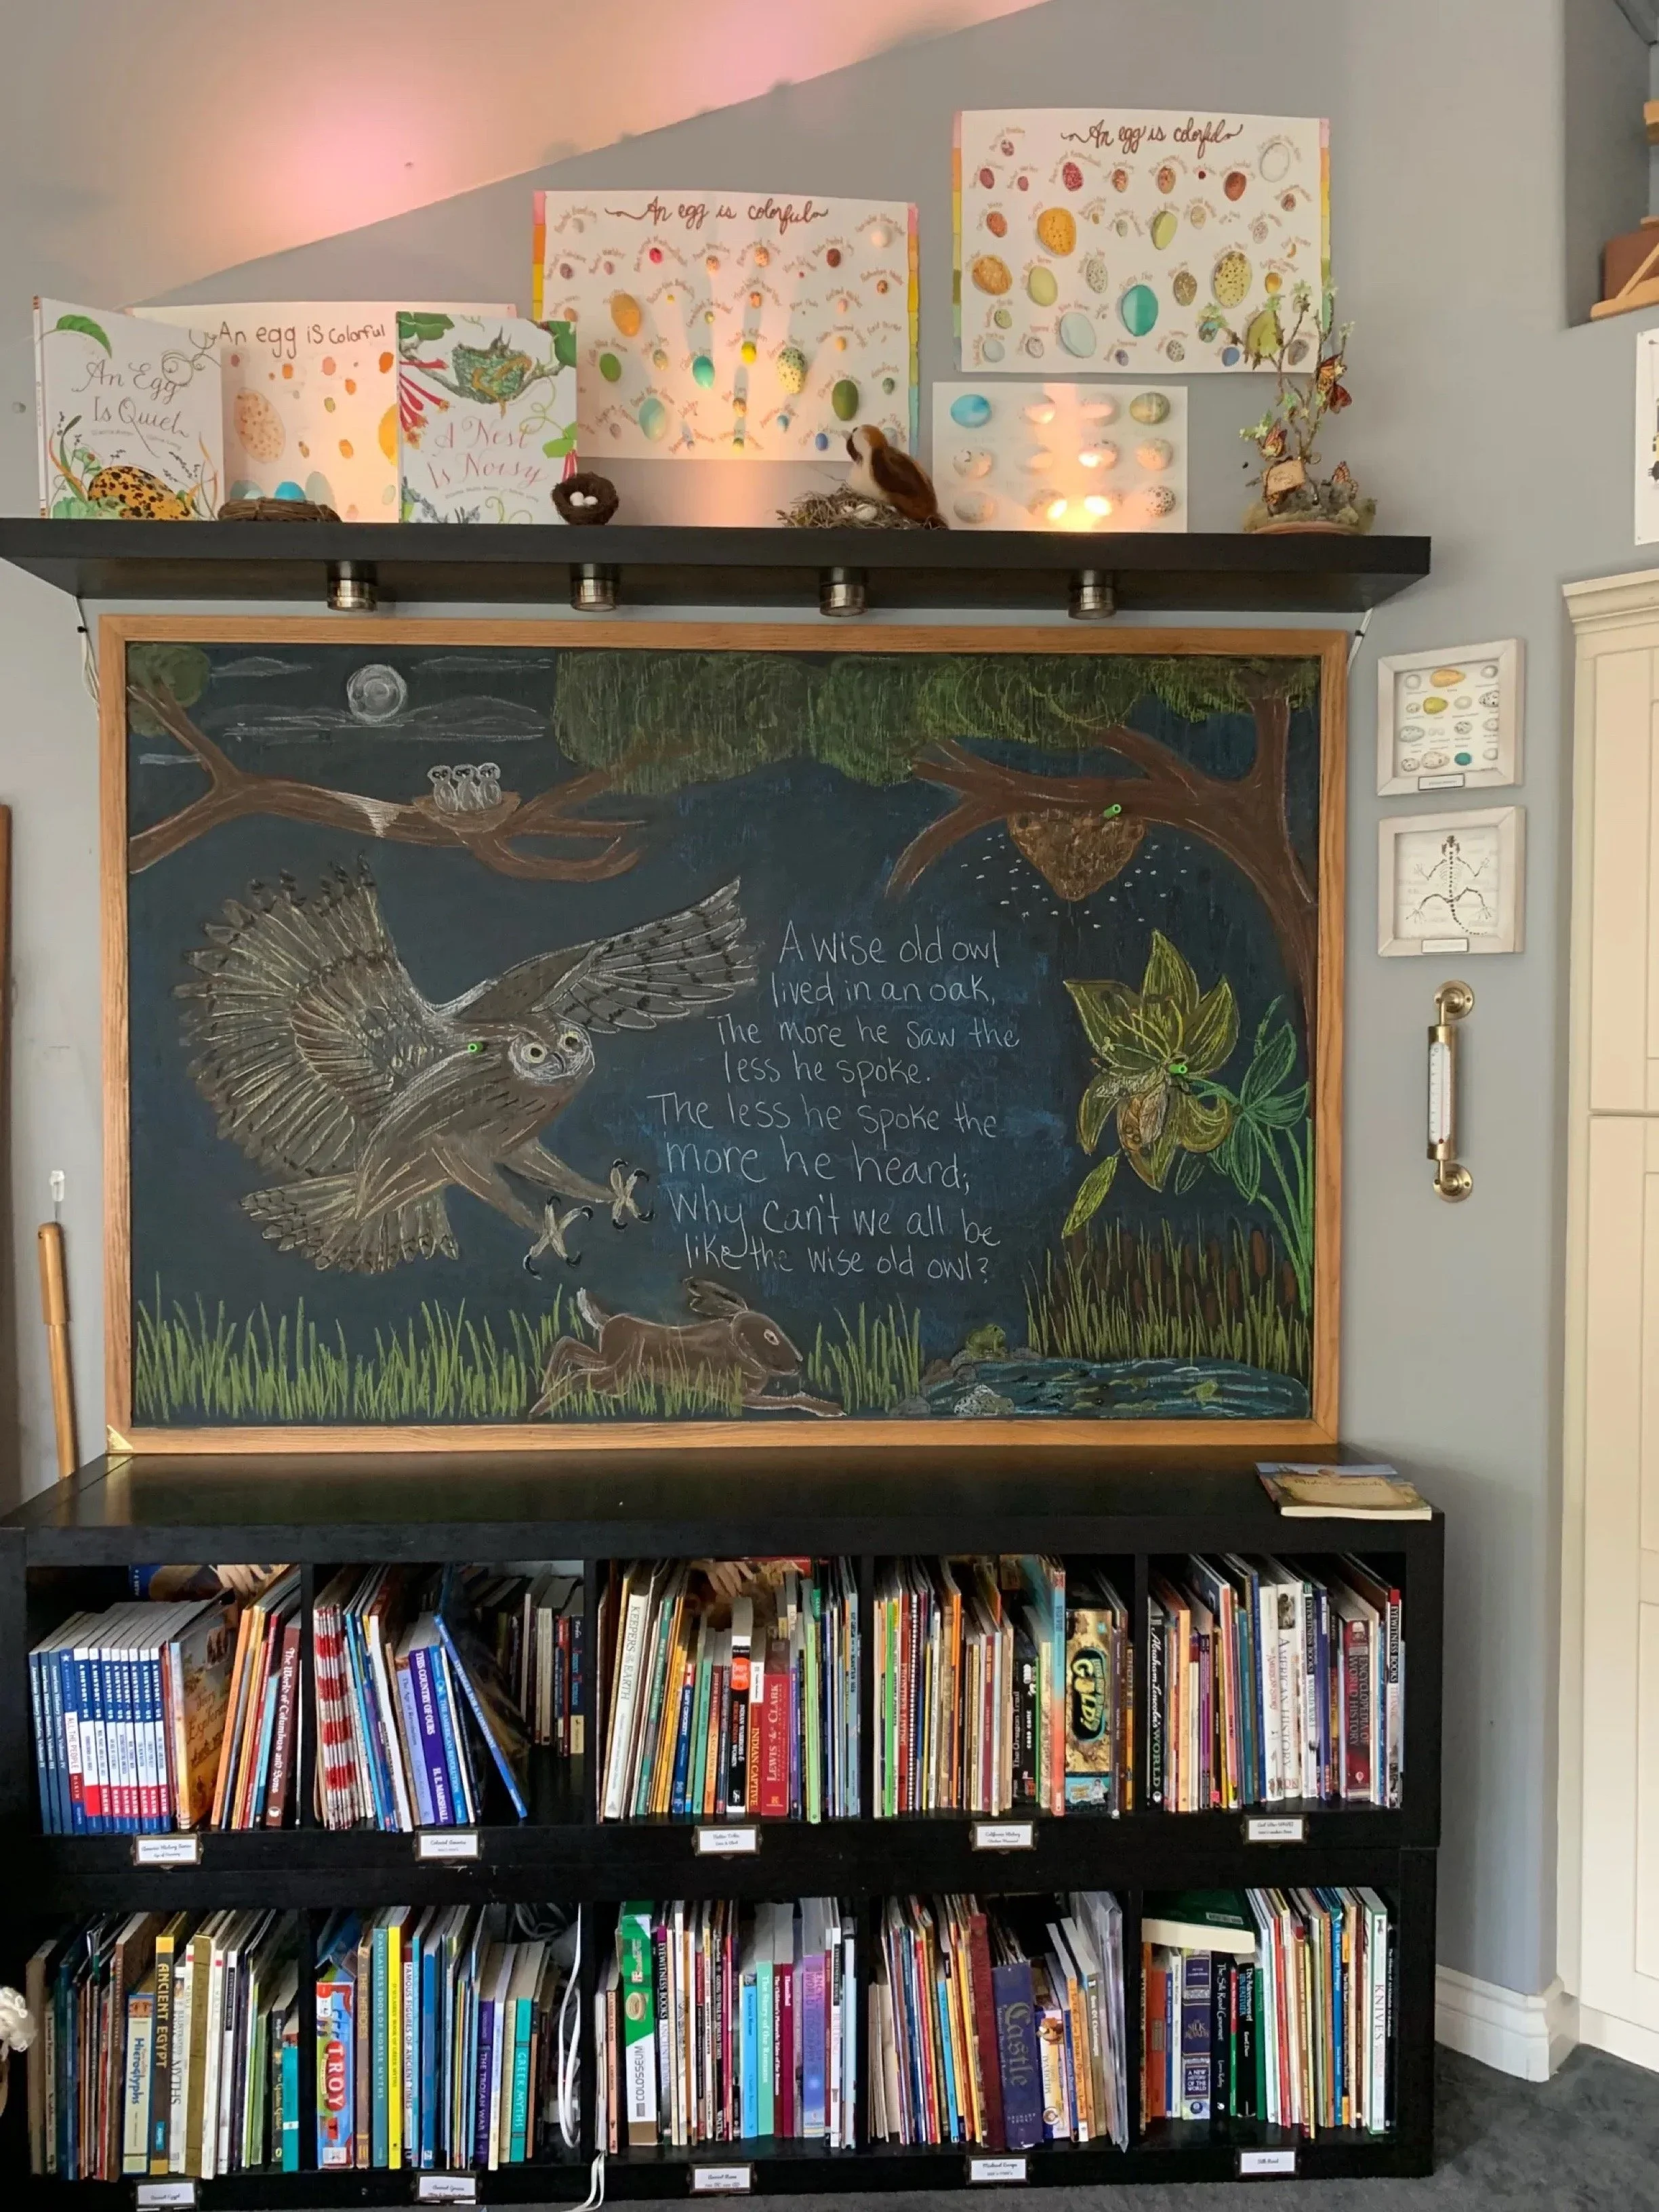
Chalk Drawing
Not every new unit or main lesson blocks gets a new chalk drawing and in some cases, one chalk drawing serves for several units as this one does. This chalk drawing has the image of an owl, the life cycle of a frog and a bee and beehive. While it's not my favorite chalk drawing, I think it serves the purpose of inspiring us throughout this unit and adds beauty to our homeschool space. Collected around the chalk drawing are the books and resources we'll be using for this series of units.
While this part of the chalk drawing only took 20 minutes, the owl took 65 minutes and the life cycle of a frog took 20 minutes bringing the grand total for this chalk drawing at 1 hour and 45 minutes. That may not seem too bad for a 4' by 6' drawing, but compared to other images, it was. Also, I can't say I love the bee part!! I do wish I would have made a hexagon pattern with a bee in the beehive. But there's always next time!
For this drawing, I used by Sargent Art Square Chalk Pastels as well as a number of resources as drawing inspiration. Materials for this unit were purchased using charter school funds and were purchased from Acorn Naturalists and Nature-Watch. Art materials were purchased from Waldorf Supplies and A Child's Dream.


How to Make a Felted Owl
WoolPets are the best kits for beginners looking to try wool felting. The kits are also an amazing value, you can get at least 4 owls from this kit (the package says 2), and if they are a bit smaller, you can get 6 adorable owls :)
Check out our Owl Unit Study for more projects and activities:
You can this kit and others at A Child's Dream.
You can also find them at Rainbow Resource.
The wool in this kit is the softest I've used. The projects are as mentioned, with this intermediate project really being for someone who's tried needle felting before.
The only thing you'll want to buy is a foam pad. It can find them at Jo-Ann and other fabric stores.
Give this project a try! It's perfect for a cold winter day :)
Though we didn’t pick up this kit with our supplies we got for our kindergarten curriculum recently, we did intend to add it to the KG schedule. Originally I had intended to make these owls with my 10 year old 5th grader for my kindergartener to play with, but before I had completed the set up for this project, my five year old had removed the directions, and make her own! I was really impressed. She did fantastic! So even though the package indicated this project is for 10 year olds and up, you can certainly modify it for a younger child.
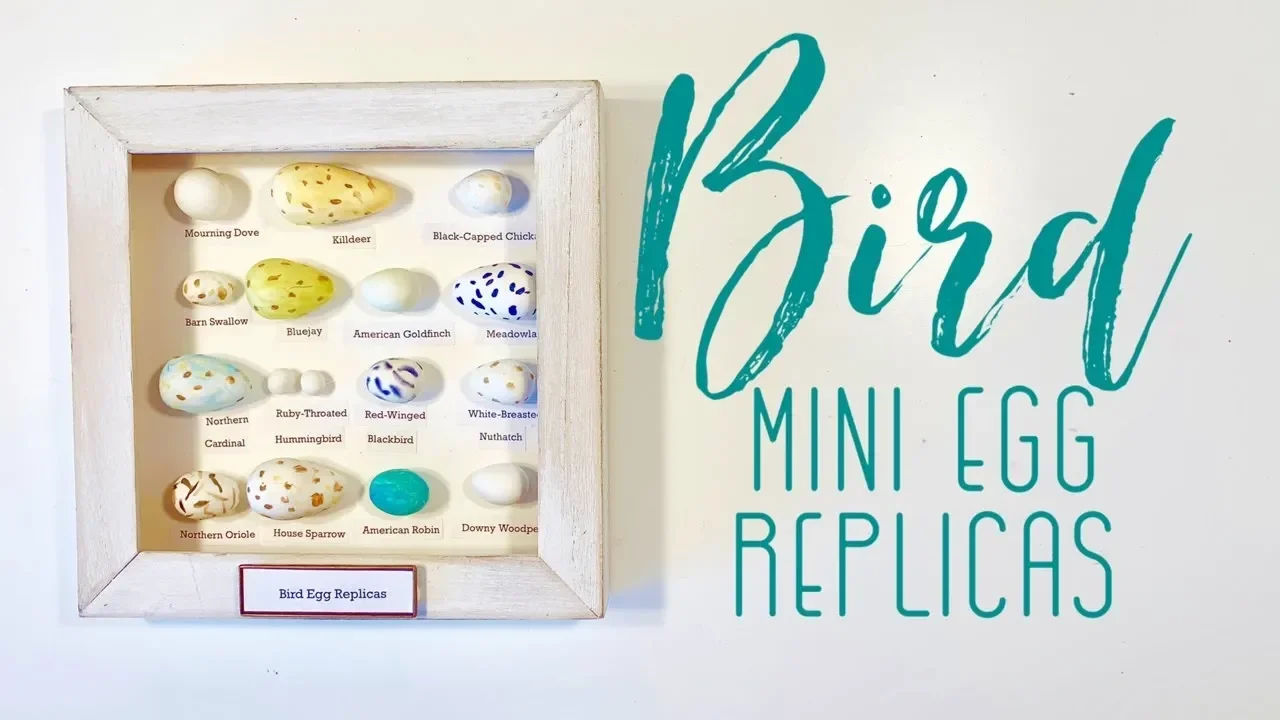
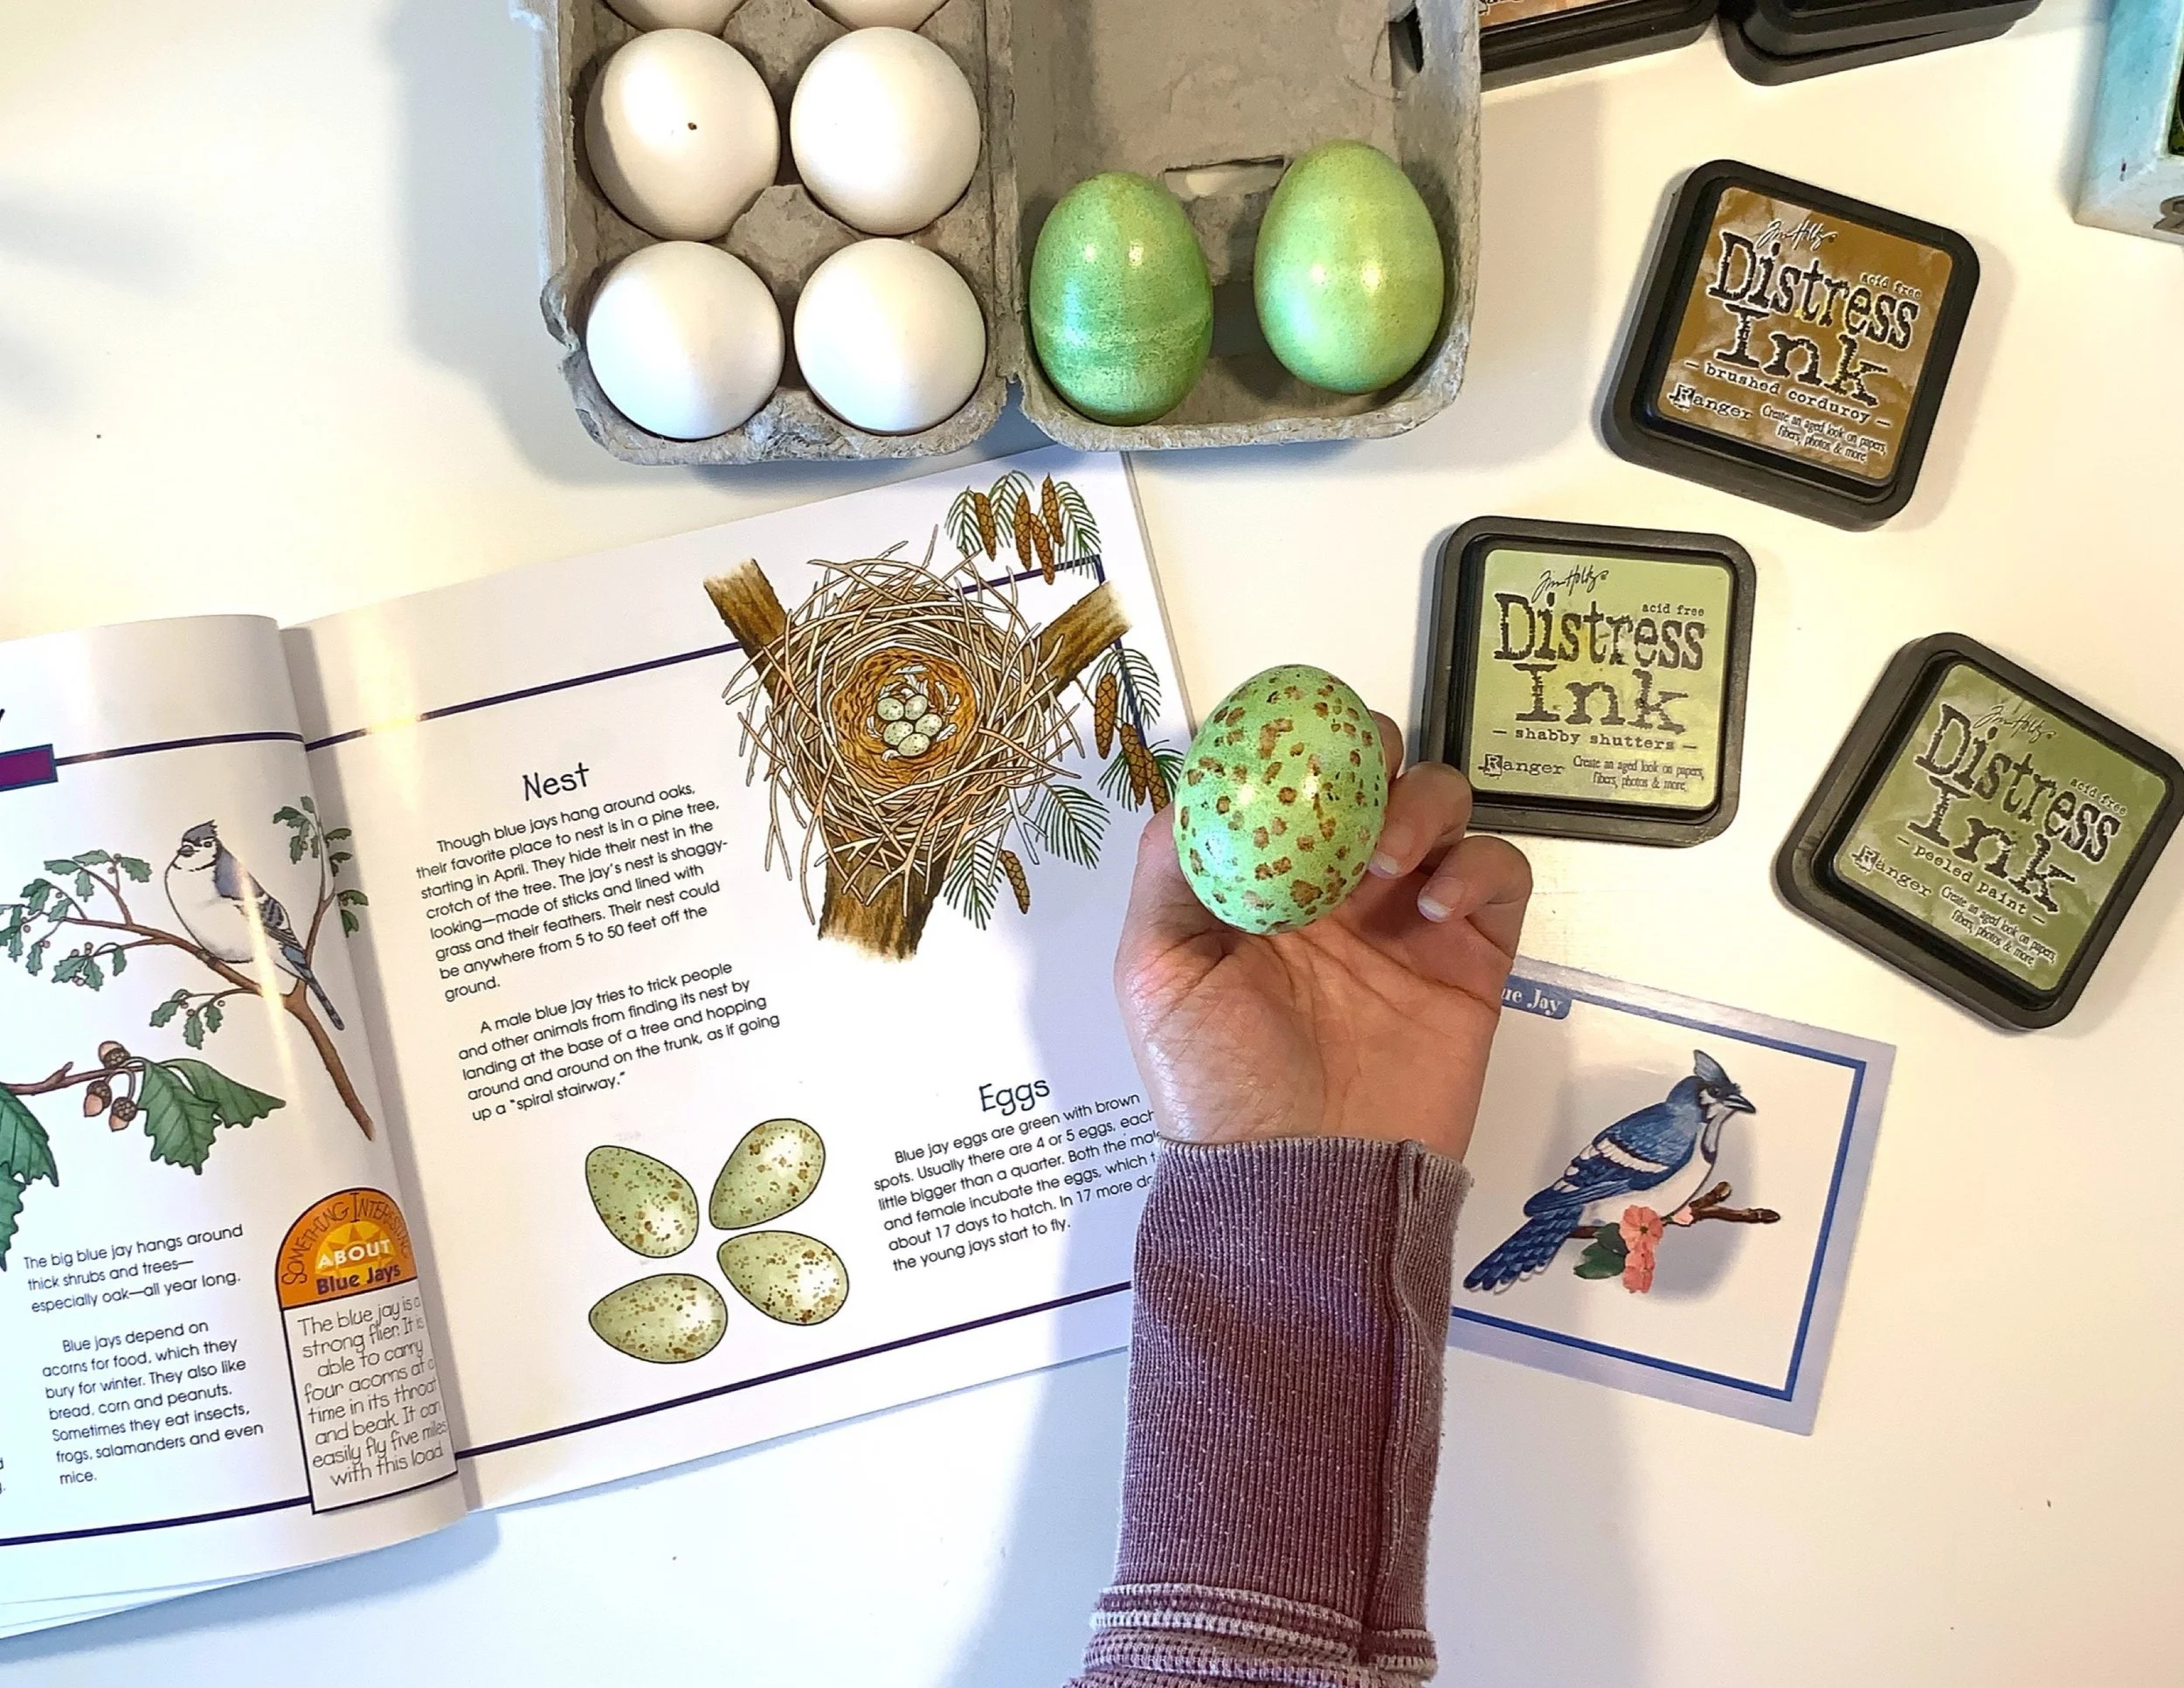
How to Make Bird Egg Replica
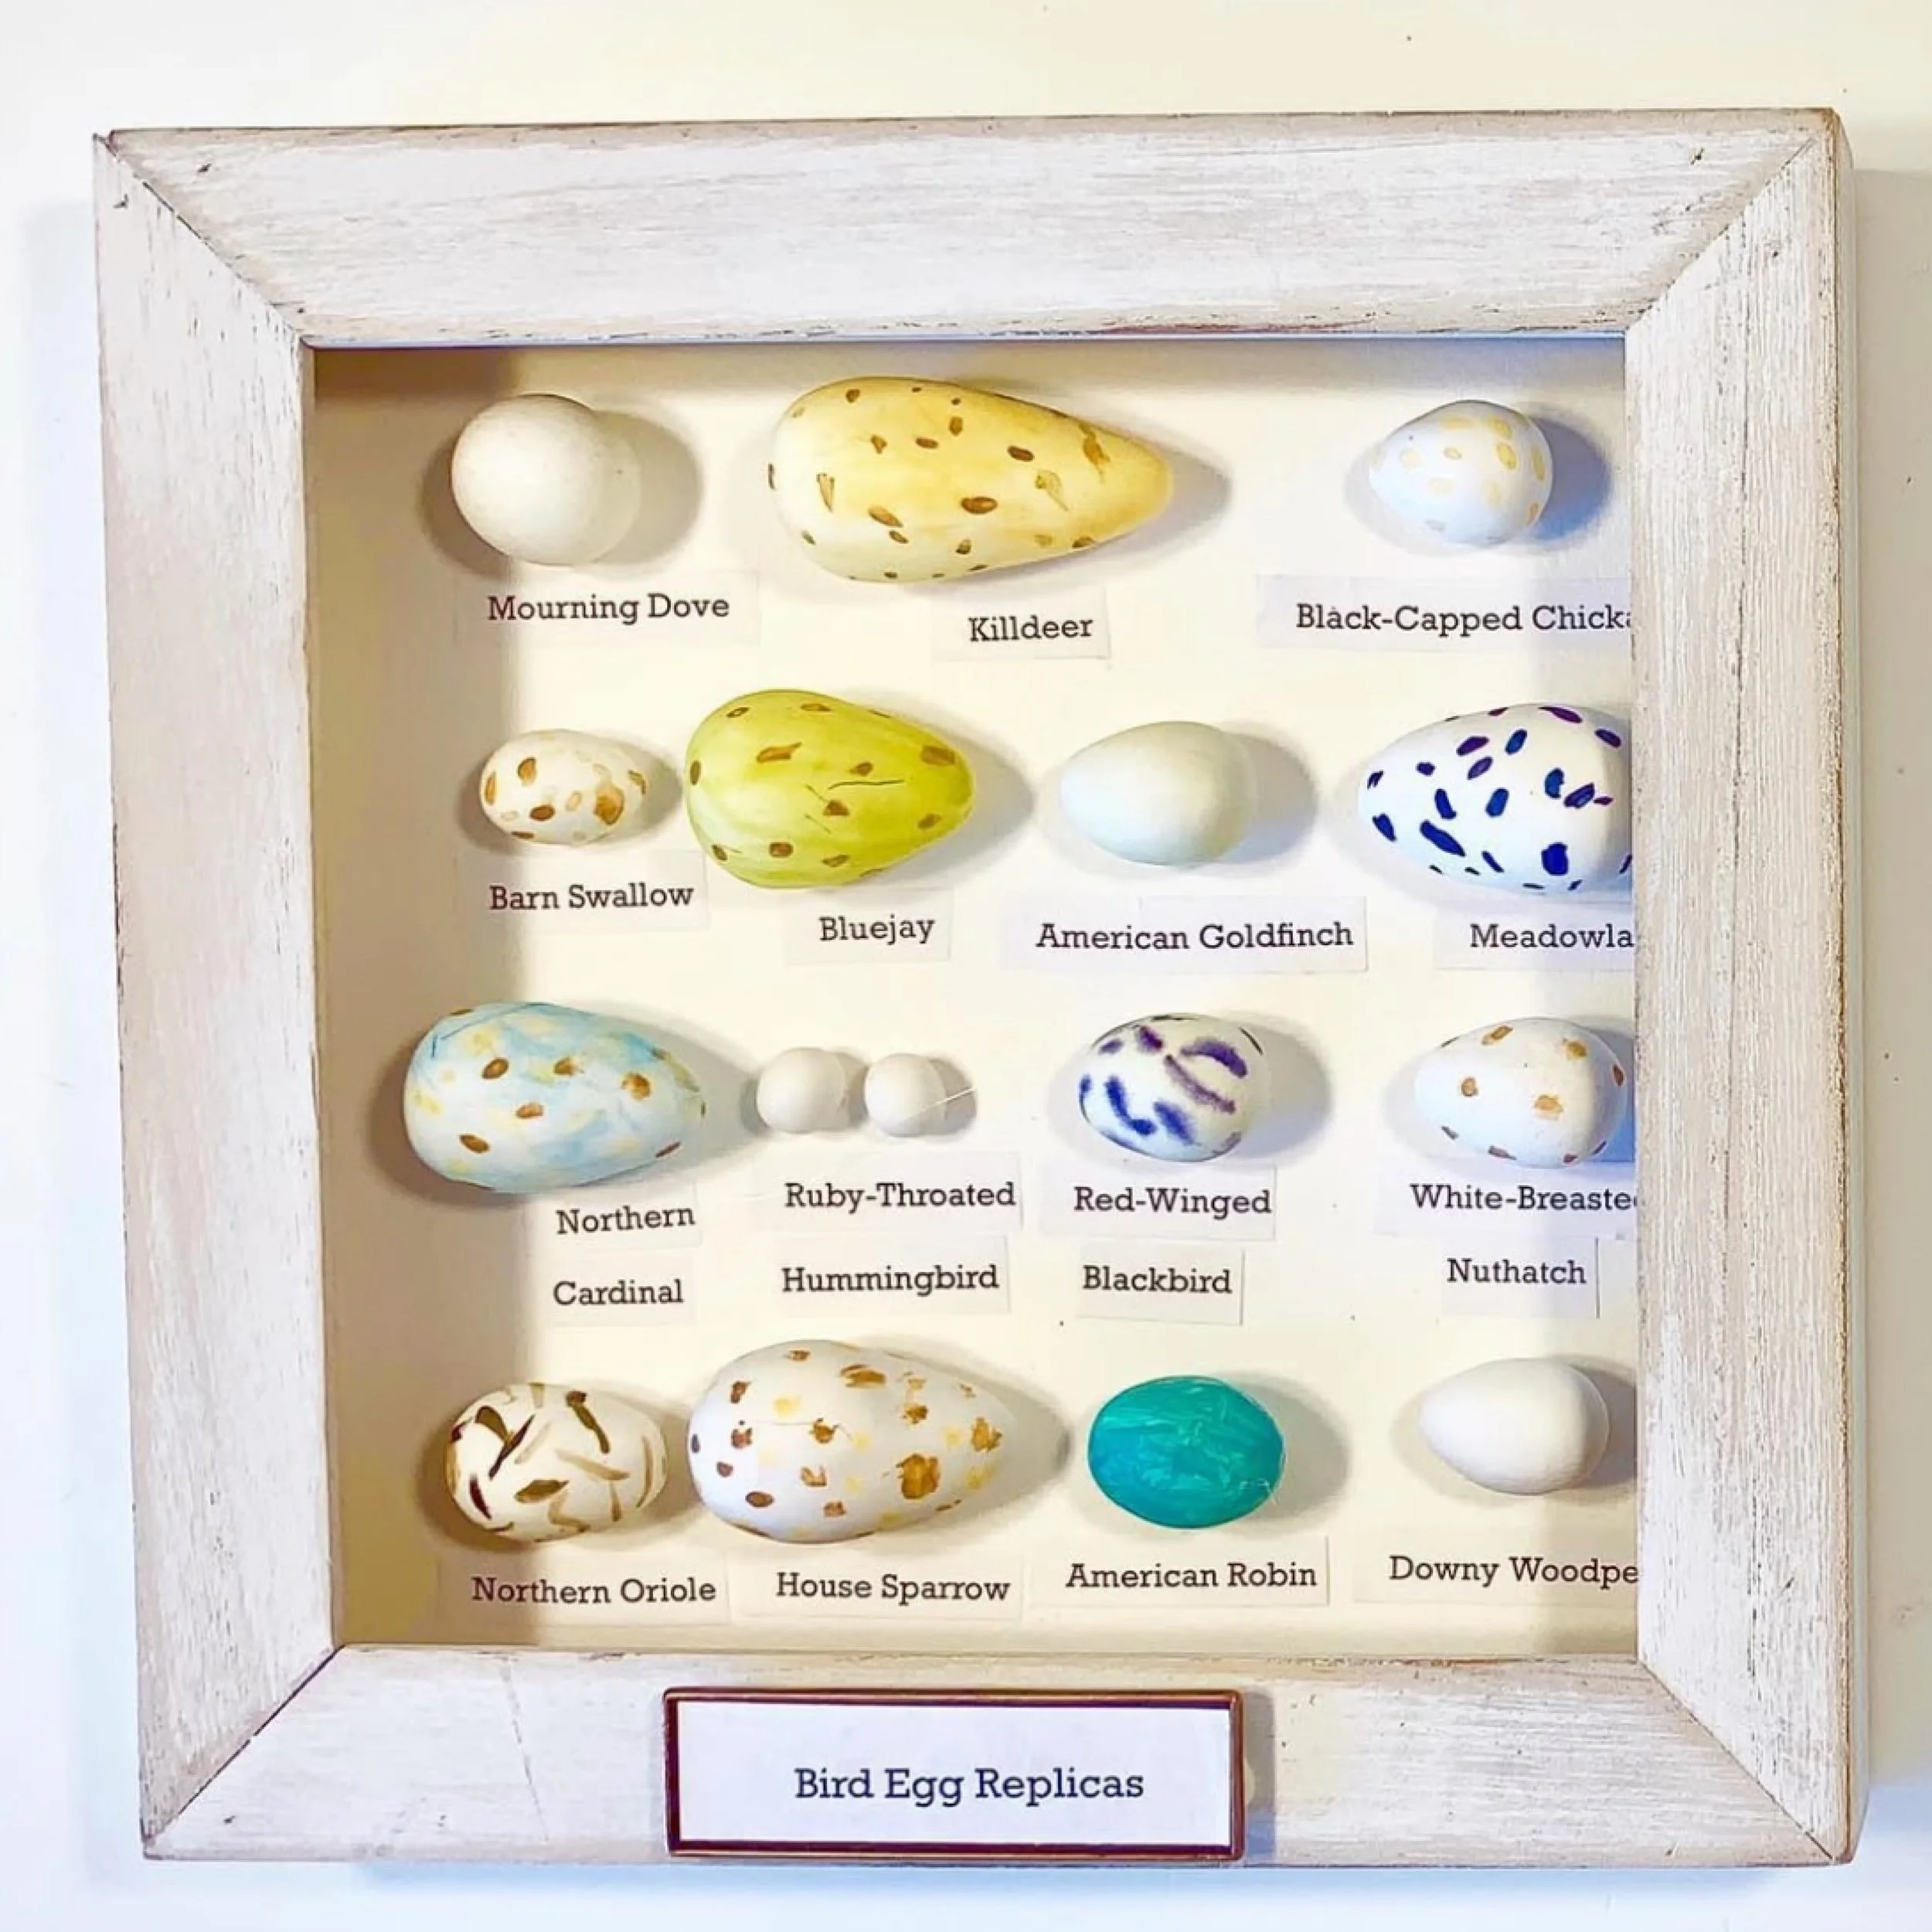
After making egg replicas using chicken eggs, I decided I wanted to make something that was a little more accurate. I wasn't sure how to go about doing this project, but my Instagram family really came through. You always do :)
Polymer clay was suggested as a material to make eggs that are just the right size and shape. I had completely forgotten that I still had some Sculpey Ultra Light Oven Bake Clay, and as I was rummaging through my polymer clay bin, I found my Ultra Light Oven Bake Clay. This stuff is awesome!! It's super easy to work with (especially when working with children), it stays soft indefinitely, it's very soft yet bakes hard and you can paint it with acrylic paints (Distress Inks don't work).
This project also had its challenges. For one, you have to make sure that your hands and surfaces are very clean as the clay easily attracts dust and other things. Second, it's not as easy to shape the clay into egg shapes (though it's easier to make little eggs versus big eggs as you'll see in our An Egg Is Quiet egg replica project). With some effort, I was able to make a complete set, but mid-way through the project, my 12-year-old son got frustrated with this project and abandoned it completely. After a day, he revisited this project with new enthusiasm.
While he did shape most of them, I did help with some of the more challenging shapes and sizes. Once the eggs were shaped, we baked them at 275 degrees for 20 minutes. We let them cool completely before painting them with a variety of acrylic paints. I don't have a large selection and they are from several brands so I can't share with confidence which ones we like or how they'll hold up over time. However, with our limited supply, we were able to mix enough colors to paint these eggs to resemble the ones in the book.
To make painting easier, I mounted each egg on a 1/2 inch square piece of watercolor paper using a glue dot. This made painting each egg so much easier! I honestly can't believe I didn't think of this solution sooner as I started using it with our peg doll projects, too.
Once the eggs were painted, we used our hot glue gun to adhere the eggs to either our watercolor paper covered chipboard. I labeled each egg in pencil, but you could use a permanent marker or print labels.
One thing my son wanted to do differently than my example was mount them in a shadow box frame. The frame was purchased from PartyCity after Easter for a deep discount. Instead for several dollars (I'm not actually sure of the original price), these frames were only $0.50! What a deal! Because the frames were so small, there wasn't room to label each egg by hand, and instead, I printed up labels of each egg and he glued them beneath each egg.
For his project, I also added a metal label plate to the front of the frame and that really distinguished the piece nicely.
The birds we made egg replicas for our chicken egg and polymer clay project are as follows:
Northern Cardinal, Ruby-Throated Hummingbird, American Robin, Barn Swallow, Northern Oriole, White-Breasted Nuthatch, Meadowlark, American Goldfinch, Red-Winged Blackbird, Bluejay, House Sparrow, Downy Woodpecker, Black-Capped Chickadee, and Killdeer.
Check out our complete Owl Unit Study with videos on how we put this unit together, the resources we used and the projects we did. You can also check out our larger Bird Unit Study which includes more projects and resources.


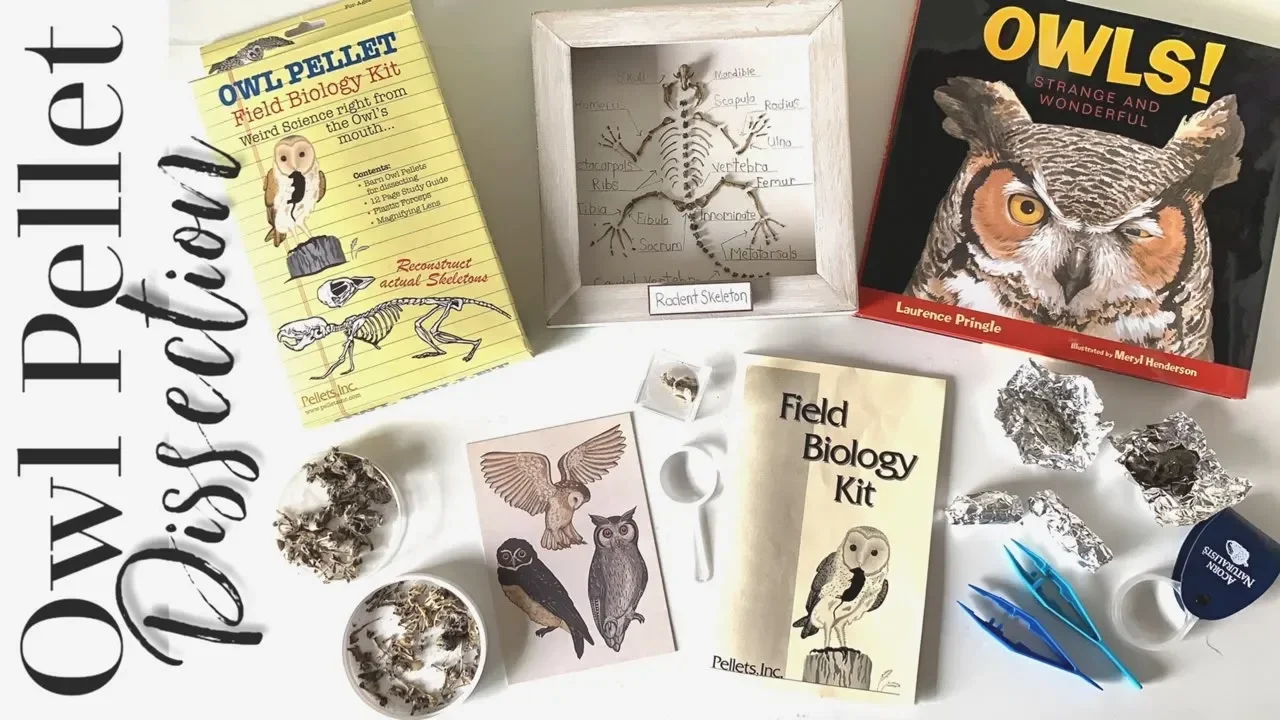
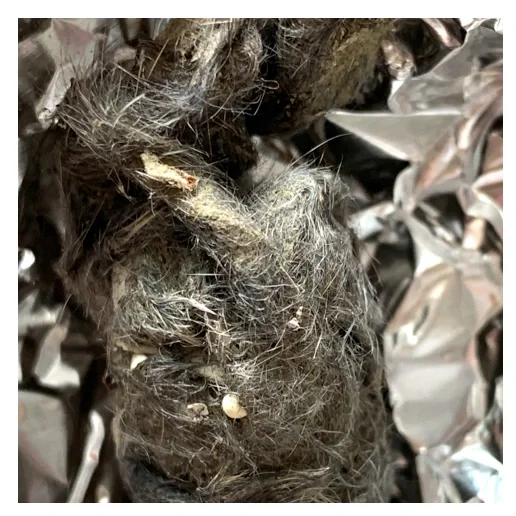
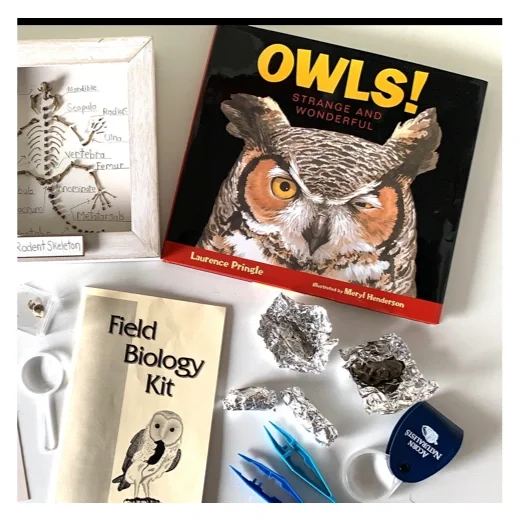
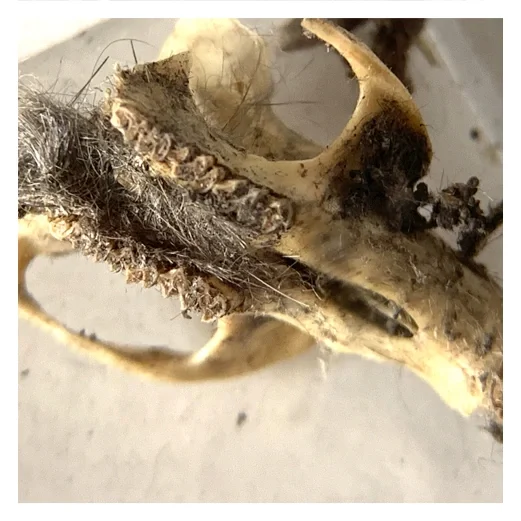
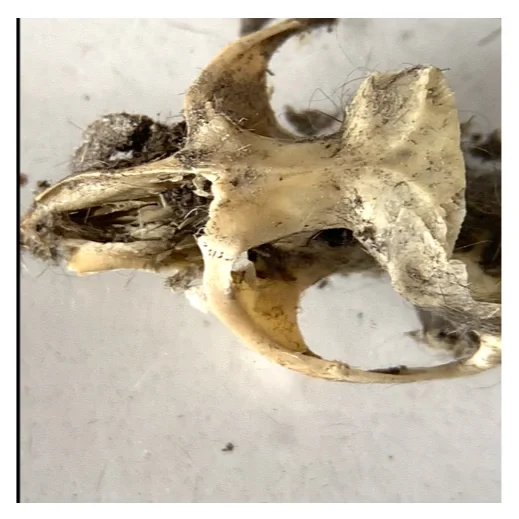
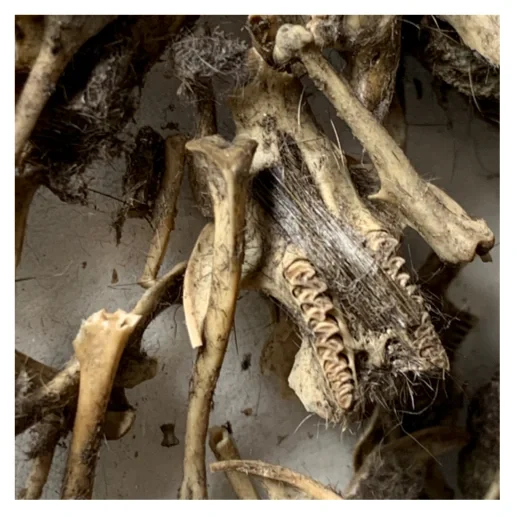
Owl Pellet Dissection | Full Rodent Skeleton
If you’ve never done an owl pellet dissection before, fair warning, it can be hard to stomach this activity. We took this project to the next level by assembling a complete rodent skeleton out of the remains we found in the owl pellet. While that wasn’t our initial intentions, I’m really glad we did so, and I found it to be the most educational part of this project.
We used an Owl Pellet Field Biology Kit from Rainbow Resource. I highly recommend this one because the owl pellets were big and we found a lot of bones in them. We were also sent some owl pellets from a friend’s property and that gave us a chance to observe the differences between them. The smaller owl pellets contained fewer bones and needed to be prepared for safe dissection. To safely dissect owl pellets you find in the wild, wrap them in aluminum foil and bake them for 45 minutes at 350 degrees fahrenheit. This ensures that the bacteria and germs are killed. This is especially necessary if you are working in a classroom or with children. The downside to doing this (I believe) is that the owl pellets harden and became too difficult to dissect without soaking. The small owl pellets from the wild needed at least 15 minutes to soak in very hot water. This helped open up the owl pellets and made it easier to find the bones. However, there may be a bit of an odor when you soak your owl pellets. Also, you may find the wet fur and bones less pleasant than the dry ones. The texture does change when it’s all wet and if you are easily grossed out by these kinds of things, soaking the owl pellet will just make it worse for you!
Overall, we really enjoyed the process, and the owl pellet kit was a hit! The kit we bought contained three owl pellets, a magnifying glass, a pair of tweezers and most importantly, a field guide. The field guide was exceedingly helpful in helping us identify the bones and ultimately the type of animal the owl ate.
I think this kit is the perfect hands-on project to any owl or bird unit.
We mounted our skeleton on 90 lb. watercolor paper by Fabriano using Tombow mono adhesive. The adhesive we used is strong and dries clear. It also takes a long time to dry making it ideal for projects you may have to move things around for.
I framed it in a shadow frame box I picked up after Easter at PartyCity for only 50 cents. They were heavily discounted because the frame had an Easter image. I popped out the backing using an X-acto knife (the kids were not around and would not be allowed to do this part of the project) to cut along the back and separate the glue. I mounted the finished project using a glue stick. I’m not sure if the glue was acid-free, but I recommend that you check before using on a project like this. I used Gorilla Wood Glue to glue the frame onto the backing. I finished off the frame with a metal label plate from my scrapbooking stash.
I’m very pleased with how this activity and project turned out. It took the better part of one afternoon to do the initial dissection and the better part of a second day to finish the project and hang it in our school room. I kept the leftover undissected small owl pellets in the box along with the other materials for us to do in the future. Now that they are baked, I do think they’ll last a while.
We did pull out a few things from our own materials for this project: extra tweezers and magnifying glasses and boxes as well as petri dishes and paper plates for dissection. The kit recommends placing a piece of white paper under the dissecting owl pellet, but if you soak the pellet, I recommend something heavier.
I did this project with my 8-year-old daughter and 12-year-old son as part of a homeschool science unit study on Owls.
Check out our complete Owl Unit Study with videos on how we put this unit together, the resources we used and the projects we did.


How to Make Bird Egg Replicas
While reading the book Birds, Nests and Eggs by Mel Boring, I had a moment of inspiration and thought it would be a fabulous hands-on project to create egg replicas of the birds we learned about in the book using chicken eggs. While this idea is a great way to learn about the different eggs and the details on each, it turned out harder than I expected. Firstly, our choice of paints wasn't the best. Initially it seemed to be working and I got a nice range of colors. But the ink spread and bled into each other when colors or layers were combined. Then it took a long time to dry which posed additional challenges. The ink was each to smudge and it took several weeks before the ink was so dry and set that it wasn't ruined by our touch.
The first thing I had to do for this project is buy white chicken eggs. Unless you are using acrylic paints, you're going to need to use white eggs or the color of the ink or dye will be obscured by the color of the egg. Next, I needed to remove the yolk from the egg. Instead of blowing the contents out by poking a small hole on either end of the egg, I make a rather large hole on the backside (or long side) of the egg using a bamboo skewer first, and later my metal paper piercer which has a sharp end like a safety pin. The bamboo skewer only worked well the first time, but the tip blunt so easily, it didn't work well after that. It was far easier to get the inside of the egg out with this single large hole, but I did still have to shake it out quite a bit.
I washed the eggs with water and dish soap because I intend to keep this project long term. If you didn't want to keep this long term, I'd suggest skipping this step, or better yet, just painting them whole or hard boiled. I can't say for certain how long you can keep a raw egg, but one year, my daughter kept a goose egg for months before we had to throw it out.
Prepping this project took longer than most projects we did for this unit, and you may choose to involve the kids in this process, but I chose to prep it for my 12-year-old son and 8-year-old daughter.
We had 24 eggs, and it was my intention for us to each do the same eggs so I could walk them through the process of painting each one. So we chose eight birds from the book. In the end, each child only did a few because it proved to be more difficult than I expected to get the detail of each egg. For the remaining eggs, I made them on my own to complete the set.
While this was a great project to do with supplies you probably already have around the house (you can experiment with various paint mediums), I found that ultimately, I didn't like the finished project. I was bothered by the fact that all the eggs we made were one size: chicken size, which meant they were all too big. With some eggs being the size of a dime or quarter, I decided to do the project again with Oven Bake Ultra Light Polymer Clay so that we could make them in the appropriate sizes. You can check out that tutorial as well.
The birds we made egg replicas for our chicken egg and polymer clay project are as follows:
Northern Cardinal, Ruby-Throated Hummingbird, American Robin, Barn Swallow, Northern Oriole, White-Breasted Nuthatch, Meadowlark, American Goldfinch, Red-Winged Blackbird, Bluejay, House Sparrow, Downy Woodpecker, Black-Capped Chickadee, and Killdeer.
Check out our complete Owl Unit Study with videos on how we put this unit together, the resources we used and the projects we did. You can also check out our larger Bird Unit Study which includes more projects and resources.
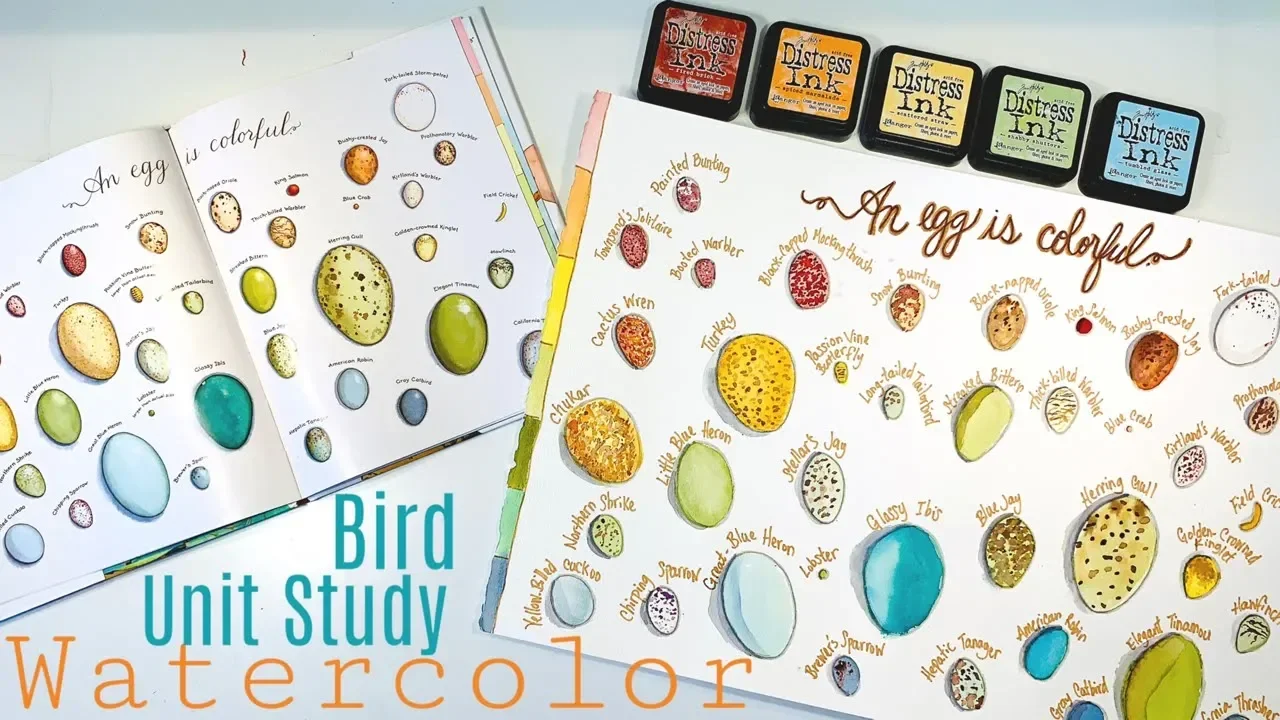
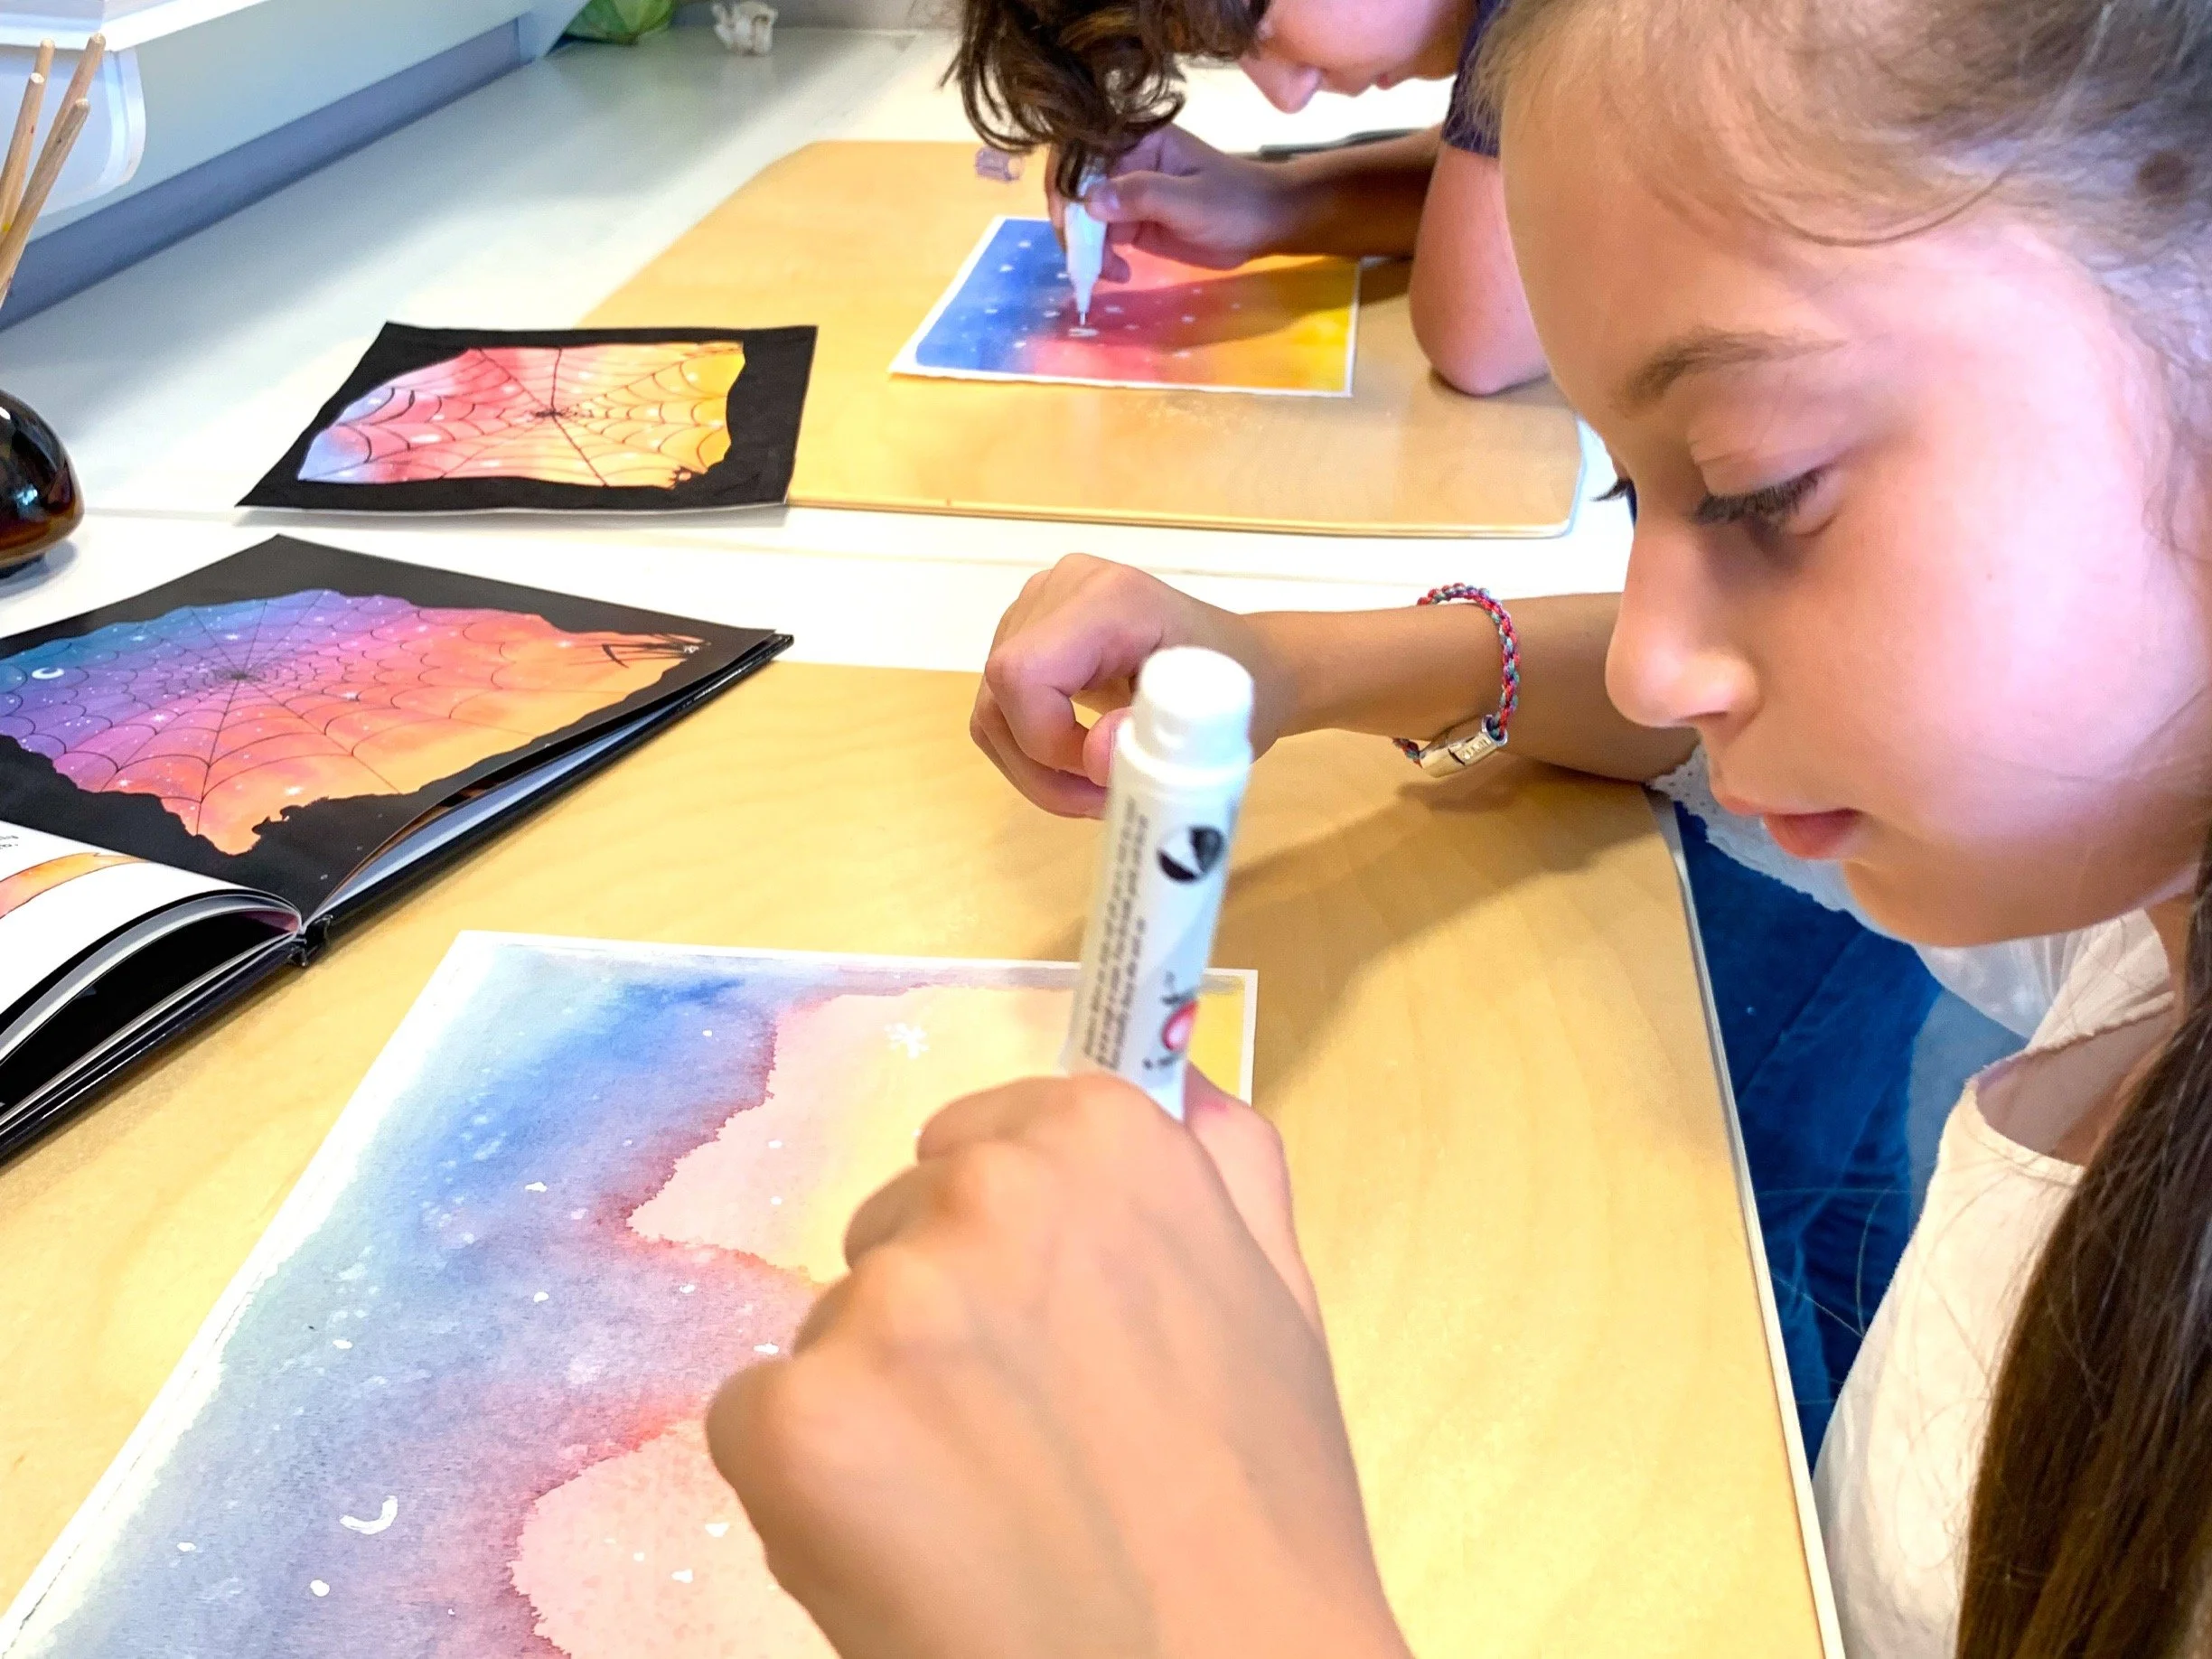
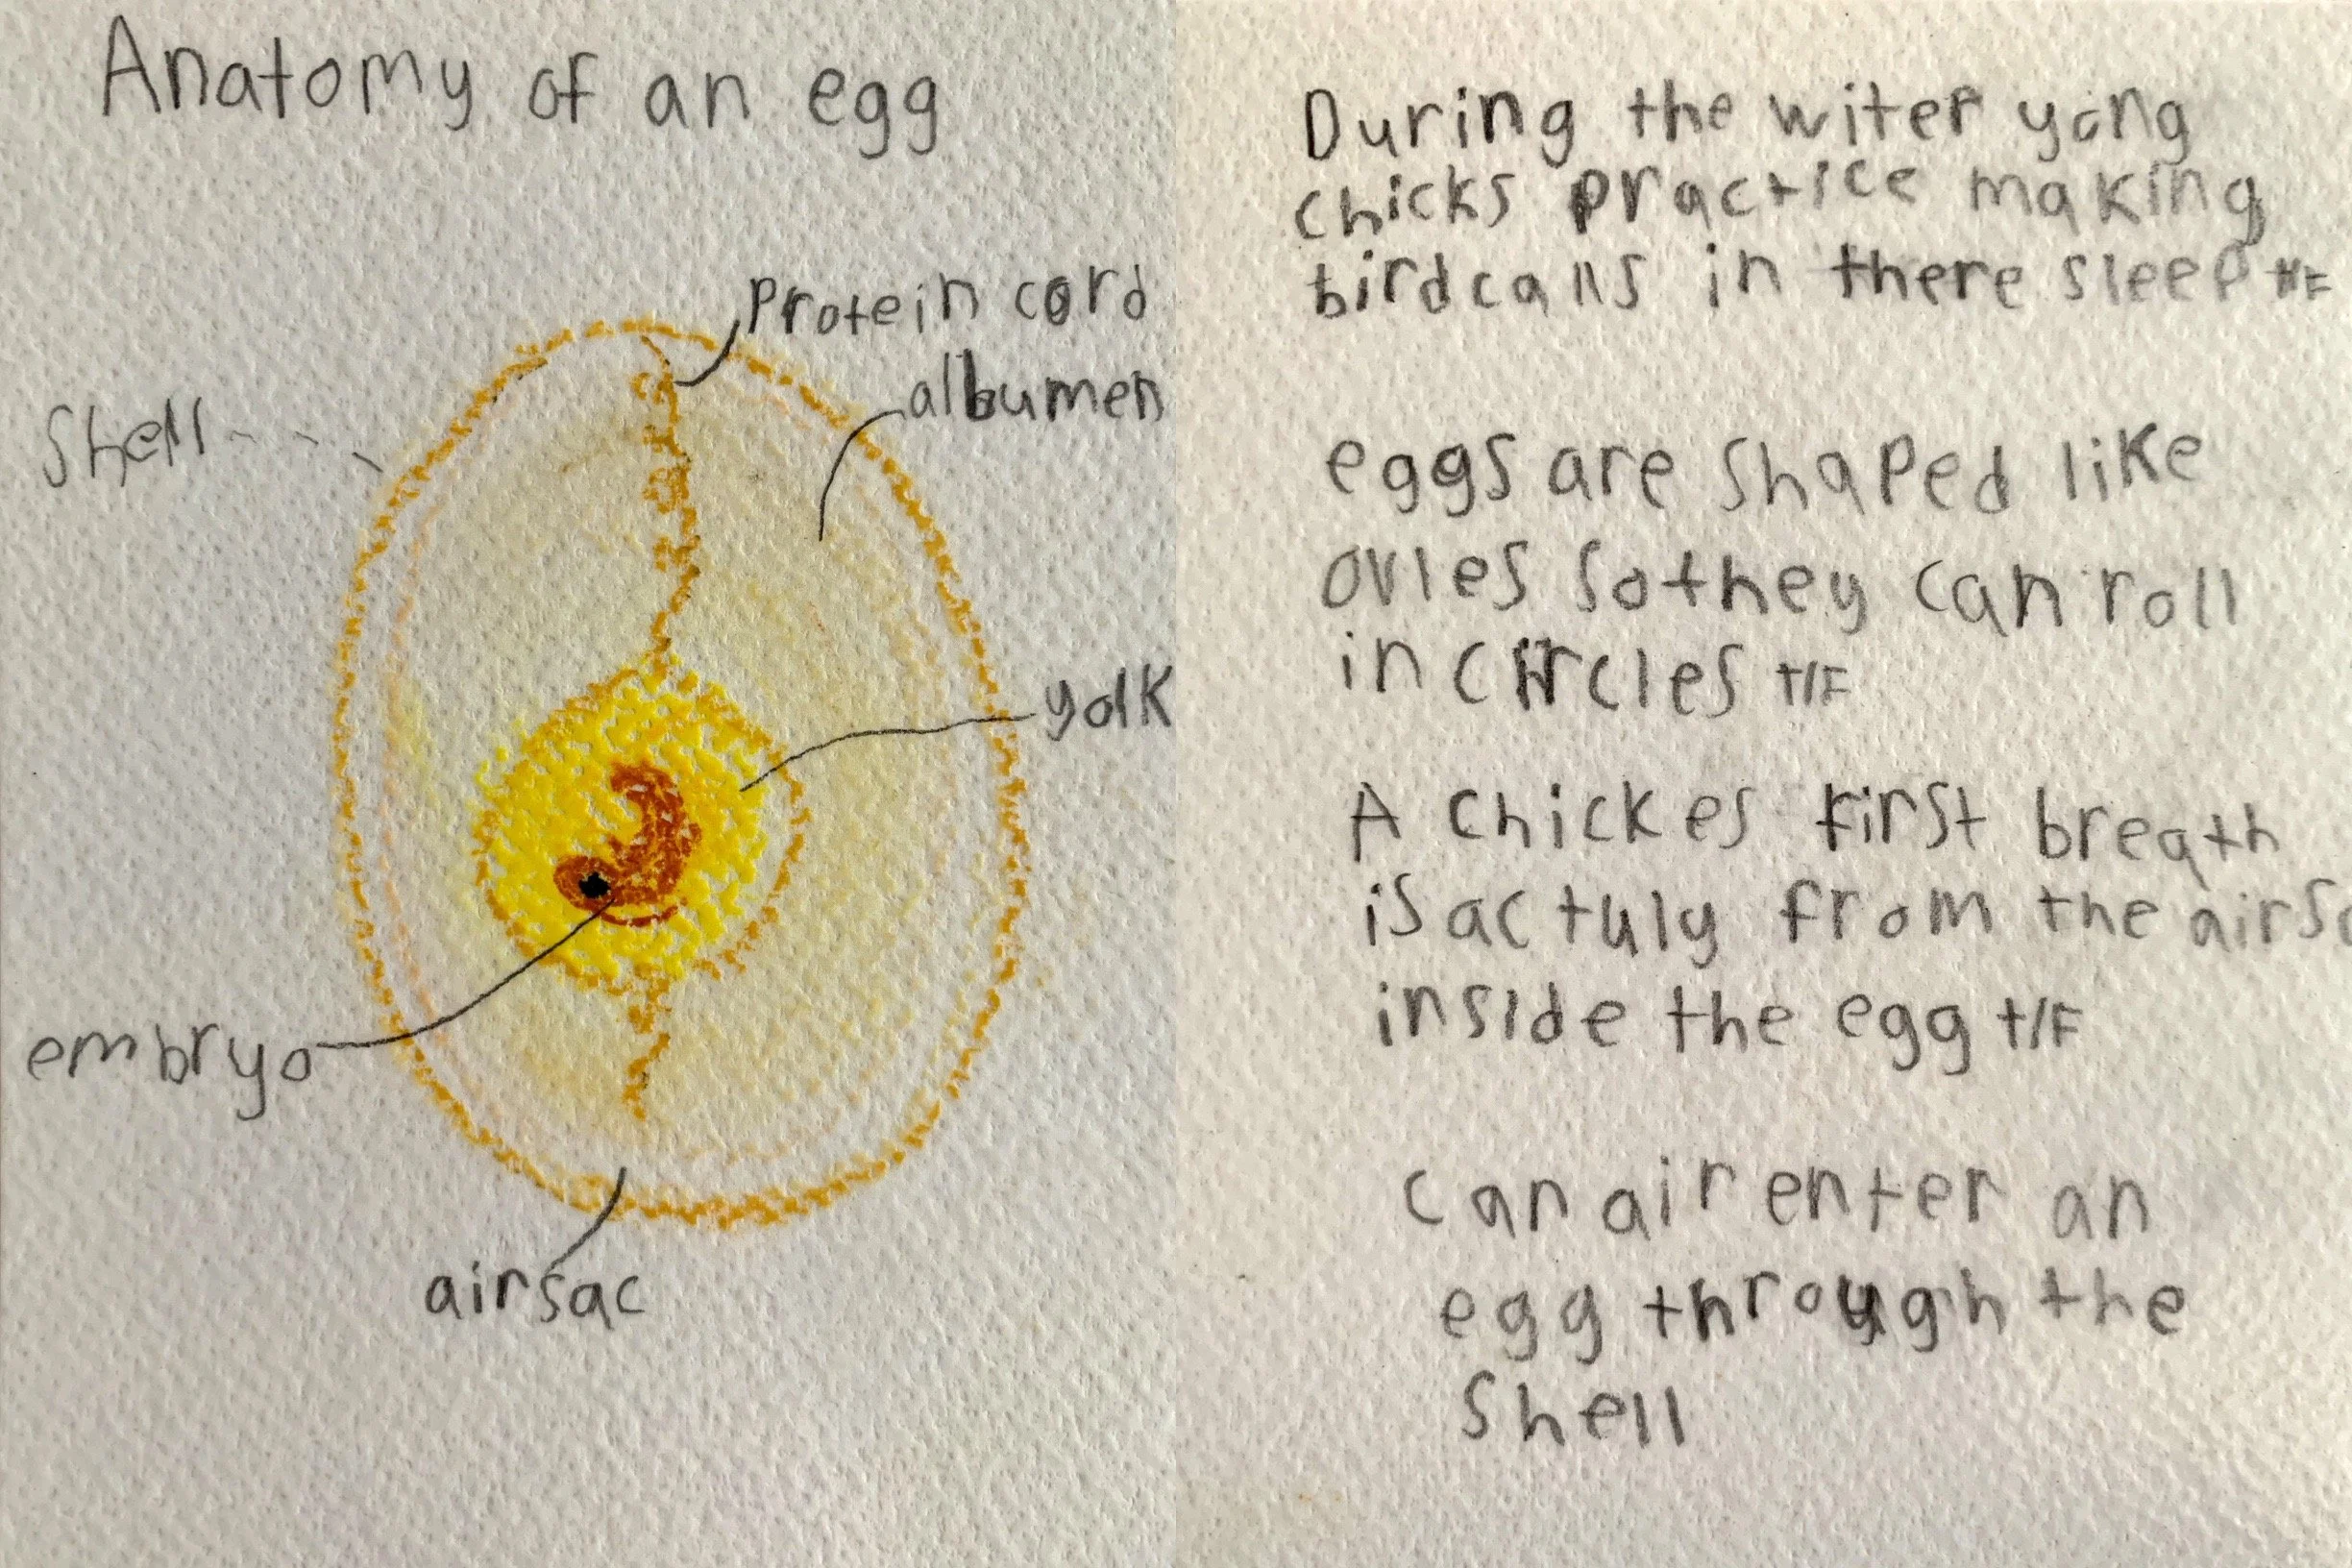
Bird Unit Study | Eggs

Any excuse to pull out our art supplies for a project is a good reason! I love adding art and color to our unit studies, and this is one project I’m sure you’ll love to try. This project was inspired by the book An Egg is Quiet by Dianna Aston and Sylvia Long. This book is packed with gorgeous illustrations, and this two page spread entitled An Egg is Colorful was the inspiration for this art project. We used our Distress Inks in a rainbow of colors. I especially like Distress Inks for their versatility in uses and colors. As an ink pad, Distress Inks can be used in the traditional sense with stamps, you can also squish the ink pad onto a non-porous surface like contact paper, glass or an acrylic block and used them as watercolors, or you can use a smudger and add color to paper and leave as is or blend with water. I also love the range of colors. Distress Inks come in a wide assortment of colors that are natural and work perfectly for many of the projects we do in which we need browns, greens and blue that are true to nature.
Though I show you a variety of paint mediums in the video, and I think any of them would do, I chose to work with our Distress Inks. Unlike watercolors, these inks dry permanent. I decided to use Strathmore 140 lb. Watercolor paper for this project because it is a high quality paper and more importantly it was larger than the two-page spread in the book giving us enough room to watercolor the eggs and label each one.
Check out our complete Owl Unit Study with videos on how we put this unit together, the resources we used and the projects we did. You can also check out our larger Bird Unit Study which includes more projects and resources.


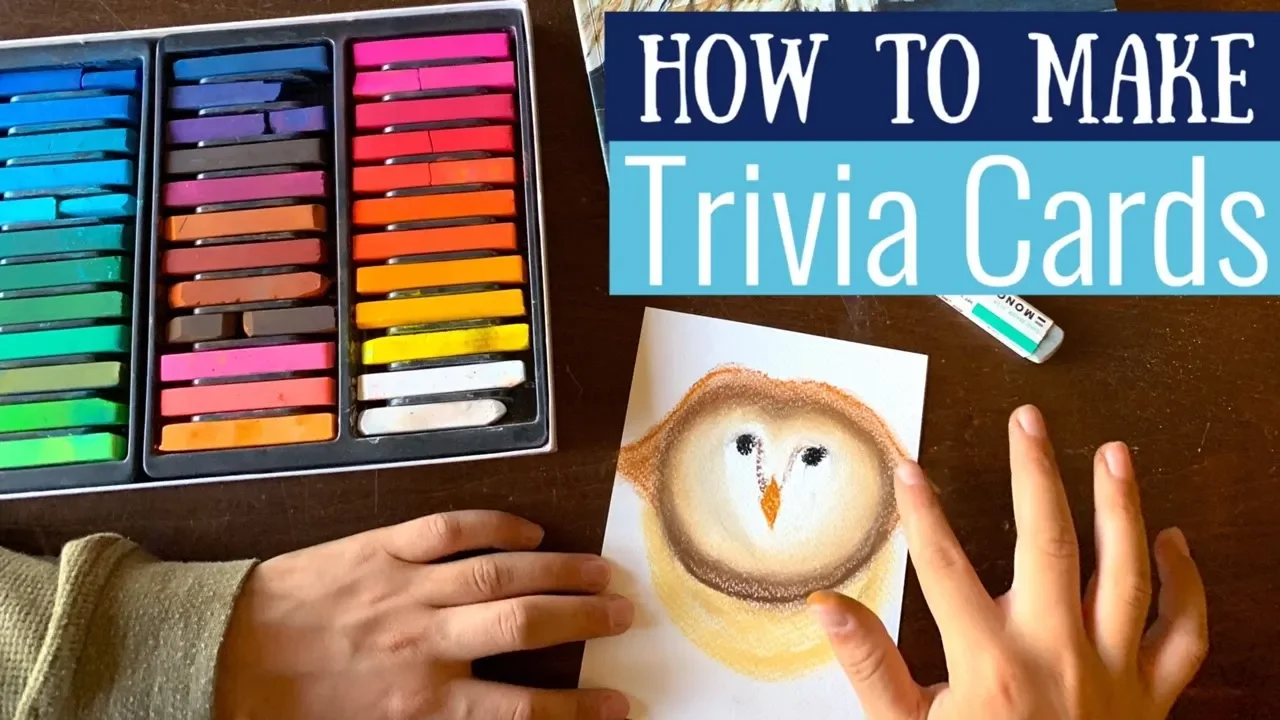
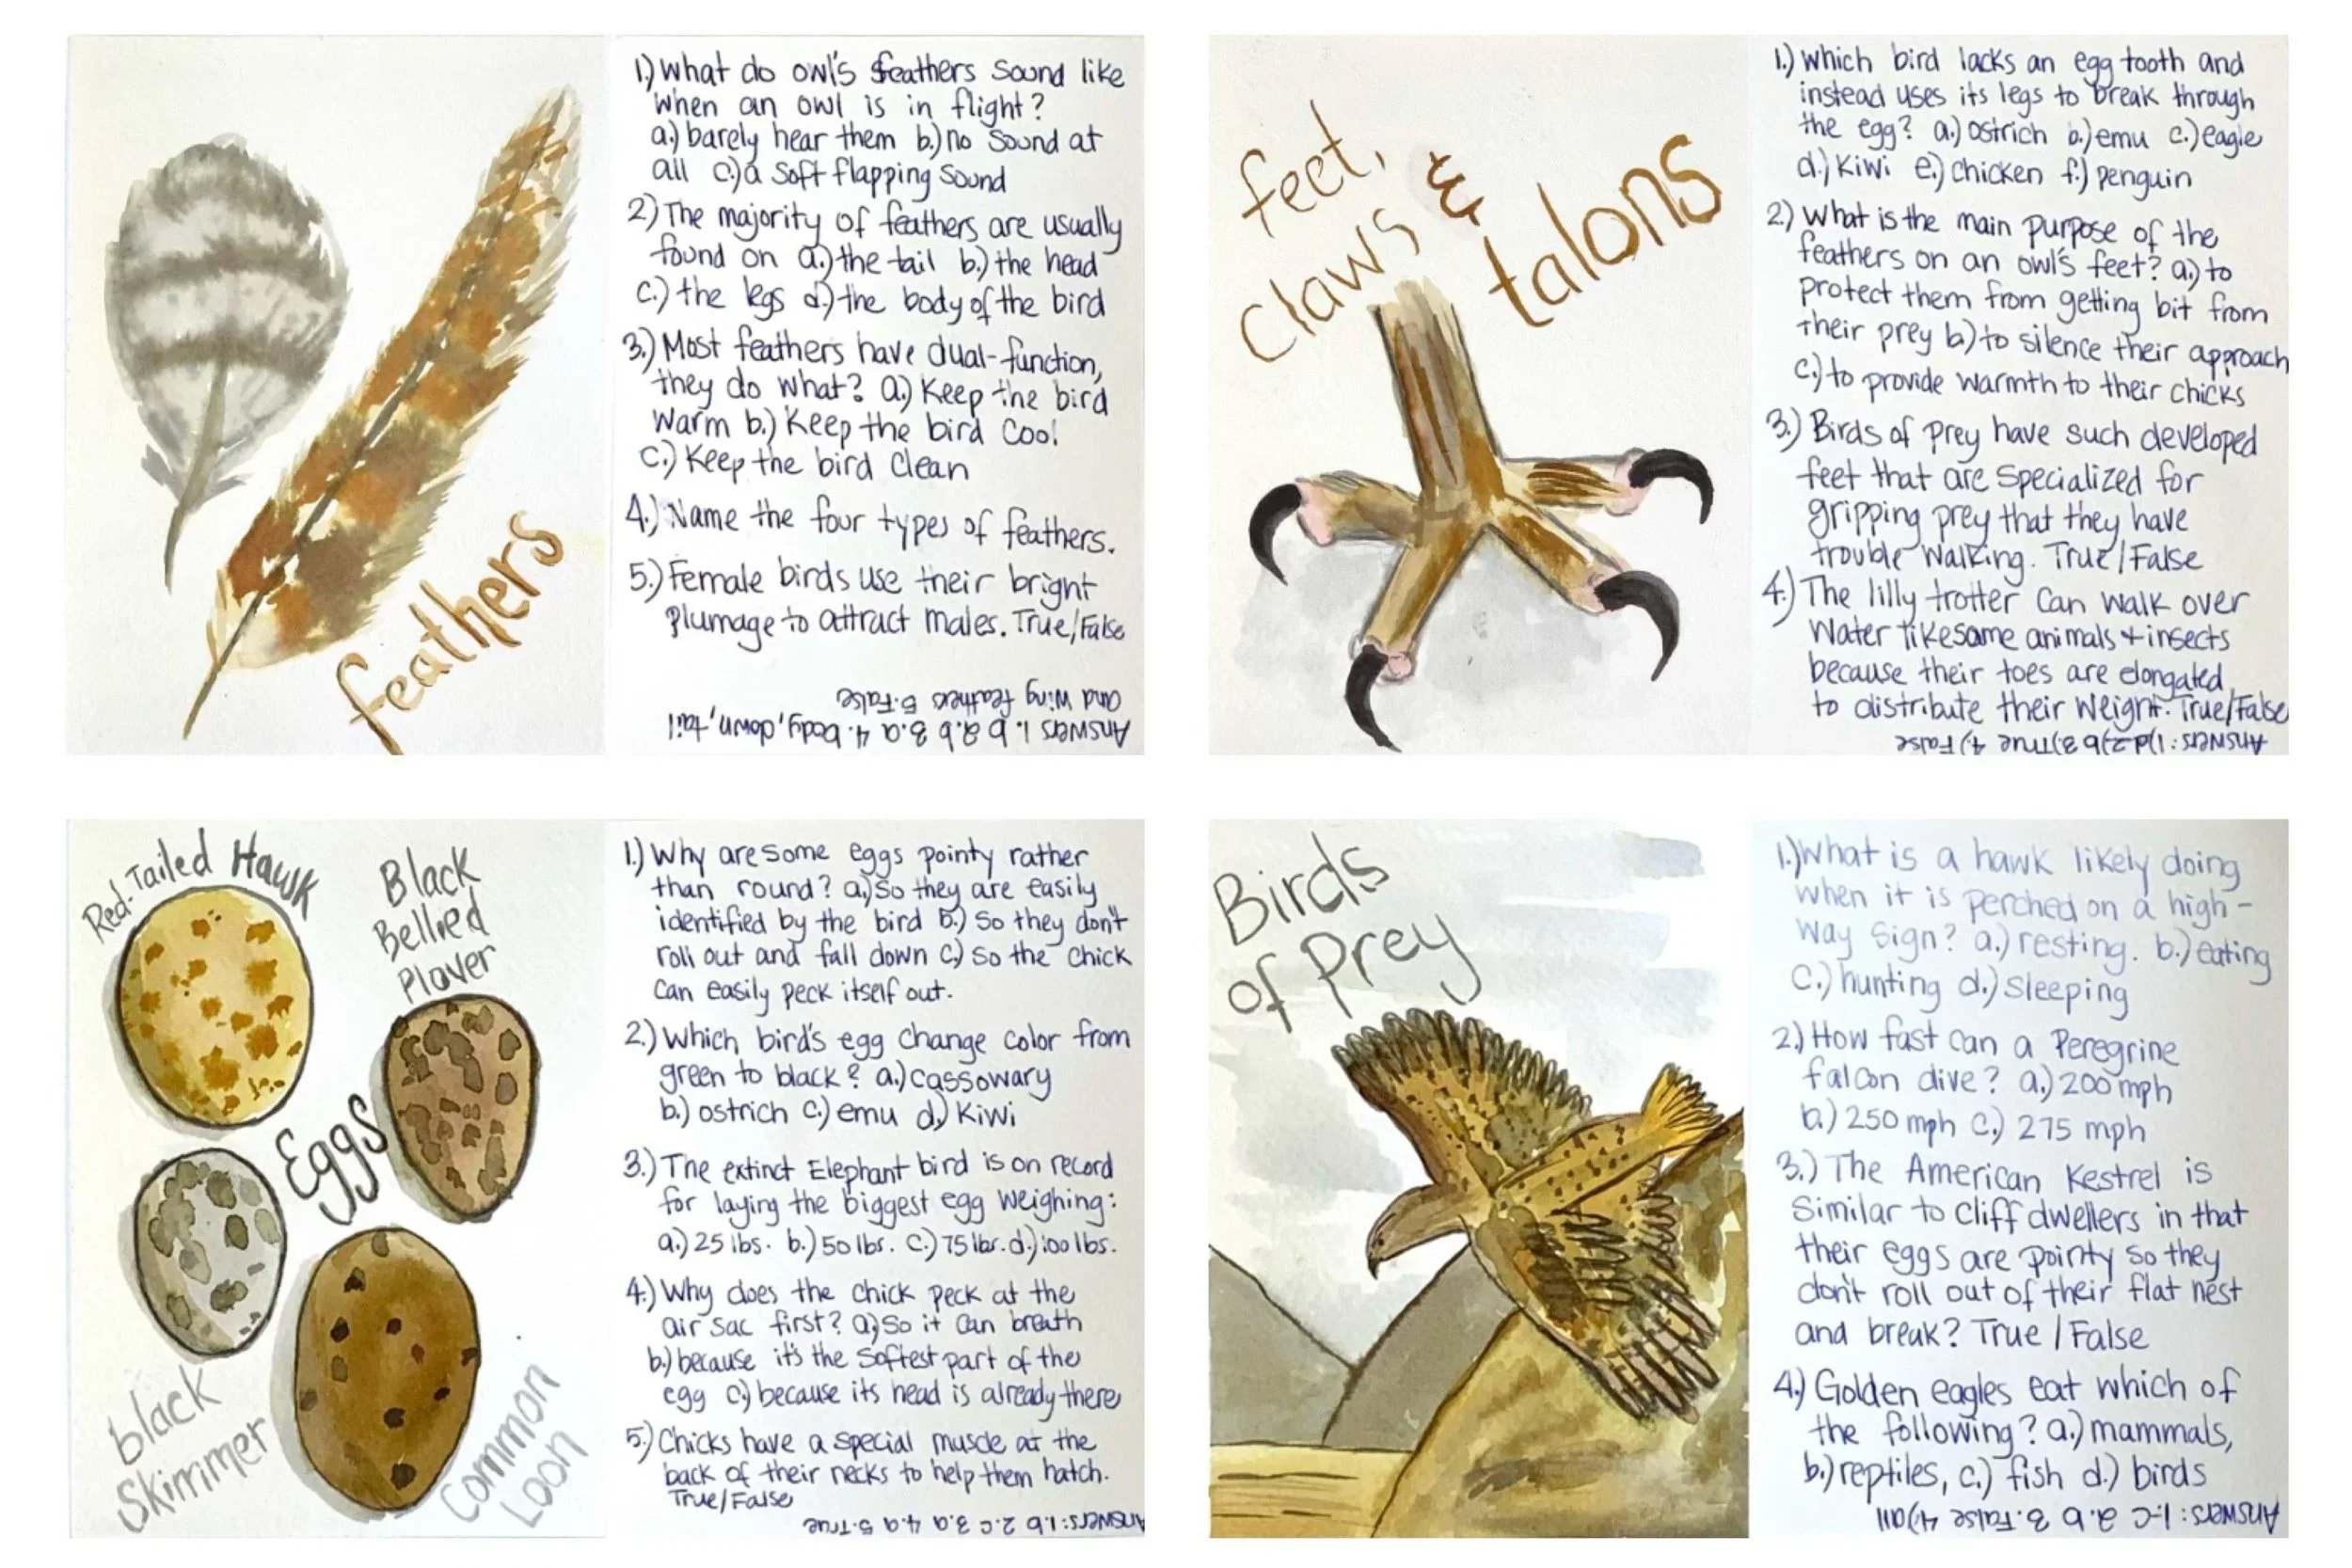
Trivia Cards For Bird Unit

We love our Professor Noggin’s Trivia Cards, so making our own was not just a fun way to make a game we know we’ll love but it was also a great way to add essential skills to our lessons: research, synthesis of information, handwriting and drawing. Coming up with questions requires looking at the information with a new different approach. In some ways it’s not only harder, it also helps solidify the information on a deep level.
This is the second time we’ve done a project like this. The first time was earlier in the year when we did our astronomy unit. We made trivia cards for all the planets and other astronomical occurrences. For that project we used our watercolors.
This time around we had a more difficult time making these trivia cards because we didn’t have resource material that was specific for each bird, instead we had a lot more general cards. If I were to do this project again, or if we continue this project moving forward, I would get books specifically on each bird we did a trivia card for, or rather, make trivia cards on general information about birds like feathers, eggs, flight and more.
For this project, we also opted to use our Sargent Art Chalk Pastels. This posed challenges as well because the chalk pastel easily smudges, so rather than do our drawing first and then write up the questions, we did the writing first followed by the drawing. This meant that if any mistakes were made in the drawing that didn’t suit the student, the whole card had to be done again. As my 12-year-old son doesn’t especially like handwriting, he made due with the drawings that weren’t exactly what he wanted.


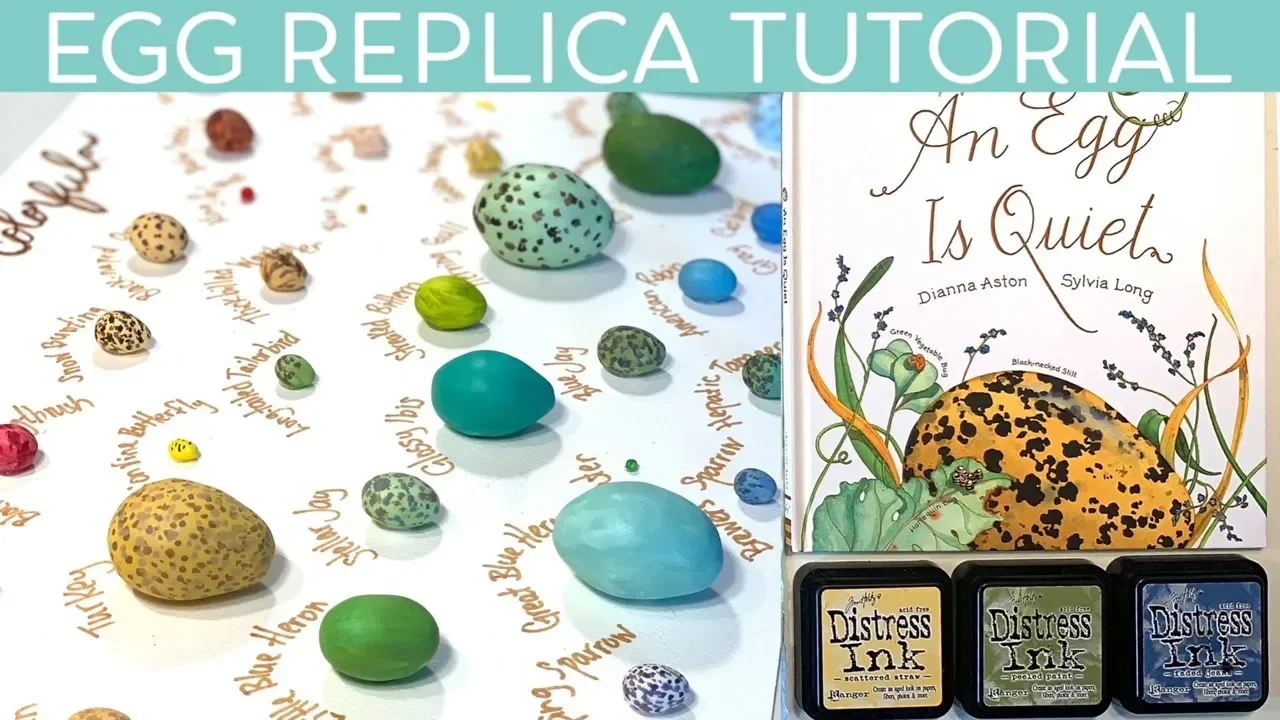
How to Make Bird Egg Replicas
This project was inspired by the book An Egg is Quiet by Dianna Aston and Sylvia Long. It's a beautifully illustrated book with a two-page spread on various eggs in gorgeous watercolors varying in size for accuracy. I loved it so much we watercolored our own version of it for this unit, but later decided to make full size egg replicas using our Sculpey Ultra Light Oven Bake Clay. This stuff is amazing! It's super soft and stays soft indefinitely until you bake it. It's easy to work with as opposed to typical polymer clay which can get hard and crumbly over time. It also bakes light weight and it's easy to paint with acrylic paints.
We did this activity as a group project with my 12-year-old son and 8-year-old daughter. Unfortunately, my daughter didn't show much interest in participating, in part because this unit was completed in the summer and by then, the kids weren't interested in much.
I helped a lot with this activity because shaping the eggs was a bit challenging. Also, there ended up being quite a few eggs to paint in the end, so I helped with that too.
For this project, we also used our Distress Inks to watercolor the edge of the paper. We used 140lb. Strathmore watercolor paper and Copic markers for the title and labels. We used various brands of acrylic paints.
Check out our complete Owl Unit Study with videos on how we put this unit together, the resources we used and the projects we did. You can also check out our larger Bird Unit Study which includes more projects and resources.
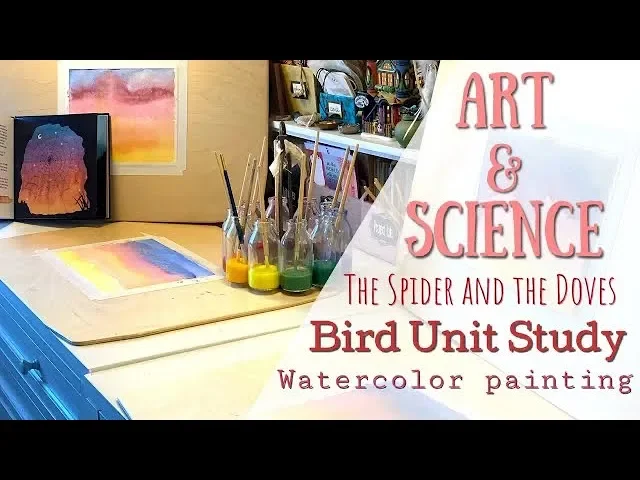
Art & Science Lesson
There's a difference between an art lesson and an artistic representation of a lesson. Some lessons include narrations or dictation and some lessons include some art or handwork or hands-on project. While these activities always take longer, they are often more impactful, and meaningful. Usually, what is learned remains longer and an added perk is that children love to look back at the work they've done which causes a natural review of the material learned in an organic natural way.
In today's lesson, we read the book The Spider and the Dove by Farah Morely. It's a delightful story of the Hijah (migration) of Prophet Muhammad (saw) told through the eyes of a spider and two doves. I love the perspective of the story and seeing these historical significant events depicted this way. Not to mention that the book is full of beautiful watercolored paintings with black silhouettes. I was immediately inspired by the image of the spider's web from the inside of the cave on Mount Thawr and decided to turn it into an art project.
This happens often. We'll be reading our books for a unit, and I see something that inspires an artistic lesson. For this project, I am using our Stockmar watercolors, Strathmore 140 lb. watercolor paper and a variety of paint brushes from inexpensive synthetic to expensive all nature squirrel hair. To be honest, I prefer the synthetic ones which I purchased about 10 years ago from a local craft store for less than $5 for the set. I also taped down our paper onto painting boards using artist tape.
I'm also using a new watercolor paint caddy. It's actually probably intended as a flower vase, but I thought it would make a very pretty watercolor caddy, and it does! You can find this treasure (if they still have it) at Farmyard Darlings in Northern California.


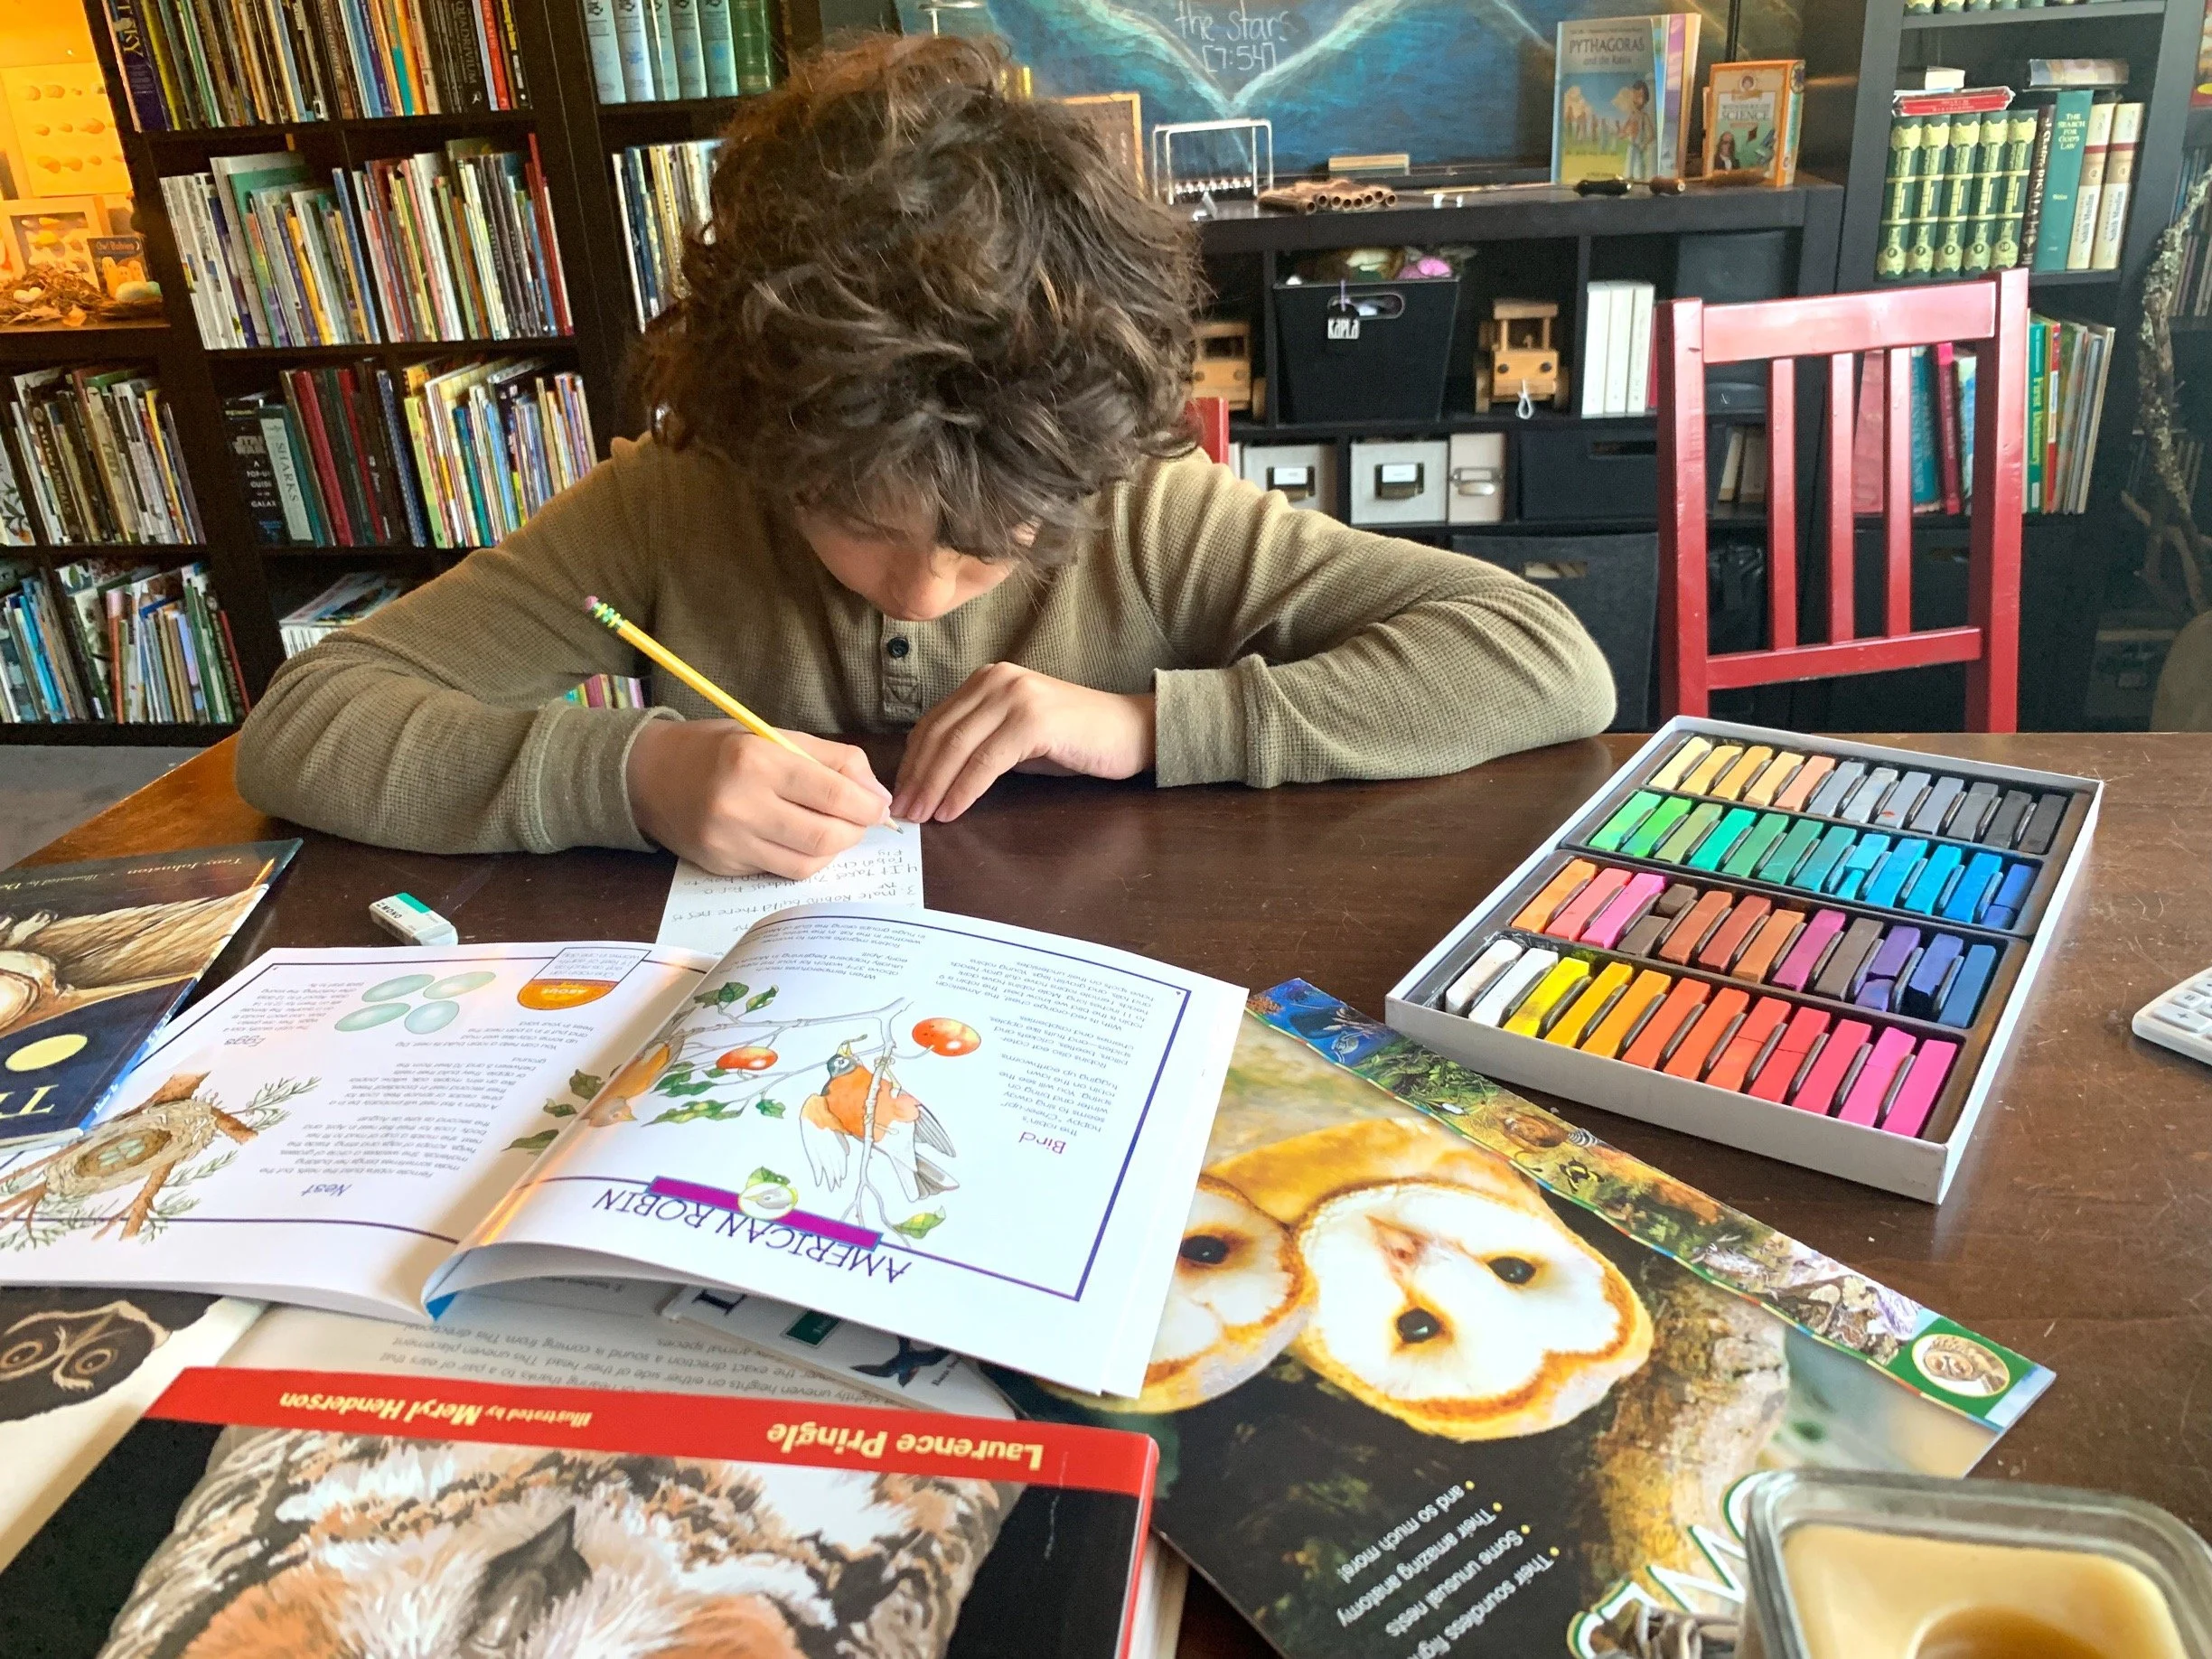
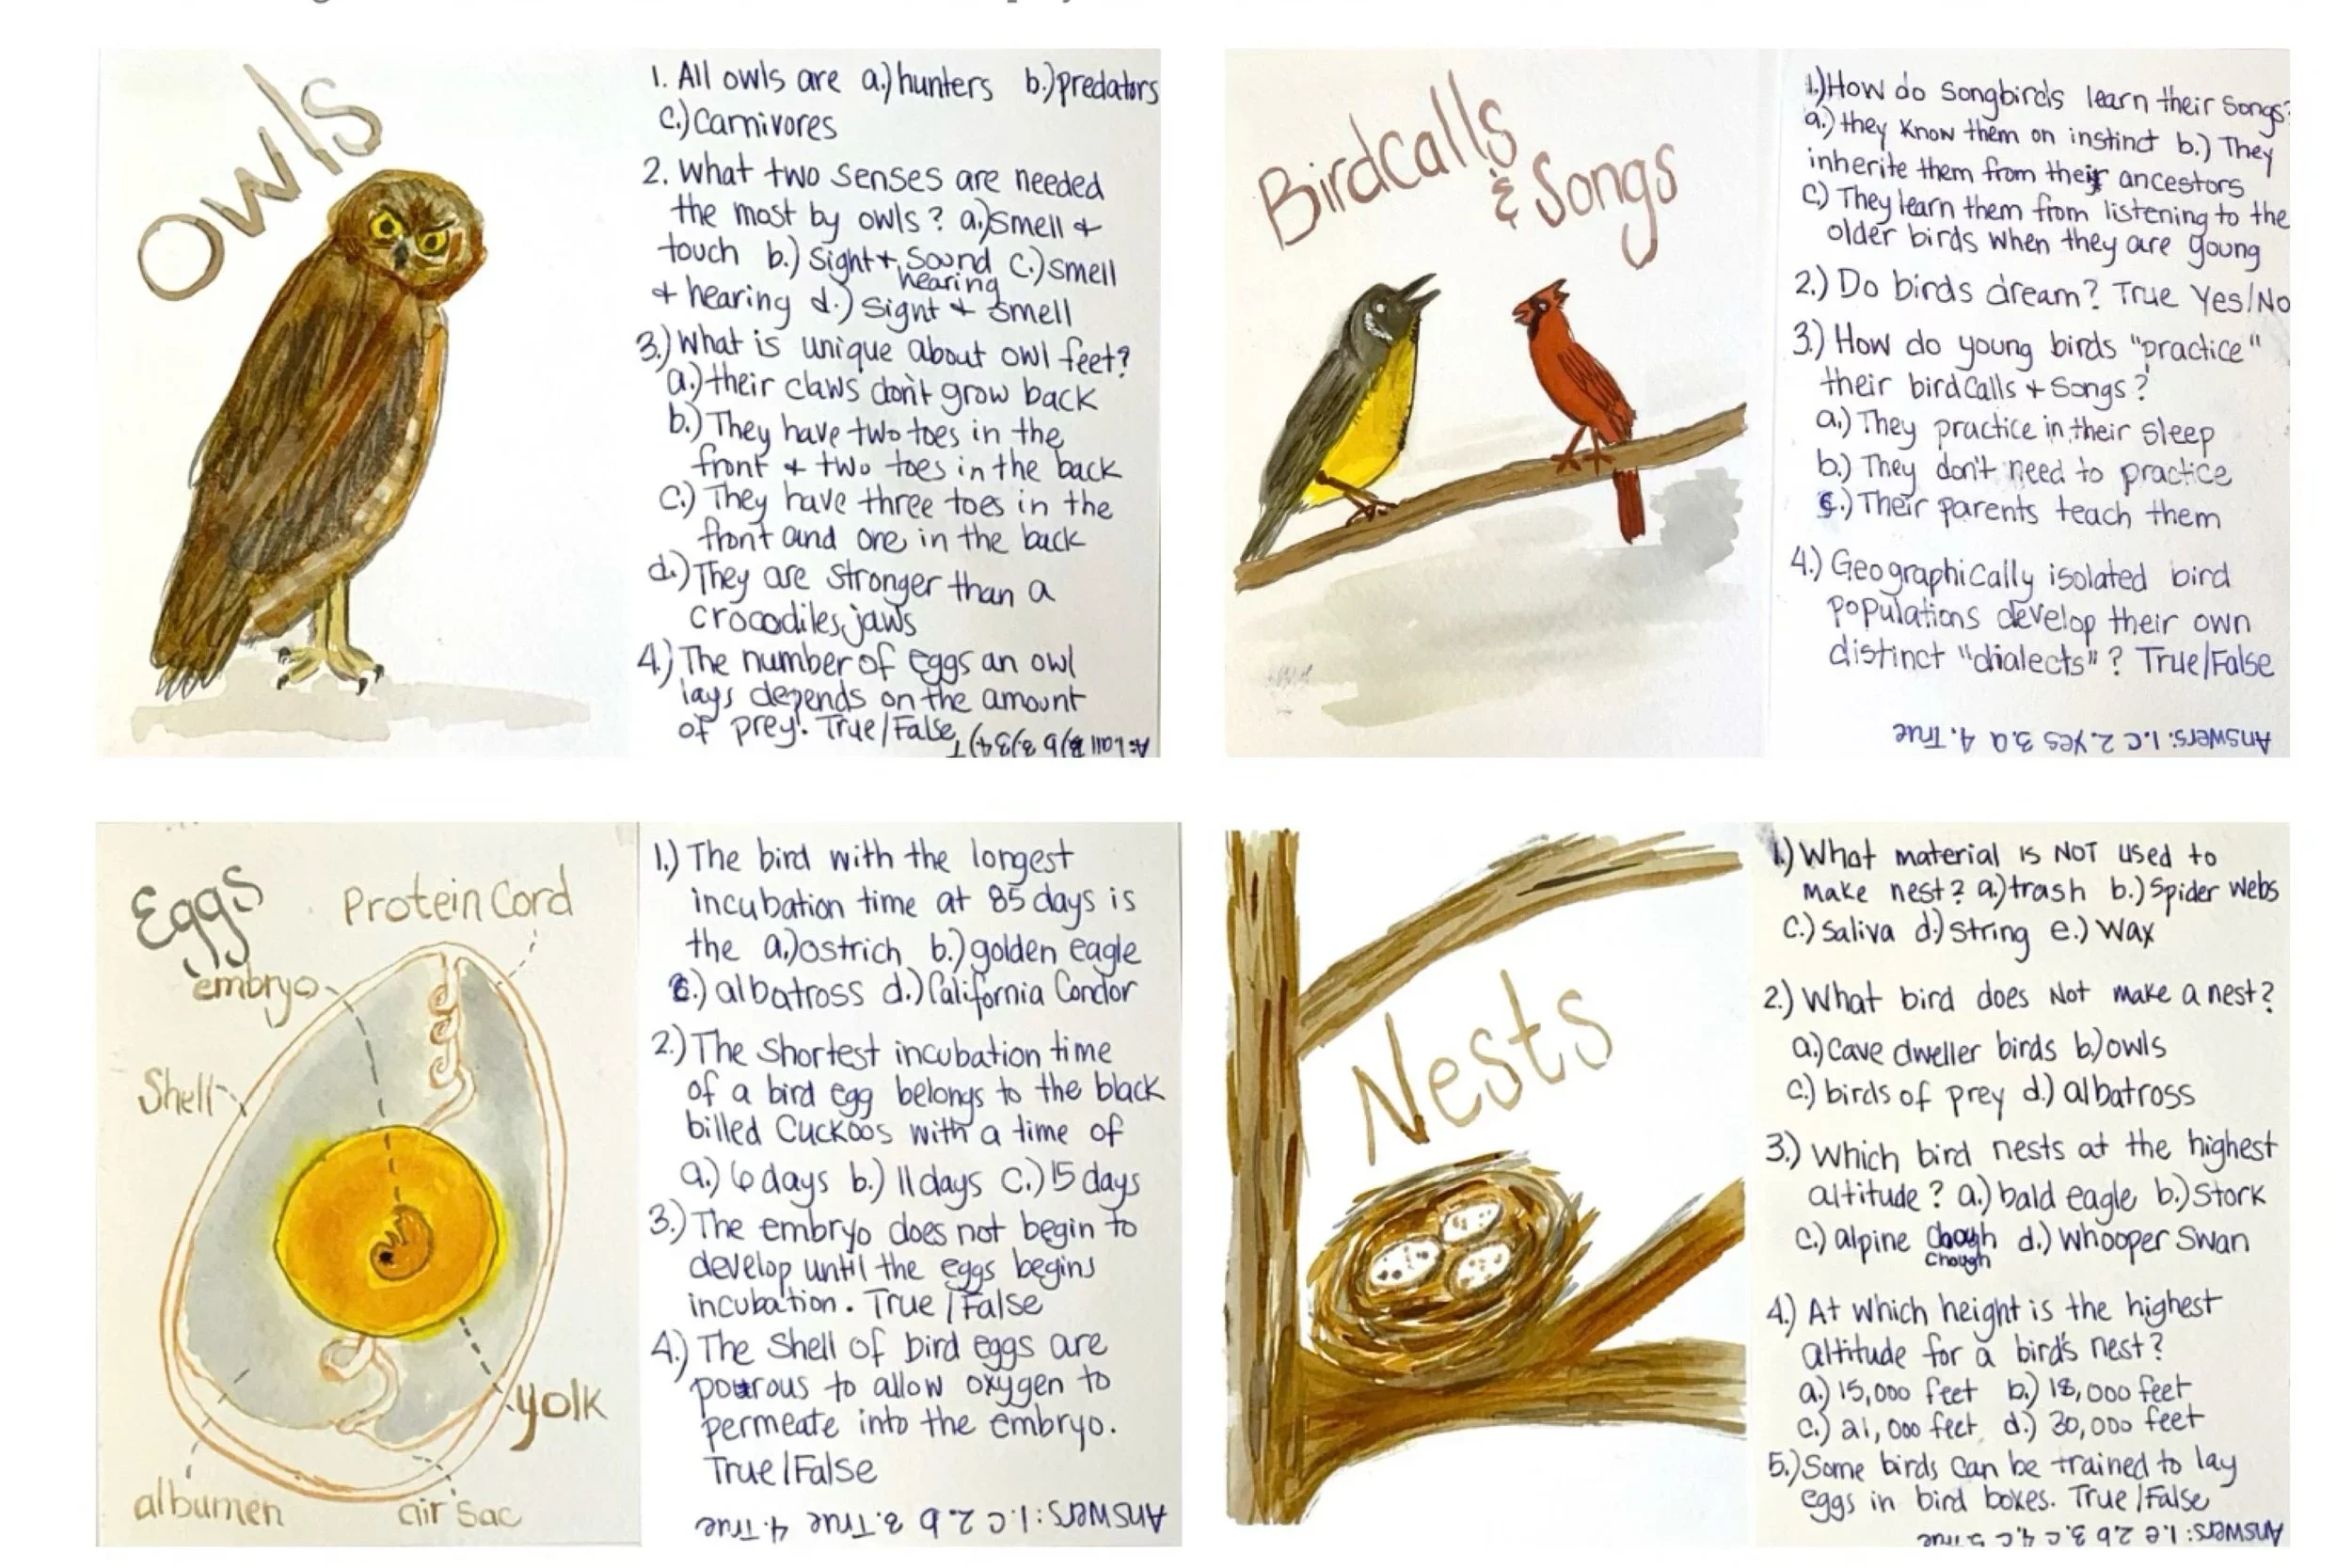
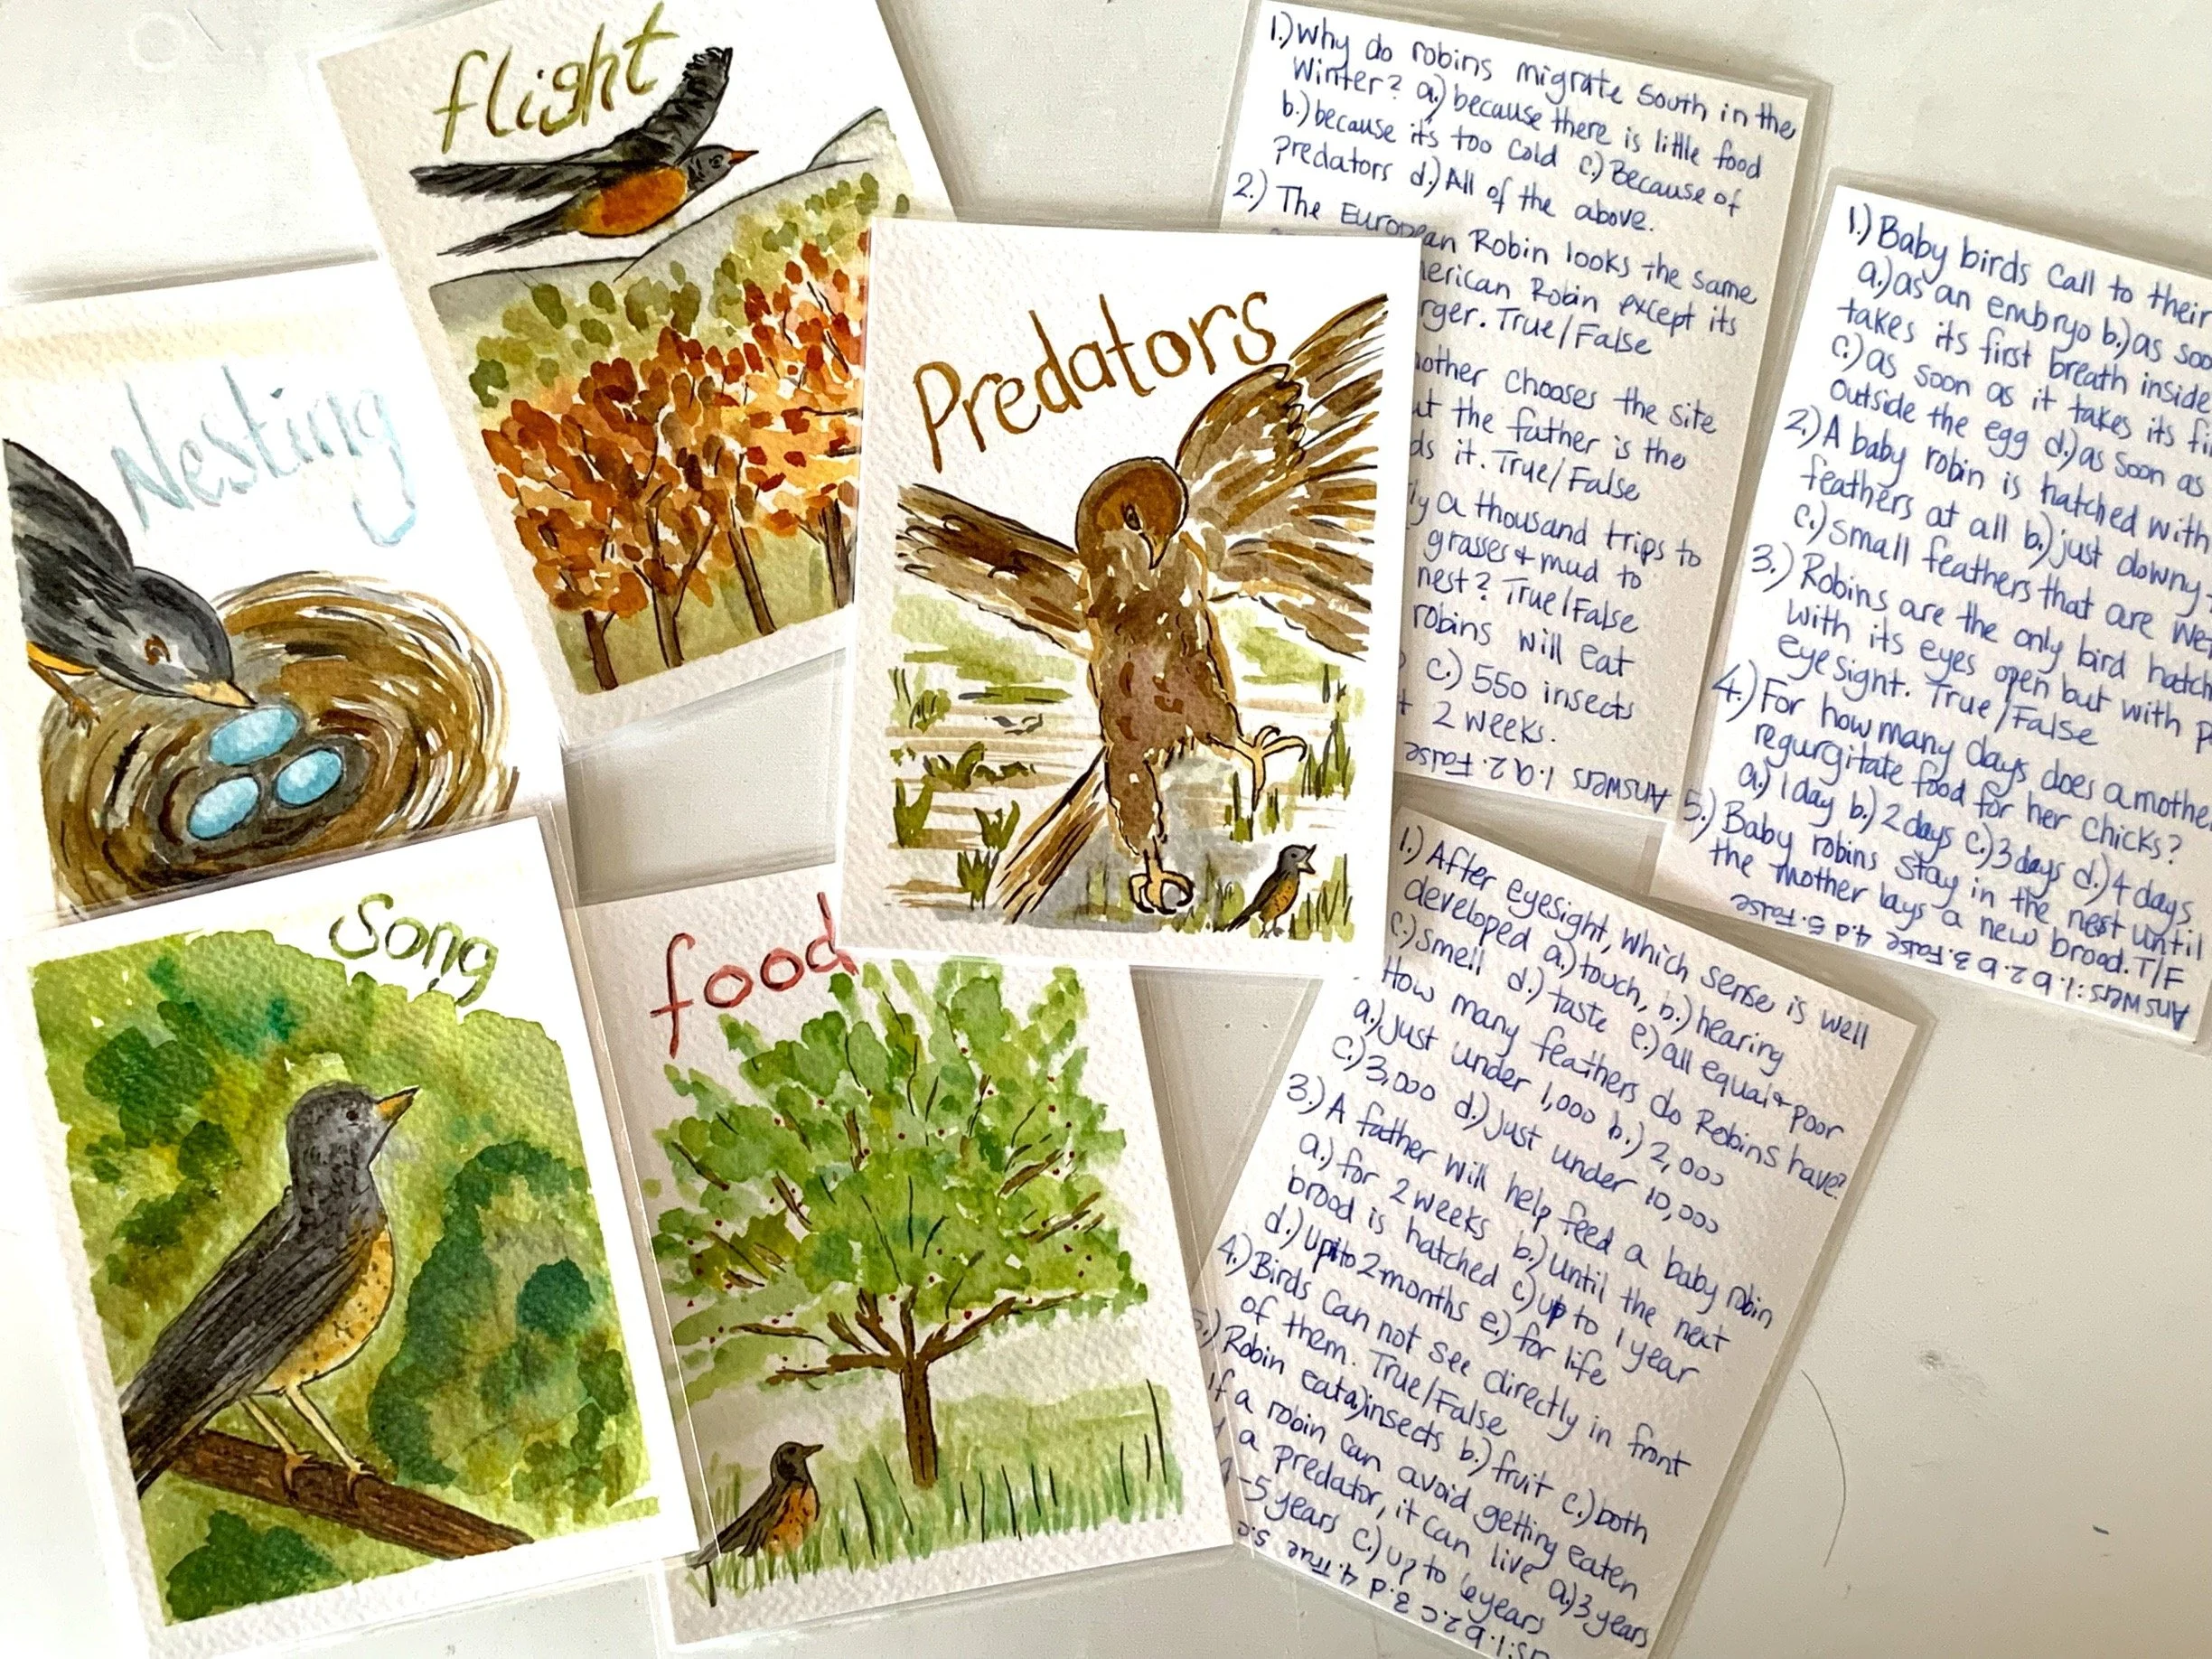
How to Make Nature Study Flashcards

For years now I’ve noticed that our science units lack substantial written narrations. While some of our science units may include a fair amount of writing, most don’t and we end up with unit after unit with the same blank main lesson book. This time around, I opted to make our own Professor Noggin’s inspired trivia cards and they were a hit!! Not at first, mind you. At first they were not going well. Here’s what happened:
This started out as a project I intended to do with my 12-year-old son. We were going to make our own Professor Noggins inspired trivia cards. He made his with chalk pastels, and I was going to work along with him as I usually do when we do these types of projects.
But this time I didn’t. As a result, the process was less enjoyable, and I kept finding myself telling him to do his work rather than us naturally doing it together. It got frustrating at times because I felt the project was dragging on, and he was complaining about it a lot. But as we had no main lesson book entries for this unit, I was adamant that we have some kind of writing assignment. After struggling through 6 cards, I told him he could end there. But then as we continued our unit, I wanted him to do more. So I told him I would match him card for card if he continued. And at the end, we could have a competition. I chose to do mine with watercolors because I prefer that medium to chalk pastels for this kind of project.
I really got into it! But it was hard!!! Coming up with trivia questions is so hard!! I wanted them to be just challenging enough to bring a smile to my son’s face when he got it right. And so I poured over all our bird books trying to piece together just the right kind of questions, often forgetting which resource I found something in and frustratingly scouring all of them page by page so I could fact check.
I also asked Siri often for help, but she was useless. She’d read me my emails and tell where on google maps was an albatross’s nest 🤦♀️ I finally gave up on her and went directly to the Internet for some of the harder to find answers.
For this project, we used 140 lb. Fabriano Watercolor paper, a variety of paint brushes from a local craft store, various earthy and brown toned Distress Inks, and a lot of books and resources to help with art inspiration. We also used a fountain pen for the writing and eventually we’ll laminate our cards using our Black and Decker Laminating sheets and our Minc Machine to laminate them. The Minc machine is a foiling laminator so you can get a more affordable option for laminating.
We love using our Distress Inks as watercolors for our projects. Check out our other tutorials in which we’ve used our Distress Inks.


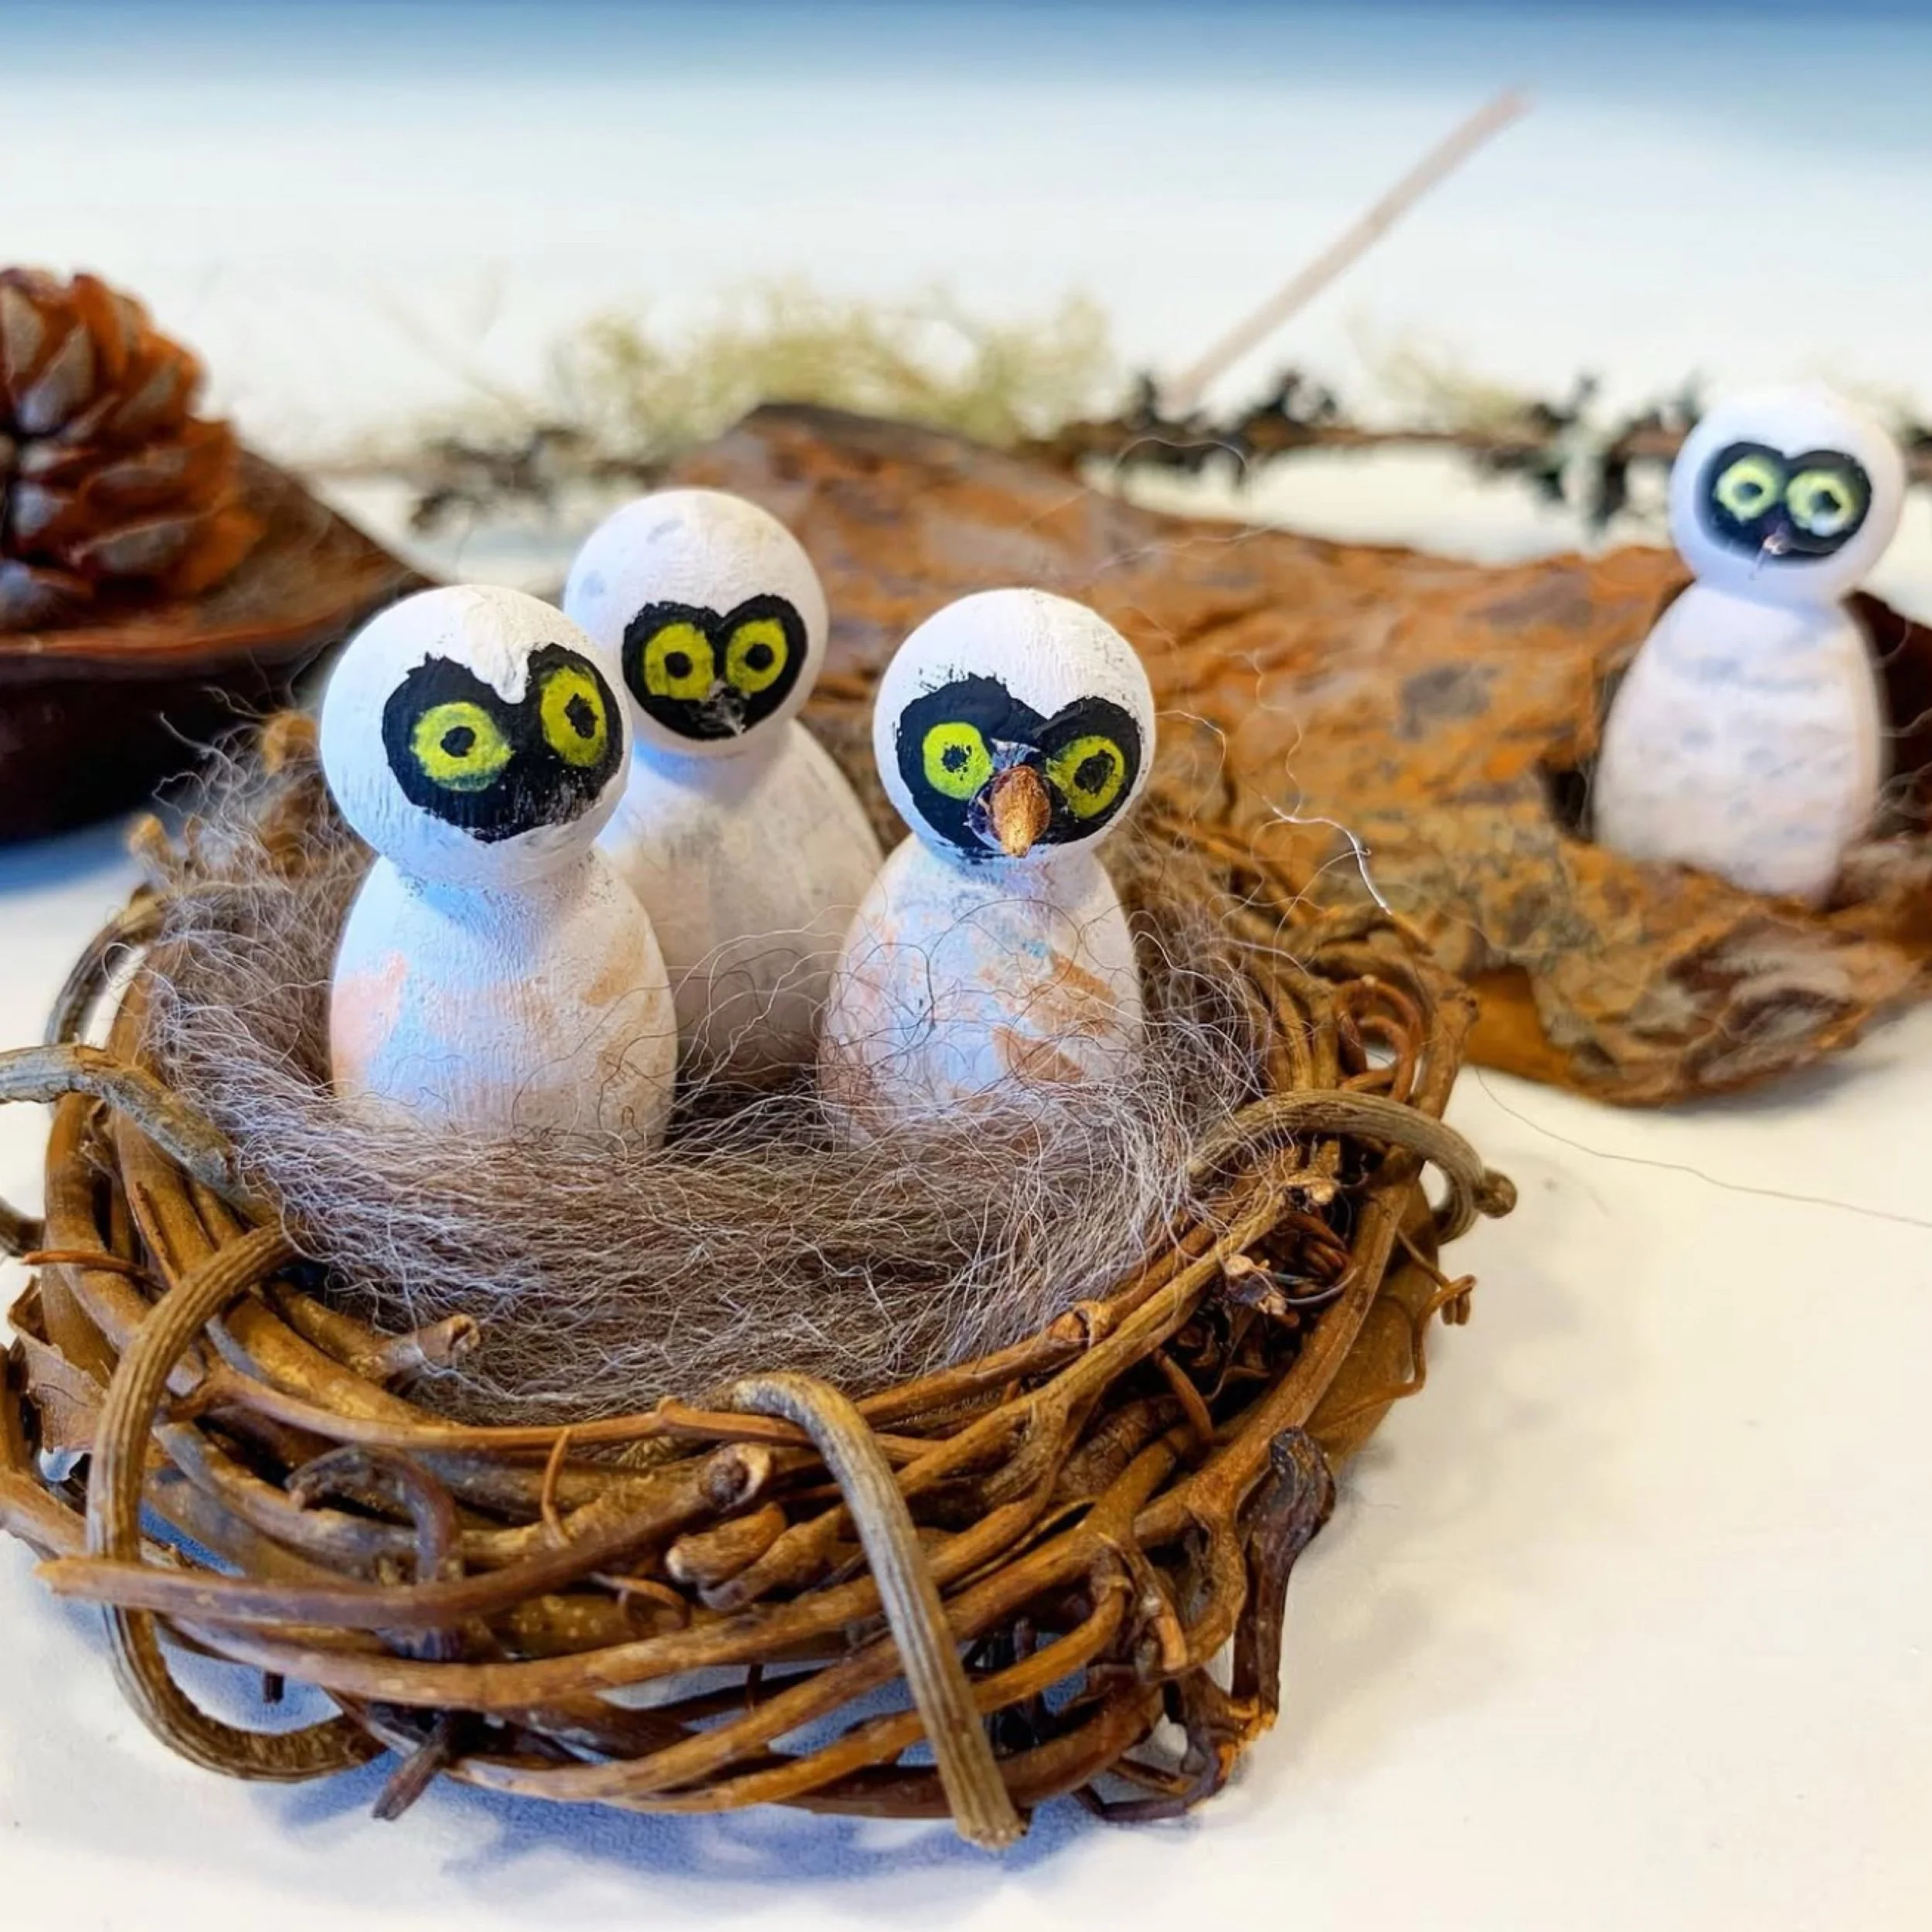
Owl Peg Doll Tutorial
Check out the video tutorial on how to make these adorable owl chicks.
Finding hands-on projects for our unit studies and main lesson blocks brings me so much joy, especially when we can make adorable owl peg dolls like these. They were pretty simple to do, but had their challenges. Making the eyes were too hard for my 8-year-old daughter and 12-year-old son, so after they attempted, I helped them fix it up. The beaks were also really hard to do and while we found some solutions, I’m thinking they are eventually going to break off. While those small pieces are choking hazards for young children, these peg dolls babies are also very small and so I don’t recommend giving these to young children. Also, as we used a mix of Lyra Opaque watercolors (which I believe are safe for children), I don’t know about the acrylic paint we use to make the black around the eyes. For that reason, I advise you check the safety of your paints and keep these objects (whether painted or not), out of the hands of small children.
For the first time, I glued the peg doll base onto a small square of watercolor paper using a glue dot so the children and I would have an easier time painting them. I don’t know why it took me so long to figure that out! But oh did it make things easier.
I’m using peg doll babies and Lyra Opaque watercolors for this project. You can find these materials at A Child’s Dream. I used various materials for the beak.
Check out our complete Owl Unit Study with videos on how we put this unit together, the resources we used and the projects we did. You can also check out our larger Bird Unit Study which includes more projects and resources.
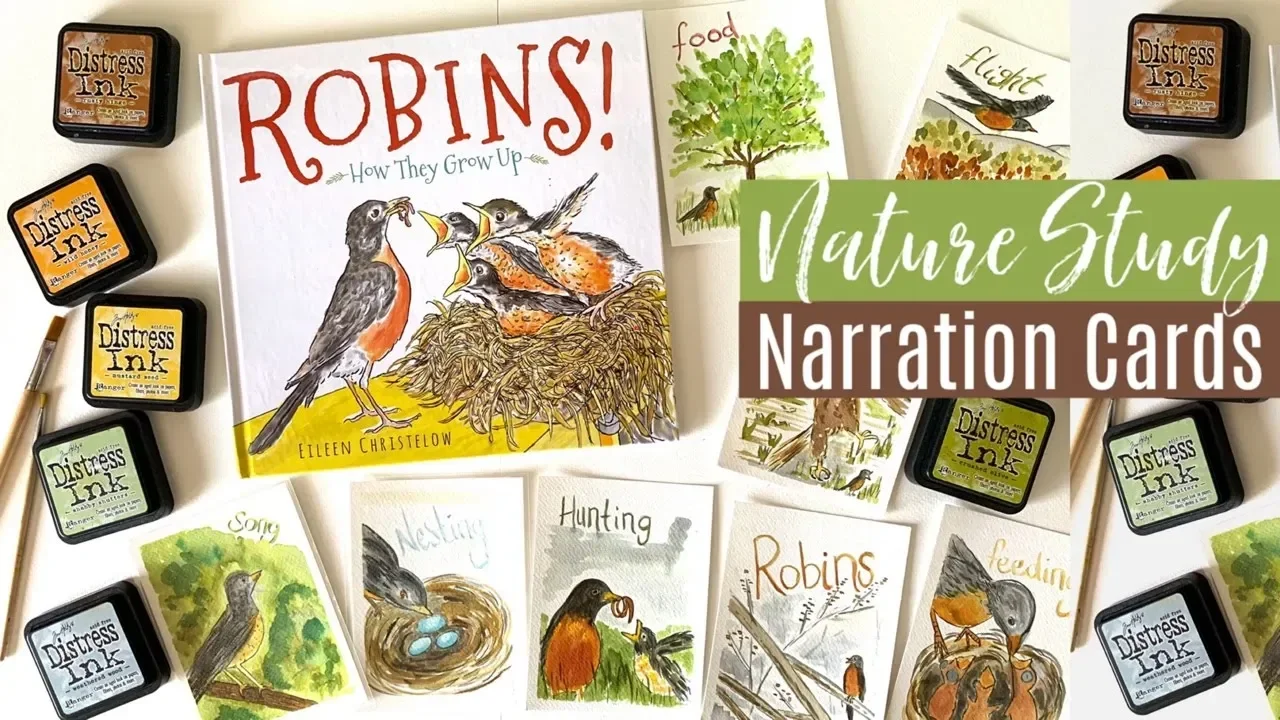
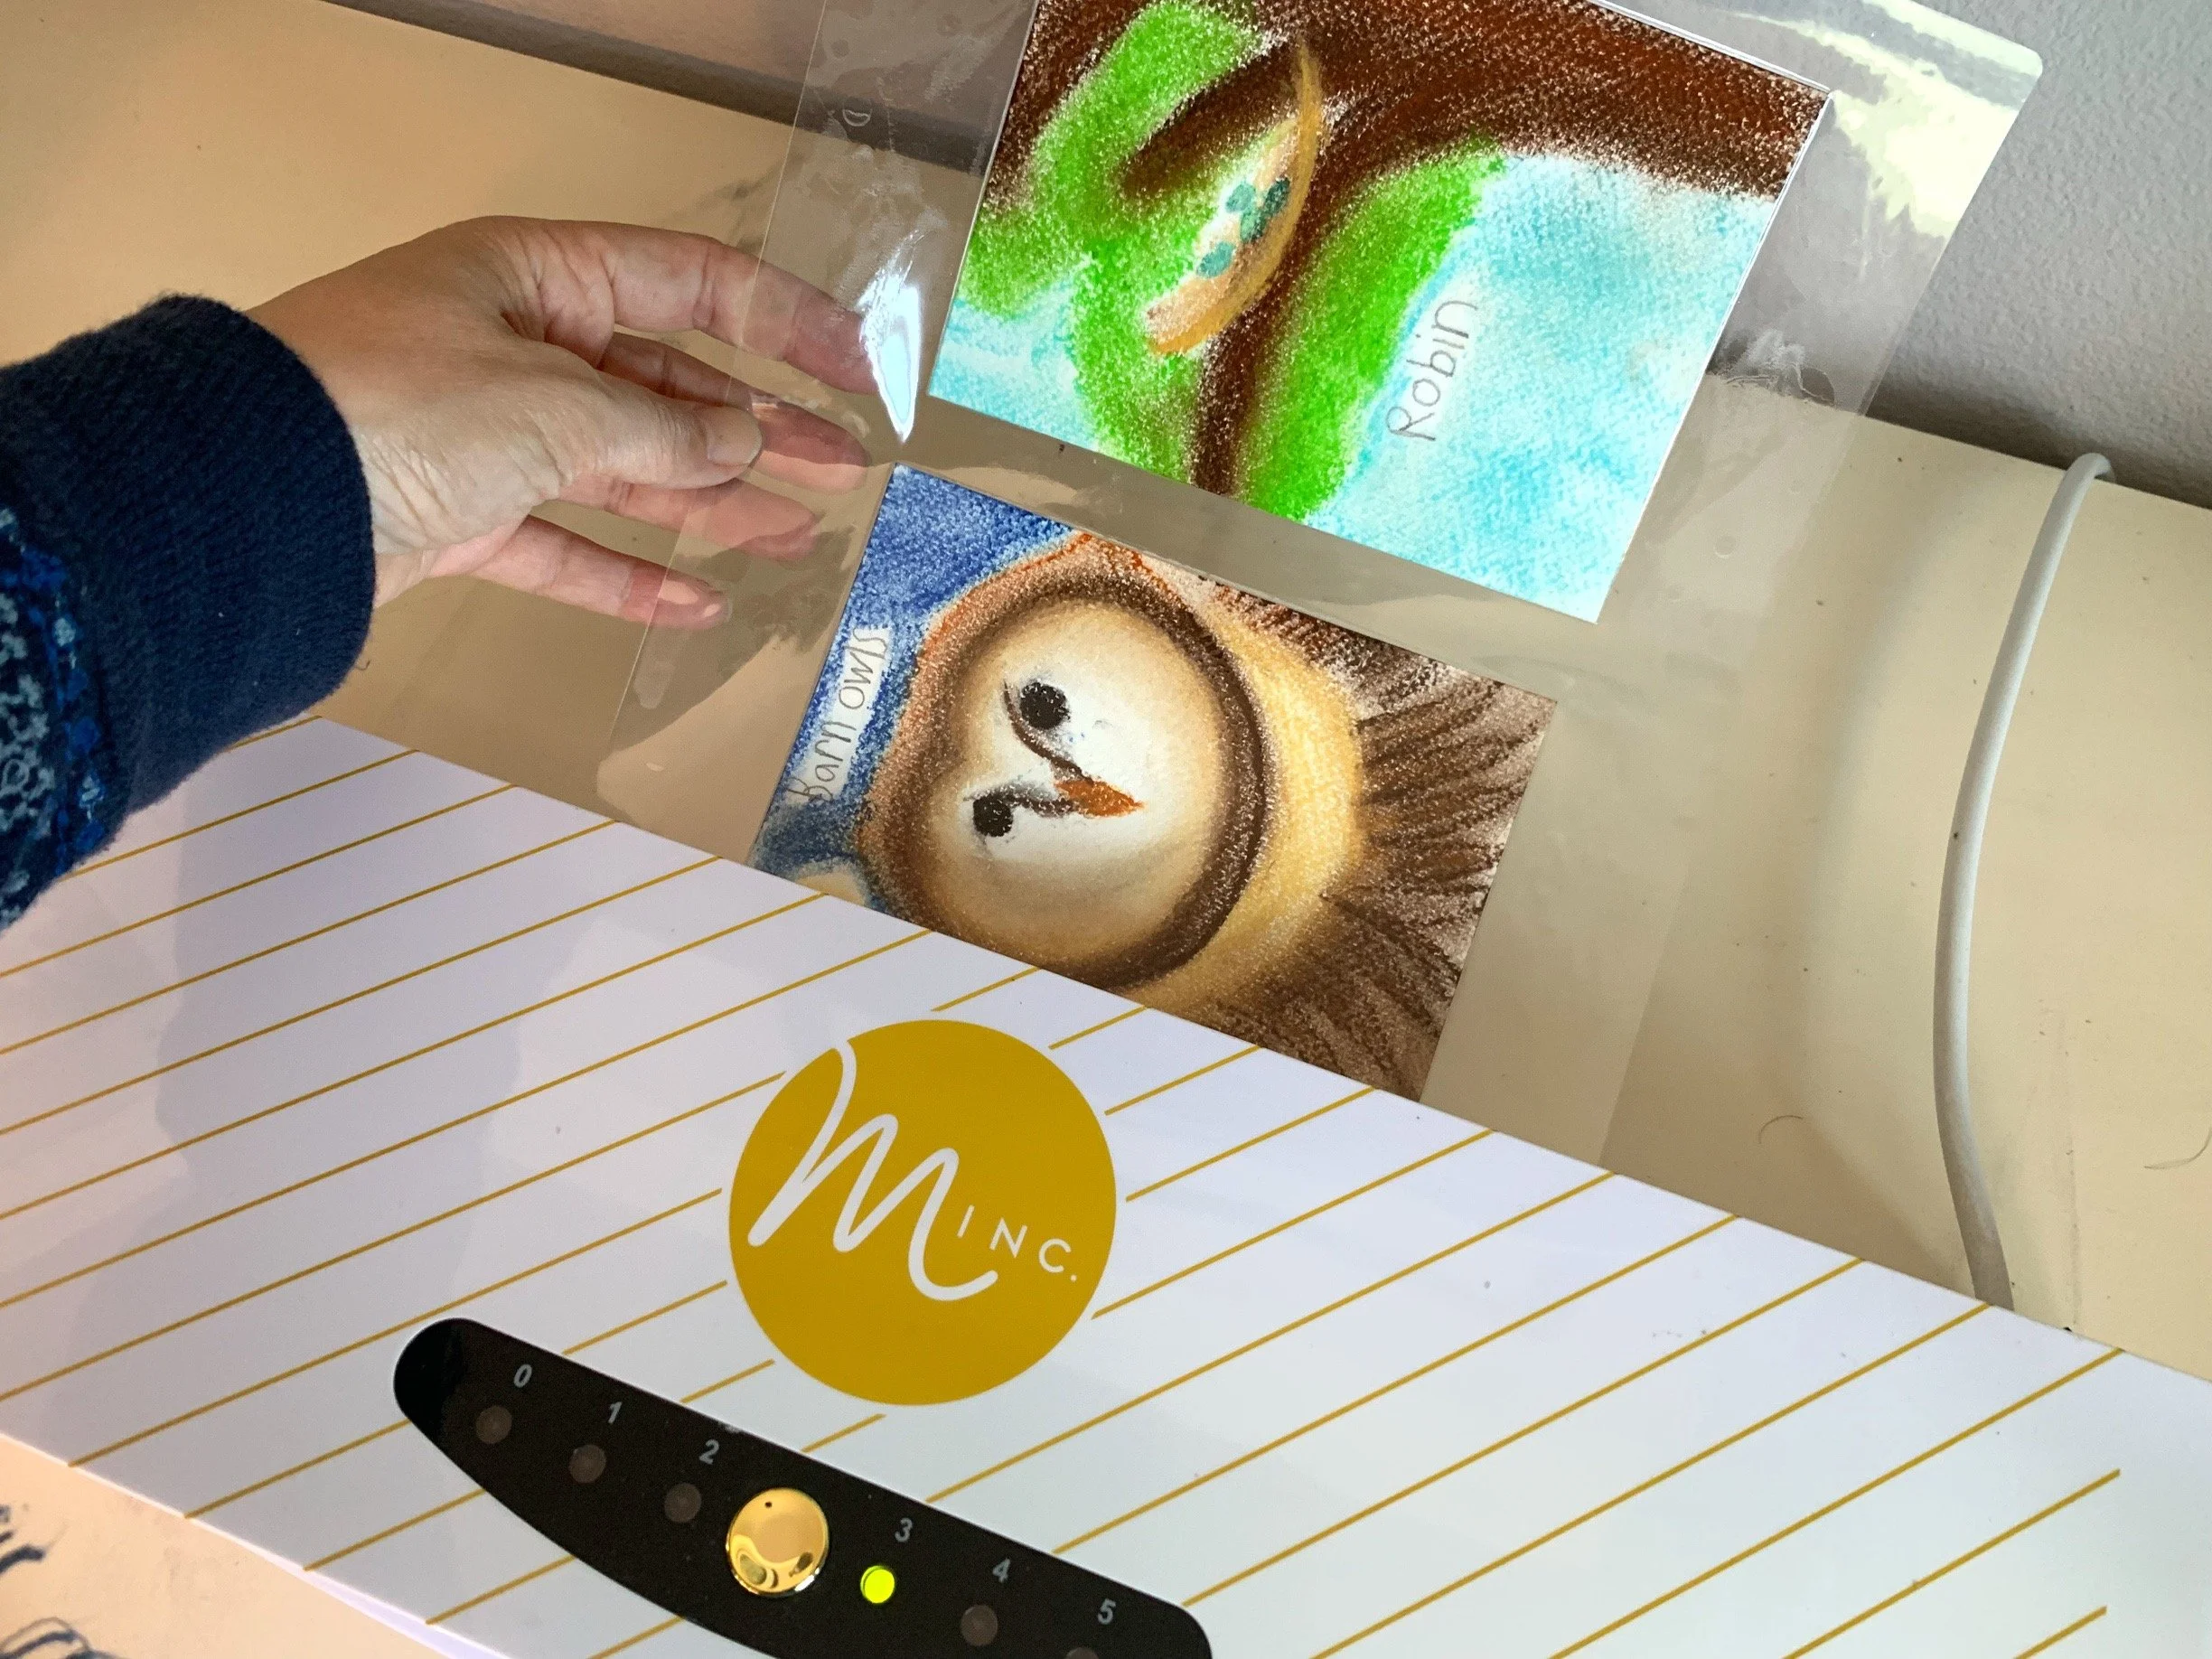
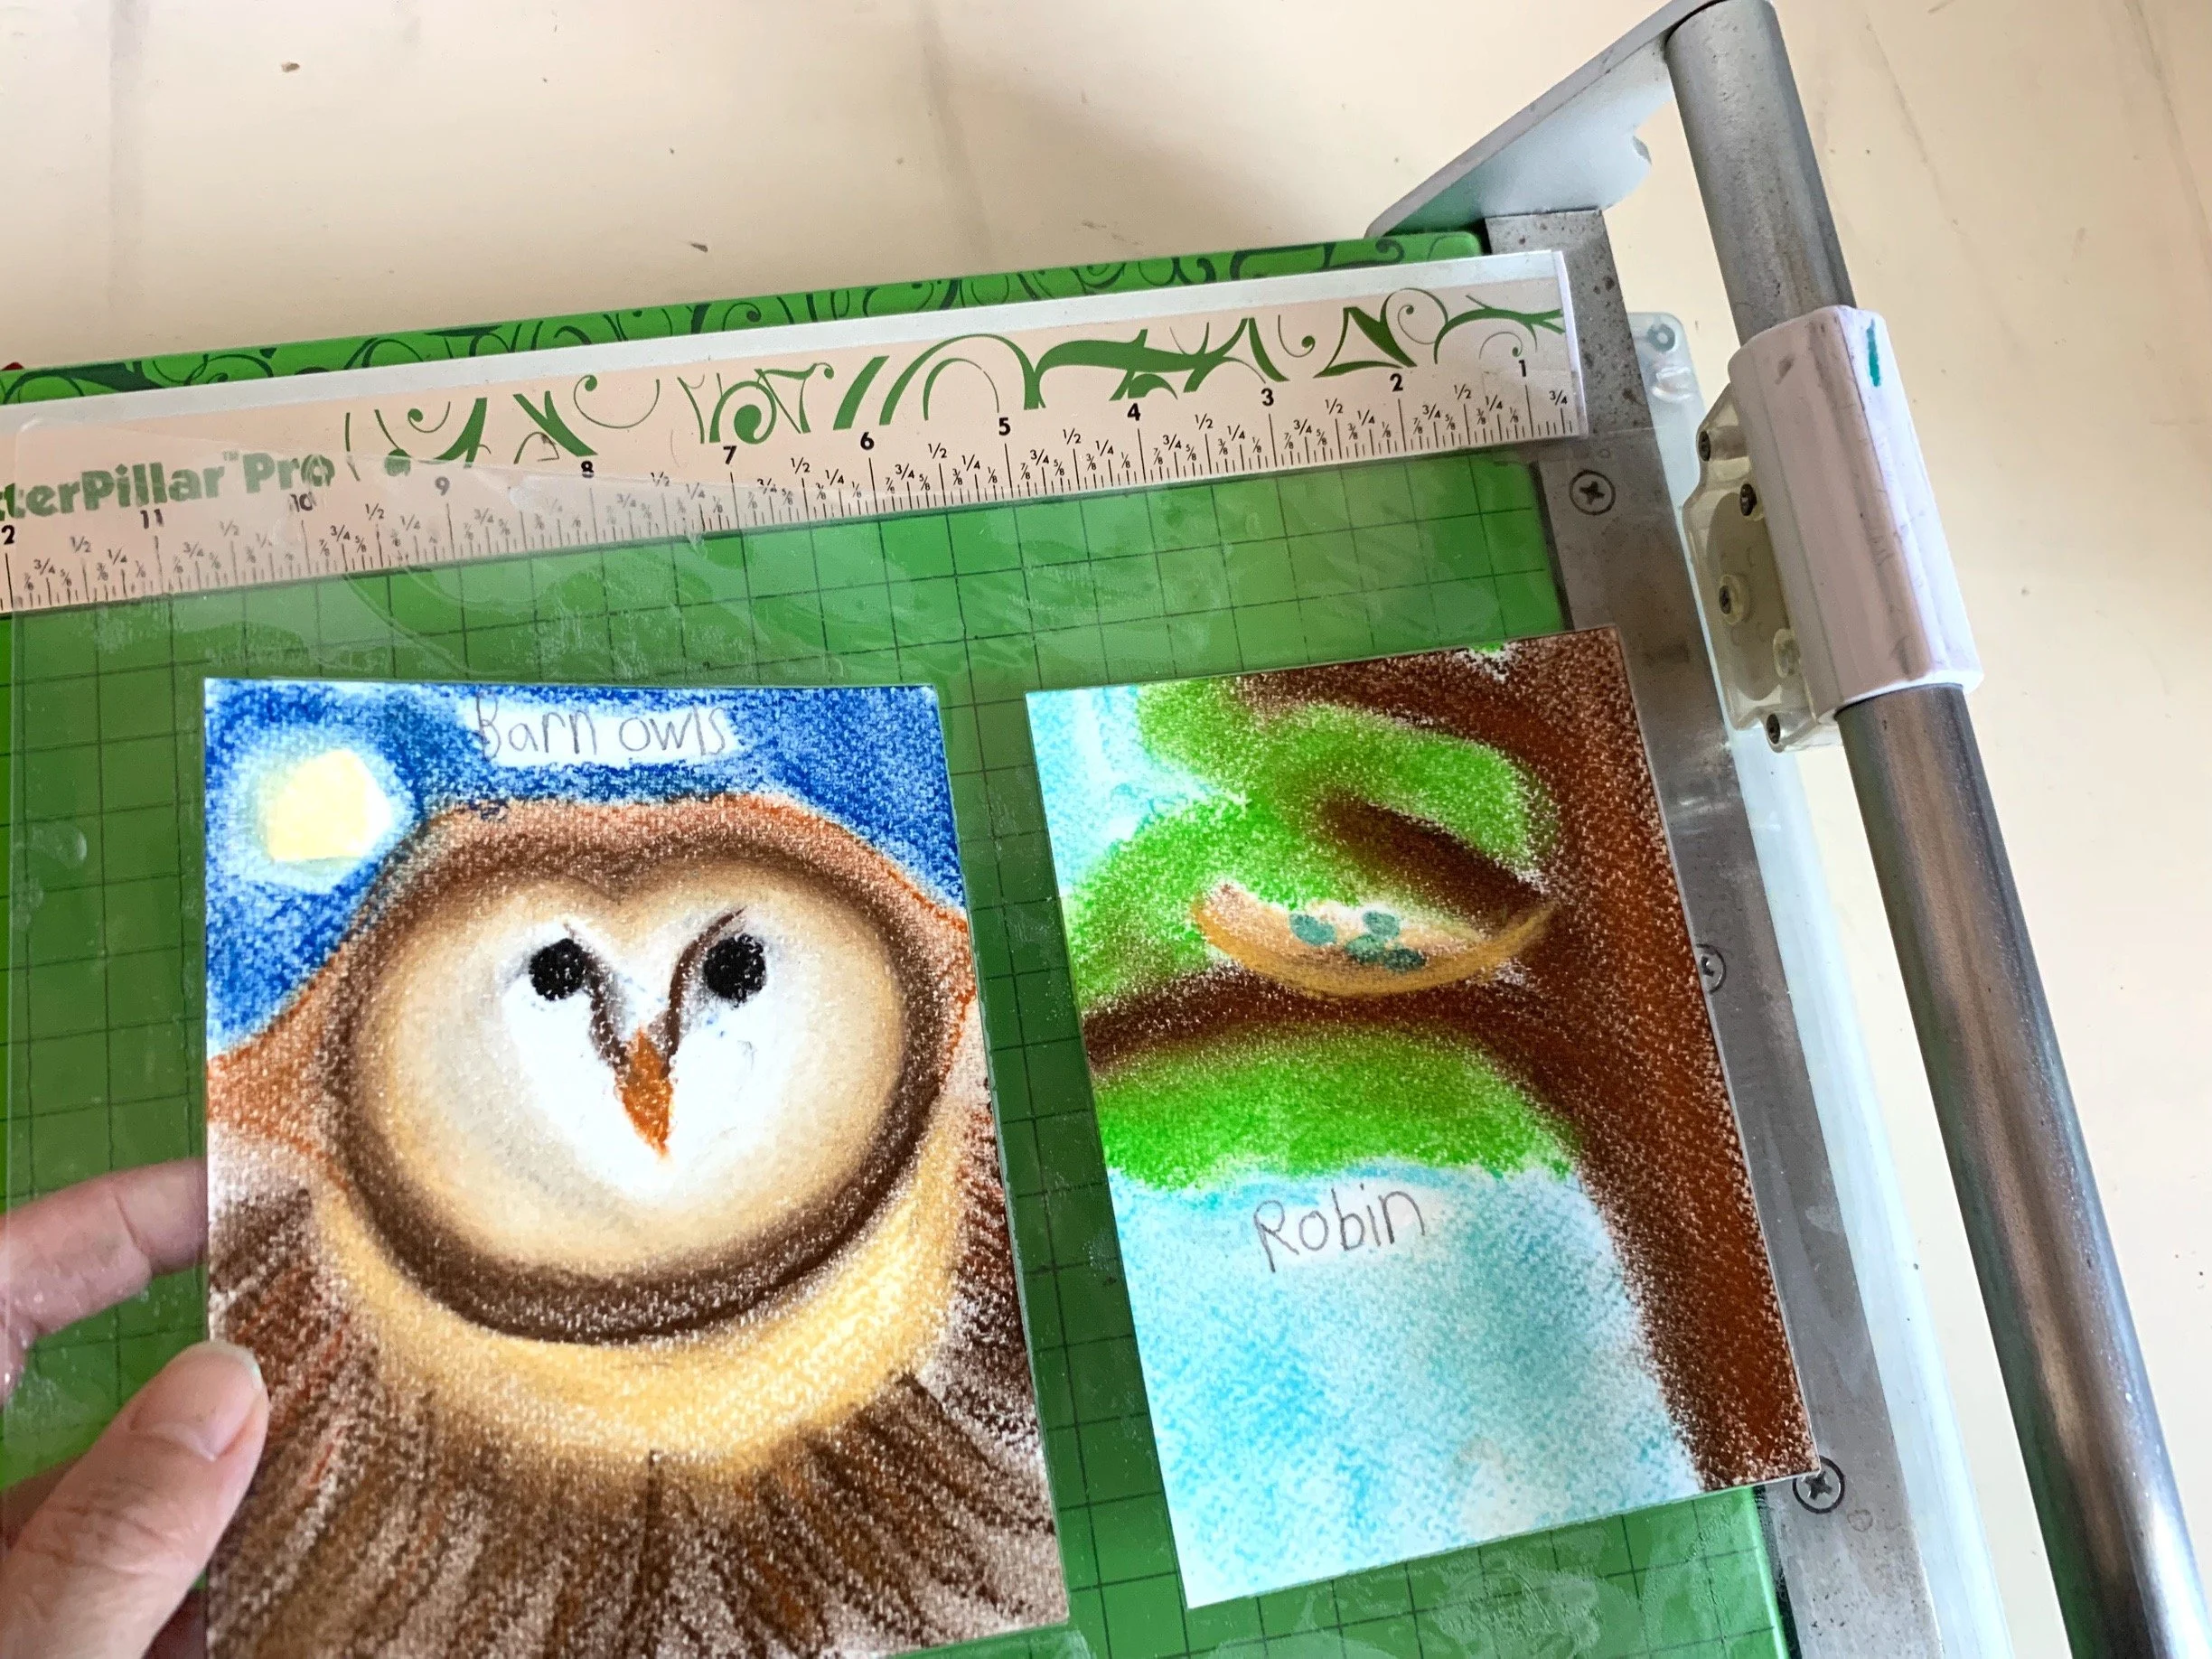
How to Make Bird Nature Journaling Cards
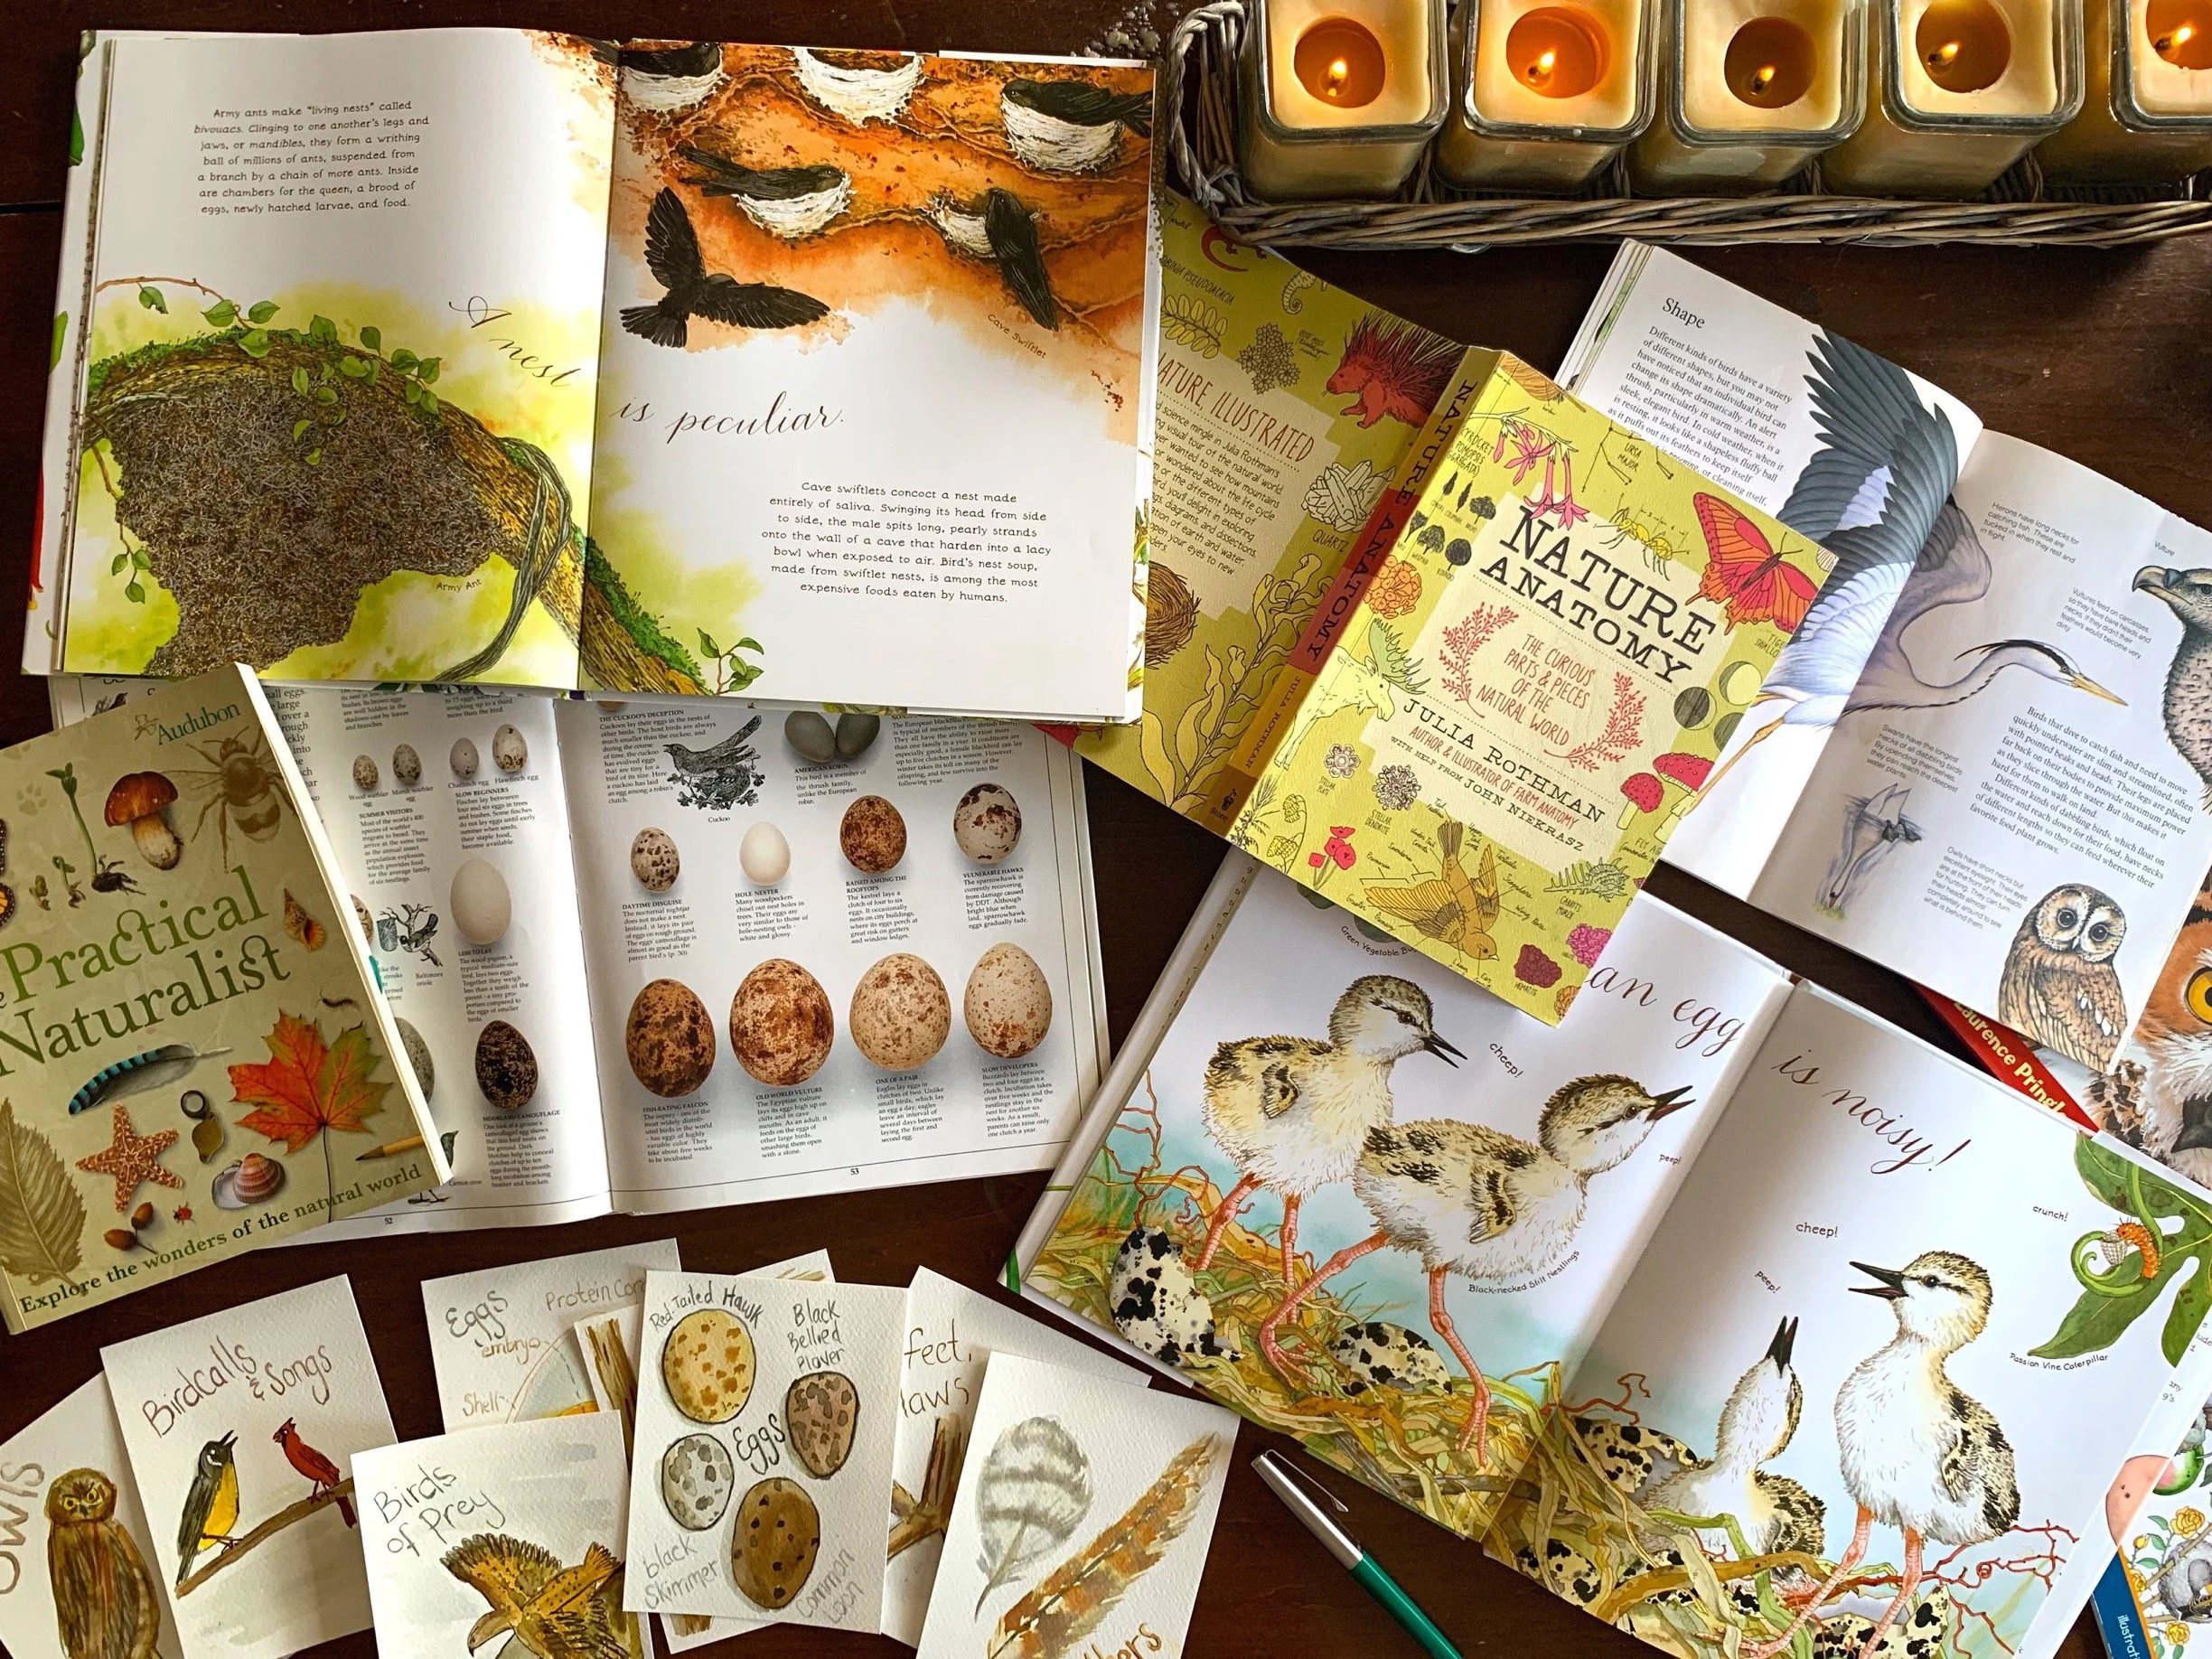
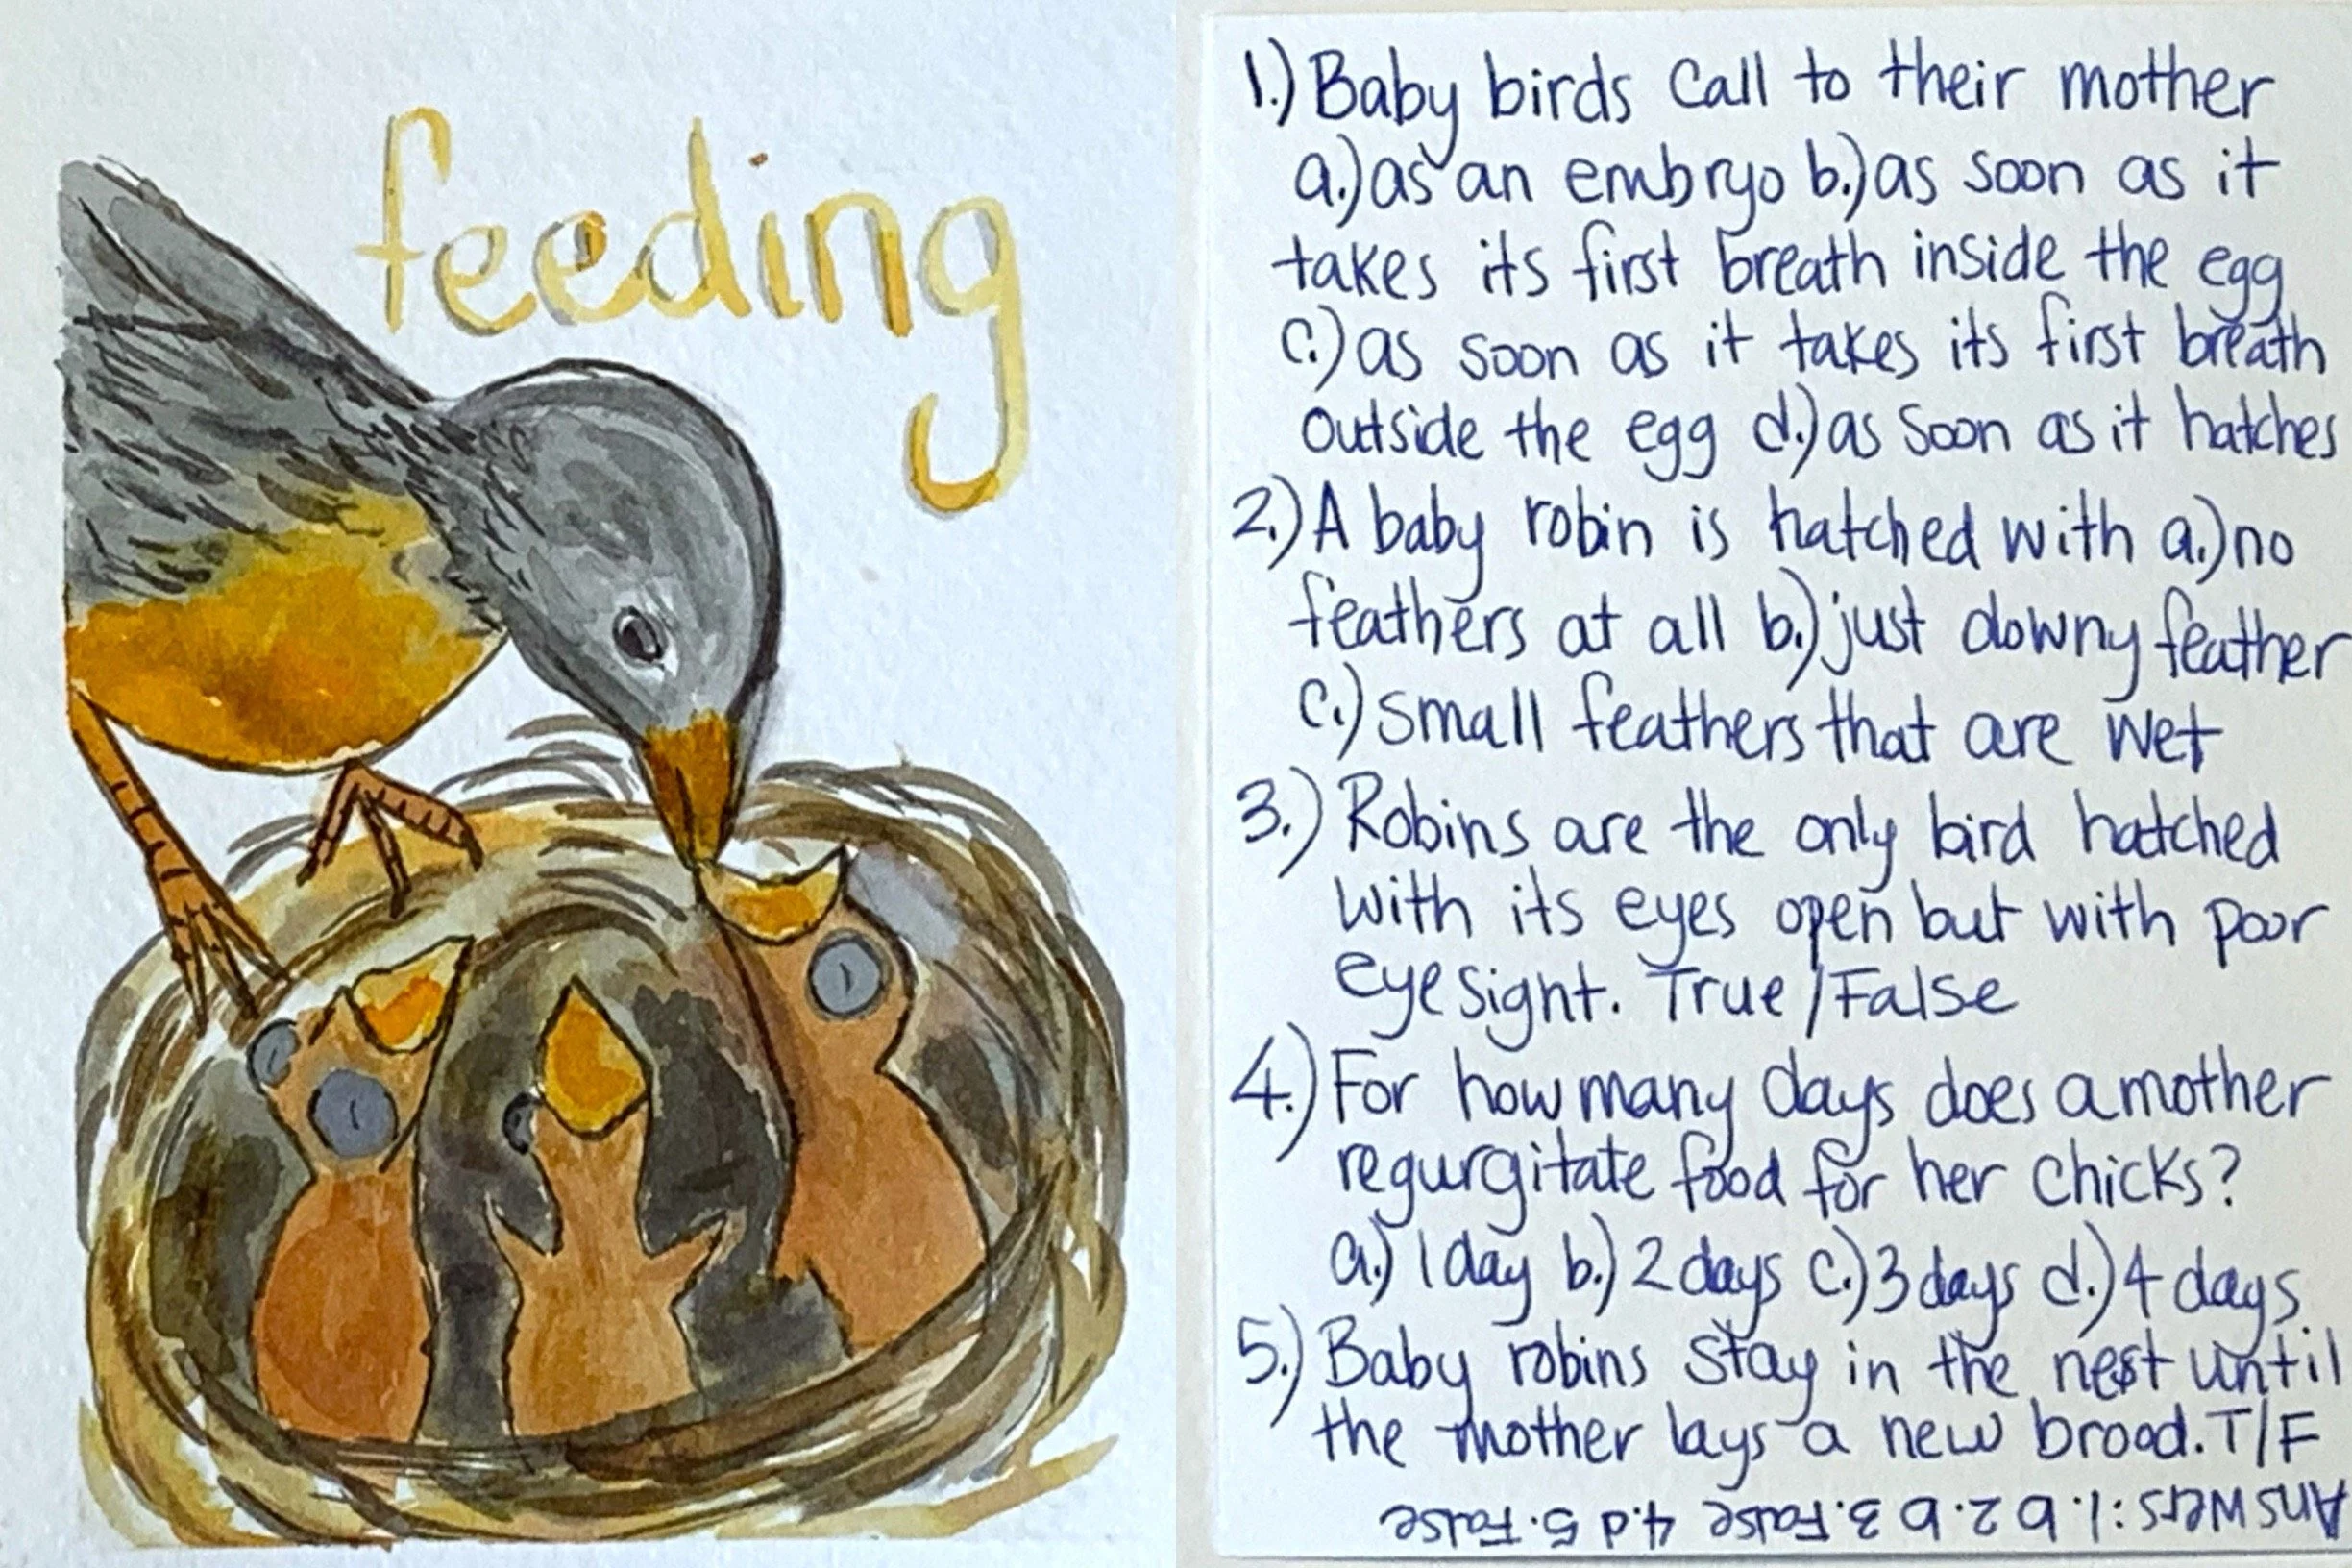
We’re on a roll with these nature cards. But this project is different. This time, because we are at the tail end of our unit (pun intended), I’m the only one who did this project. It’s for a couple reasons that I didn’t encourage the children to partake in this project. Firstly, the unit was basically over, but we received one last book that didn’t arrive until the end of our unit. Robins: How They Grow Up by Eileen Christelow is a fantastic picture book! The illustrations are gorgeous and captivating and the story format in engaging and informative. I loved the illustrations so much, I felt compelled to make a small set of trivia nature cards. And by small I mean four cards, but I got carried away and made eight of them.
So while my children didn’t make any cards themselves, they did participate in the game that followed. We took all the cards we made from the unit (a total of three sets) and played! We each got about 6-8 cards each and we asked each other the questions which were written on the back. Whoever got a question right, got to keep the card. At the end we tallied up to see who won.
Had we gotten this book at the start of our unit, I know we all would have worked on this project together with either the children making their own set or working together on a community project. Seeing that they were thoroughly not interested in the project, I did not pursue having them do a set too. And because I made mine, we all can enjoy the benefits off the cards!
For this project, I used Fabriano 140 lb. Watercolor paper. It measures 9″x12″ and I cut it down in half and in half again until the paper was 4.5″x6″. We used Distress Inks as watercolors. I love these inks because they have a wide range of colors and they dry permanent. I laminated the sheets for durability using Black and Decker 5 mil sheets and my Heidi Swapp Minc machine. This is an expensive foiling machine, and any laminating machine will work and be much more affordable.
Check out our complete Owl Unit Study with videos on how we put this unit together, the resources we used and the projects we did. You can also check out our larger Bird Unit Study which includes more projects and resources.


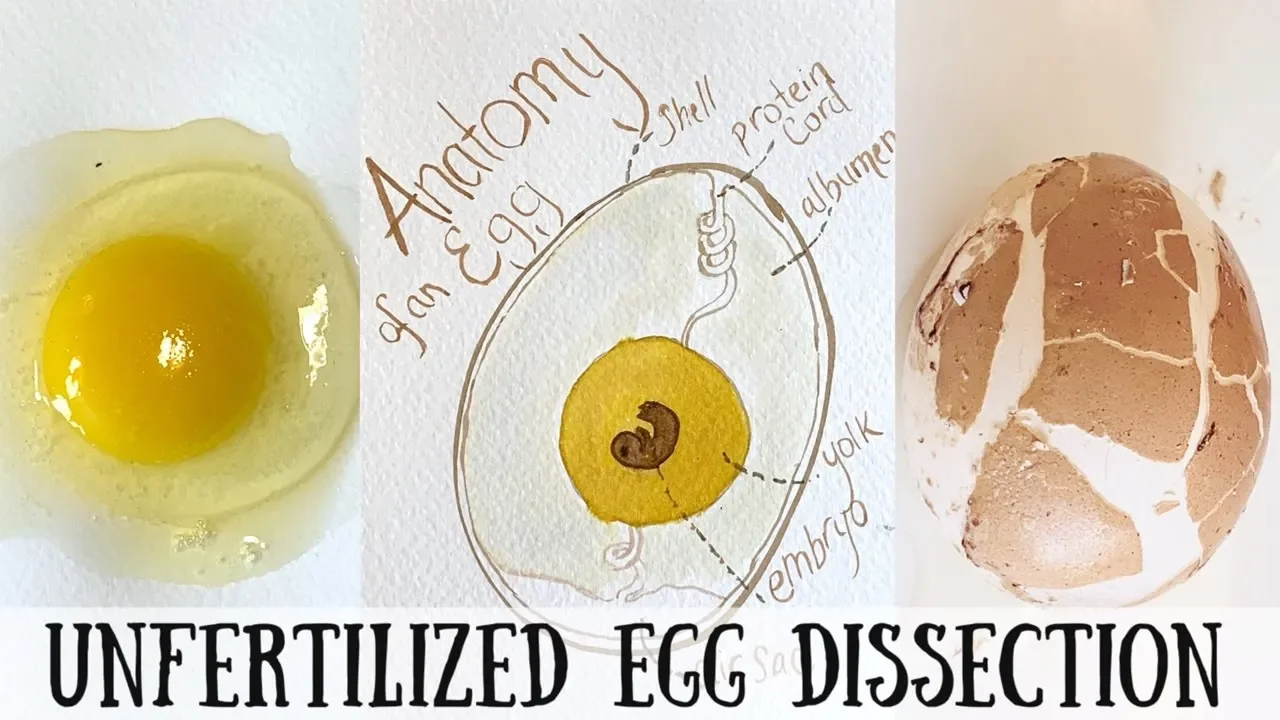
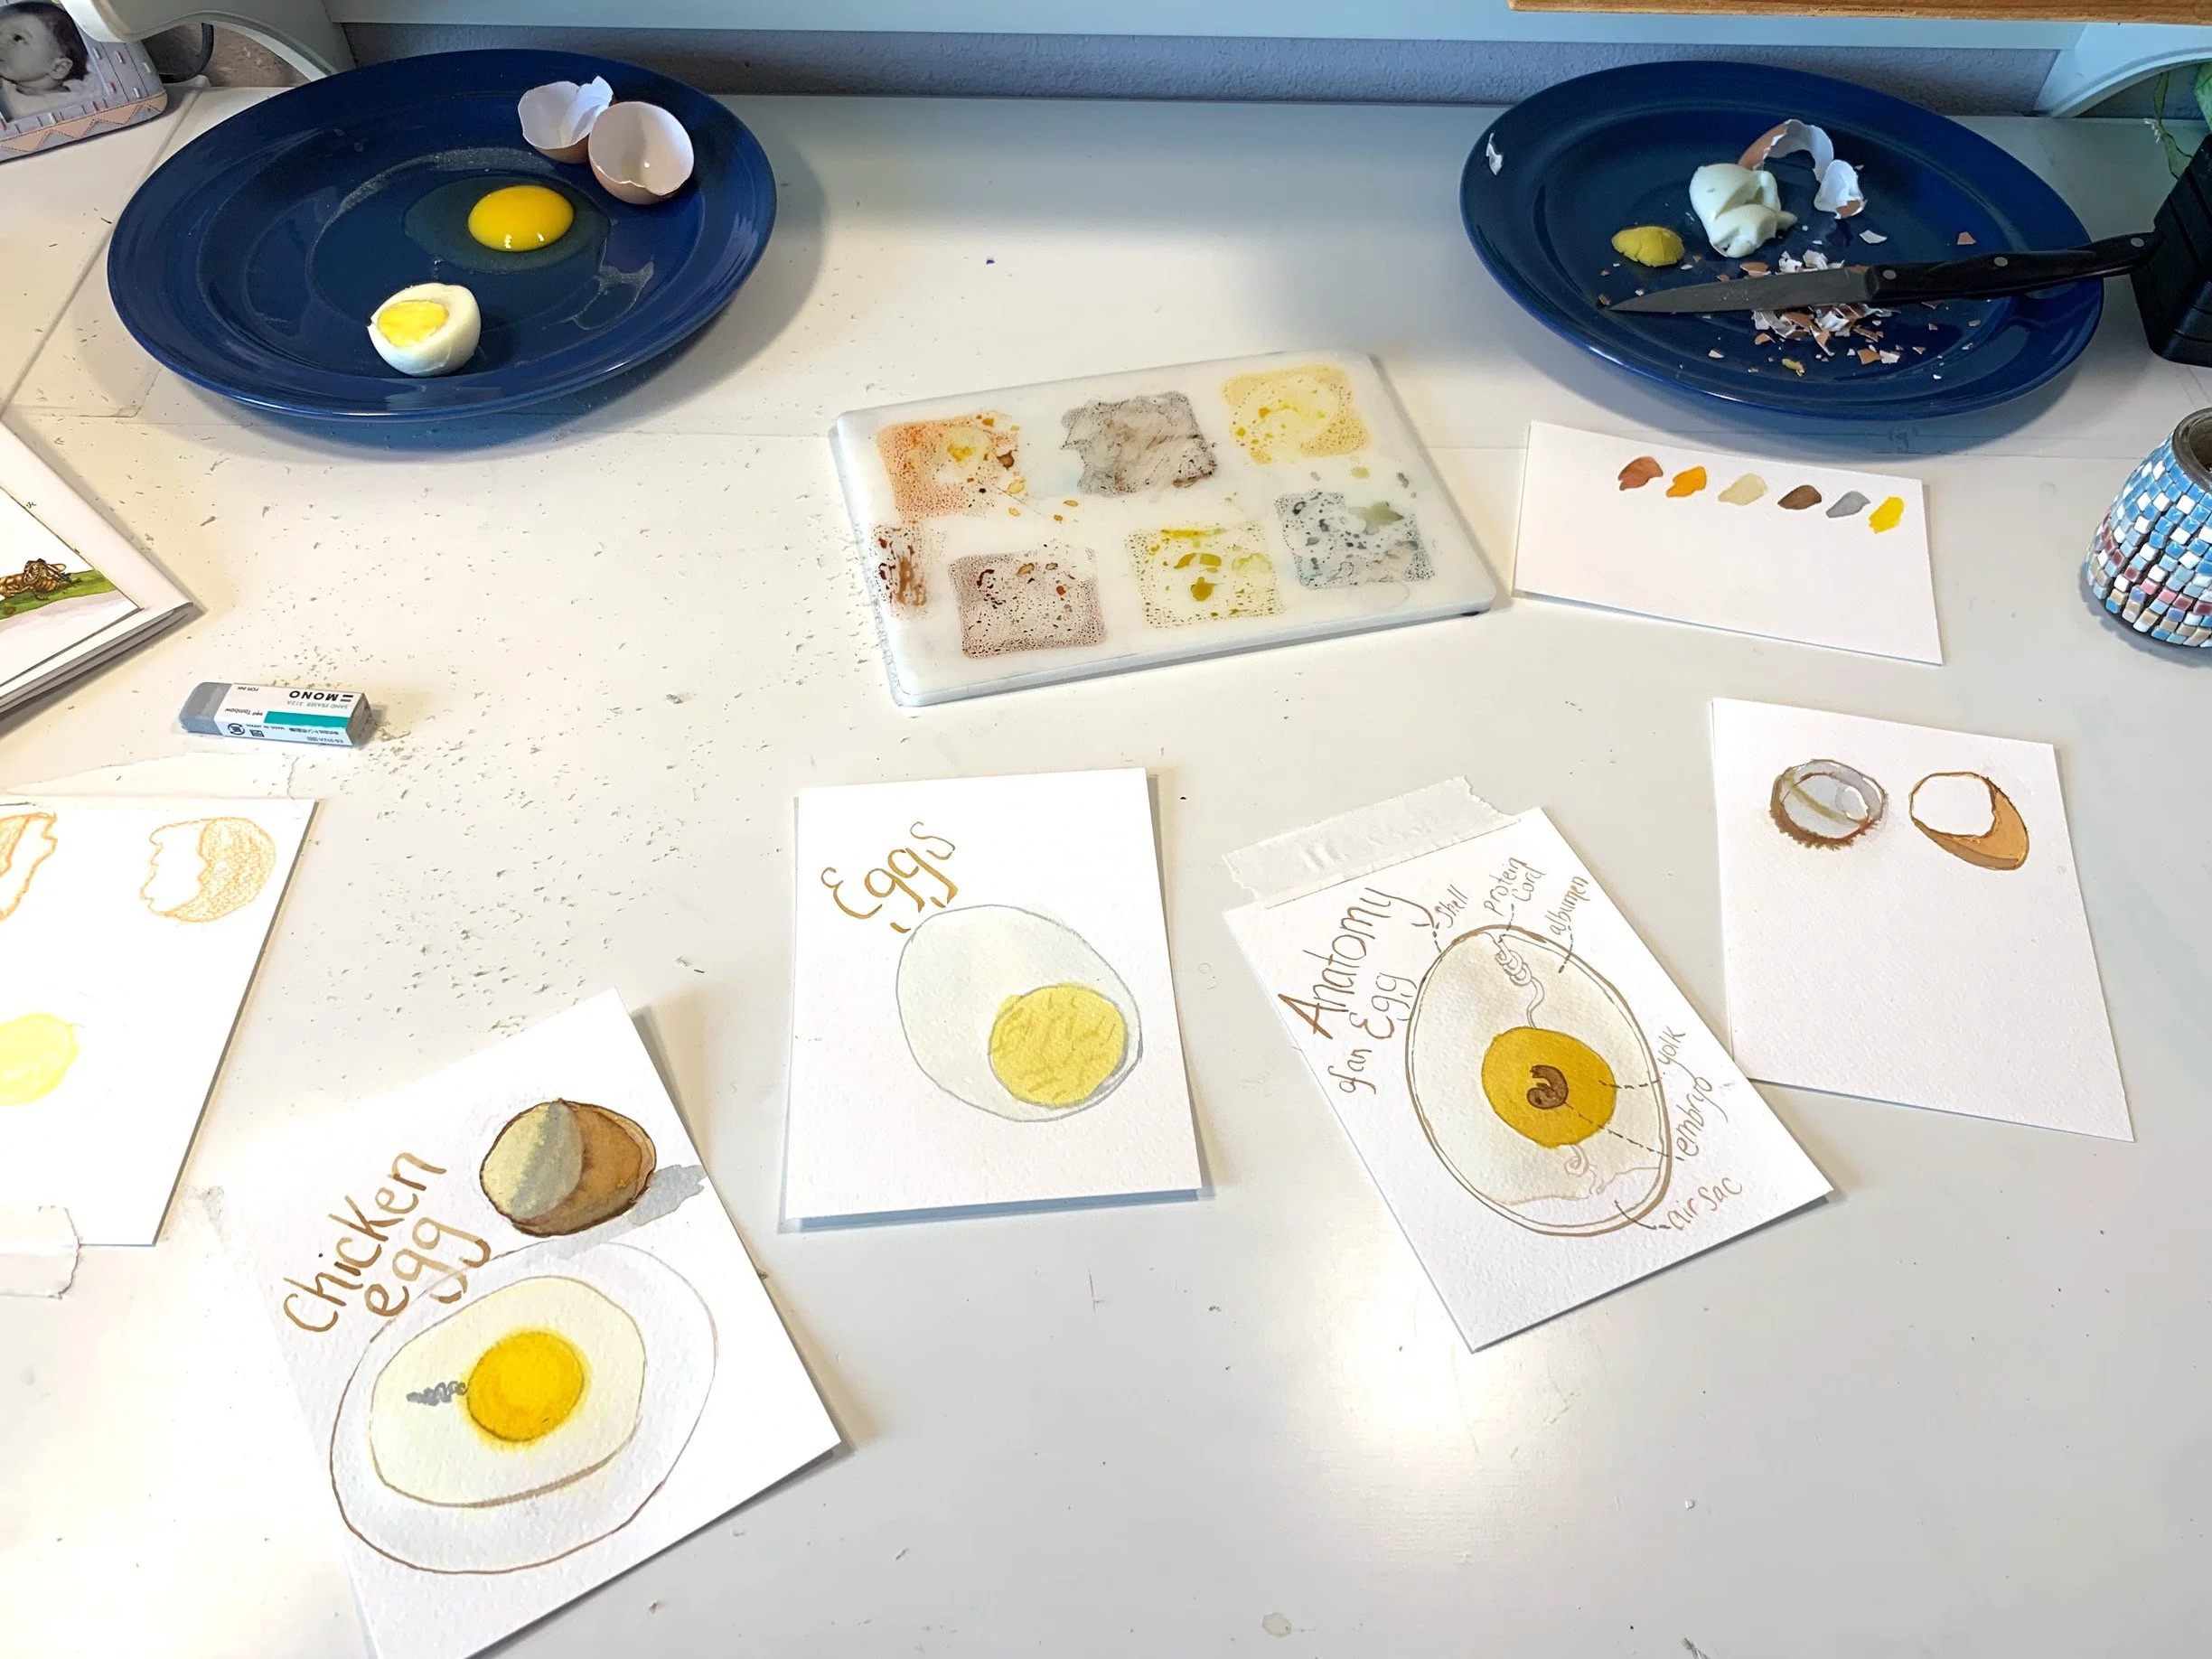
Egg Dissection
Live Homeschool Lesson
Sometimes we overlook the simplest projects because they don’t seem obvious. Like this one: An egg dissection. Most of us have and eat eggs so the thought of dissecting one often passes right by us, but what a great, easy and affordable project this is! All you need is an egg and a surface to work on. While we added to the project by watercoloring the various eggs we dissected, you can keep this pretty simple.
We did three dissections: one with a hardboiled egg, one with a unfertilized egg and one with an egg that had been resting in white vinegar for 48 hours. All three had their merits, but if you were to do just one, I would recommend dissecting an egg. If you can watch the development of an embryo into a chicken, that would be phenomenal! While we would still love to incubate our own eggs, we have not done that yet.
For this project, we used our Fabriano 140 lb. cold pressed watercolor paper and Tim Holtz Distress Inks in a few shades of yellow and pale blue. The paper we used is 9″x12″ and I simply cut the paper using my CutterPillar Pro paper trimmer in half and then in half again so the cards were 4.5″x6″. We used these cards to watercolor the various dissections and write our trivia questions. We also displayed our various eggs for a couple days until they began to dry, but surprisingly not to smell.
Once our project was complete, we referred to the book An Egg is Quiet by Dianna Aston and Sylvia Long for art inspiration as well content to make up our trivia questions. We also referred to other resources such as Nature Anatomy and Birds, Nests and Eggs by Mel Boring.
Check out our complete Owl Unit Study with videos on how we put this unit together, the resources we used and the projects we did. You can also check out our larger Bird Unit Study which includes more projects and resources.


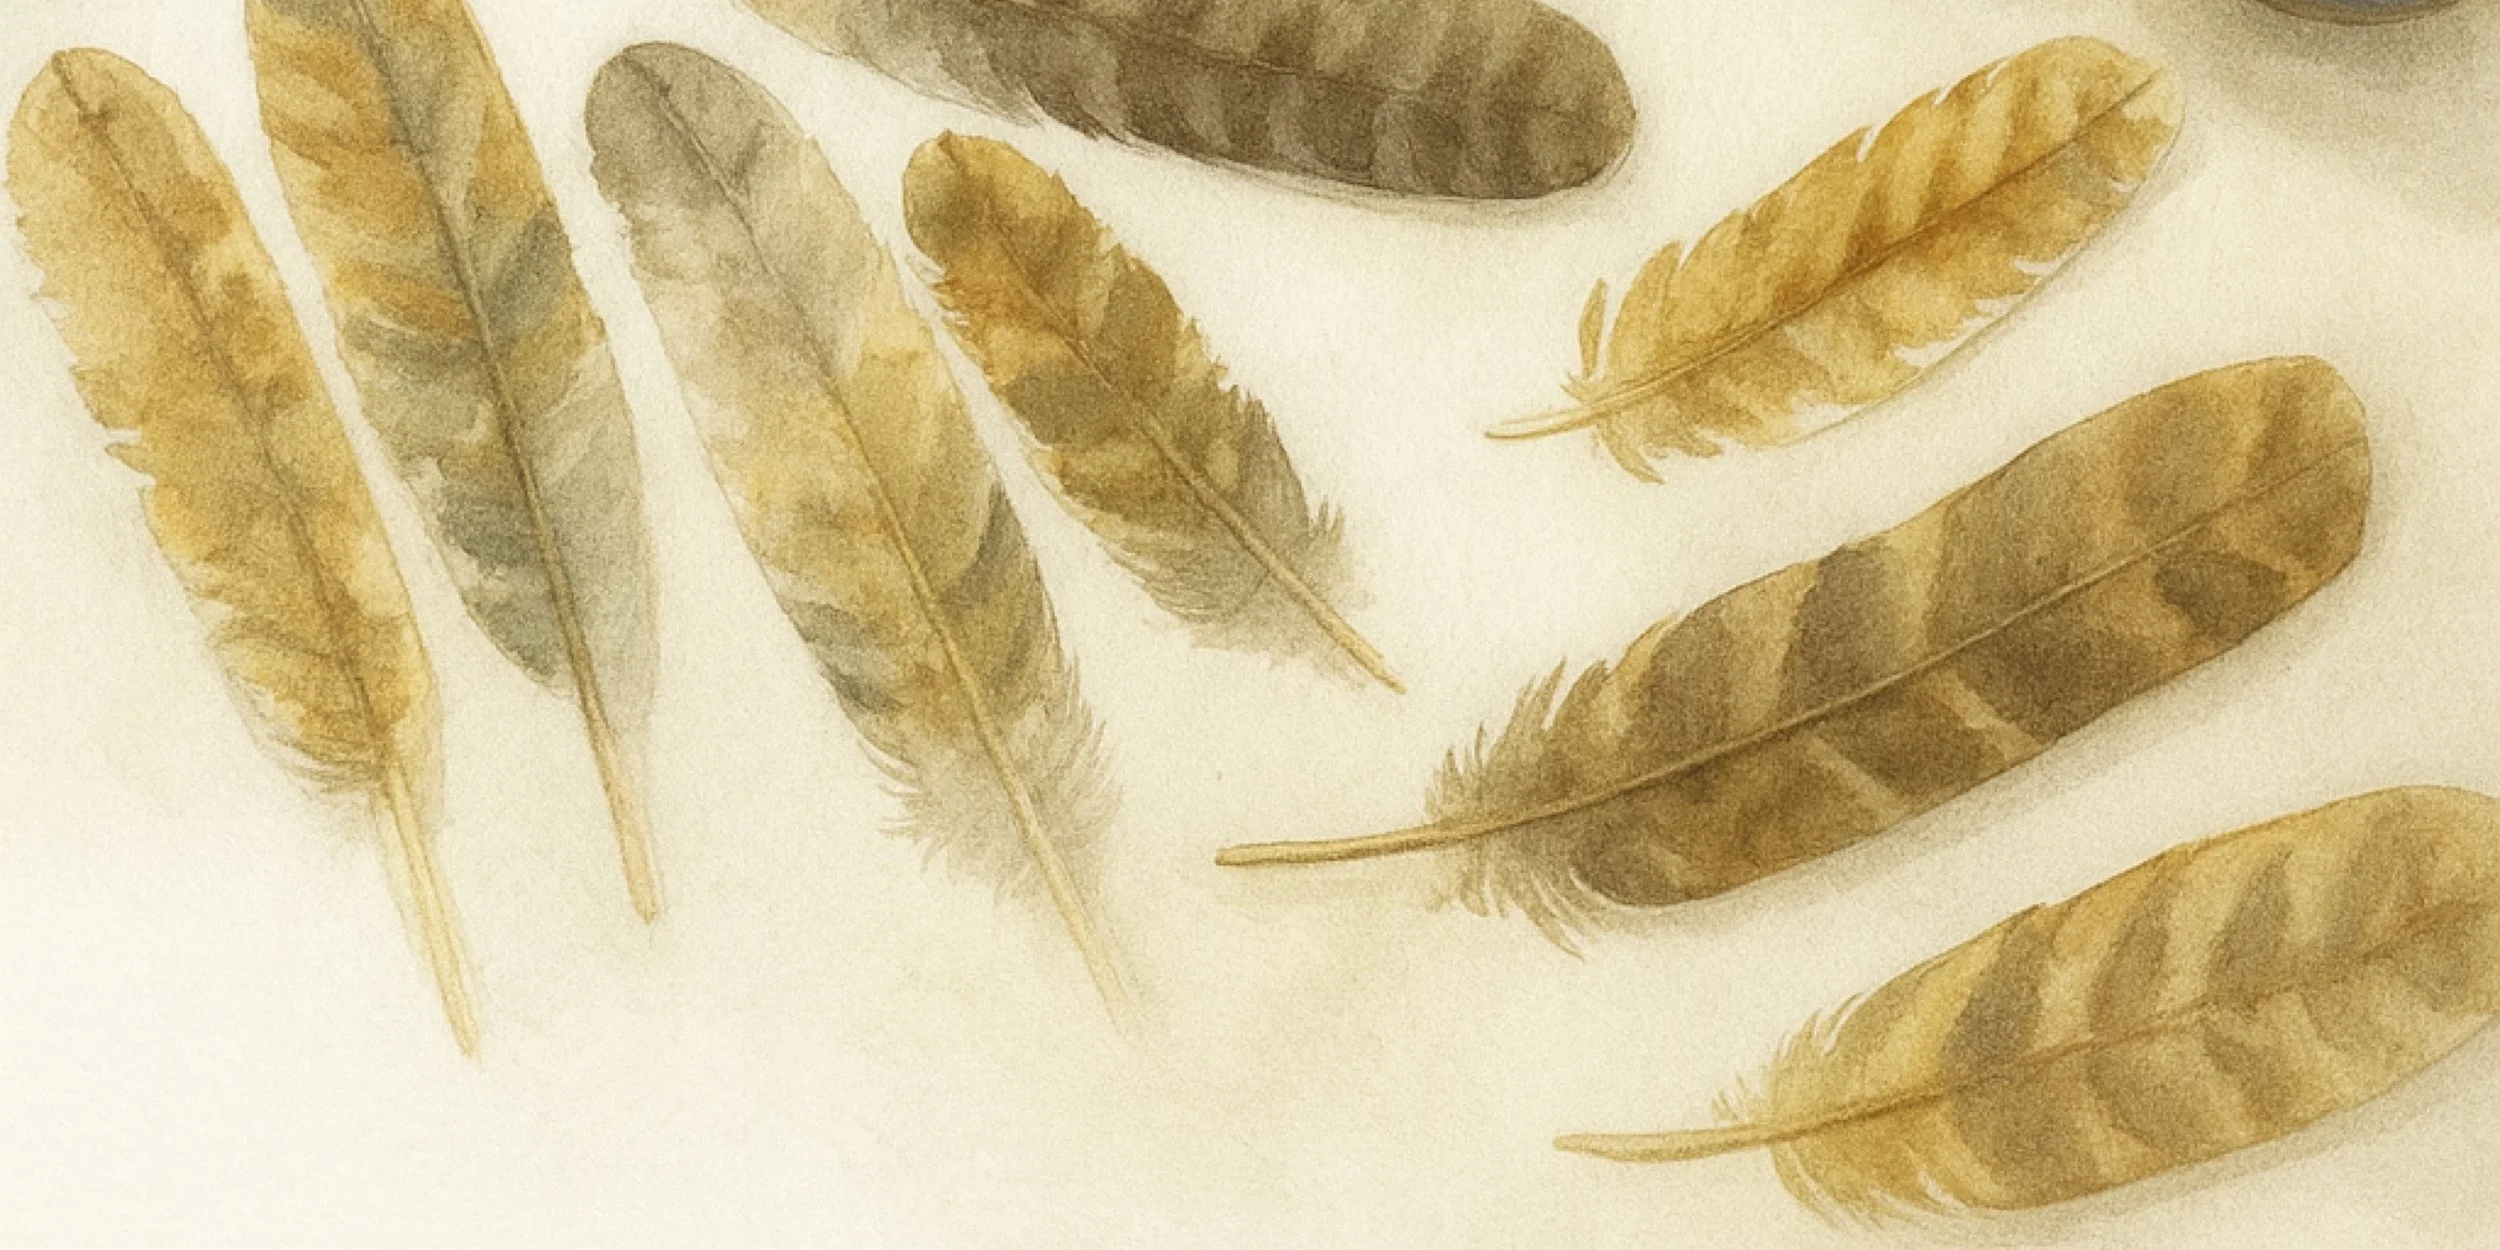
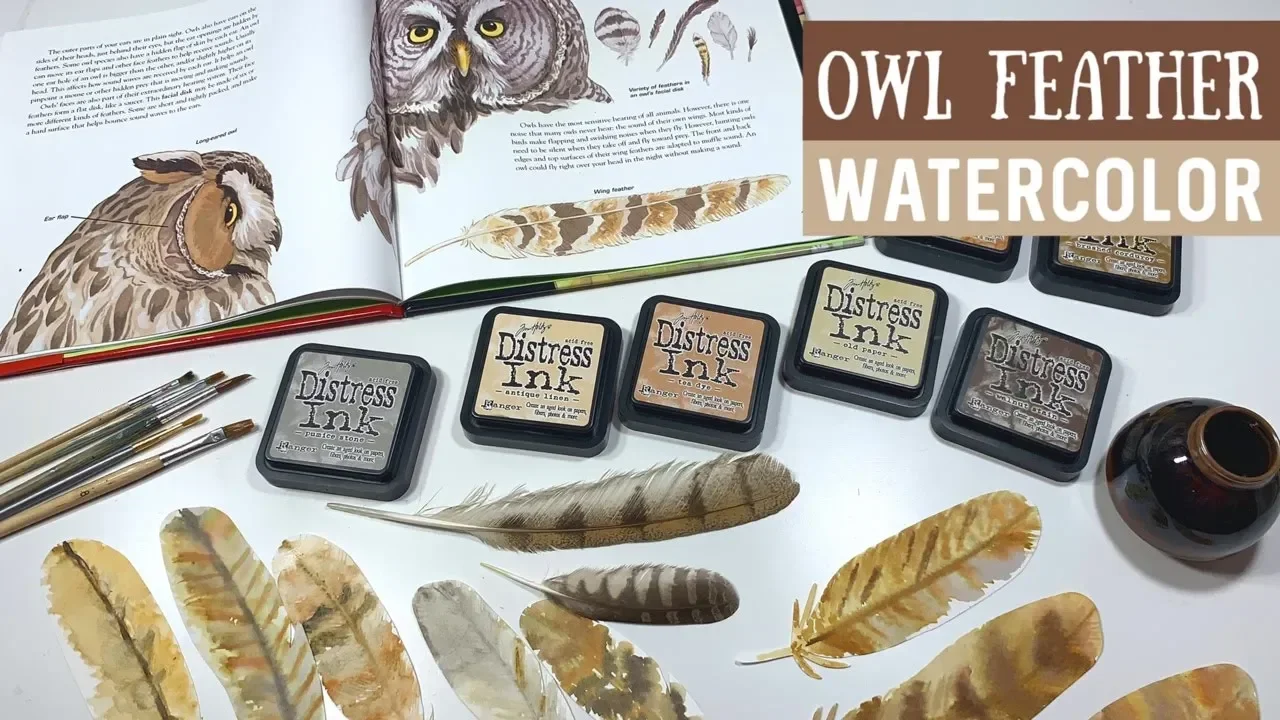
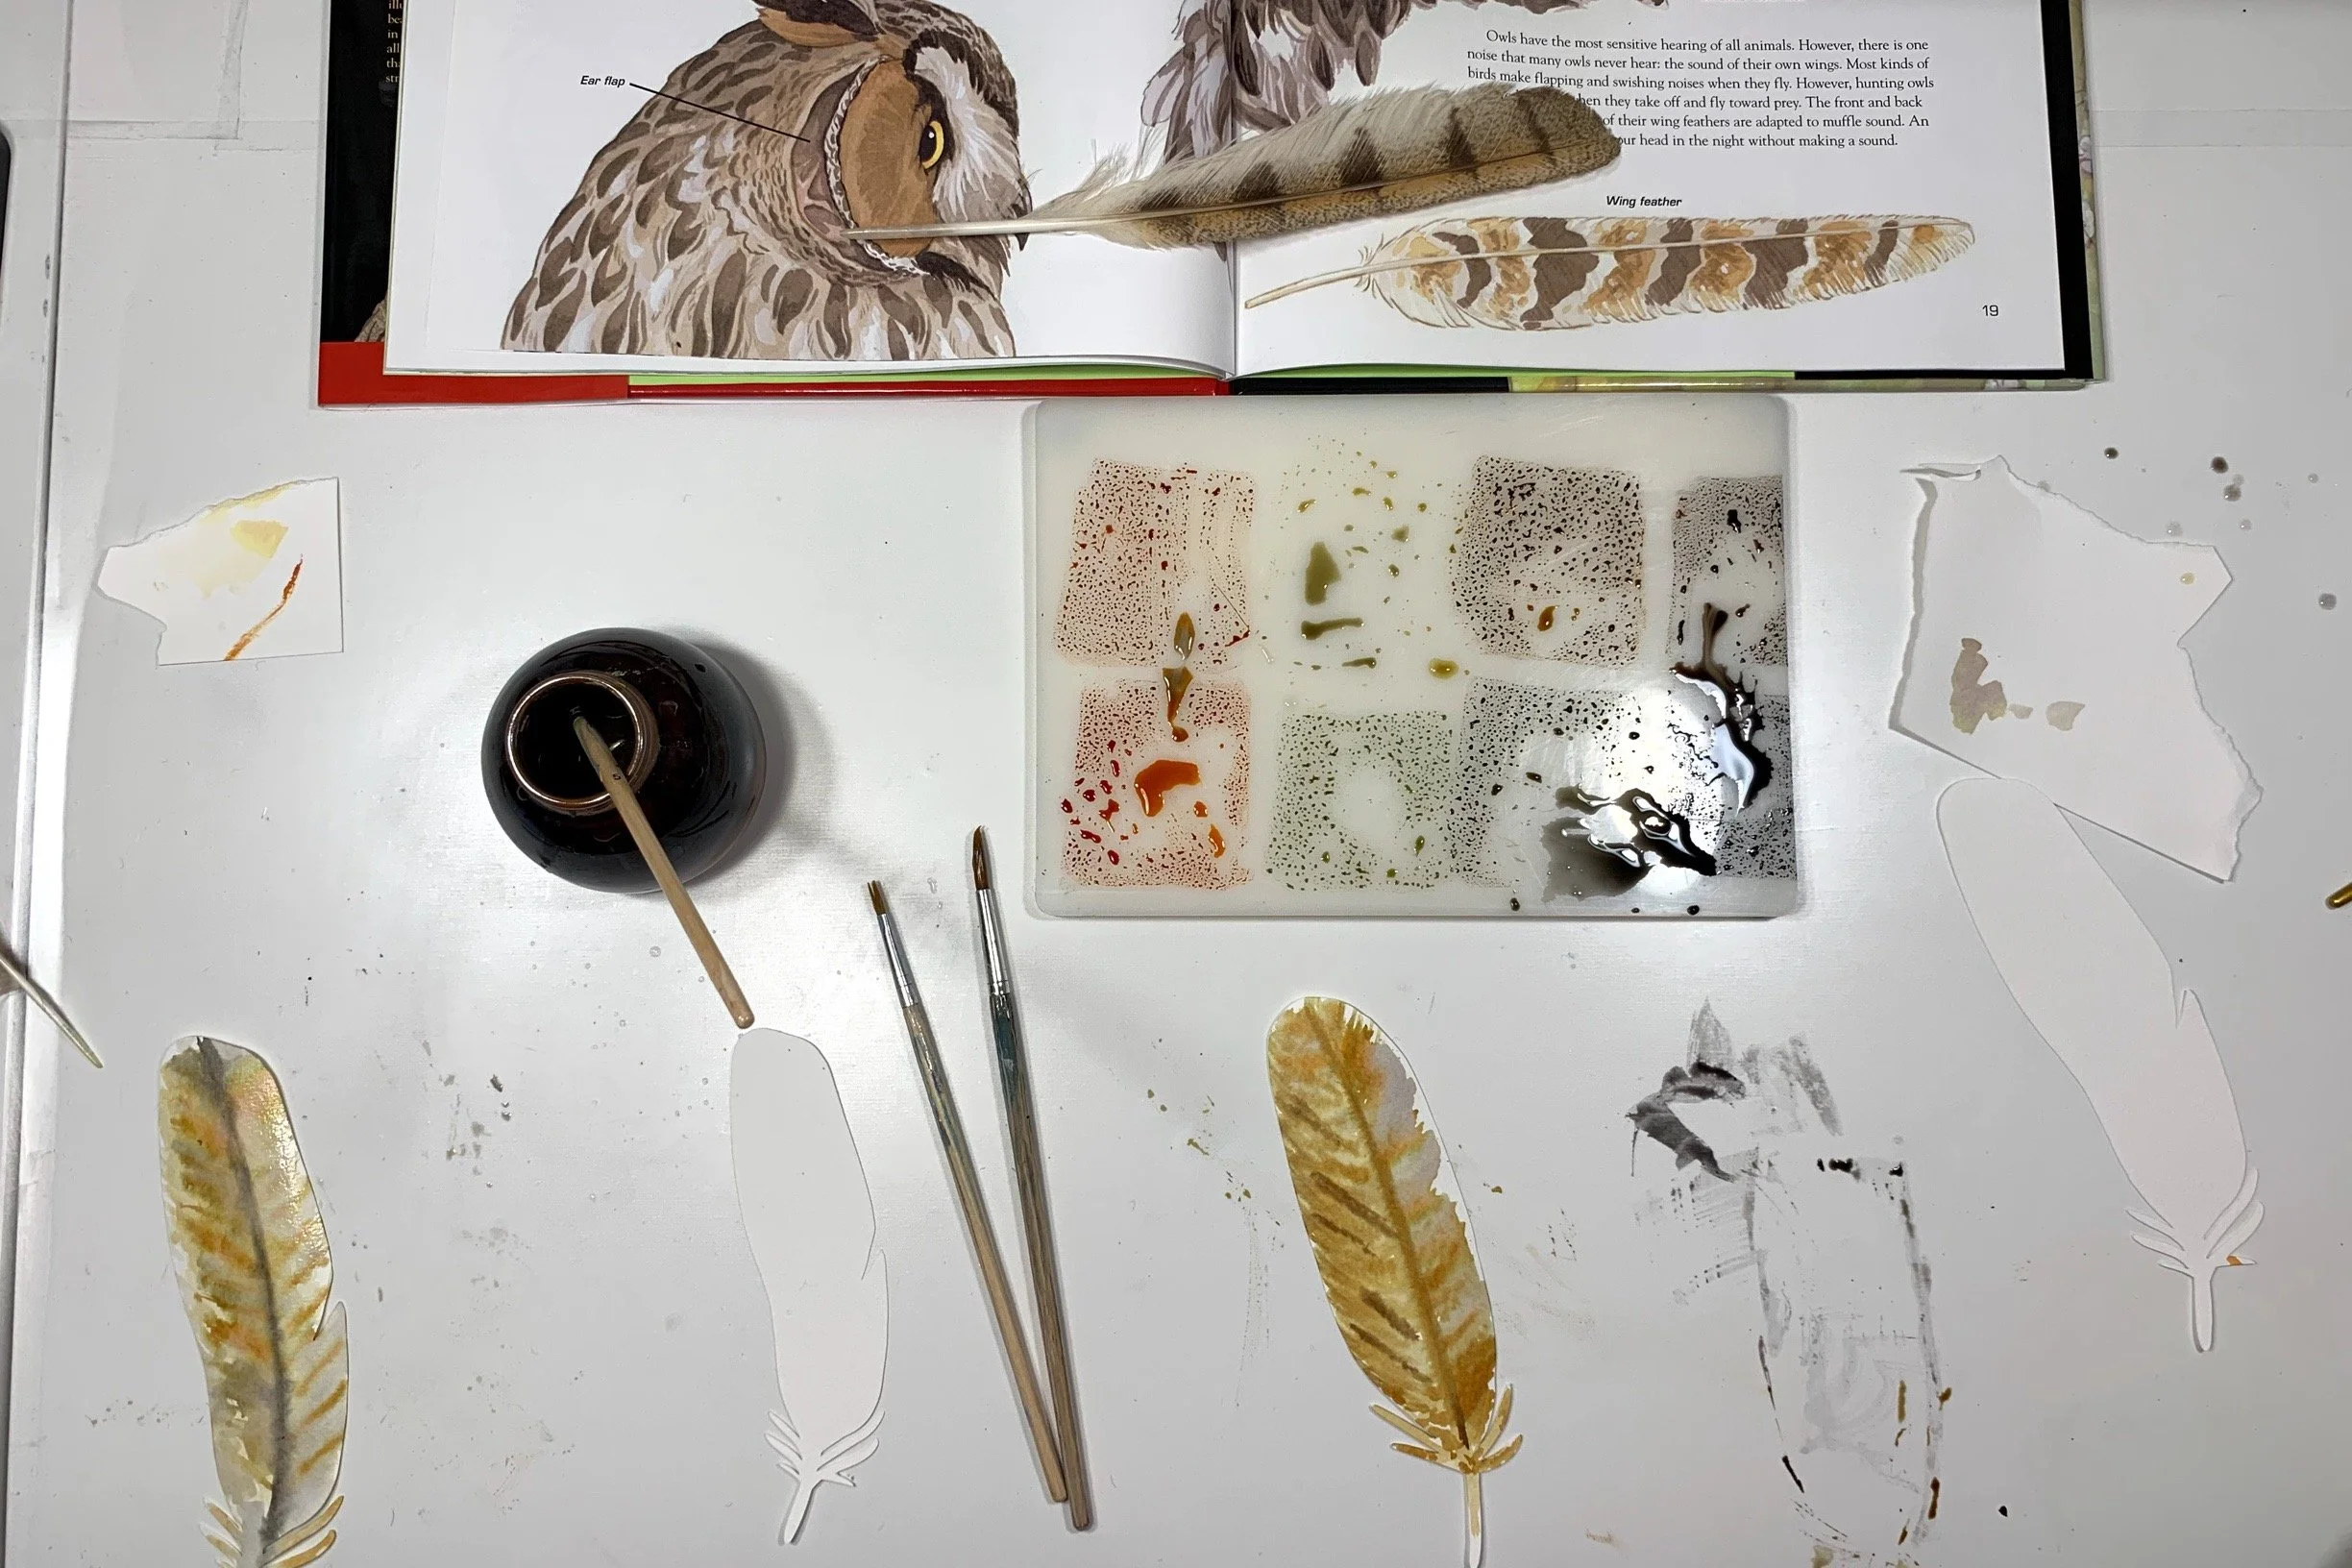
Owl Feather Watercolor
Whenever possible, I incorporate art into our lessons. It’s not a art lesson, rather it’s a science lesson that’s artistically depicted. Sometimes art is the perfect medium for a lesson and when it comes to nature science, I can’t think of a better choice. Each spring, we pull out our nature units, and I find that our main lesson books are either wholly empty or filled with magnificent watercolors. There’s limited writing and a lot more hands on projects.
For this lesson, we were inspired by the book “Owls, Strange and Wonderful” by Laurence Pringle. The illustrations are glorious and the text is easy to follow along with and appropriately informative. There are several painted owl feathers, and I thought we could recreate the artwork.
For this project, I used my Silhouette Cameo to die cut feathers from Fabriano 90lb. watercolor paper. You can free hand feathers or skip it entirely and just paint!
We also used our Distress Inks in a variety of tans and browns.
Distress Inks for this project
After cutting the feathers, the children and I tried recreating specific feather patterns. While we had a nice time doing this, we found that accurately watercoloring the patterns was such a challenge!! In the end, it was an artistic representation of the lesson and definitely called on our powers of observation as we looked at the details of each feather.
We also had two feathers we got from nature class. The large one is a barn owl feather and the small one is a western screech owl feather.
While you can do this project with any kind of paint, I do recommend using watercolors for the beautiful translucent feel. We used our Distress Inks as watercolors for some and our Winsor Newton watercolors for others. I think both worked well.
Check out our complete Owl Unit Study with videos on how we put this unit together, the resources we used and the projects we did. You can also check out our larger Bird Unit Study which includes more projects and resources.
Check out this lesson!
Whenever possible, I incorporate art into our lessons. It’s not a art lesson, rather it’s a science lesson that’s artistically depicted. Sometimes art is the perfect medium for a lesson and when it comes to nature science, I can’t think of a better choice. Each spring, we pull out our nature units, and I find that our main lesson books are either wholly empty or filled with magnificent watercolors. There’s limited writing and a lot more hands on projects.
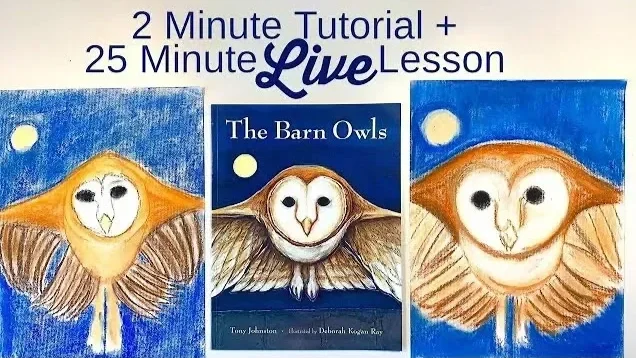
For this lesson, we were inspired by the book “The Barn Owls” by Tony Johnston as well as the Animalium postcards. We pulled out several resources for this project including Zoobooks Owls and Nature Anatomy, but ended up finding the rich paintings in “The Barn Owls” the perfect inspiration for this art project.
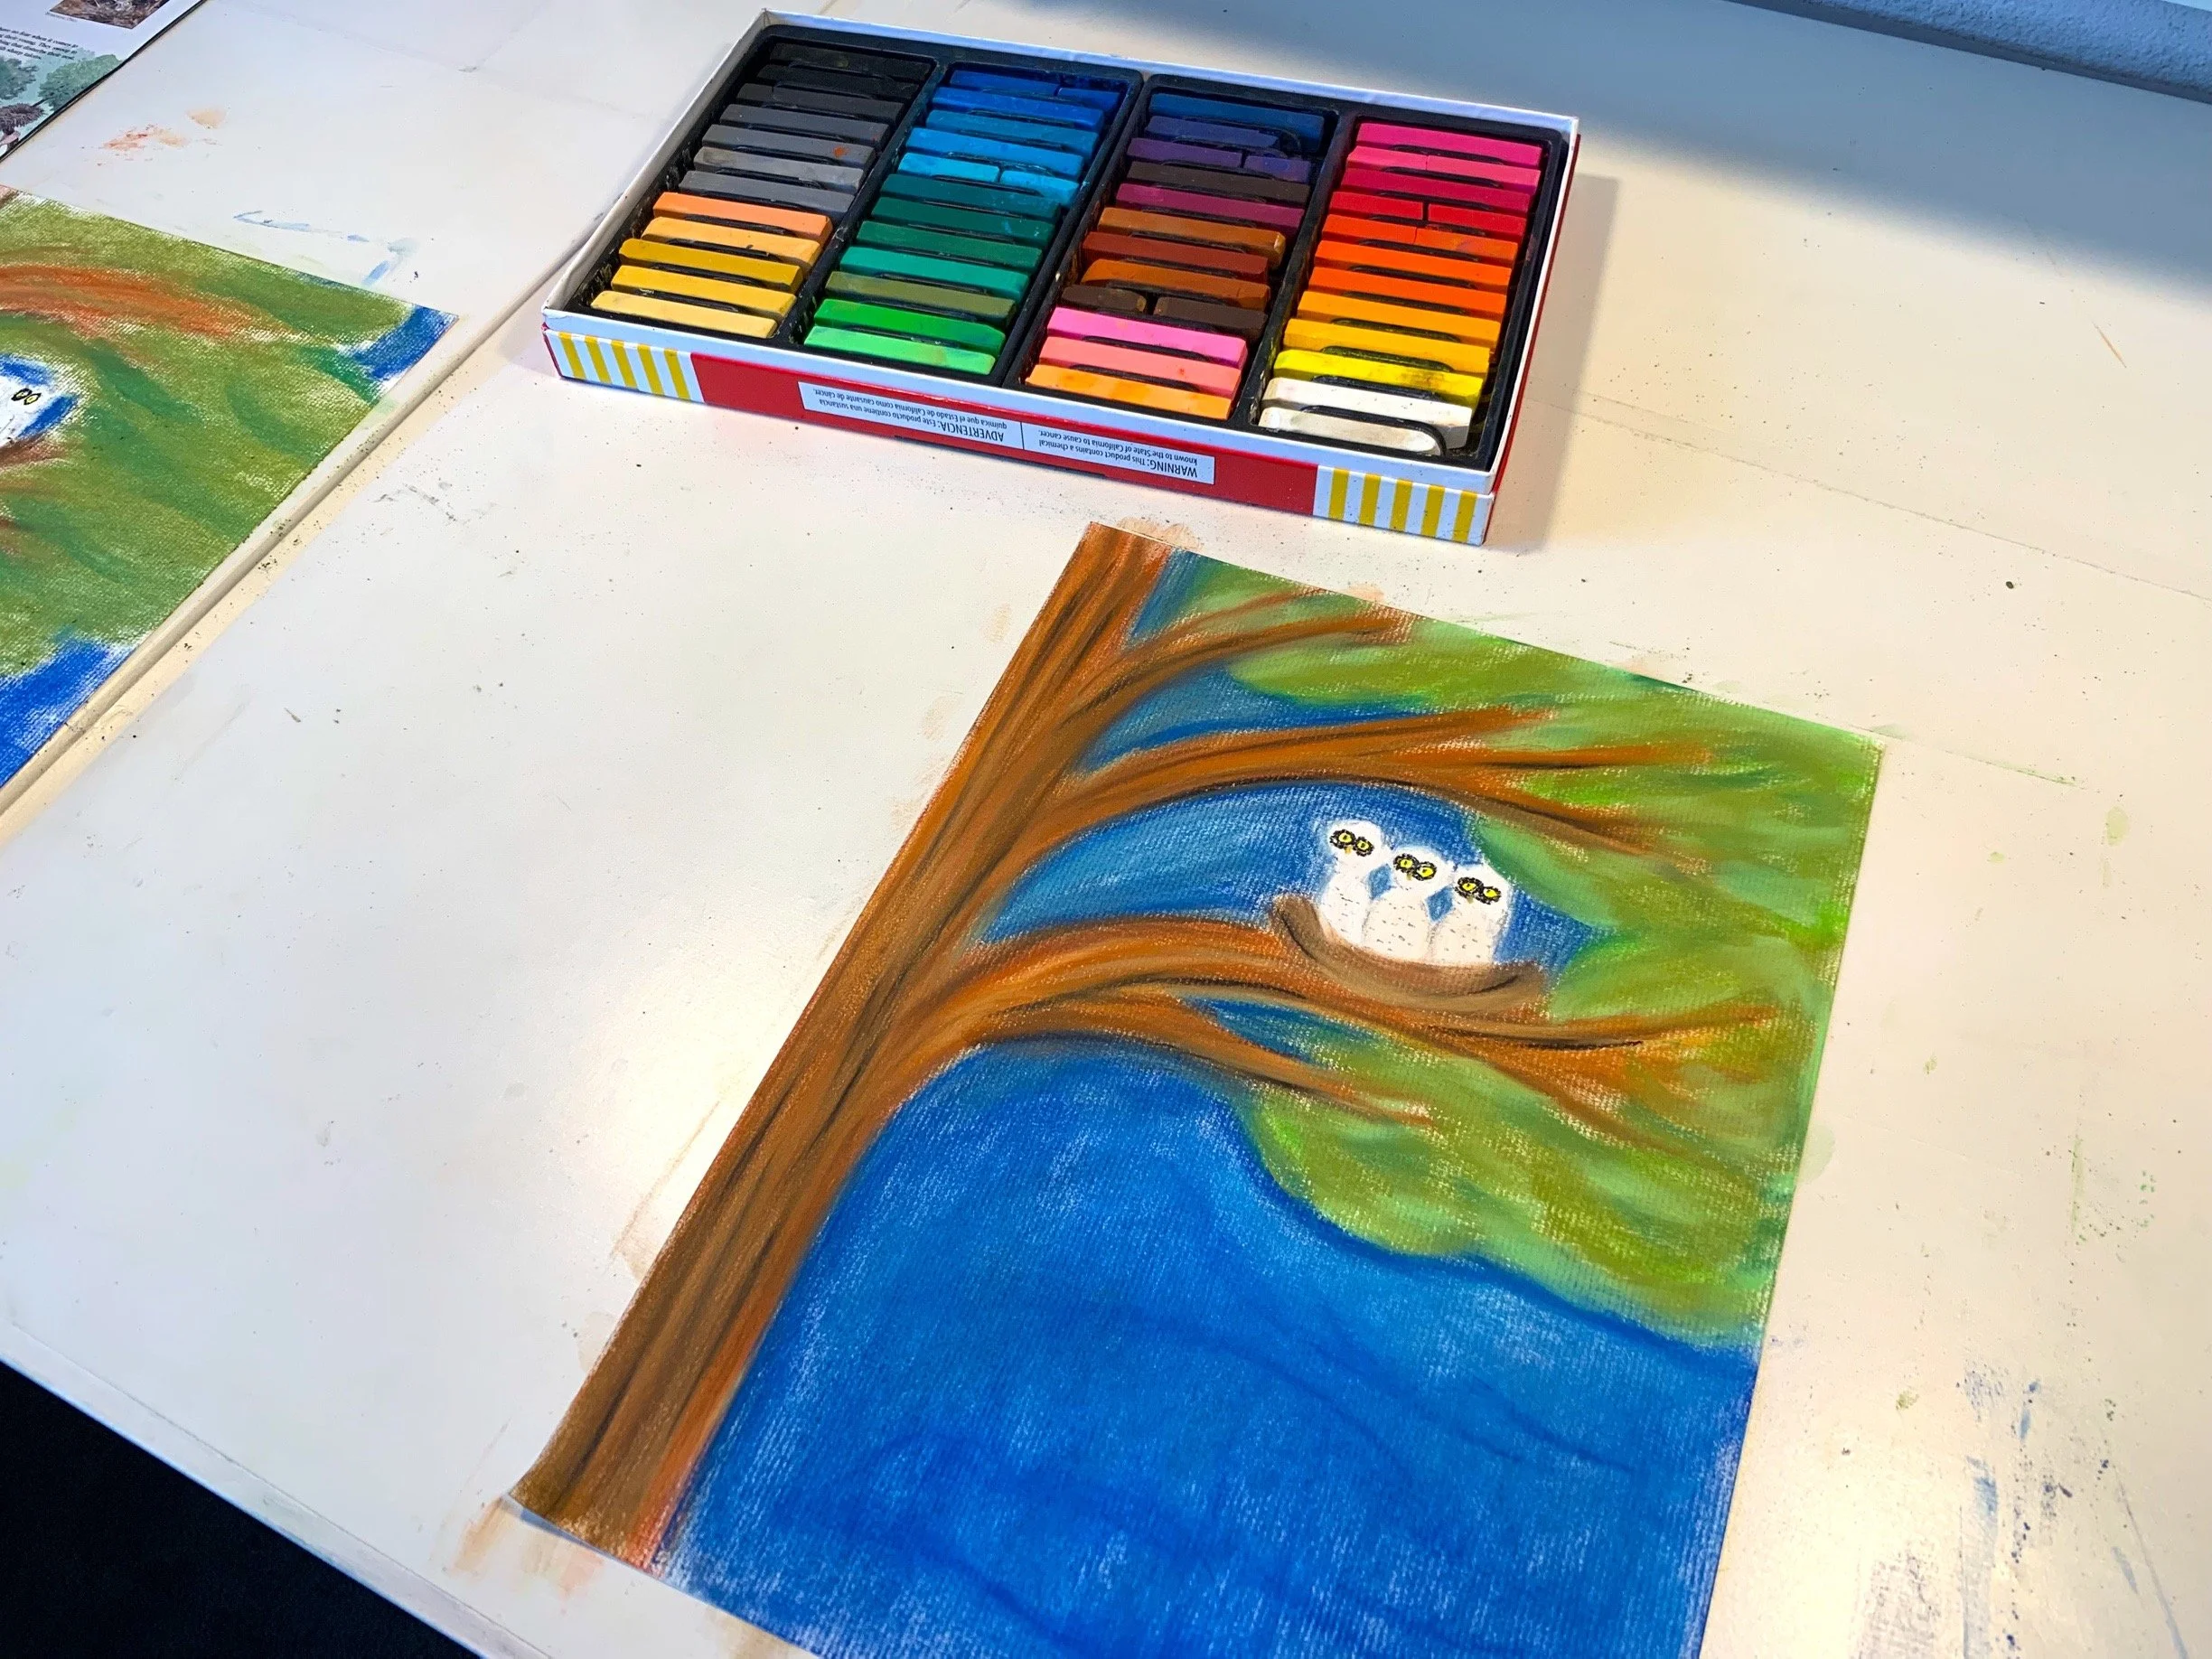
For this project, we used our Sargent Art Square Chalk Pastels available at Dick Blick as well as pastel paper from Waldorf Supplies.
At first, I tried using our oil pastels, but found blending them wasn’t working the way I hoped. After making a sample alongside my 8-year-old daughter, I pulled out our chalk pastels and tried this lesson again. This time we copied the image on the cover of “The Barn Owls”. I liked the results so much, we did another lesson a few days later. Once again we copied an image from the book “The Barn Owls”, but this time, my 12-year-old son didn’t complete his work because he was displeased with the results. Again a few days later, we scoured our resource material and opted to use Zoobooks for our final inspiration. We drew owl chicks in a nest and this time, my 12-year-old son completed his drawing.
Working with chalk pastels is satisfying but frustrating at the same time. You can’t erase, and very easily, you can get other colors onto your work if you’re not careful as the chalk gets on your fingers easily and if you blend with your fingers, you can mess up your drawing accidentally. What’s great about them is their vibrant colors and ease of blending. Layer a few similar colors together and then watch them blend naturally together as you smudge the chalk with your fingers or a blending tool. We found that our fingers worked best.
Once your drawing is done, it can easily be damaged if you don’t seal it with a sealant specially designed to seal pastels and other paint mediums. As we ran out of ours, I’m leaving these flat (unstacked) until they can be protected. Once protected, I’ll store them flat after displaying them on the wall of our homeschool room.
Check out our complete Owl Unit Study with videos on how we put this unit together, the resources we used and the projects we did. You can also check out our larger Bird Unit Study which includes more projects and resources.


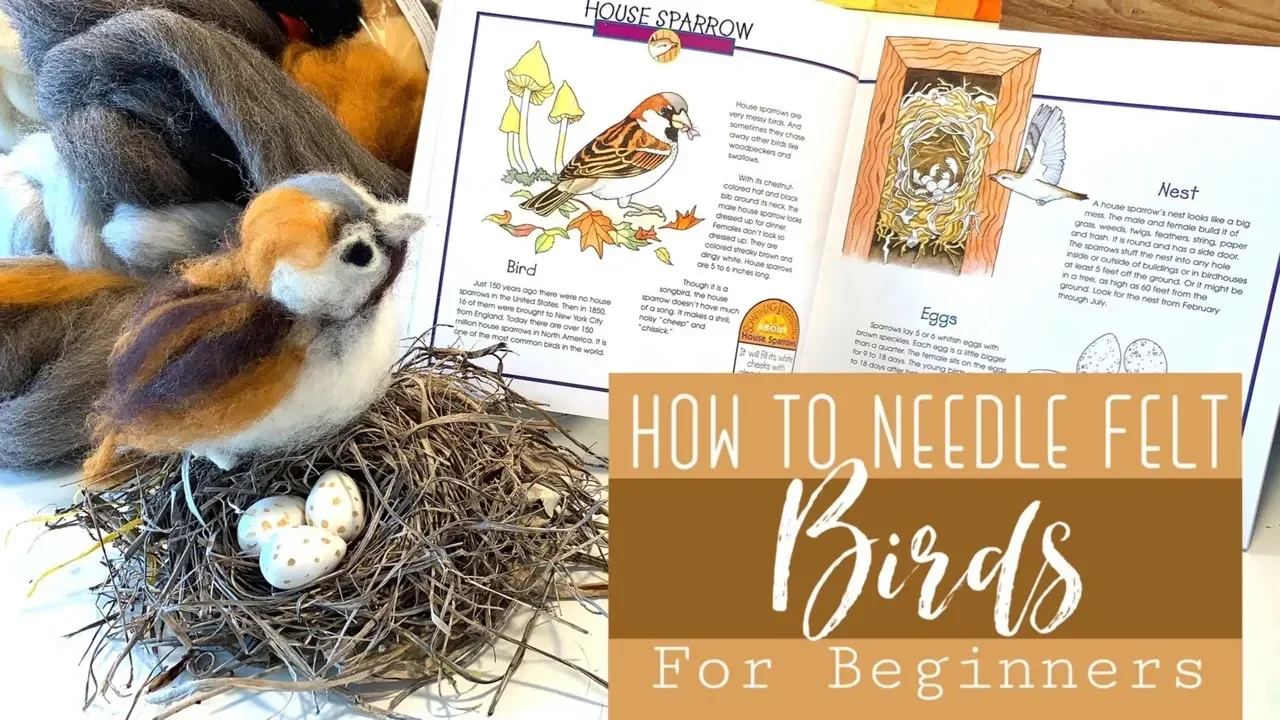
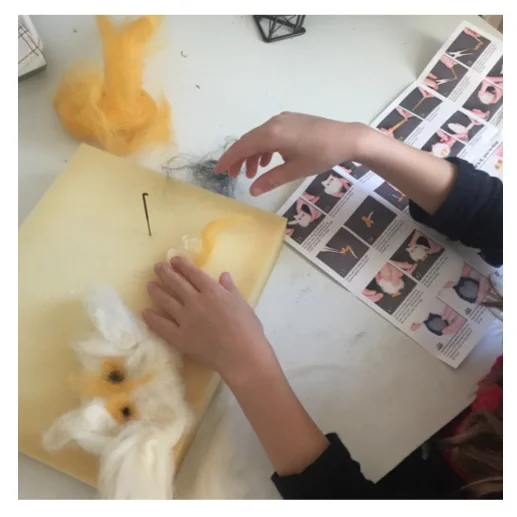
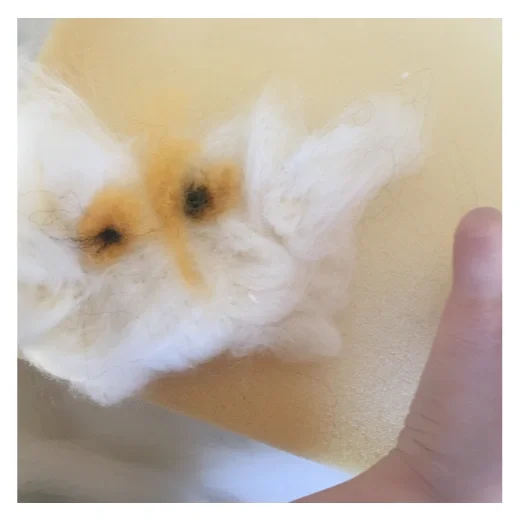
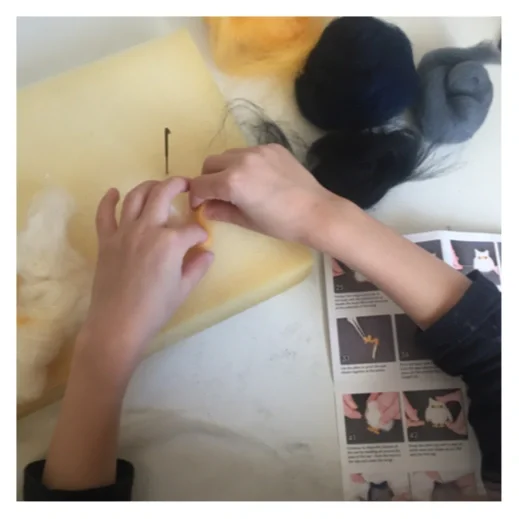
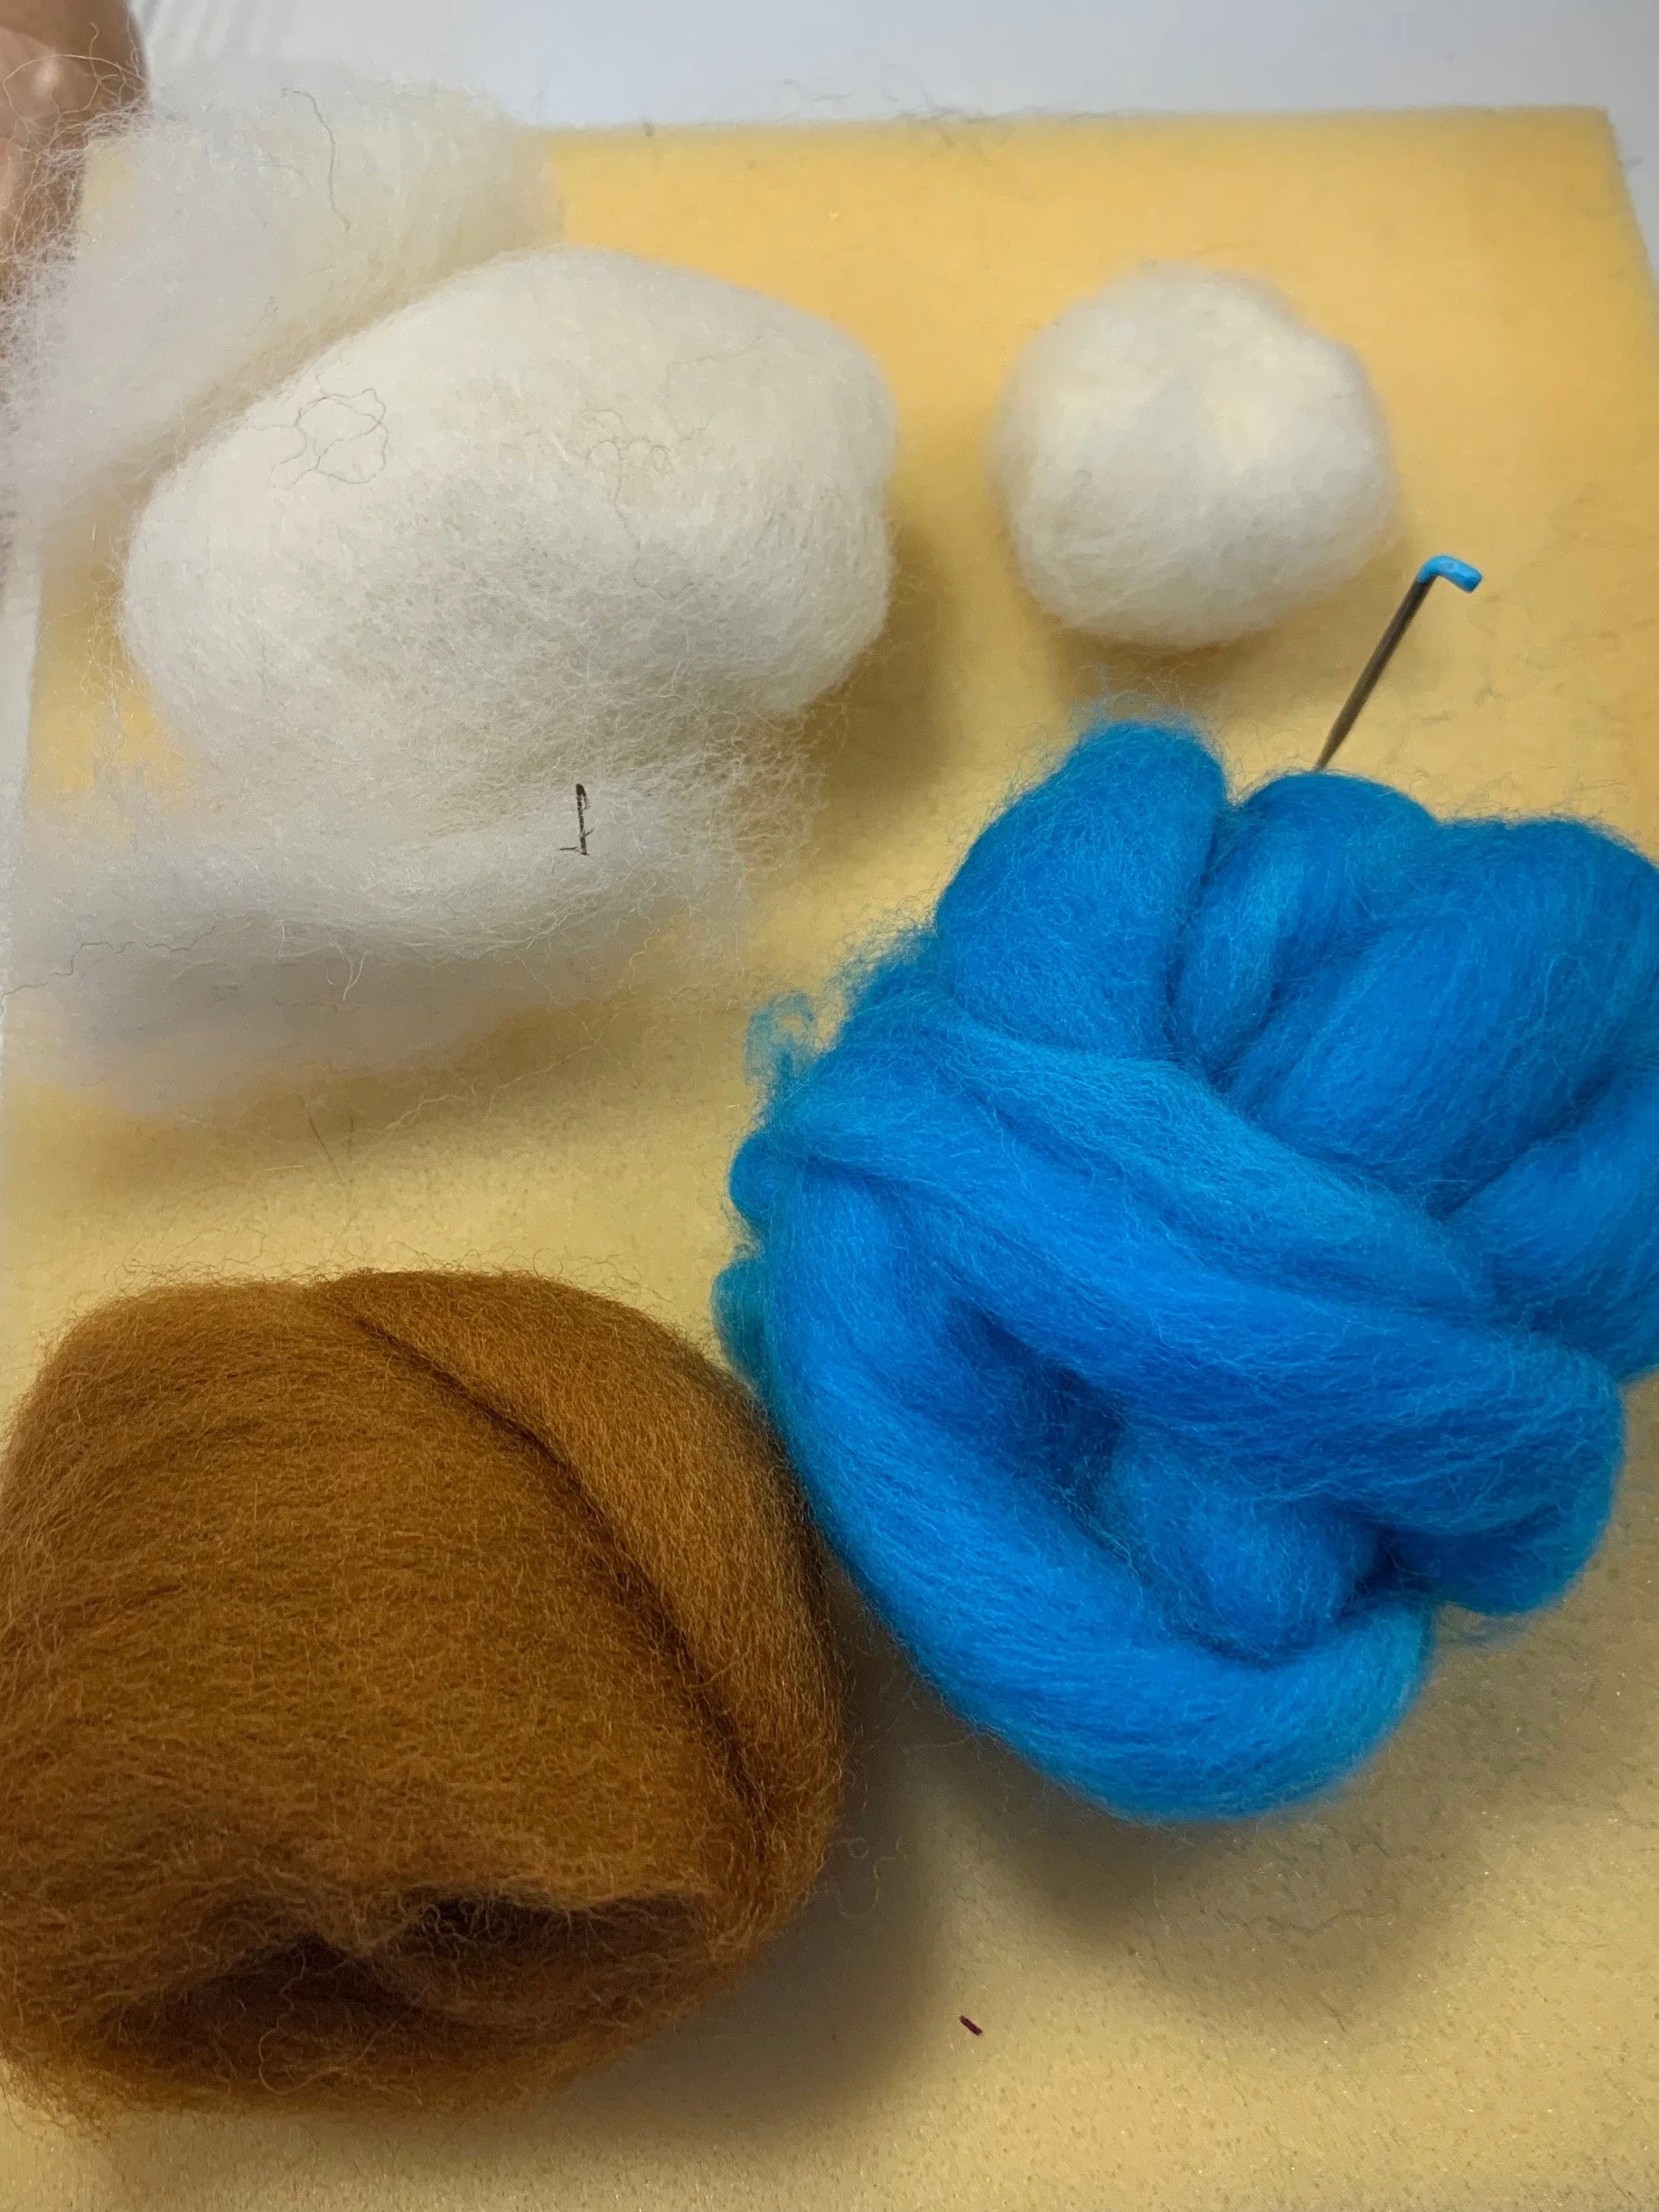
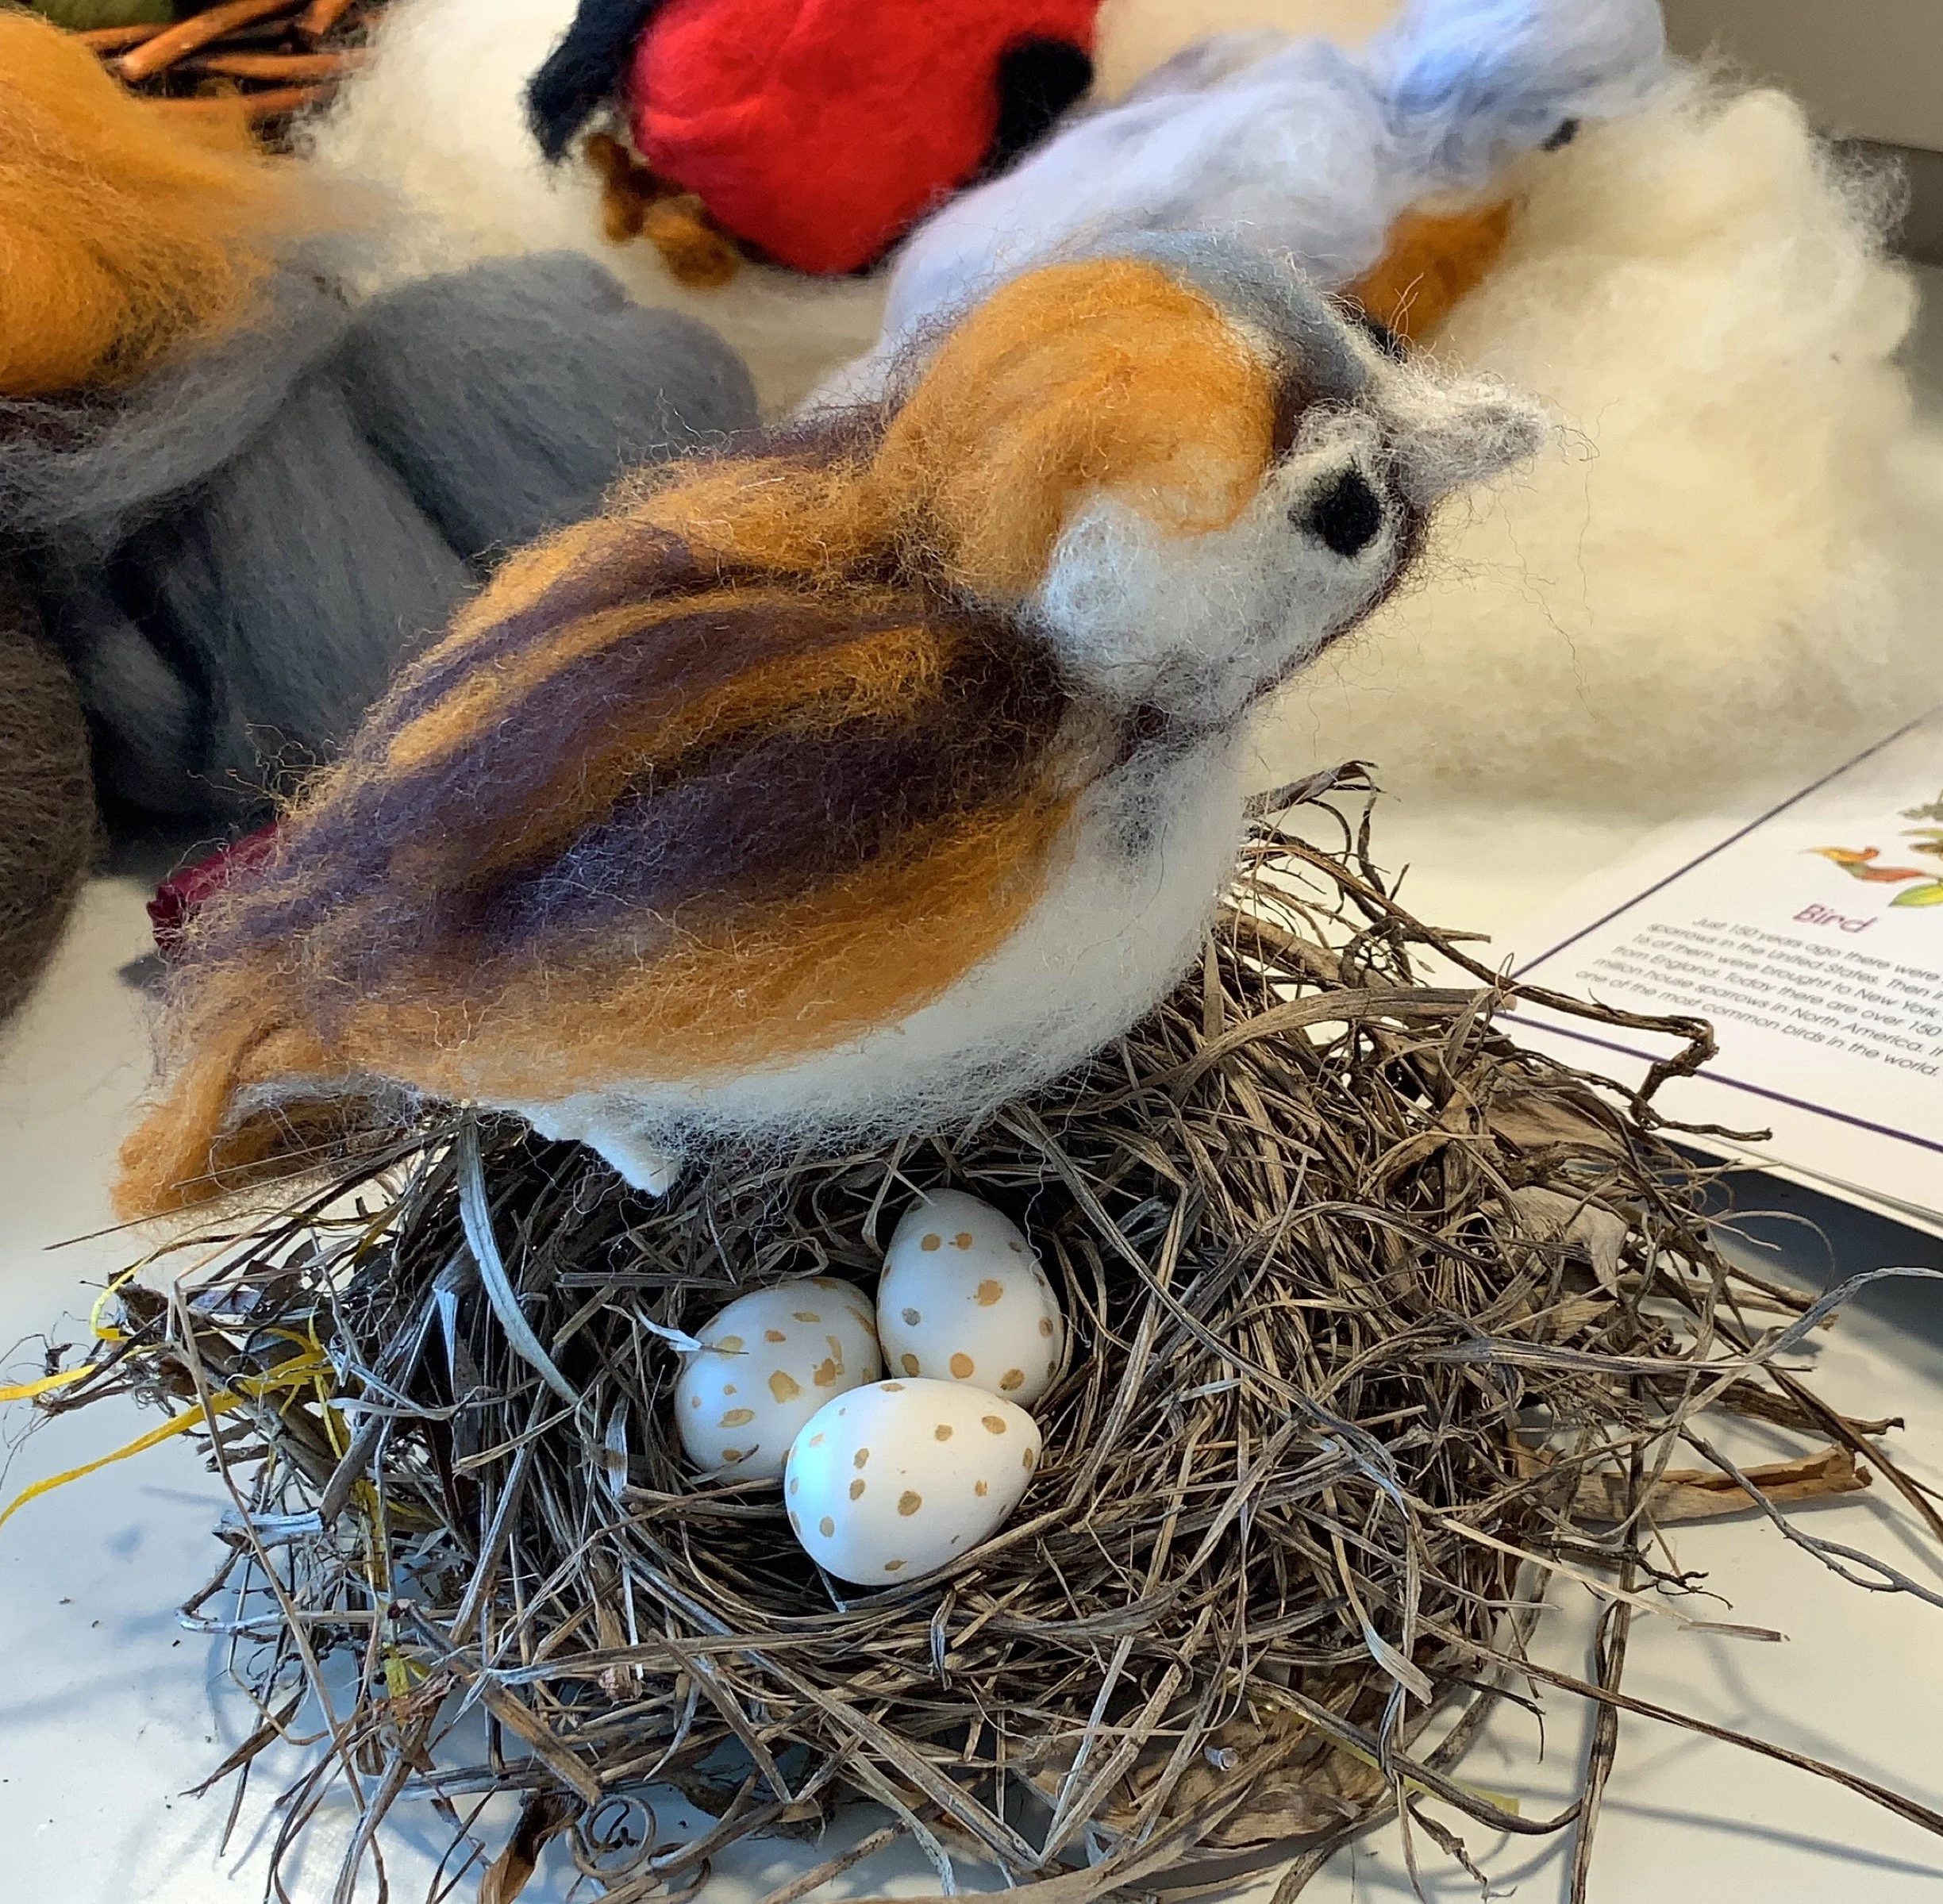
How To Needle Felt A Bird
Needle felting a bird is probably one of the easier animal felting projects you can do. Especially when you felt it out of one large piece of wool batt and simply shape the head rather than needle felting a head separately and adding it on to the body of the bird. While there are many different ways to needle felt, I’m showing a modified version that I think works especially well for beginners and students. While I don’t recommend you do needle felting with children under 8-10 years old, my daughter has been joining us in our needle felting projects since she was 5 years old. Her projects reflect her abilities and each time they’ve turned out lovely.
This project is for my 12-year-old son and 8-year-old daughter for our Bird Unit Study. They each chose a bird to needle felt. My daughter chose a blue bird and my son chose the red tanager, both were depicted at the back of the book by Dianna Aston called An Egg Is Quiet. I chose a house sparrow from the book Birds, Nests and Eggs by Mel Boring because we found a sparrow’s nest in our front yard. After over a year, we finally removed the nest and brought it indoors where we made little eggs from Ultra Light Oven Bake Polymer Clay by Scupley.
For this project, we used materials from A Child’s Dream. We used various colors of Ashford Corriedale Wool Roving over a base of undyed wool.
We used small needle felting needles, finger guards and a foam pad.
While you can find kits by WoolPets with all the supplies you need to needle felt a bird (or other projects), we opted to do our own with the materials we had one hand. One main difference between how we needle felt versus how you’ll likely see other crafters do it, is that we keep our finished projects rather full and soft and squishy. Usually projects are needle felted until they are firmer. While this is a great option if you wish to work more closely with what other crafters do, the main advantage I see with working the project less is that we finish faster and the final project is softer. Finishing fast shouldn’t be a goal in and of itself, but if little hands are tiring from a project like this, know that you can needle felt just enough to shape the animal. I actually prefer this look over the firmer projects, but I encourage you to try it the way that works for you.


Owl Drawing Tutorial
Our live lesson with tutorial really shows how we go about doing art within a unit study.
Check out this lesson!
Whenever possible, I incorporate art into our lessons. It’s not a art lesson, rather it’s a science lesson that’s artistically depicted. Sometimes art is the perfect medium for a lesson and when it comes to nature science, I can’t think of a better choice. Each spring, we pull out our nature units, and I find that our main lesson books are either wholly empty or filled with magnificent watercolors. There’s limited writing and a lot more hands on projects.
For this lesson, we were inspired by the book “The Barn Owls” by Tony Johnston as well as the Animalium postcards. We pulled out several resources for this project including Zoobooks Owls and Nature Anatomy, but ended up finding the rich paintings in “The Barn Owls” the perfect inspiration for this art project.
For this project, we used our Sargent Art Square Chalk Pastels available at Blick as well as pastel paper from Waldorf Supplies.
At first, I tried using our oil pastels, but found blending them wasn’t working the way I hoped. After making a sample alongside my 8-year-old daughter, I pulled out our chalk pastels and tried this lesson again. This time we copied the image on the cover of “The Barn Owls”. I liked the results so much, we did another lesson a few days later. Once again we copied an image from the book “The Barn Owls”, but this time, my 12-year-old son didn’t complete his work because he was displeased with the results. Again a few days later, we scoured our resource material and opted to use Zoobooks for our final inspiration. We drew owl chicks in a nest and this time, my 12-year-old son completed his drawing.
Working with chalk pastels is satisfying but frustrating at the same time. You can’t erase, and very easily, you can get other colors onto your work if you’re not careful as the chalk gets on your fingers easily and if you blend with your fingers, you can mess up your drawing accidentally. What’s great about them is their vibrant colors and ease of blending. Layer a few similar colors together and then watch them blend naturally together as you smudge the chalk with your fingers or a blending tool. We found that our fingers worked best.
Once your drawing is done, it can easily be damaged if you don’t seal it with a sealant specially designed to seal pastels and other paint mediums. As we ran out of ours, I’m leaving these flat (unstacked) until they can be protected. Once protected, I’ll store them flat after displaying them on the wall of our homeschool room.
Check out our complete Owl Unit Study with videos on how we put this unit together, the resources we used and the projects we did. You can also check out our larger Bird Unit Study which includes more projects and resources.


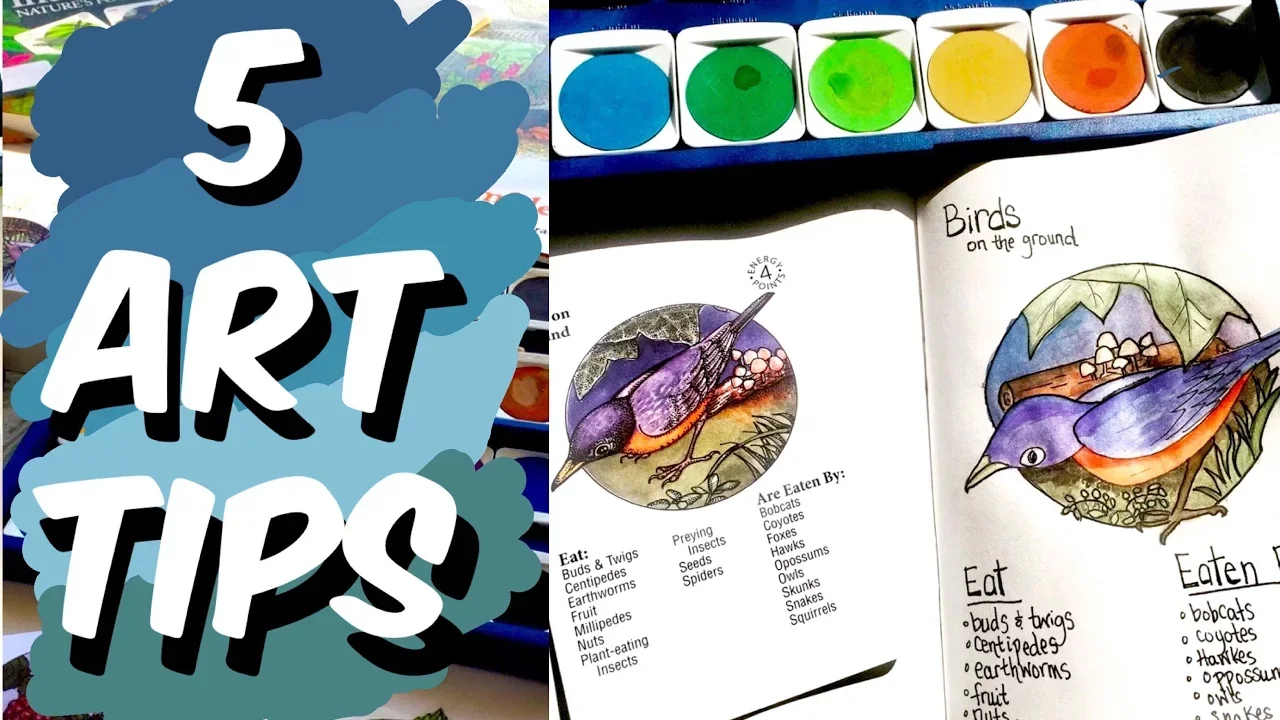
Art & Science
Although I'm not an artist, I still enjoy drawing, painting and other art expressions. But everyone has an inner artist we can all nurture. I wanted to share the tips that might help you enjoy the art process and help you be more satisfied with your artwork. These tips are pretty simple and maybe you already do some of them, but for me it was a learning process of discovery. But now that I know them, it's so much easier to draw, and I'm happier with the results.
April 2017
Family Reading Crate
Build Your Library
What if you could cozy up on the couch surrounded by a stunning library and be handed one book after another that is sure to delight you and your kids. Sounds too good to be true? That's exactly what you'll be getting each month with Build Your Library's family book subscription crate. Not only will Emily had pick fabulous books, but the books are grouped together in monthly themes. But that's not all! You get multiple books, one for each family member (well, not quite, but pretty close), plus you get little items (this month was a stuffed parrot and two bird gliders + three bookmarks) to compliment the month's books as well as a booklet with discussions questions on each book and links to the website where you can explore the topic through additional book and movie recommendations and more. Each crate comes with a read aloud selection, a book for teens and best of all, a book for mom (or dad)!! Occasionally, your crate will even come with more! Yep, this month's crate came with TWO additional picture books! Wow, now that's a lot.
Where do you find all this goodness? Build Your Library! And the Crate here.
The price per crate is expected to be $35 and currently this is for US residents. Please check the website for international prices and monthly prices as they may change a bit month to month.
Find Emily (creator of Build Your Library crate and curriculum) at Arrrgh Schooling here on YouTube.
You can also find some other crate reviews.
Challice from Sodbuster Living. Marie from CrazyBusyFamily. Emily from ArrrghSchooling. aCheck out Emily's library.
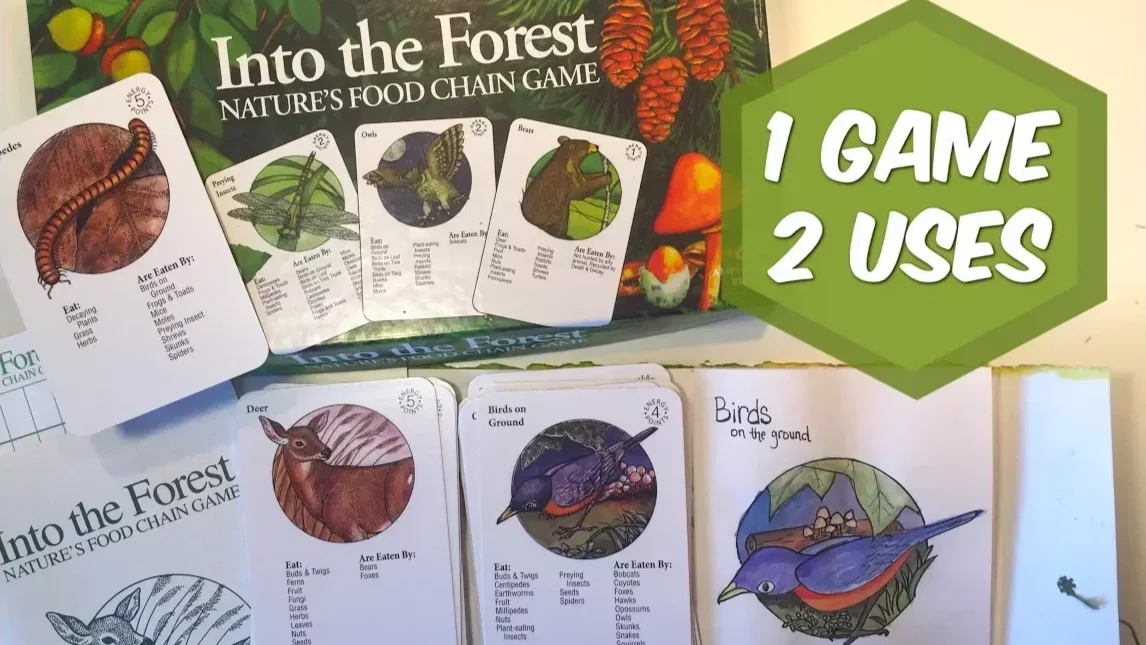
Games & Art | Into the Forest
After many of you saw these Into The Forest game pieces, you asked about the game, where to find it, and if we liked it. The thing is that at the time, we weren't playing the game, we were only uses the beautiful cards for drawing inspiration for our nature studies. We would draw one of the cards into our nature journal, then write about the plant or animal. We did this for a couple of weeks, choosing 1-2 cards a week. During that time, we also spent a lot of time in the garden planting seeds and tending our raised beds. Finally one day, we learned how to play the game.
June 2017
Bird Unit Study Review
There’s always one more project I think of when a unit is over, but being able to stop at a high point during a unit is a skill in and of itself that I continually strive for! Now that our unit is officially over and the projects and hands on activities are all complete, it’s time to access how everything went. I’m pleased to share with you the projects we did, what we liked, didn’t like and what we actually got through. While I tend to over plan (in the sense that I think we can cover far more in just a small space of time), and get overzealous at the possibilities within a unit, we still don’t usually cover everything and many things I think we’ll get to, we don’t. Some books that look engaging and rich, end up not being so and other books and resources end up being unexpected successes.
Check out our complete Owl Unit Study with videos on how we put this unit together, the resources we used and the projects we did. You can also check out our larger Bird Unit Study which includes more projects and resources.
Here's a list of the books we used for this unit: Birds, Nests and Eggs by Mel Boring, A Nest is Noisy by Dianna Aston, About Birds by Cathryn Sill, Arrowhawk A True Survival Story by Gabi Swiatkowska, The Desperate Adventures of Zeno and Alya by Jane Kelley, An Egg is Quiet by Dianna Aston, Outside Your Window First Book of Nature by Nicola Davies, Birds by DK Eyewitness Books, Summer Birds: The Butterflies of Maria Merian by Margarita Engle, United Tweets of America: 50 State Birds Their Stories, Their Glories by Hudson Talbott, Nature Anatomy: The Curious Parts and Pieces of the Natural World by Julia Rothman, Practical Naturalists by DK Publishing, Animalium by Jenny Broom, Curiositree: Natural World: A Visual Compendium of Wonders from Nature by AJ Wood, The Spider and the Doves: The Story of the Hijra by Farah Morley, Birds by Peter Gill.
We also used Professor Noggin's Birds of North America Trivia game and Sibley Backyard Birding Flashcards: 100 Common Birds of Eastern and Western North America, as well as Animalium postcards.
Check out our complete Owl Unit Study with videos on how we put this unit together, the resources we used and the projects we did. You can also check out our larger Bird Unit Study which includes more projects and resources.