Gardening
Grades 1-3
Gardening with Children
Gardening with children is a rewarding experience for both parent/teacher and child. So often we are disconnected from the natural world and that of our ancestral traditions. We may not all be able to live off the land, fell timber for our home or weave our fabric into clothes, but occasionally, we may partake in some of these experiences as a small reminder of where our food, clothing and homes come from.
Water is the enriching resource that brings life to a parched land. A dormant seed may burst into life when the right conditions appear, and the main component to that life is water. As many of us no longer rely on the rains to water our land and bring it from the dusty, dry, lifeless existence to one bursting with greenery and vibrancy, we may have lost our gratitude and awe for this life giving resource.
Growing tomatoes from seed with my children, many years ago, was one of the most spiritual experiences I had as a person. It was such a simple, yet powerful reminder that there exists a Sustainer greater and more Subtle than we are aware of. It may be moving for us as adults watching this unfold before our eyes, yet for our children their first instinct is to connect this to the Love of the Creator for them. Children know they are cared for and growing a garden is one more way for them to experience that in a subtle way.
Gardening
-
How a Seed Grows | Root Observation
It's a quintessential rite of passage to grow plants from seeds, and now you can watch the growth of the roots with this Root Observation kit from Nature-Watch.
-

Mason Jar Herb Garden
Here's a fun little project you can do so you can have fresh herbs at the ready when cooking. A big bonus is that these frosted blue mason jars look super cute on your kitchen counter. And once the herbs start growing, they add a splash of vibrant green that brightens your space and brings the outdoors in.
-
Garden Update | Gardening with Children
Welcome to my garden! Again, I'm trying to grow a little vegetable and herb garden and soon I want to add fruit trees, too. But my problem is that I don't have a green thumb! In fact, I'm pretty convinced I have the opposite.
-
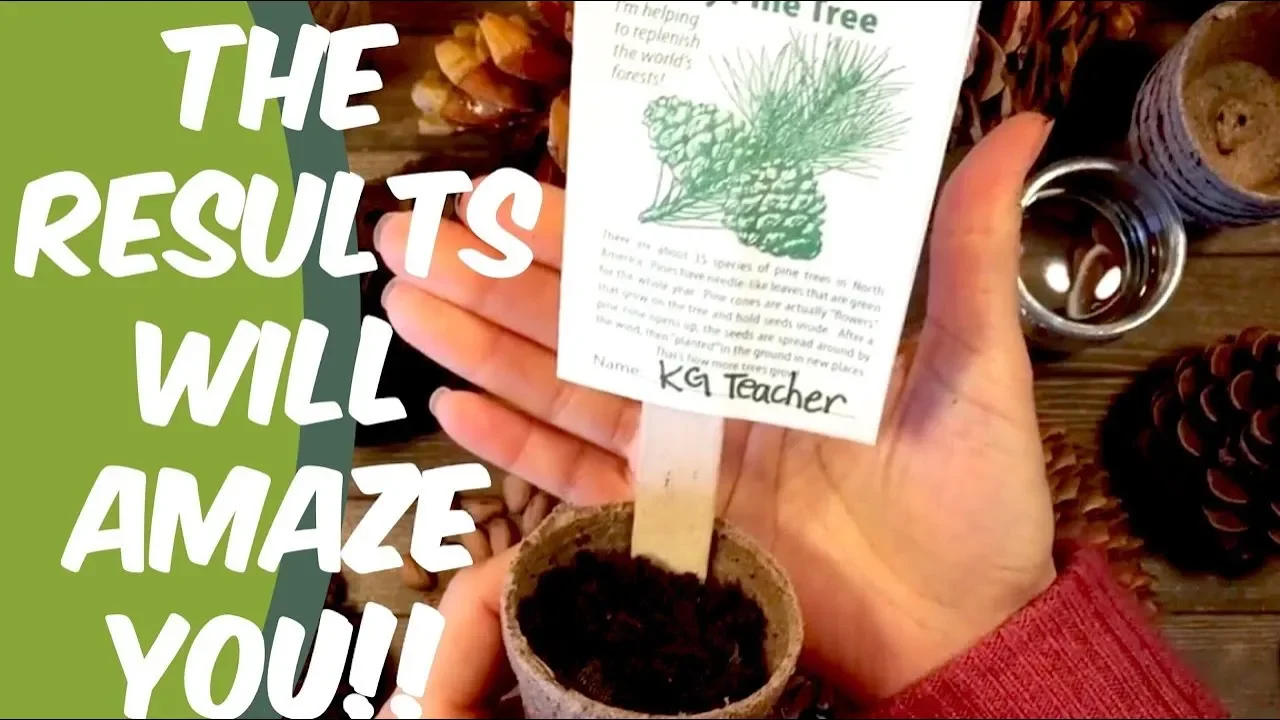
How to Grow a Pine Tree from Seed
I can't tell you how much we love the kits we got from Nature-Watch. The one I'm sharing to day is a classroom kit for 25 students called Forever Forests. In addition to providing content for a lesson, this kit comes with enough supplies to plant more than 25 pine trees from seed
-
How to Compost
There are two ways to compost: The right way and my way ;) I don't compost with the intention of balancing nutrients; I compost primarily to keep our kitchen waste from ending up in the landfill.
-
How To Grow A Medieval Herb Garden
We made this Medieval herb garden for the first time back in 2010. I kept the materials and used it again in 2014 when we returned to this unit and again 2018 when we circled back to that unit for the third time (my children are about four years apart so we tend to circle through our units every four years).
-
DIY Mason Jar Herb Garden
Grow your own herb garden using supplies you probably already have around the house. This DIY indoor Mason Jar herb garden was easy to do and you can make one, too! All you need is a mason jar or similar jar. Wide neck is easier than a narrow neck. You also need sand, rocks, soil and seeds. We used basil for our herb garden, but you could use a variety of herbs.
-
How to Grow Herbs Indoors for Transplant | Indoor Greenhouse
I can't say enough about the Nature-Watch kits we've used so far. They are well designed and take all the hard work out of doing hands-on projects and replaces with simple projects that are easy to do with great results. The projects are meaningful, educational and long lasting. And because we've purchased the classroom kits for projects, we have left overs to use again and share.
-
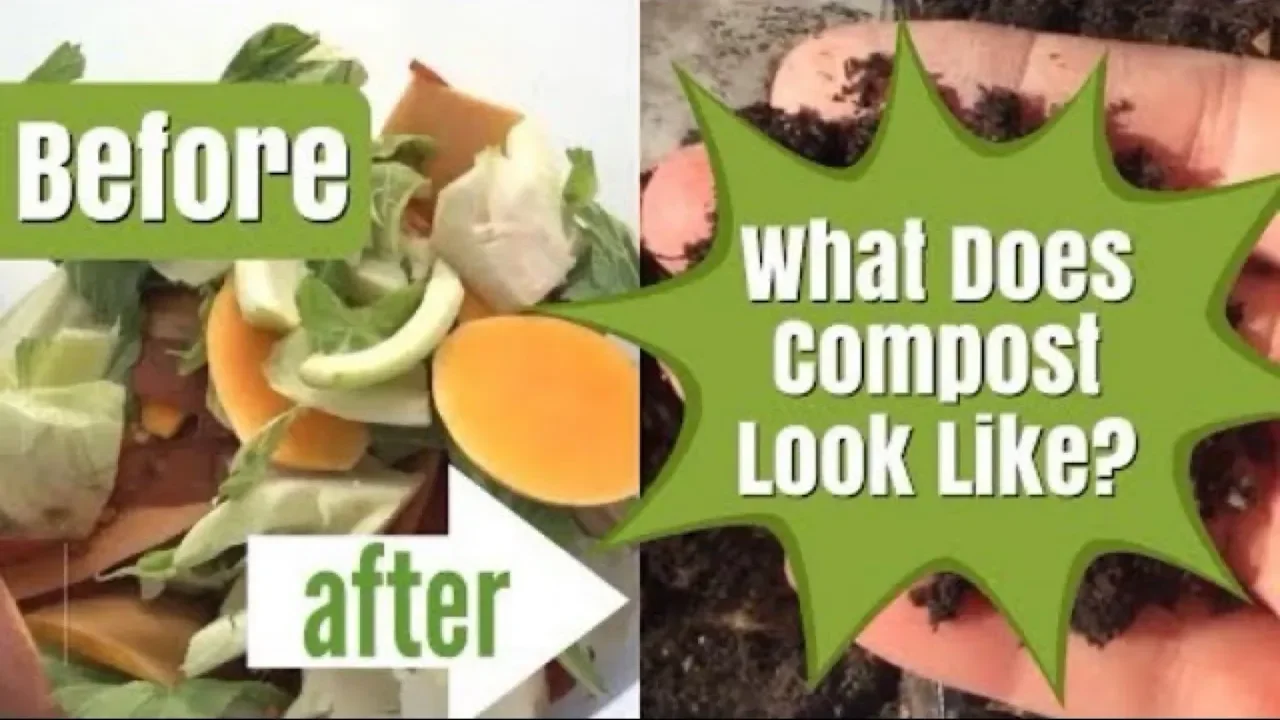
What Does Compost Look Like After 3 Weeks?
Curious to see what kitchen scraps look like after three weeks in the dirt? It's probably what you'd expect, but each time I turn over soil that's been composted, I'm always surprised and thrilled at the same time. It's incredible how quickly the right materials will decompose and how unchanged materials that take eons to decompose look like after weeks, months or years. Another surprise is the temperature.
-
How to Grow Mushrooms
Growing mushrooms is watching nothing happen for weeks and then suddenly they emerge and grow overnight doubling in size in days. That's what happened with our Mushroom Adventure Grow Edible Mushrooms kit from Gardeners. We bought this kit for our spring nature study, but really had intended to buy when we did our Botany Main Lesson Block to accompany the lesson on fungi.
-
How To Grow A Bee Friendly Garden
Growing a Bee Friendly garden is just about as easy as growing wildflowers in a pesticide free urban garden. We used the Nature-Watch classroom kit for this project. The kit comes with everything you need to grow wildflowers in easy-to-transport containers for 25 students. We love the kits from Nature Watch and have used them in our homeschool for years.
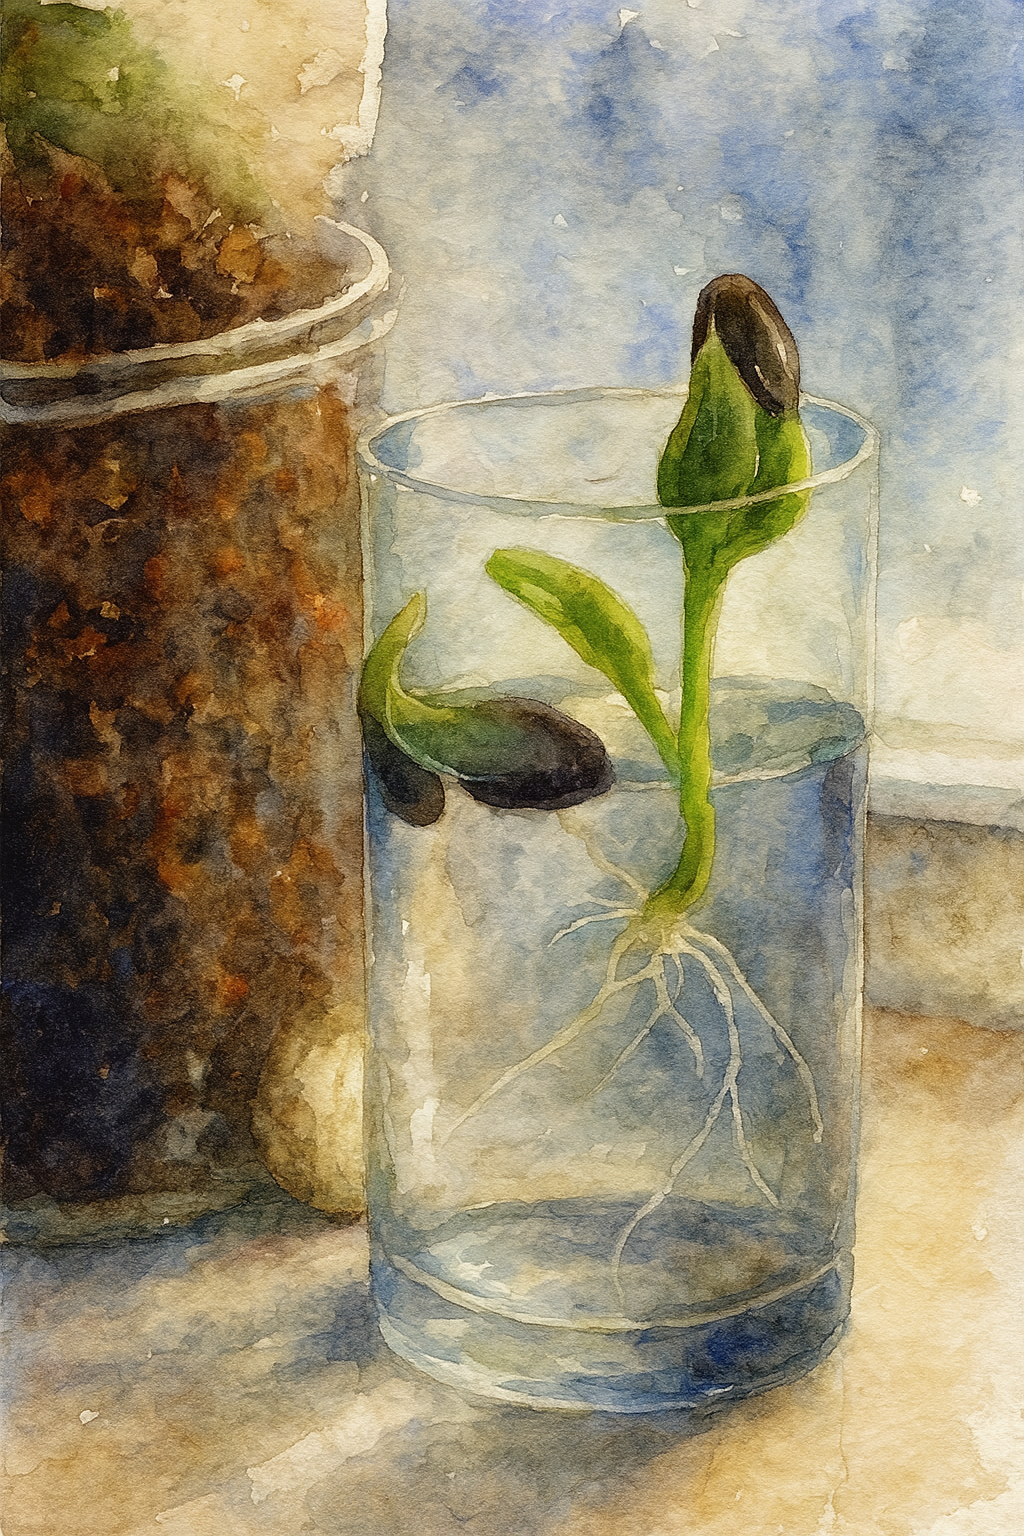
How a Seed Grows | Root Observation
It’s a quintessential rite of passage to grow plants from seeds, and now you can watch the growth of the roots with this Root Observation kit from Nature-Watch. This is the classroom kit, though they sell them individually as well. This kit comes with supplies for 25 students, but I’m going to show you how you can use this classroom kit even if you are homeschooling. This kit comes with 25 clear root observation tubes (with lids), over 50 dwarf sunflower seeds, a bag of acrylamide crystals, glue and 25 cardboard plaques for your tubes. You can find this kit at Nature-Watch.
April 2017
Mason Jar Herb Garden
Here's a fun little project you can do so you can have fresh herbs at the ready when cooking. A big bonus is that these frosted blue mason jars look super cute on your kitchen counter. And once the herbs start growing, they add a splash of vibrant green that brightens your space and brings the outdoors in.
While I've seen these at Uncommon Goods (a fun place to find unique home goods and kits), I found mine on the clearance racks at T.J.Maxx.
If you can't find this adorable and useful kit, you can make your own! You can make your own herb garden in a mason jar. I would suggest frosting from the outside of the jar so avoid any paint or chemical residue lingering around where your plants are growing. I would also offer this alternative to using the metal basket that comes with the kit: try using a sewn cotton bag with two strings hanging down that you can fold over the side of the mason jar. Then screw the lid on. Fill the mason jar with water before putting the bag in place. Fill with soil and seeds and watch your herbs grow!
One nice thing about having the blue frosted glass is that you don't see the roots or water. It's not as nice you think, plus the roots need a dark place to thrive.
Our best countertop herbs are basil. It grows easily and abundantly every time. Next is cilantro followed by parsley. I haven't much luck with other herbs like thyme or chives.
The seeds that came in the kit all did well. The cress and arugula grew well.
Do water by filling the mason jar rather than by watering the soil. If you water the soil, soil particles get in the water and cloud it and may cause algae growth or mold. Do trim the flower buds to keep producing herbs. If you put them outside, they will likely need to be watered more often. Algae may grown in the jar and around the basket. If this happens, empty the water and clean it with a sponge. Clean the jar, basket and cording.
Add fertilizer when you replace or refill the water. Some comes in the kit. Once it ran out, I didn't get more. But that's something to consider. We eventually used composted soil to fill our metal baskets as we did this project again.
We've had this for a year now and have grown many plants, but one thing that happens pretty quickly is the metal ring rusts. The basket doesn't, just the metal mason jar lid has rusted. Any suggestions on how to keep that from happening or how to clean the rust off now will be appreciated.
Is This Urban Homesteading? Garden Update
Welcome to my garden! Again, I'm trying to grow a little vegetable and herb garden and soon I want to add fruit trees, too. But my problem is that I don't have a green thumb! In fact, I'm pretty convinced I have the opposite. Then again, I do have trouble staying consistent with my garden like watering and weeding. I do compost regularly and today I'll show you my new compost bins, do a composting experiment and take you through the garden and tell you what I've planted. If you like these chatty garden videos, please let me know! How's your garden growing? Are growing vegetables in pots, raised beds or planters? When do you start the growing season? Check out our previous composting project.
How to Grow a Pine Tree from Seed
I can't tell you how much we love the kits we got from Nature-Watch. The one I'm sharing to day is a classroom kit for 25 students called Forever Forests. In addition to providing content for a lesson, this kit comes with enough supplies to plant more than 25 pine trees from seed. It also comes with pine nuts for tasting and various pine cones for viewing. Watch the progress of our pine trees from seedling to sapling and beyond by following me on Instagram at Pepper and Pine.
This project is part of our Waldorf Botany Main Lesson. See the other videos in this playlist.
Find this kit Forests Forever Activity Kit and more at Nature-Watch.
April 2017
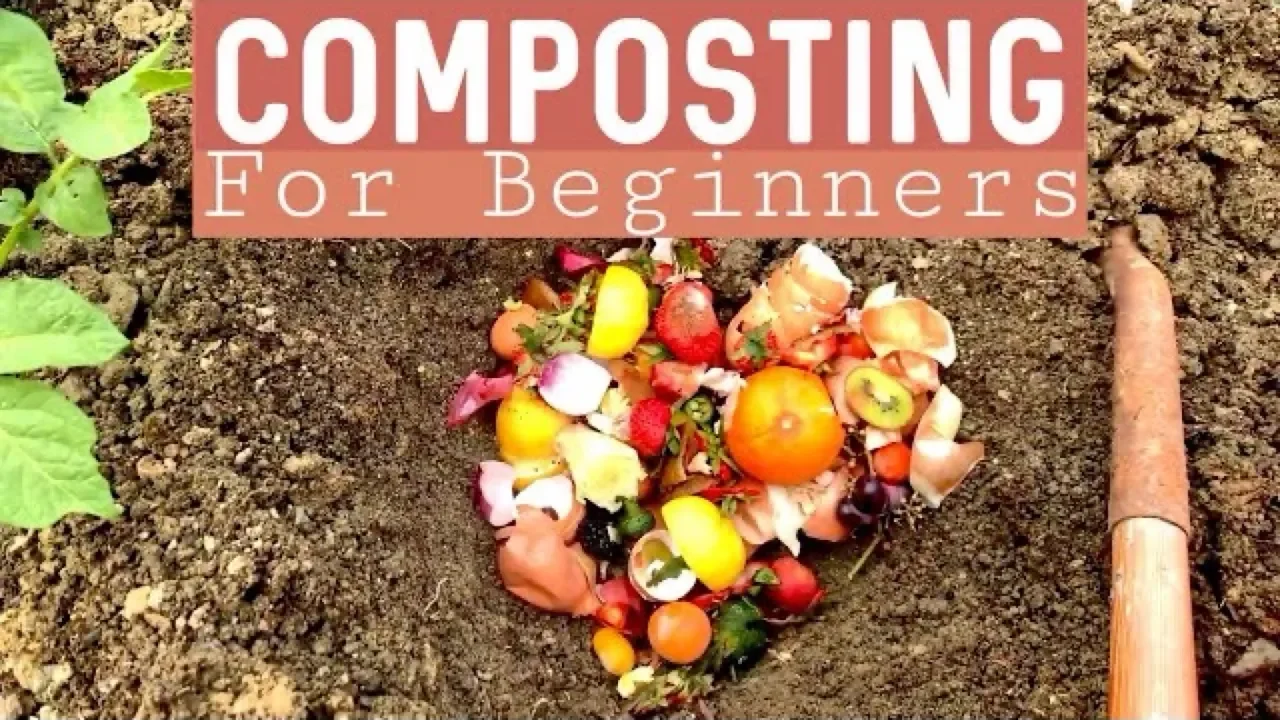
How to Compost for Beginners
There are two ways to compost: The right way and my way ;) I don't compost with the intention of balancing nutrients; I compost primarily to keep our kitchen waste from ending up in the landfill. In so doing, I create rich nutrient dense soil for my garden, but alas, I've been a novice gardener since I started gardening many years ago. I haven't progressed in my skills or abilities, but I still love to prep the soil and plant seeds. Some grow, some don't, but I still do it.
With some exceptions, I've been composting for as long as I've been gardening, and it's worked every time. Let me walk you through the process and help you understand how awesomely quick and easy this can be...that is if you do it my way ;)
First, get yourself a compost pot. It can be fancy and pretty and sit on your counter. If can be a spare bowl you have. I use my nesting Tupperware plastic bowls I've had for years...like many many years. I put one on the counter when I'm cooking and toss kitchen scraps into the bowl. Then I put it in the freezer if I can't compost right away. If I think I'll compost in the next day or two (or three if it's winter and the compost isn't likely to get yucky on the counter and smell and decompose and attract flies), I'll leave the compost bowl on the counter and sometimes, I may put a lid on it. Usually, I pop it in the freezer because that way, I can compost less often.
When I'm ready to compost, I dig a hole big enough for the compost and large enough to have a lot of soil to cover the compost completely. I put all the kitchen scraps in the hole and cover it thoroughly. If you have a problem with rodents getting to your garden or compost, you can add extra soil and then top the soil with a large pot or tile.
You can also compost in a large pot, too, and this may keep the rodents from getting into the compost. When composting in a large pot, just know that it may rot before decomposing if you don't turn it once in a while. I've also composted it my EarthBoxes and in an IKEA trash bin with a lid. Nothing works as well as composting directly in the soil.
If you wish to turn the compost, you may do so. Just make sure that you cover it completely when you're done. You can also compost in the same hole often, even if the contents aren't completely decomposed. You also may need to wet the soil if it's especially dry. That keeps the worms happy. I haven't had a problem with the soil being too wet.
Once the soil is decomposed, you'll find that the soil tends to be richer and more moist than non composted soil.
July 2017
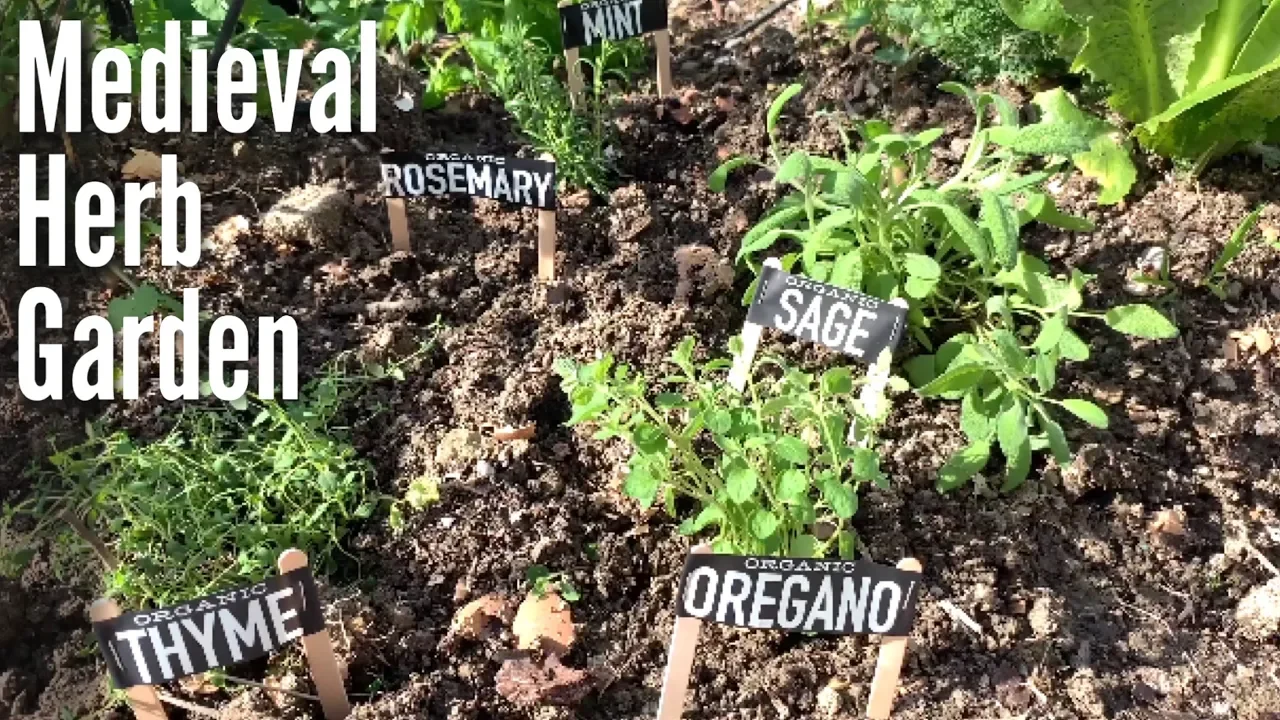
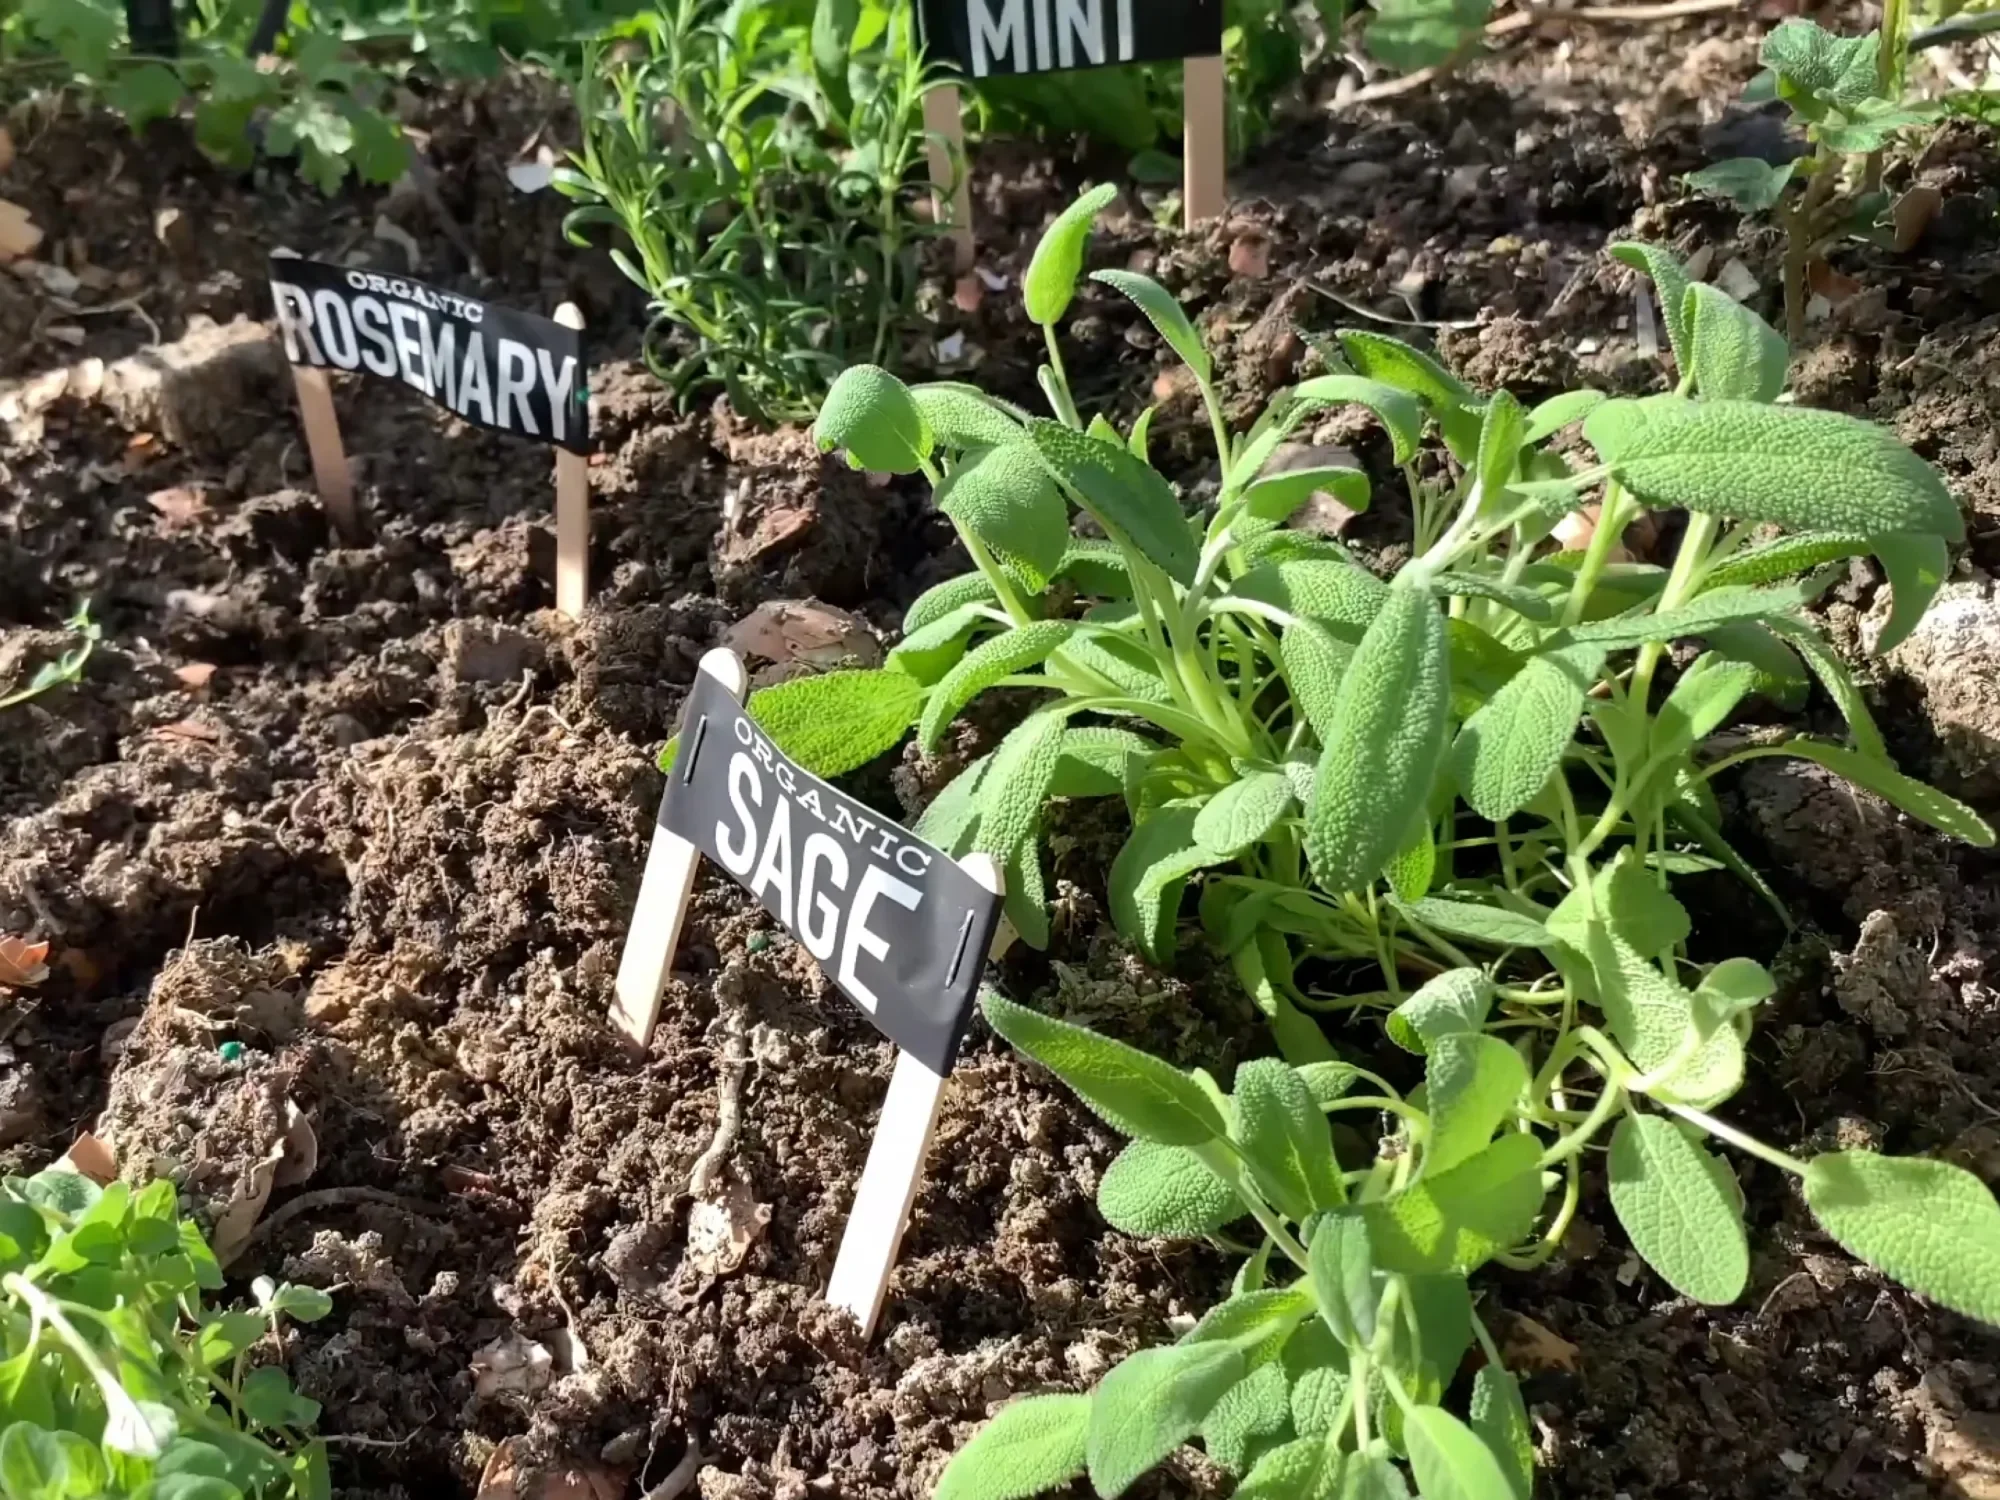
How To Grow A Medieval Herb Garden
We made this Medieval herb garden for the first time back in 2010. I kept the materials and used it again in 2014 when we returned to this unit and again 2018 when we circled back to that unit for the third time (my children are about four years apart so we tend to circle through our units every four years). Now in 2021, and still working through that unit which took on a new path, this kit is literally falling apart. We got new soil, rocks and herbs and made another herb garden. I also got some herbs from a local hardware store and nursery to add to our garden which did very well and continue to provide herbs for cooking and visual enjoyment. We dip into our herb garden now and again when making recipes from our varied cookbooks which cover many regions and time periods.
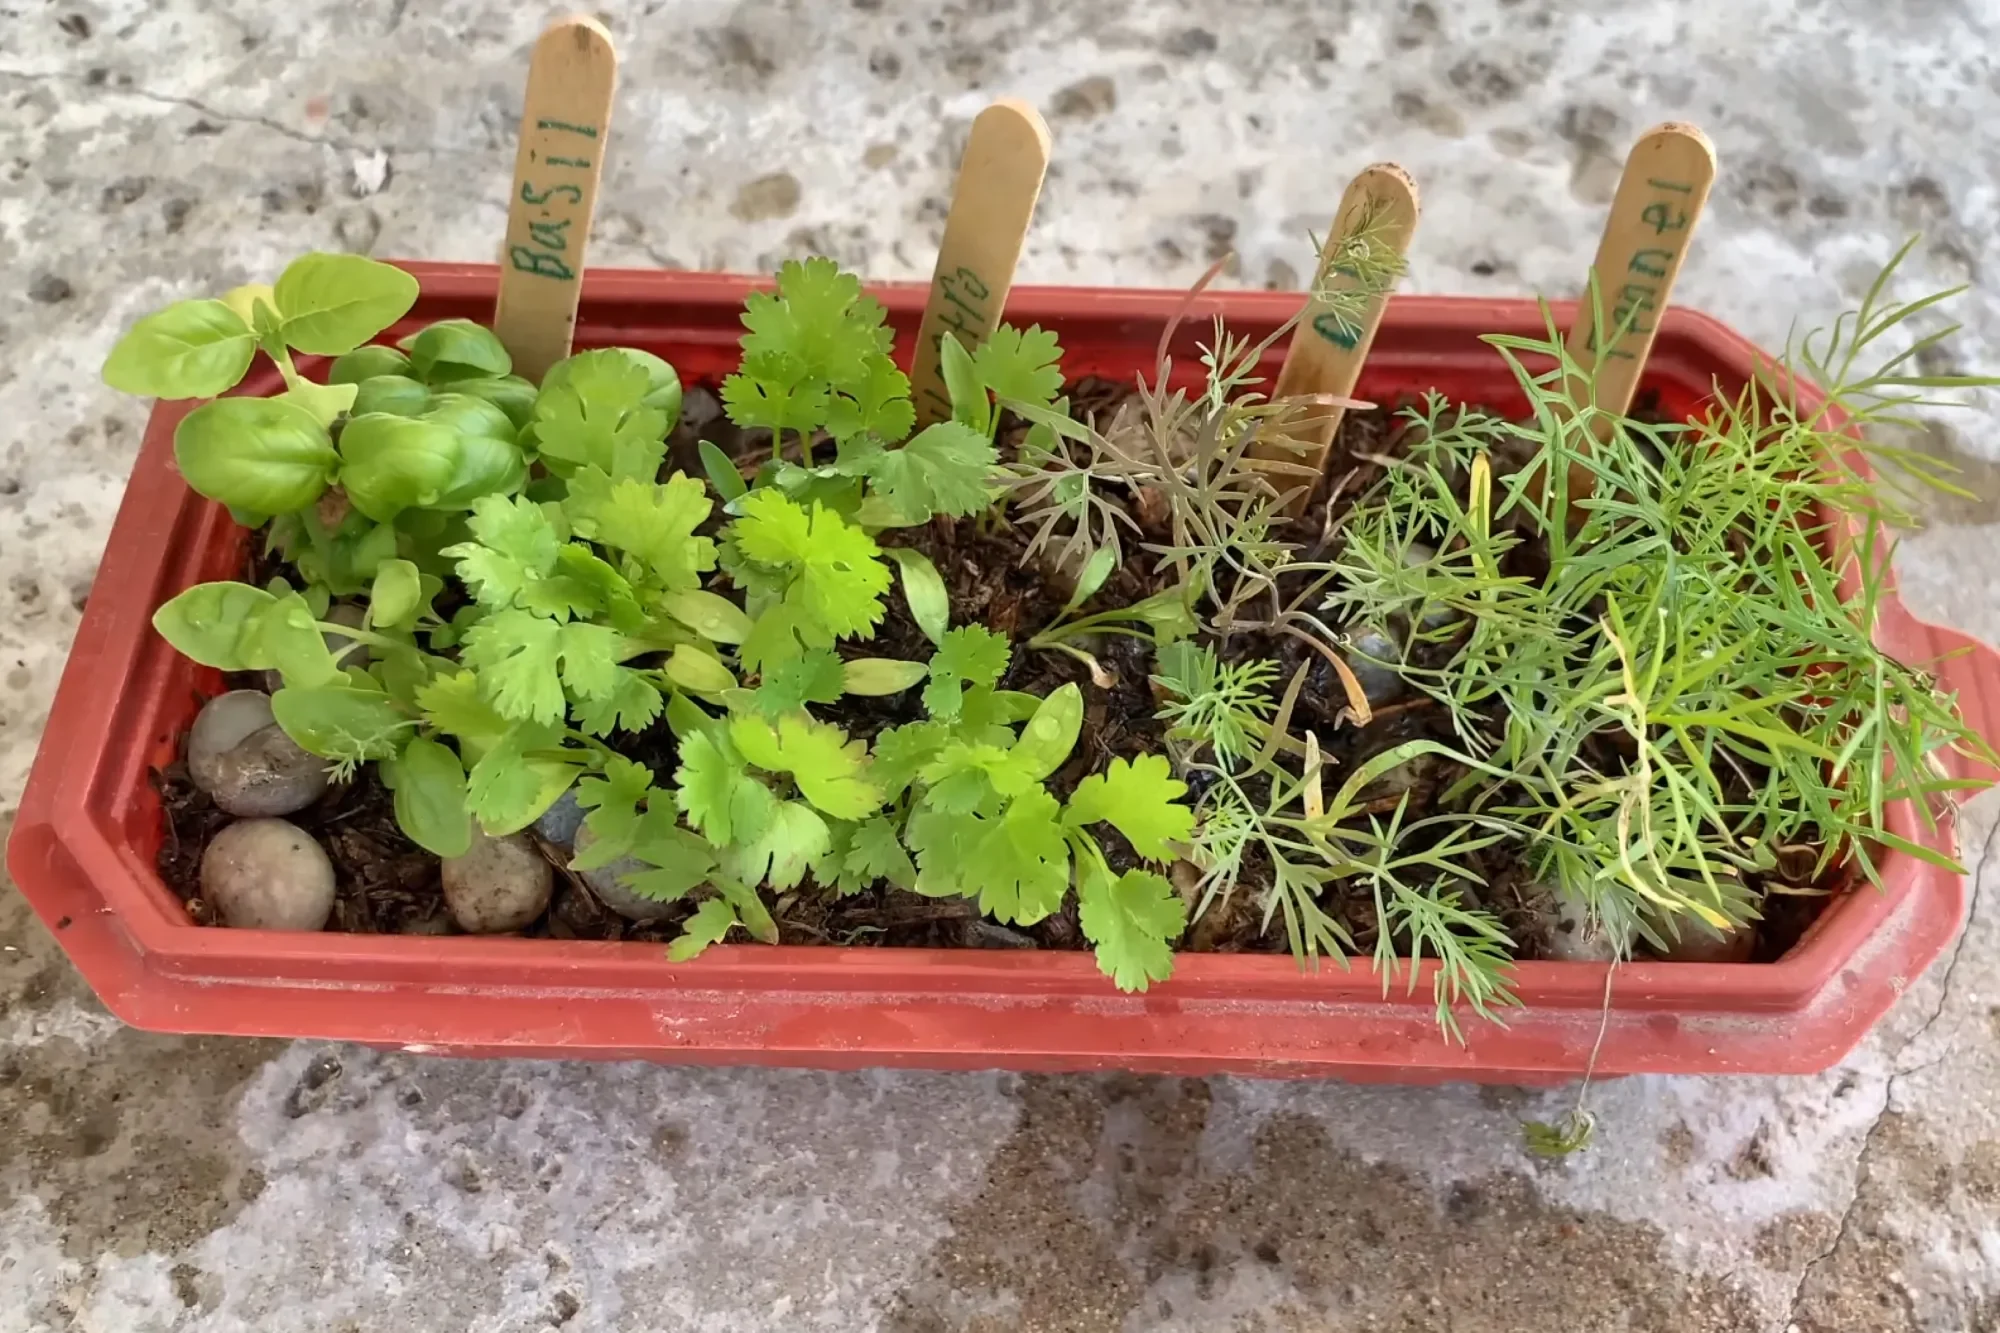

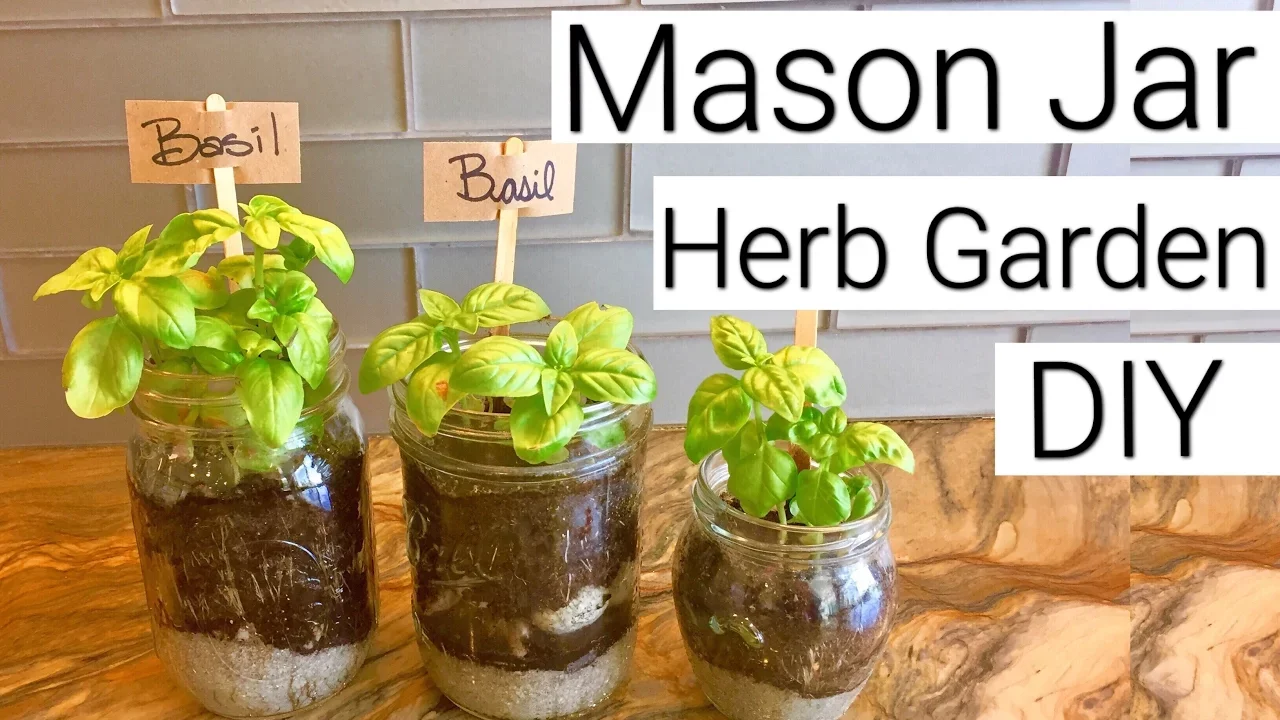
DIY Mason Jar Herb Garden
Grow your own herb garden using supplies you probably already have around the house. This DIY indoor Mason Jar herb garden was easy to do and you can make one, too! All you need is a mason jar or similar jar. Wide neck is easier than a narrow neck. You also need sand, rocks, soil and seeds. We used basil for our herb garden, but you could use a variety of herb
Directions: Fill the jar with about an inch of sand, followed by 1-2 inches of rocks, topping it off with about 2 inches of soil. Sprinkle a few seeds on top, cover with soil and water your seeds a couple times a week. It did several weeks before the basil grew large enough for us to use a few leaves. We also put our jars outside for a couple weeks because our original location in our school room was north facing. Once the basil was big enough for us to use, we moved it back in the house and put it in the kitchen. It looks beautiful and it’s functional!
Supplies: jar, sand, rocks, soil , and seeds. Cost: Less than $1 per jar. Duration: set up: 15 minutes, project: 10 minutes, clean up: 10 minutes, sprout: 1 week, leaves: 3 weeks, big enough to use:6 weeks
April 2017
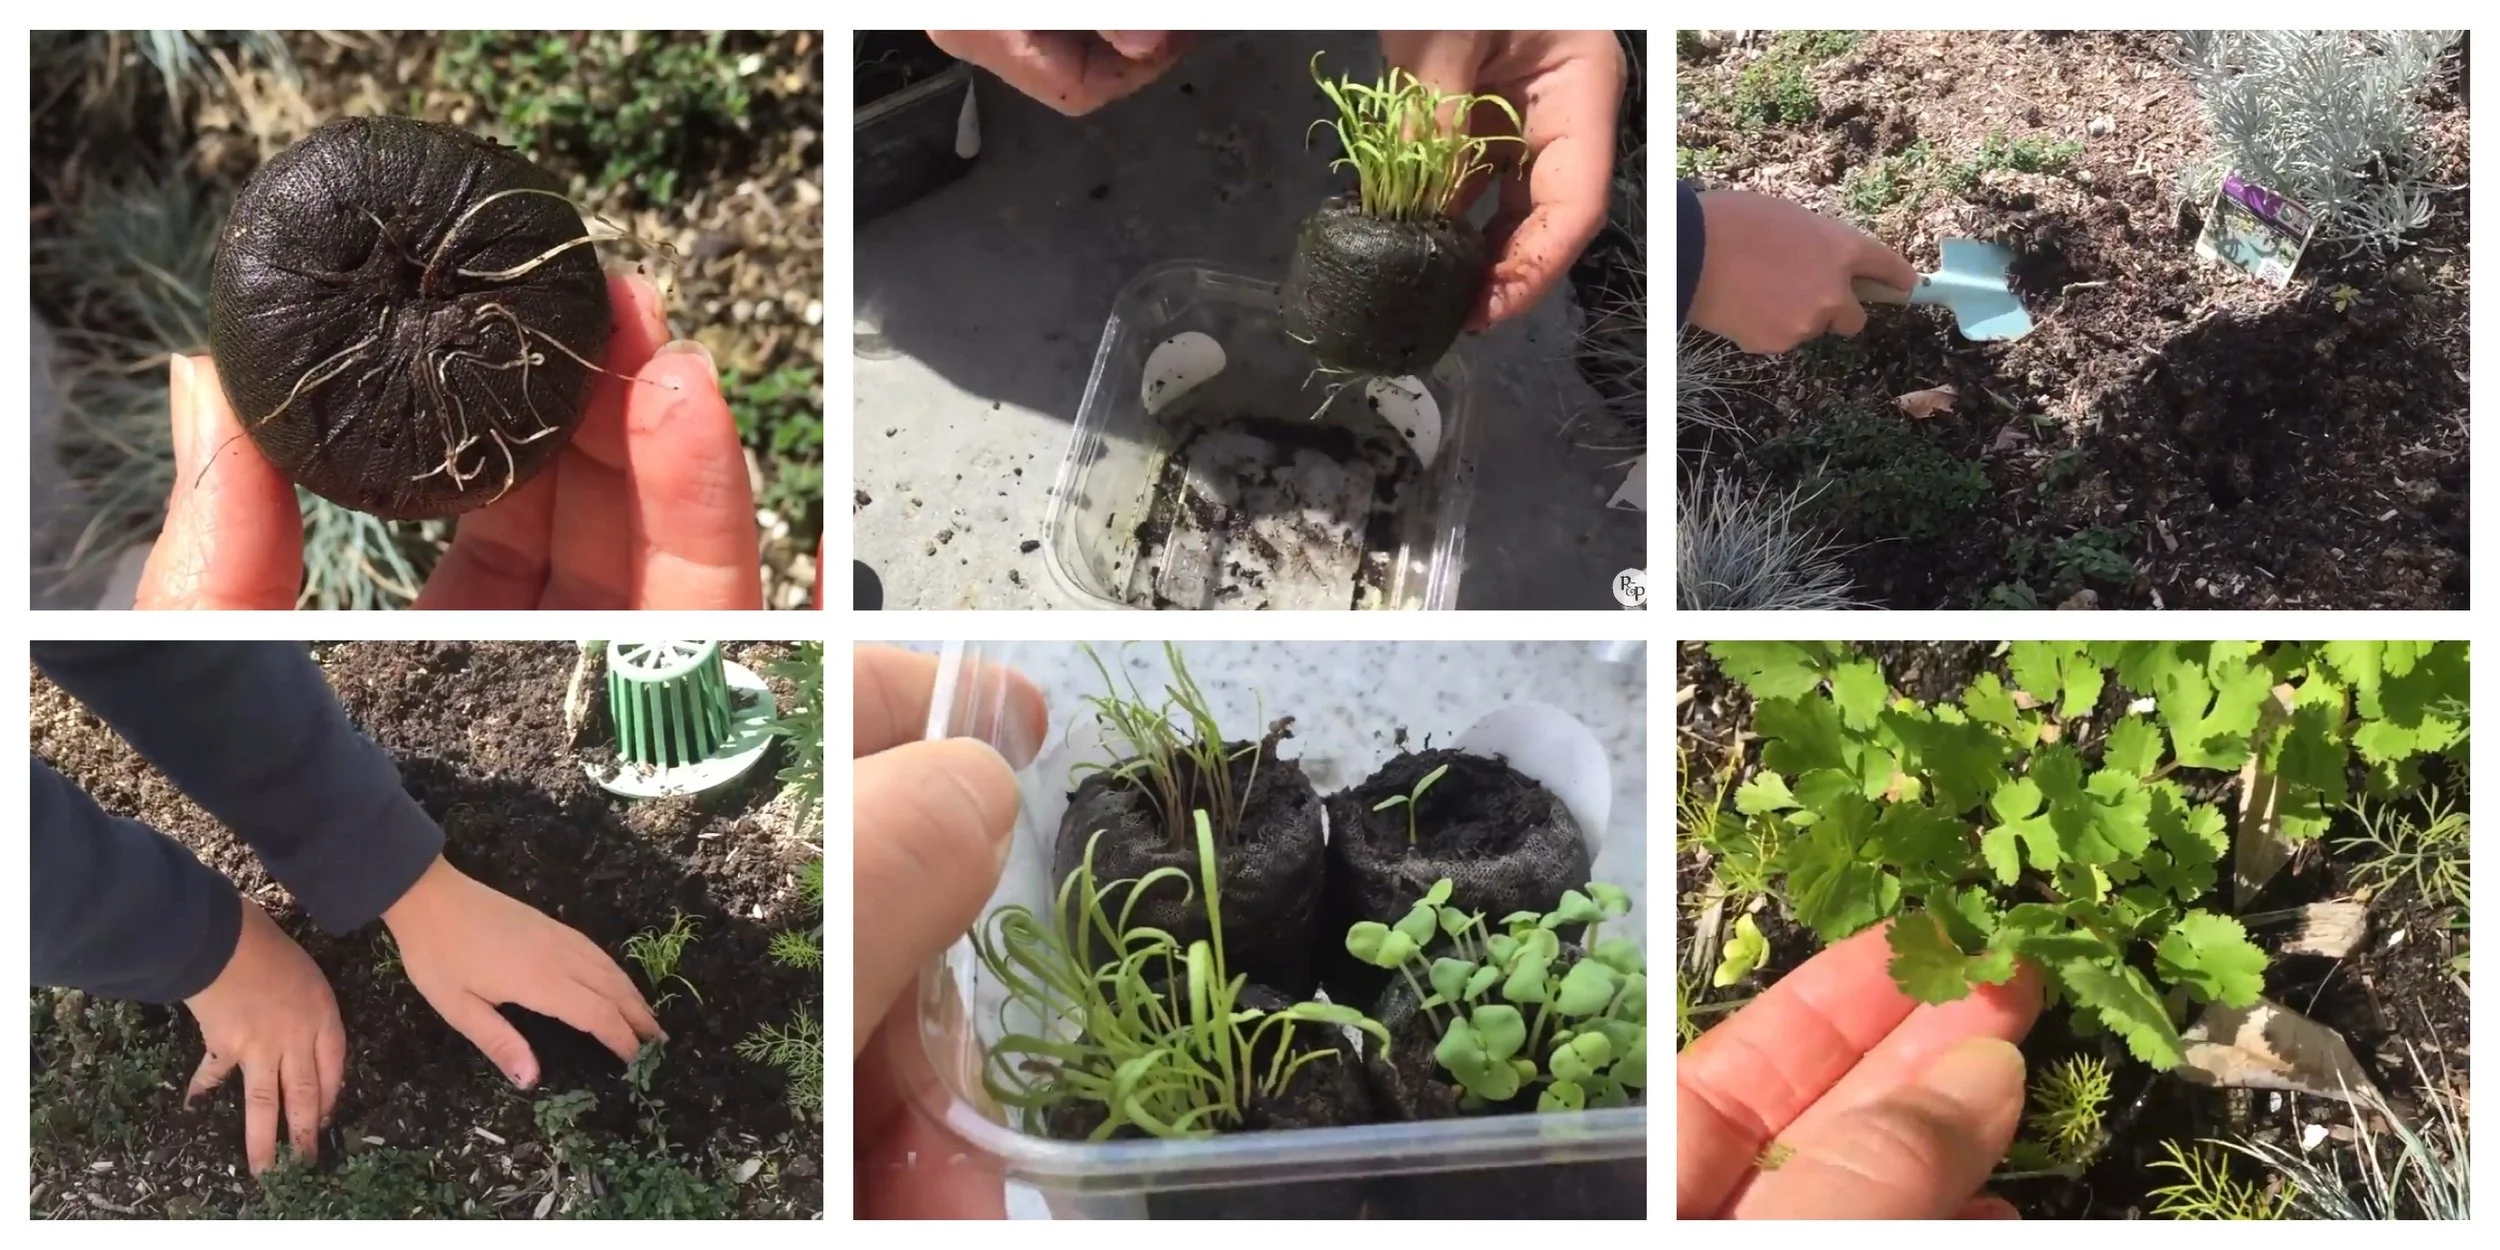
How to Grow Herbs Indoors
I can’t say enough about the Nature-Watch kits we’ve used so far. They are well designed and take all the hard work out of doing hands-on projects and replaces with simple projects that are easy to do with great results. The projects are meaningful, educational and long lasting. And because we’ve purchased the classroom kits for projects, we have left overs to use again and share. This project is for our Spring Nature Themed unit and you can see more projects for this unit.
This project is a Nature-Water DIY indoor greenhouse to grow herbs. It actually works! And what makes it especially easy for transplant are the soil pellets the kit comes with have mesh around them. These soil pellets come dry for easy shipping and storage. You just add several tablespoons per soil pellet to rehydrate them. Keep an extra half inch of water in the container once the soil pellets are rehydrated. Add 10 seeds to each soil pellet (the opening should be face up), cover the seeds and put the lid back on. In about 2-4 weeks, the herbs will be big enough to transplant. They are ready for harvest a few months later. Harvest stems and leaves and leave the plant to continue growing. To keep it from going to seed, pinch off the flowers.
April 2017

What Does Compost Look Like After 3 Weeks?
Curious to see what kitchen scraps look like after three weeks in the dirt? It's probably what you'd expect, but each time I turn over soil that's been composted, I'm always surprised and thrilled at the same time. It's incredible how quickly the right materials will decompose and how unchanged materials that take eons to decompose look like after weeks, months or years. Another surprise is the temperature. You may already know that decomposition creates heat, but seeing it on the thermometer and feeling it as you run the compost through your fingers is another thing entirely.
Check out the other Nature-Watch kits we use and love.
If you want to try this using the kit we used, you can find it at Nature-Watch.
You could also make your own using large mason jars, a hammer and nails to puncture the lid and a few thermometers to measure the temperature change. Though we did this project in the fall, I think this would be a great activity to do in the spring along with a nature or science unit. You can check out the last two spring season projects and units here: Nature Unit Spring 2016 and Nature Unit 2017.
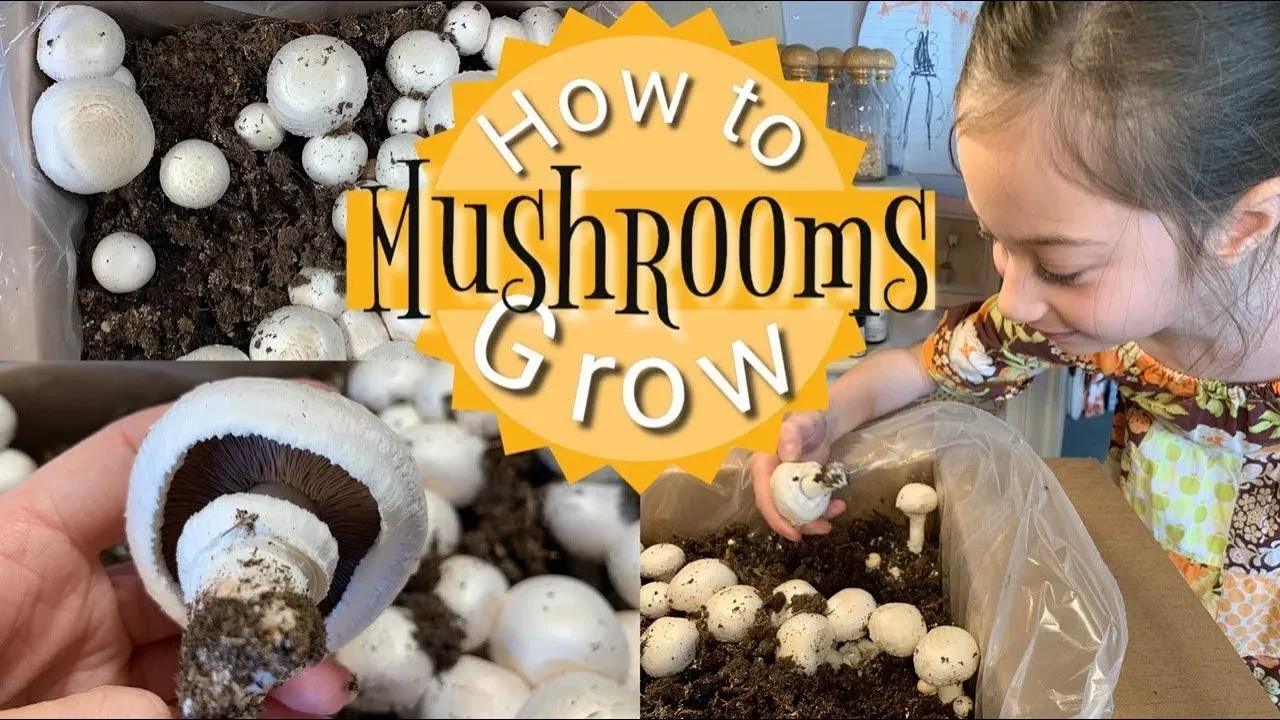
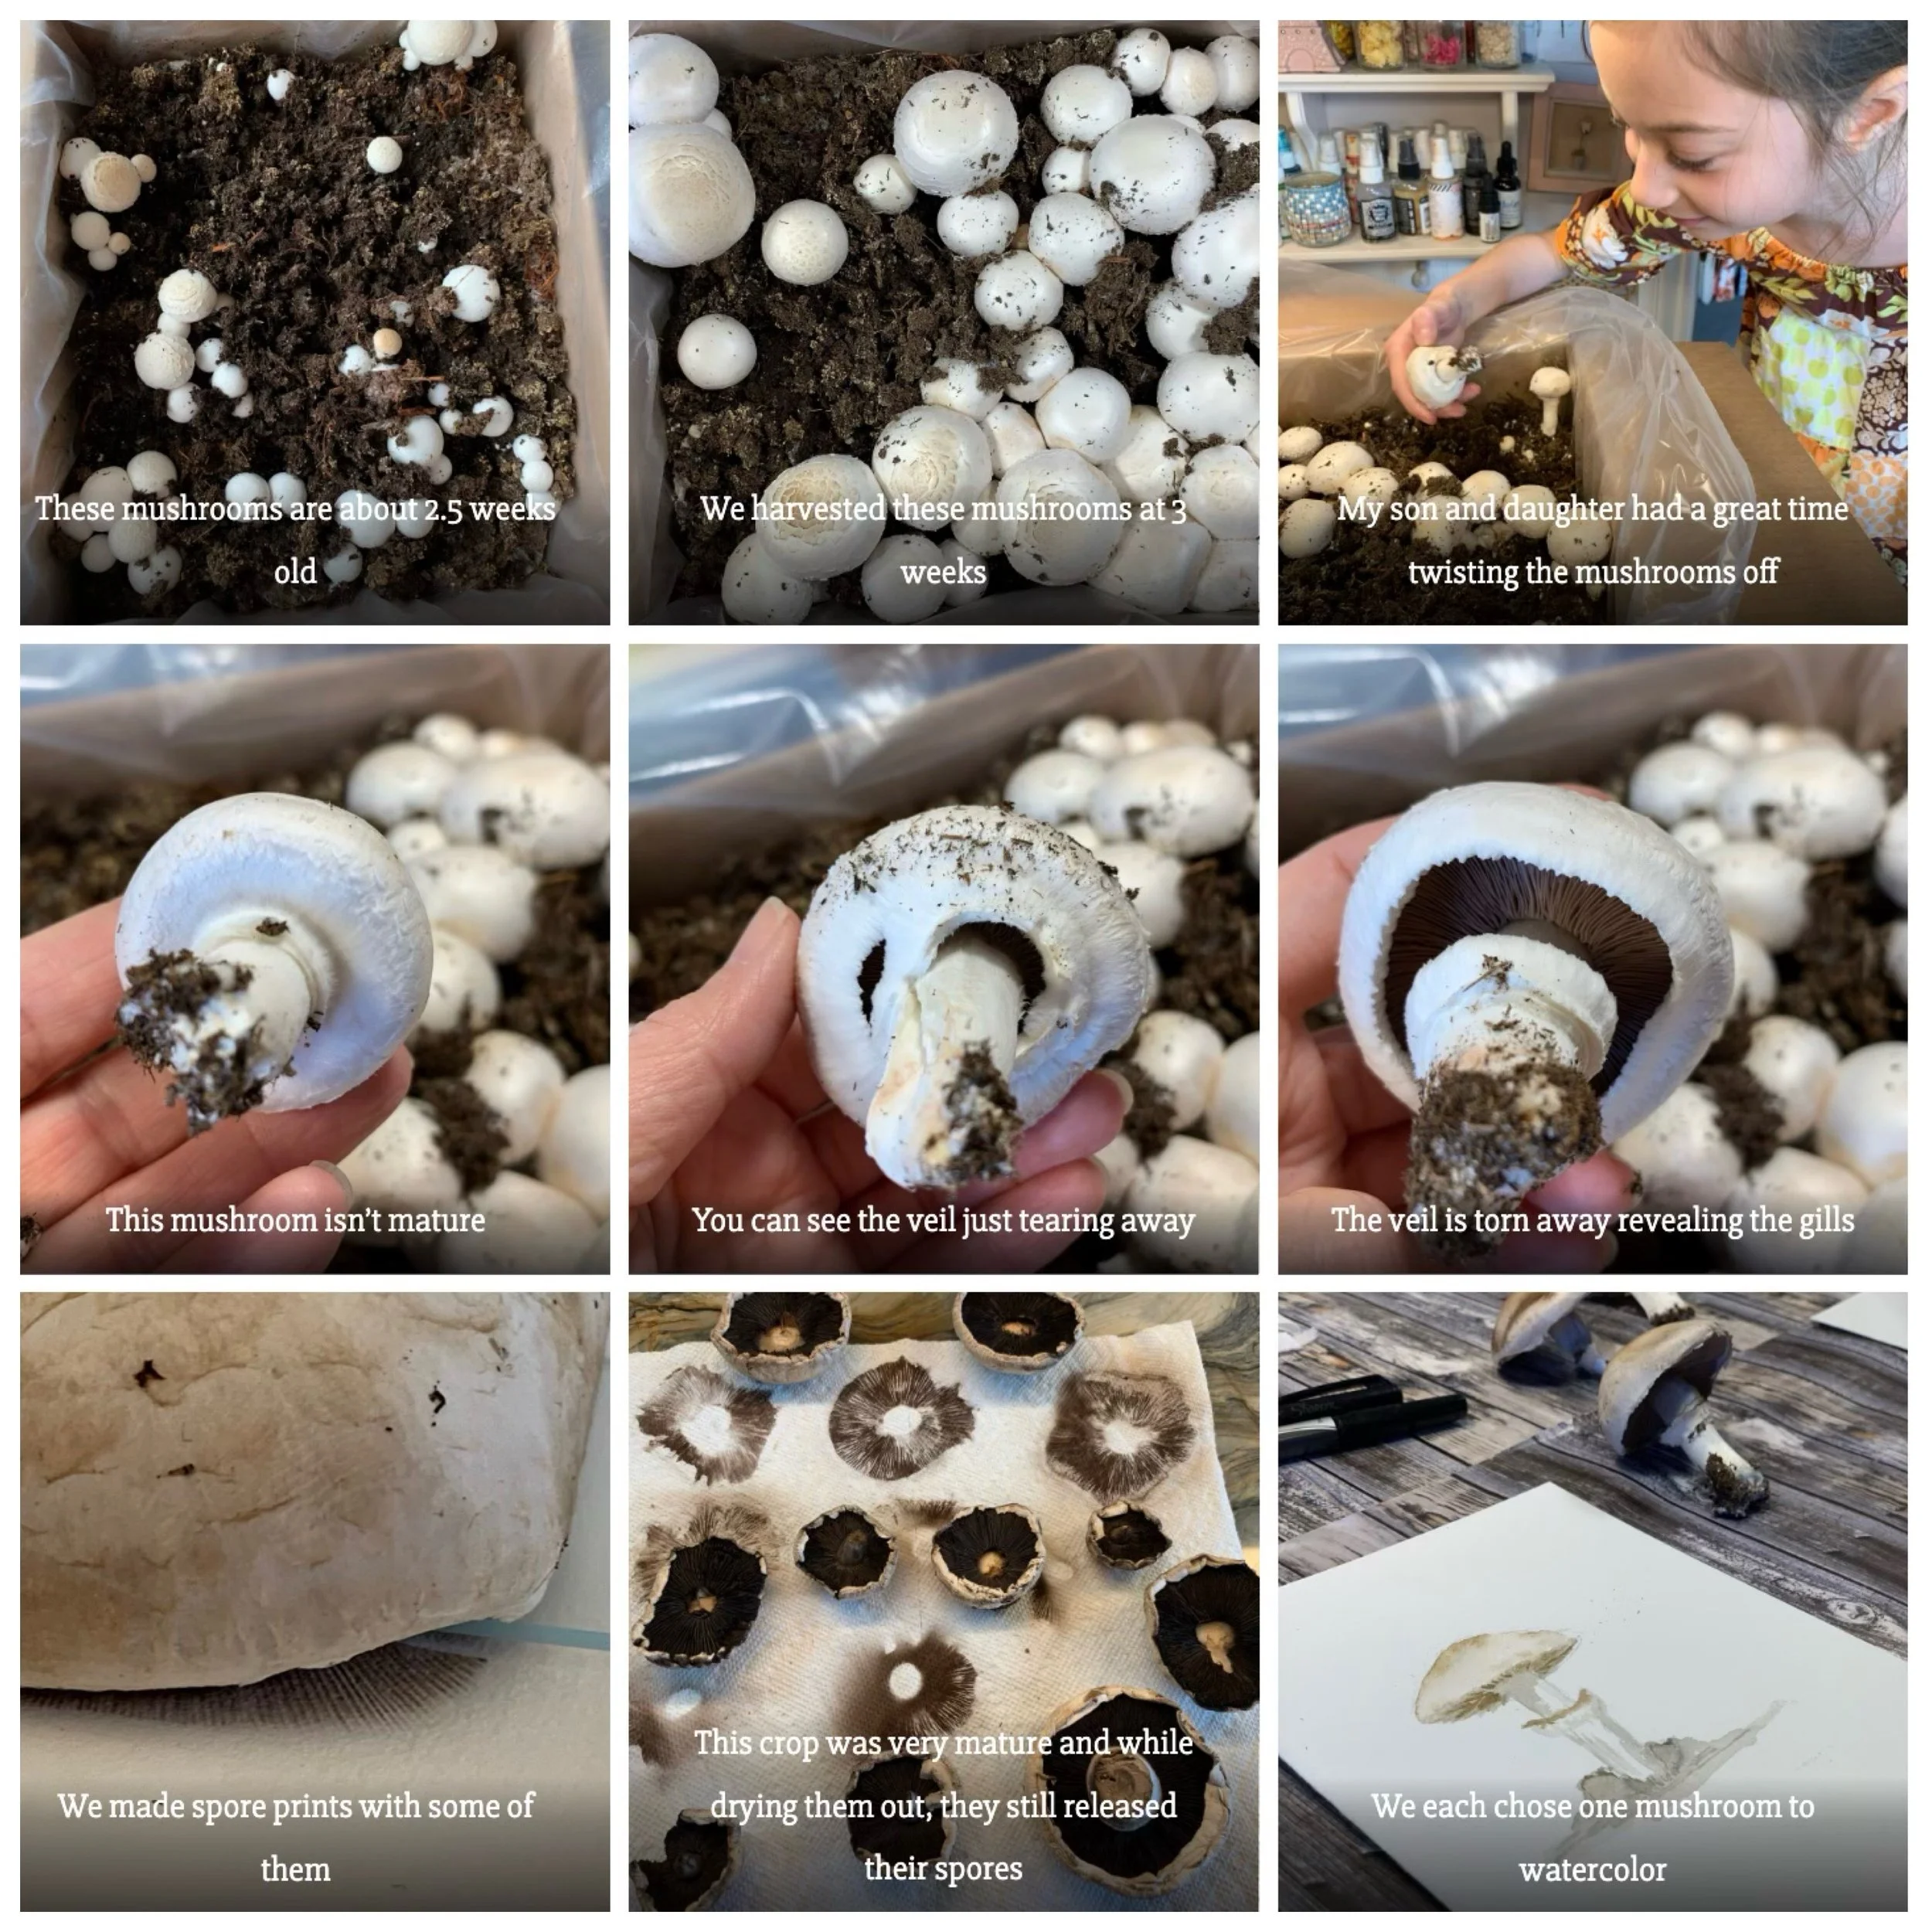
How to Grow Mushrooms
Growing mushrooms is watching nothing happen for weeks and then suddenly they emerge and grow overnight doubling in size in days. That’s what happened with our Mushroom Adventure Grow Edible Mushrooms kit from Gardeners. We bought this kit for our spring nature study, but really had intended to buy when we did our Botany Main Lesson Block to accompany the lesson on fungi.
It took about 4-6 weeks for both crops of mushrooms to grow and be harvested. We sauteed the first batch of mushrooms, made spore prints with a smaller mid crop and dried out the final crop of mushrooms to be used in future dishes.
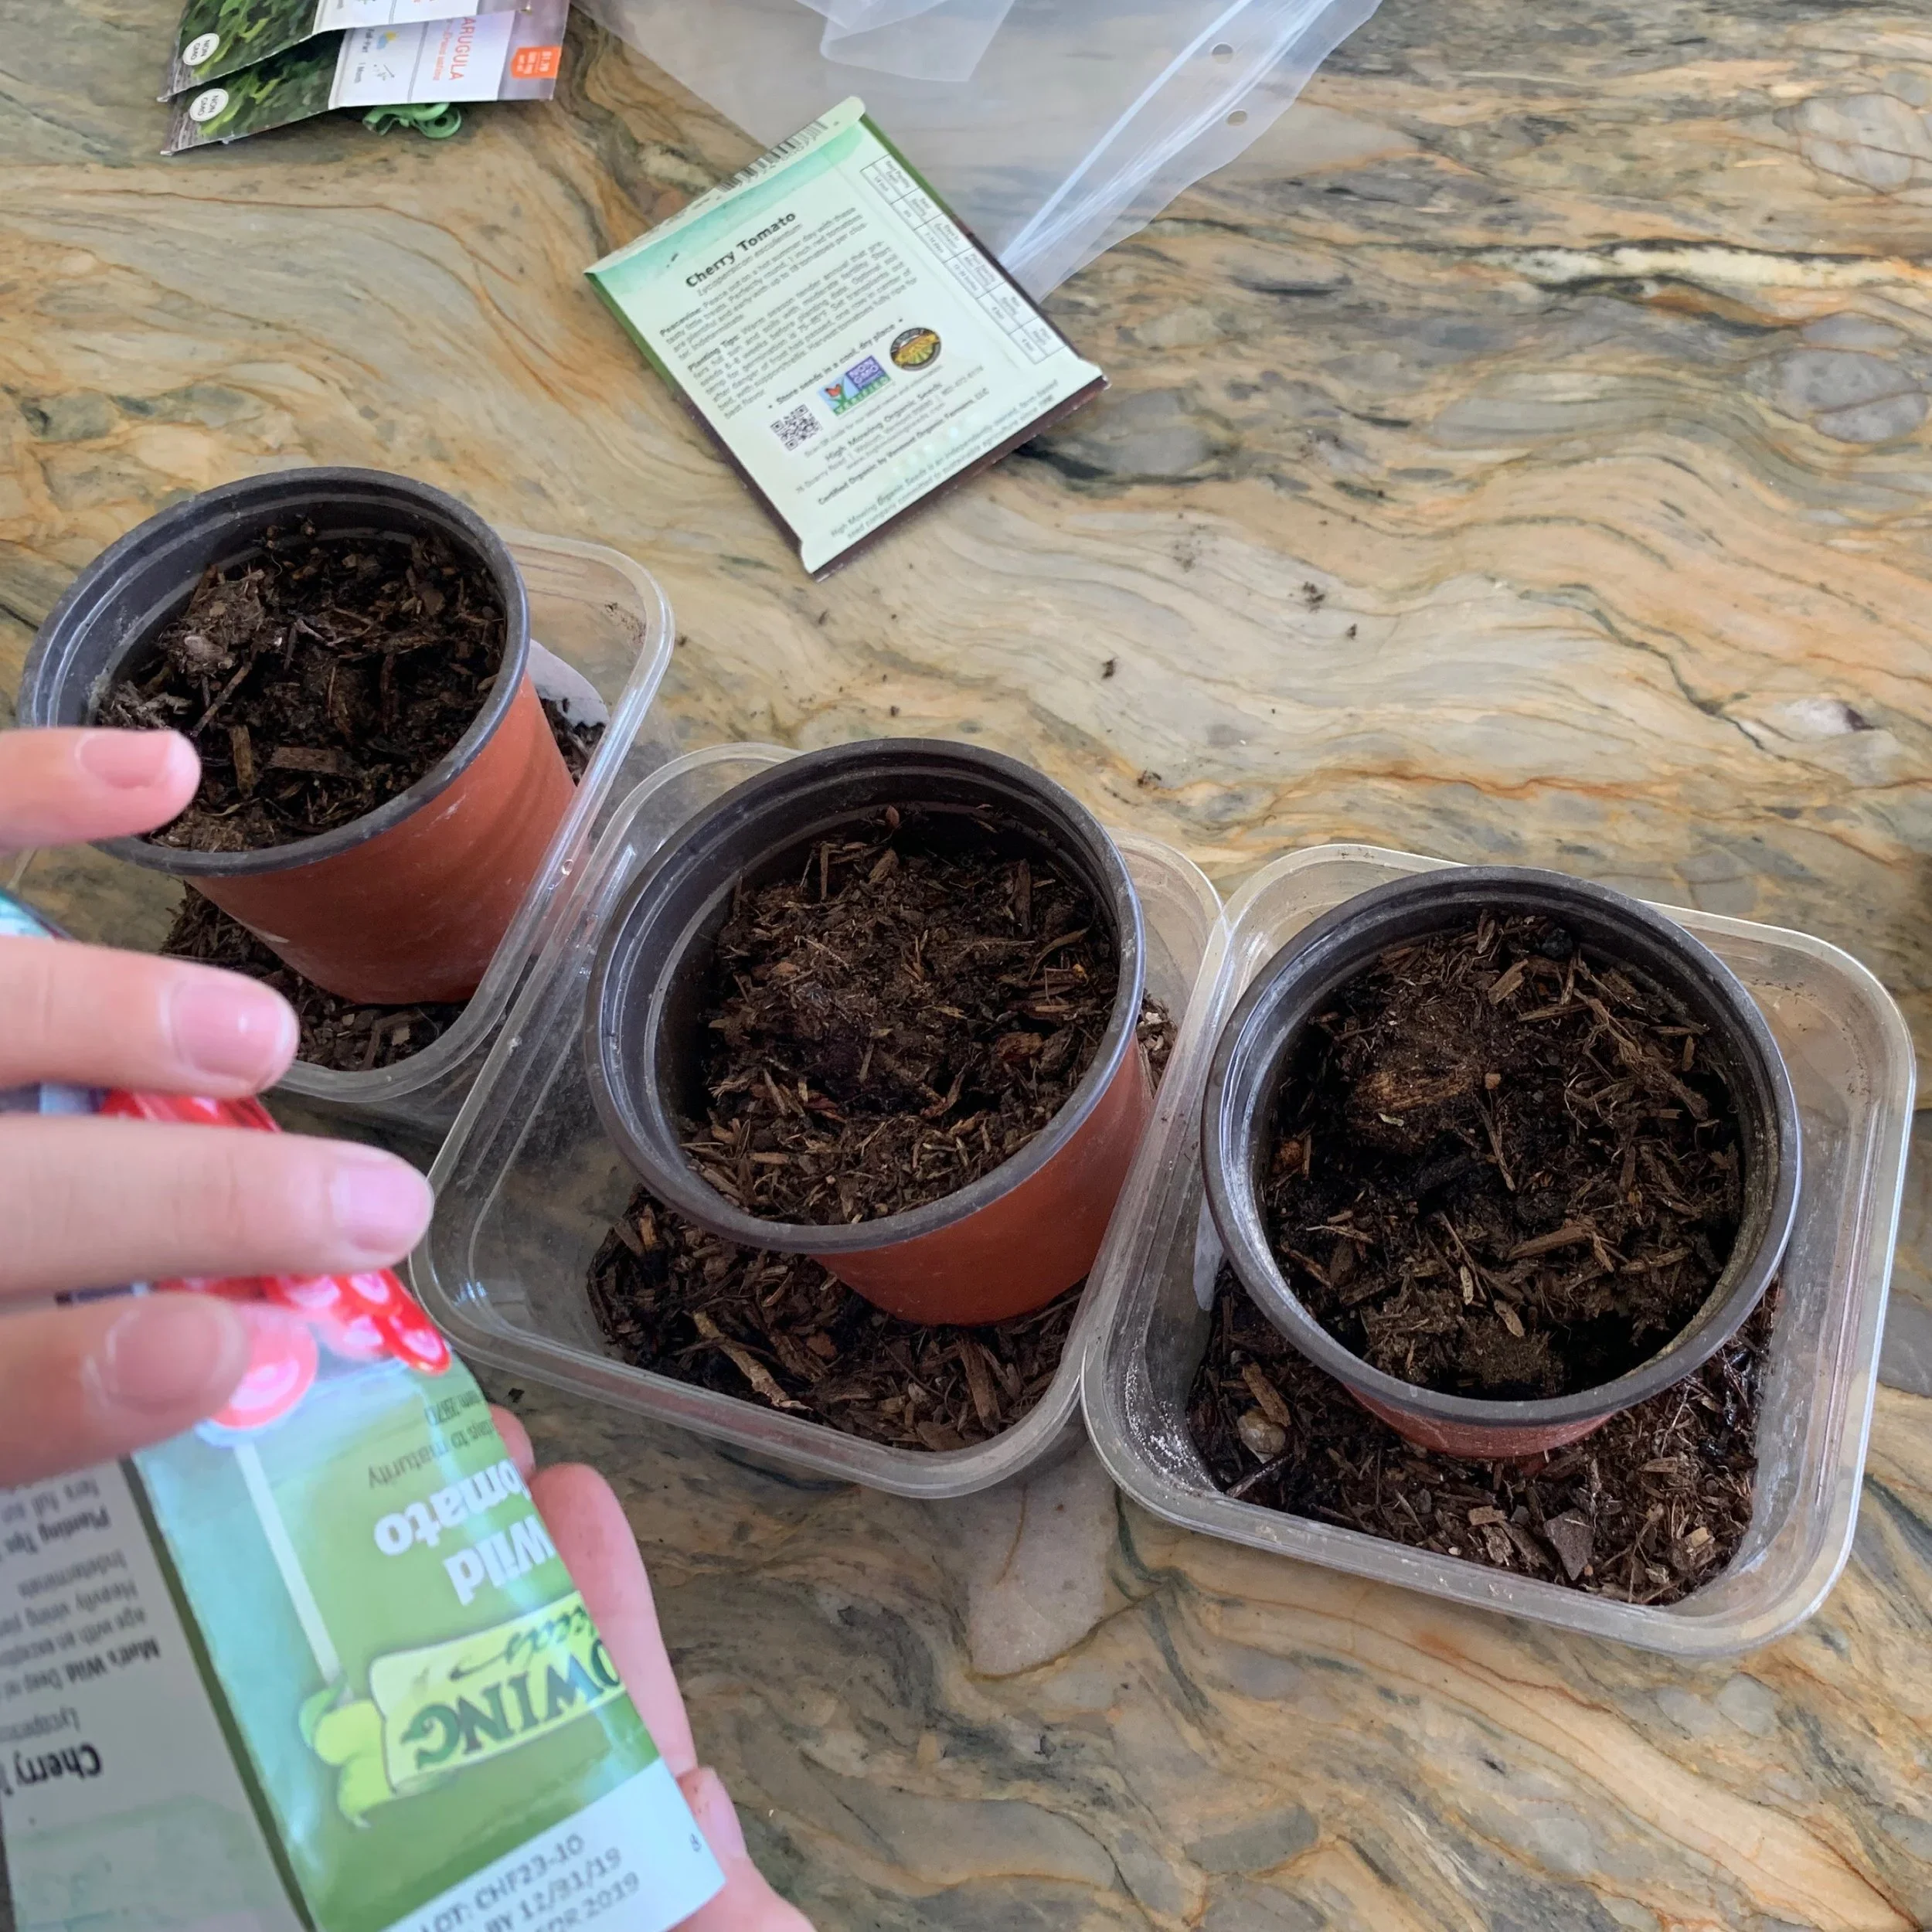
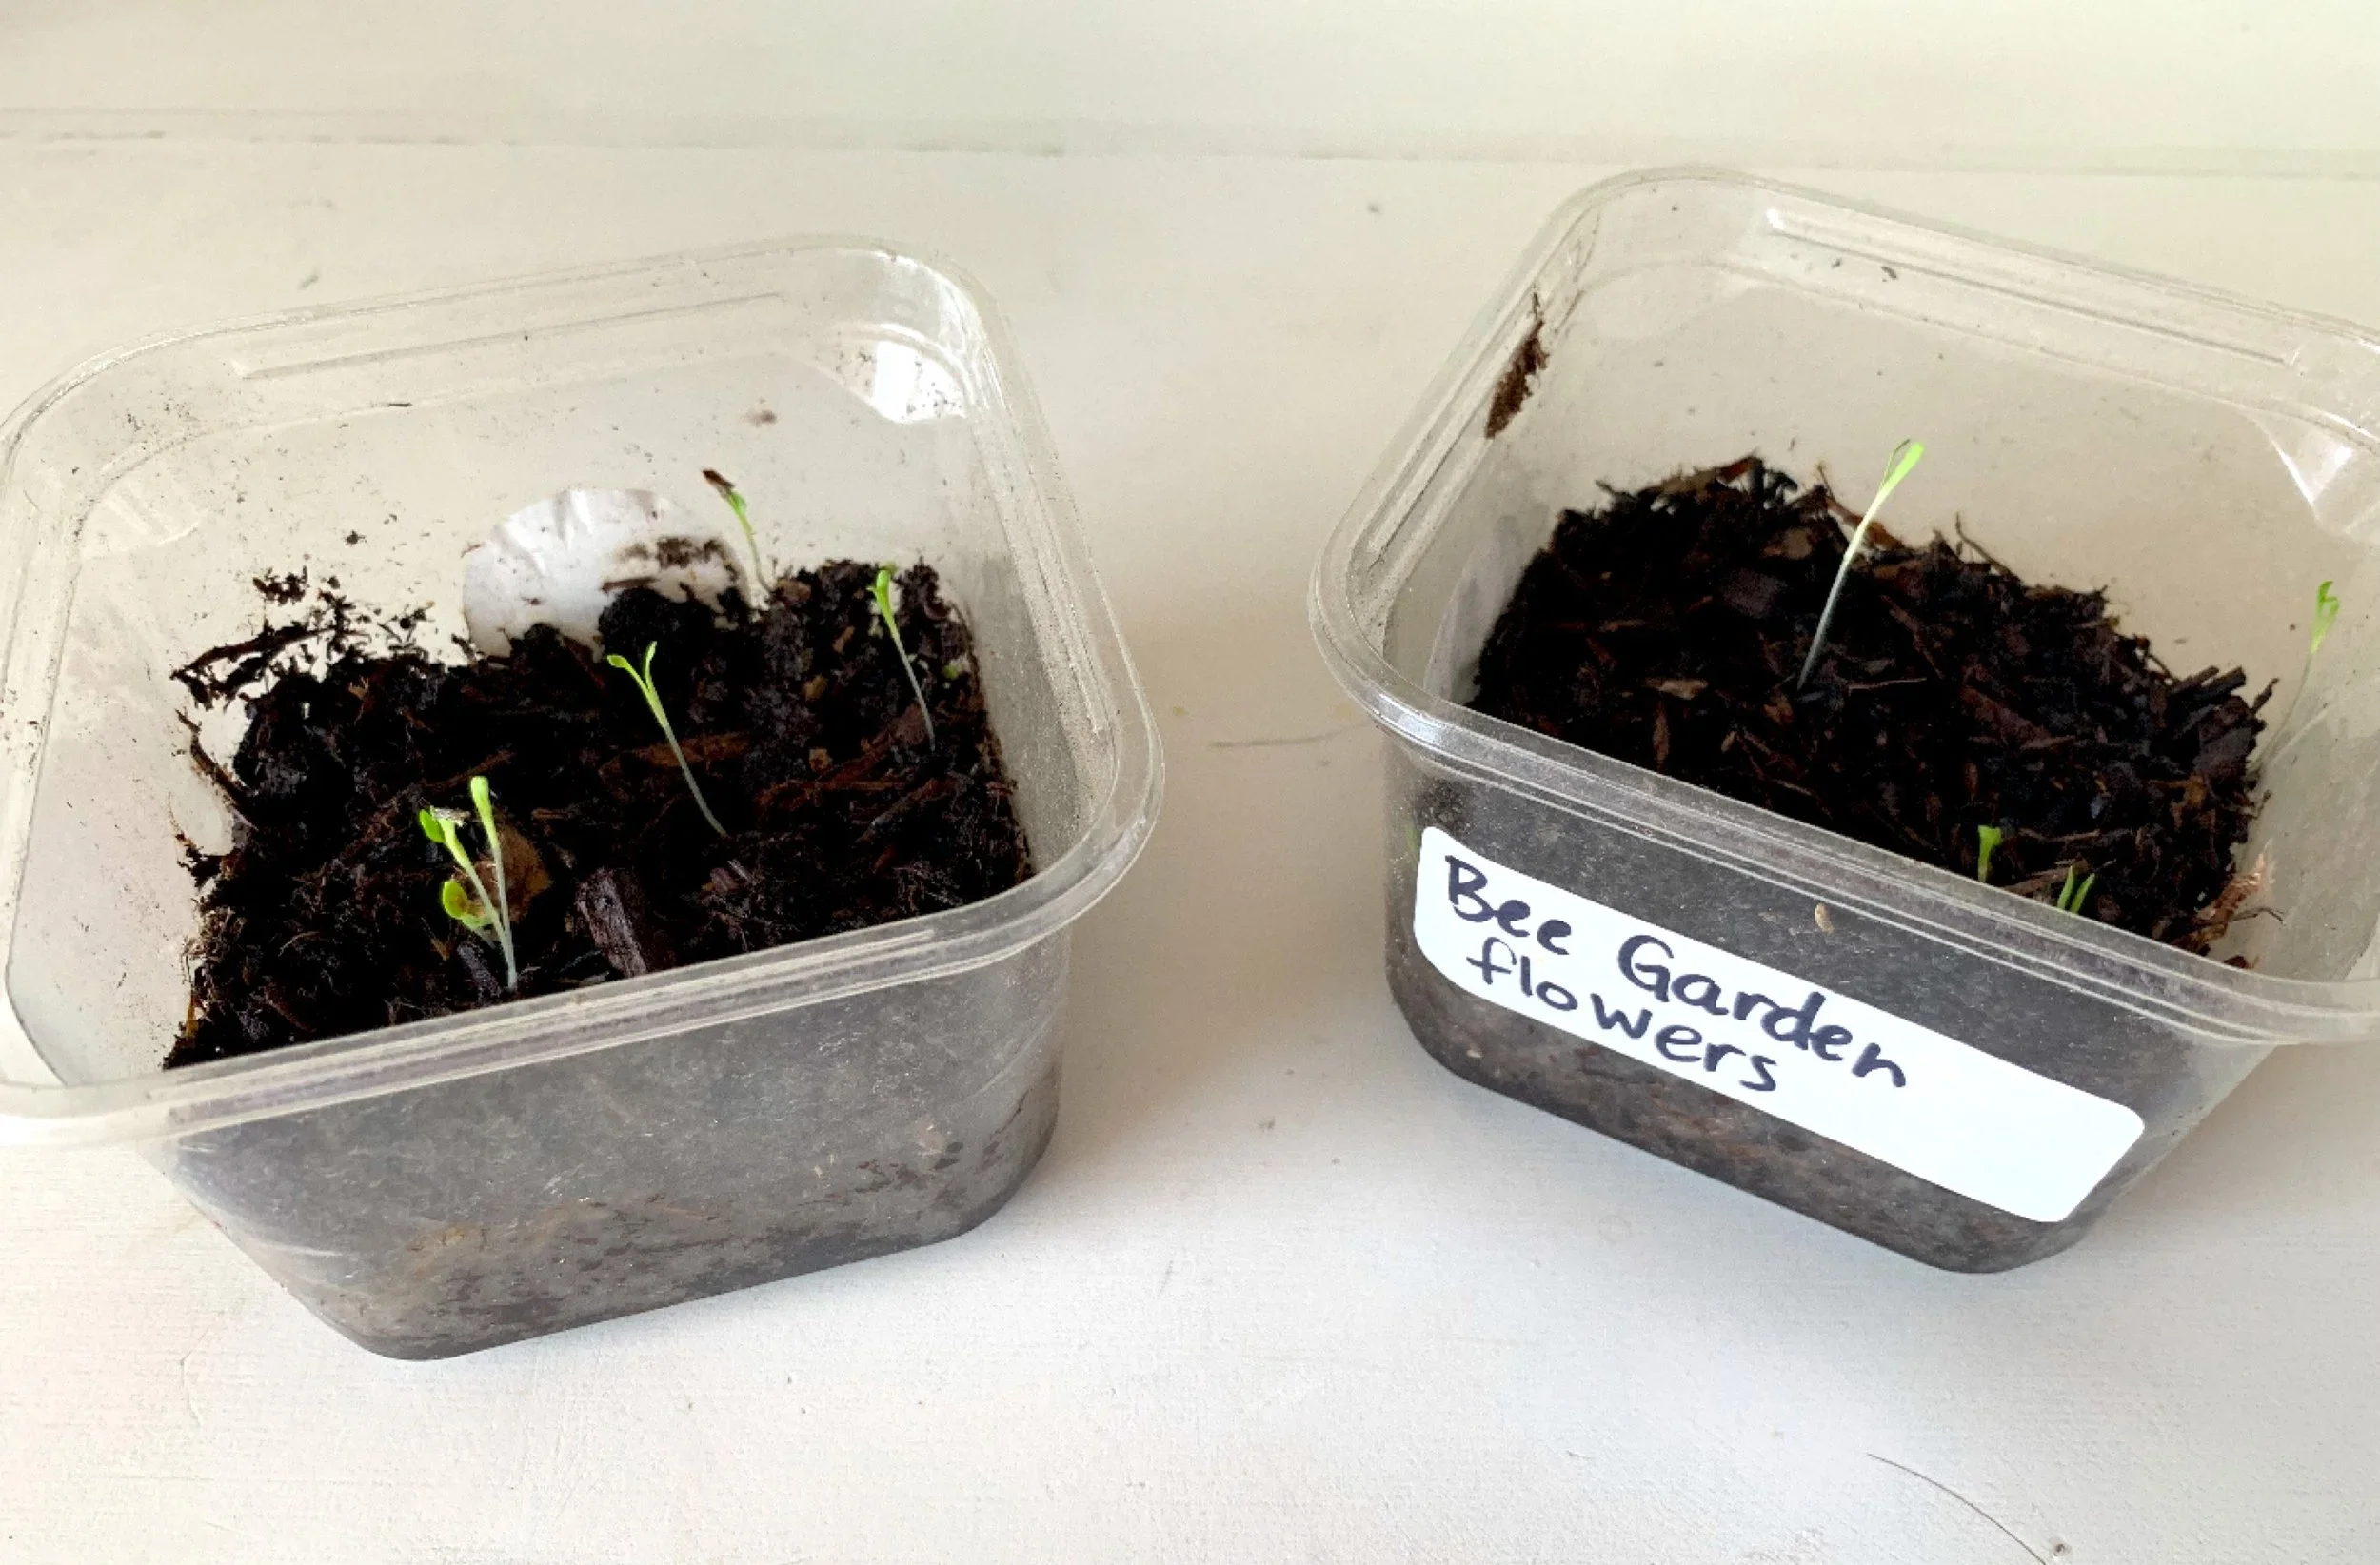
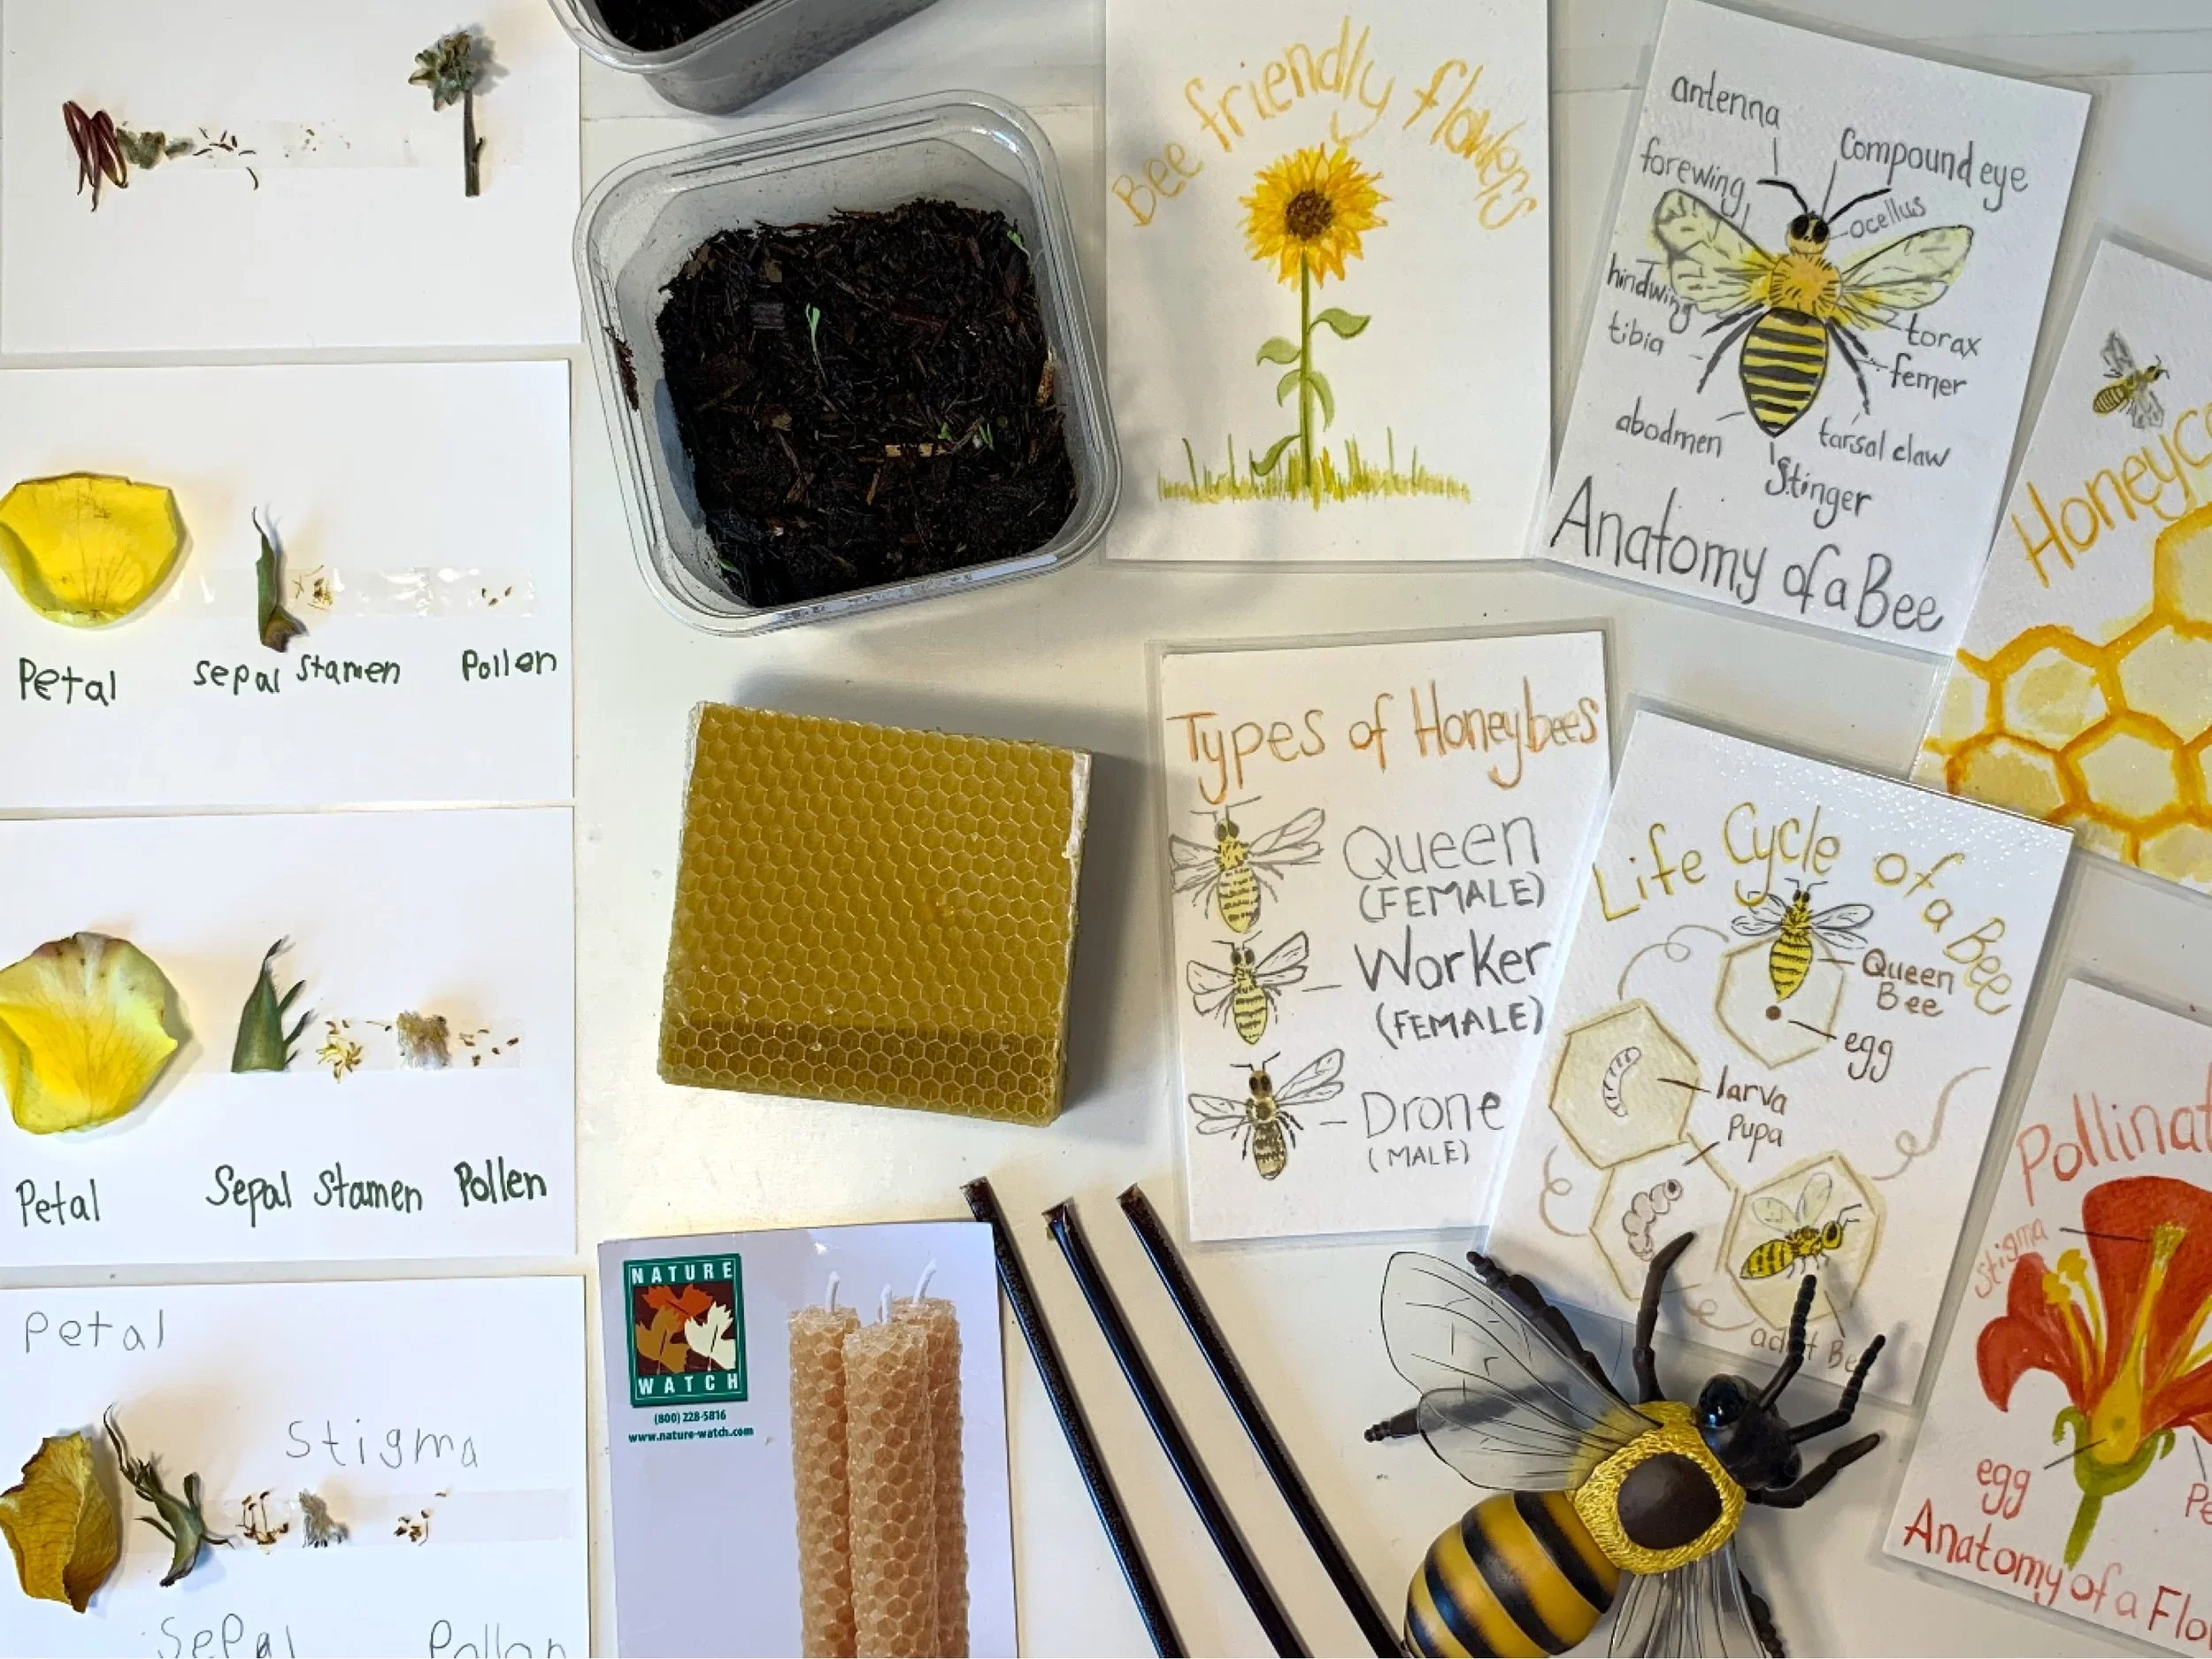
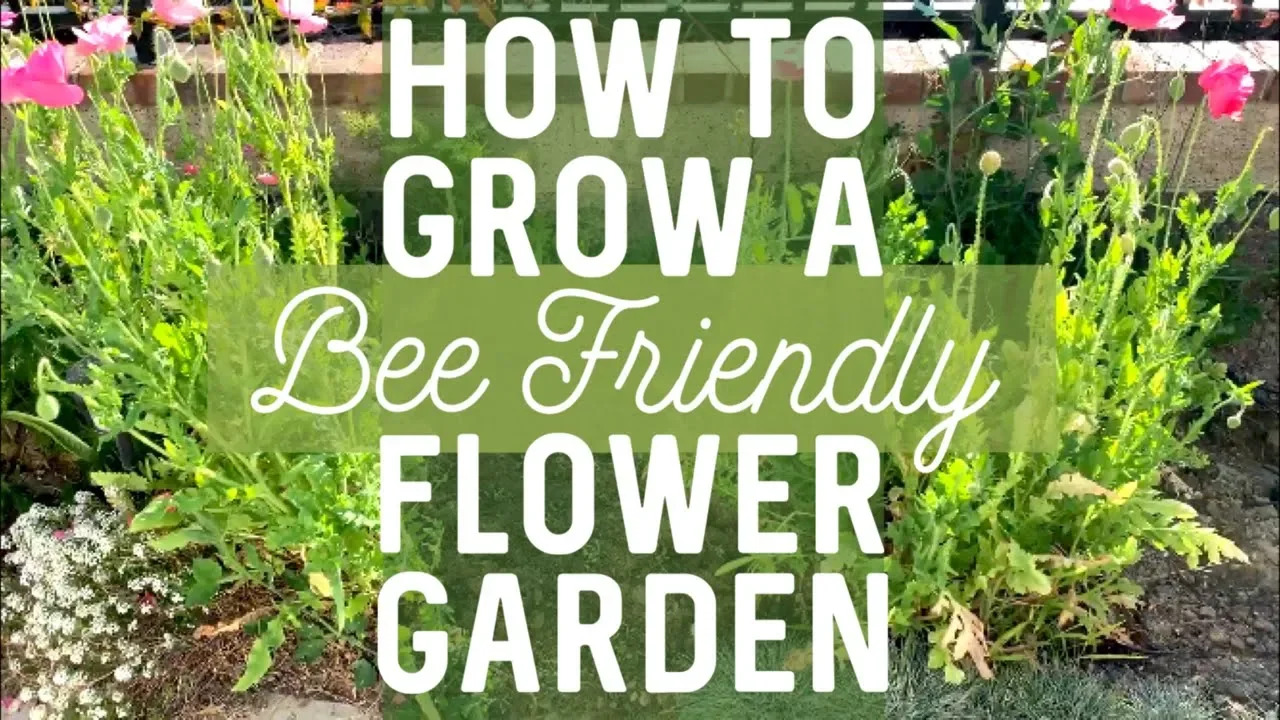
How To Grow A Bee Friendly Garden
Growing a Bee Friendly garden is just about as easy as growing wildflowers in a pesticide free urban garden. We used the Nature Watch classroom kit for Bee Garden Starter this project. The kit comes with everything you need to grow wildflowers in easy-to-transport containers for 25 students. We love the kits from Nature Watch and have used them in our homeschool for years. This kit comes with the 100 soil pellets, 25 containers and straws and enough seeds to use this kit twice! We learned a lot about bees from this kit as well as the other resource material we used during our Bee unit Study. Check the progress of this kit by seeing updates on Instagram or on this blog post. So far they grew pretty big but didn’t flower.
Materials for this unit were purchased using charter school funds and were purchased from Acorn Naturalists and Nature-Watch. Art materials were purchased from Waldorf Supplies and A Child’s Dream.