
Grade 1 Handwork

Grade 1
Grade 1 Handwork begins with knitting. The 7 year-old child begins with finger knitting or another independent handwork skill until the teacher can teach the student how to knit with two needles and in a style that promotes cross body action. There are some knitting styles in which the yarn is held in one hand and never crosses the body's midline. You want to ensure that the midline is crossed and that proper handling of the knitting needles means the child won't tire of knitting before the lesson is over and that the child enjoys the maximum benefit of knitting.
The materials for knitting, as well as all handwork that will follow, are as important as the skill being developed. Strive for using all natural materials, such a wood knitting needles and wool yarn. Wool is preferred in the younger years over cotton because wool comes from sheep and the life forces are stronger than that of the plant kingdom, and the wool's temperature is warmer, especially to touch. Just as wood is warmer than metal and a preferred material in the younger ages, even though both are natural materials. Strong pure colors are preferred over muted colors which contain grey. Bulky yarn and size 10 needles are just right for this age. The students may start their handwork lessons by making their own needles from hardwood dowels and wooden beads for the end.
Just as the materials and skill being learned are important, so too is the manner of the teacher when instructing knitting. In fact, the manner of the teacher/parent is of paramount importance in all subjects, arguably the manners are more important in instruction than anything. An appropriate amount of patiences, encouragement and tack are necessary and knowing what the child needs is a skill developed by the teacher.
The first project a child will do in Grade 1 is to knit a square or rectangle. Once the project is complete, the child will turn the rectangle into an animal shape with the help of the teacher. Out of a two dimensional piece of knitting emerges a three dimensional animal that is stuffed with wool. The delight a child experiences when making this first project is seen in the joy that is expressed. Seeing the child light up is a gift for the teacher and parent.
Once the first project is complete, the child may knit a case of her recorder. Her personalized carrying case will be treasured for years. If there is time for another project, she may choose to knit a multicolored ball, a scarf or a hat (using just two needles, a hat with four needles comes in grade 5).
Handwork Projects| Grade 1
-

Pompom
Making Pompoms is a simple handwork project that’s ideal for Kindergarten or Grade 1 prior to formal instruction in knitting. Often setting the students to simple, repetitive tasks they can do independently, frees up time and attention for teaching knitting to each student individually.
-

Knitting Needles
Did you know that making your own knitting needles isn't that hard or complicated? With a few materials and a little time, you can create one of a kind needles that you will no doubt cherish and love using.
-

Knitting Needles
This introductory handwork project is intended for grade 1 students, but if you are working with older students who didn’t get a chance to make their own needles, I think they would appreciate the task.
-

Knitting Needles
Did you know that making your own knitting needles isn't that hard or complicated? With a few materials and a little time, you can create one of a kind needles that you will no doubt cherish and love using.
-

How to Make a Knitted Bunny
This bunny project is a great first project because it's easy, fast, and forgiving. It's just right for a brand new knitter because you can take the practice piece of knitting and turn it into an adorable little animal for the child to cherish.
-
Knitted Pumpkin
Every fall, we seem to add a new autumn inspired project to our repertoire, and this year we are knitting pumpkins! This tutorial is for beginners, but children and adults of all ages may enjoy this project.
-

Pocket Dolly
This pocket dolly is easy and makes a great first project. The original pocket dolly project can be found in Elizabeth Seward’s book. However, I found that unless a child could sew the head, it required a lot of extra effort from the teacher.
-
Knitted Octopus
How adorable is this little octopus?! What's great about it, it that it's super easy, easy enough for a brand new knitter. In fact, if you don't know how knit, I walk you through the basics, from one novice knitter to another ;)
Pompom Project for Grade 1 & KG
Making Pompoms is a simple handwork project that’s ideal for Kindergarten or Grade 1 prior to formal instruction in knitting. Often setting the students to simple, repetitive tasks they can do independently, frees up time and attention for teaching knitting to each student individually.
I distinctly remember doing this project in first grade at my Waldorf school in France. I still have my project, too!! It was only years later that I knew it was called a pompom and there were many variations on this project. Today, I'm showing you the way I learned many years ago. You can reuse the template, but if you weave your pom pom really tightly, you may need to cut it out. I made my template out of heavy chipboard from the back of a paper pad. I'm using bulky weight wool yarn from A Child's Dream in a beautiful multi color.
Directions: Cut a circle 5" in diameter. Cut out a circle 2" in diameter from the center. Tie a piece of yarn about 2-3 yards long to the template and begin weaving around the circle. When the yarn runs out, tie on other piece. When you can't fit another piece of yarn through the middle, carefully cut around the perimeter. Tie a string around the middle and remove the template. And voila! You're done!
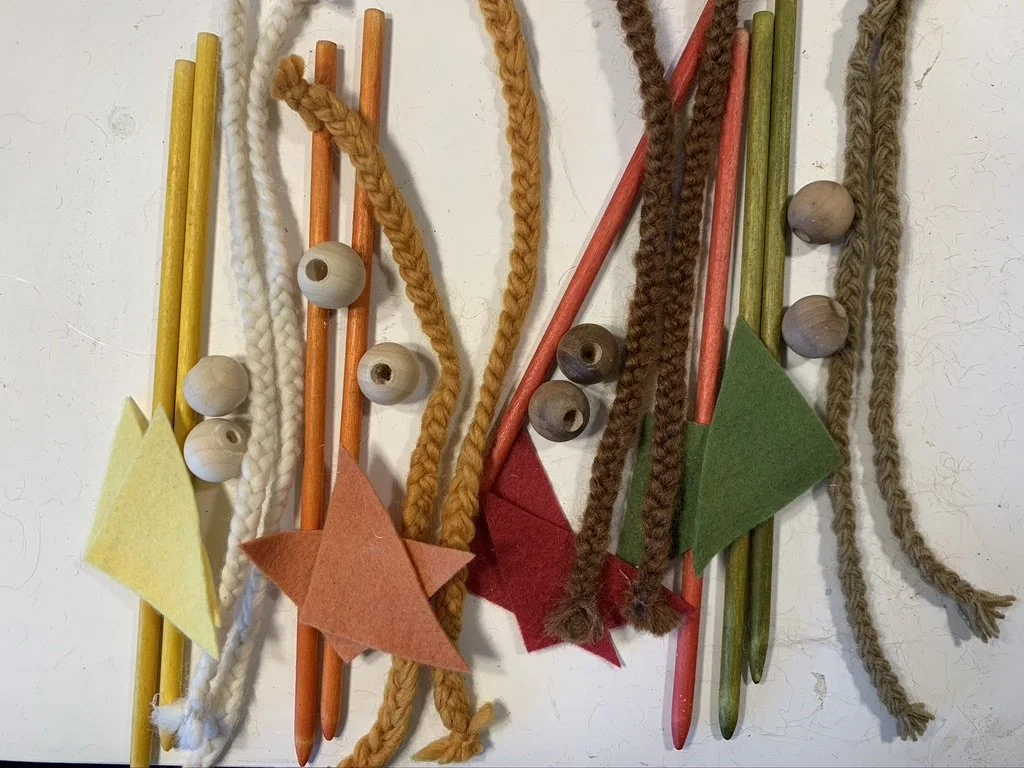
How To Make Your Own Knitting Needles

Did you know that making your own knitting needles isn't that hard or complicated? With a few materials and a little time, you can create one of a kind needles that you will no doubt cherish and love using. These knitting needles are made using 1/4 inch hardwood, sanded down with two grits of sandpaper, stained with walnut stain, sanded down again, smoothed with beeswax and topped with a acrylic painted piece of oven baked clay to look like the top of a mushroom. I followed the manufacturer's direction for baking the clay. I let the clay cool completely before painting them in two coats of red paint.
When the red paint was dry, I painted the white detail. Once everything was thoroughly dry, I added a bit of glue to the inside of the mushroom cap and adhered it to the dowel. They dried quickly and were ready to use soon after. My dowels were 12" long. I've cut them down to 10" as well. I think for a Grade 1 student, 9" or 10" is easier to work with. These are size 10 needles and work well for bulky weight yarn. A project similar to this is often found in Grade 1 Waldorf schools. I first learned how to make these needles from Melanie Hatch and Elizabeth Seward. Both are master Waldorf handwork teachers with decades of classroom experience.
When I worked with a large group of students, I found that while they did great at making their own knitting needles, the tips were not as smooth as I hoped. We only discovered the issue once they started knitting. Keep some 320 grit or finer sandpaper on hand to smooth out the tips. Another issue we found was that those who made their needles with a sharpener often had tips that were too sharp! Round them off with 220 grit sandpaper and then smooth and wax them before knitting for a more pleasant experience.
How To Make Knitting Needles

Did you know you can make your own knitting needles? And did you know it’s easy! And fun…well it was fun for me because I love making things and I think many children would not just have fun making these, but feel truly accomplished if they do. And then, they can begin to knit with the needles they just made! What a cherished project for young students.
This introductory handwork project is intended for grade 1 students, but if you are working with older students who didn’t get a chance to make their own needles, I think they would appreciate the task. I’m using hardwood birch 1/2” dowels that are 12” long. Both the dowels and beads (the end pieces) are accessible at A Child’s Dream, along with the book Jane and Jeremy learn to Knit which is a great resource for parents and teachers alike.
In this tutorial, I’ve shared three different ways to file down the tips of the dowels.
The easiest, fastest, and the one I recommend the least, is the sharpener method in which you use a sharpener to sharpen your dowels into a point.
Next, my favorite, is my taking your dowels outside and filling them down in a rough surface like rock or concrete. This takes longer, and it might even cramp your hand a little bit, but I do think it’s the most interactive for children and ultimately the most satisfying.
Lastly, if the weather isn’t good, you can file the dowels down indoors with 80 or 120 grit sandpaper.
Once you’ve gotten your desired point, you can use 220 grit sandpaper to smooth your tip. I prefer a tip that’s a bit more blunt for a beginner knitter, but typically a sharpener if you just the right angle though it’s too sharp. I like a tip that’s not as angled or sharp for grade 1 students then they can filing it down to a more pointy tip in grade 2.
You may use a 320 grit sandpaper to smooth the barrel of dowels. To finish off the dowels and beads, use a little wood oil or beeswax polish. Finally, use a drop of wood glue to adhere the beads to the dowel and let dry completely before using.
Knitting Needle Peg Doll

Did you know that making your own knitting needles isn't that hard or complicated? With a few materials and a little time, you can create one of a kind needles that you will no doubt cherish and love using. These knitting needles are made using 1/4 inch hardwood, sanded down with two grits of sandpaper, stained with walnut stain, sanded down again, smoothed with beeswax and topped with a wood beads stained and decorated to look like little peg dolls. These are size 10 needles and work well for bulky weight yarn.
A project similar to this is often found in Grade 1 Waldorf schools without all the extra fluff which takes plenty of time. Honestly, if you are not staining or painting the wood dowels, you can sand them down very quickly and of course the peg doll details took a long time compared to simply adding the wood bead on top. I had to drill my wood beads, but you can find them predilled. I first learned how to make these needles from Melanie Hatch and Elizabeth Seward. Both are master Waldorf handwork teachers with decades of classroom experience.
For this project you can use Holland felt in a rainbow of colors. I used the plant dyed felt this time and really like the soft color pallet, but feel the felt isn't as strong as the Holland felt which is the felt I most often use. I used bulky, worsted and other yarns to make the hair. I tried to match the outfits and skin color. For skin tones, I used walnut stain, but stained them each for different times to achieve the look I was going for. For two sets, I left them plain. To achieve the stain, I used Tim Holtz Distress Inks. Some colors that might work for a similar project are Fired Brick, Crushed Olive, Dusty Concord, Mustard Seed, Spiced Marmalade, and Weathered Wood.
Update! Since making these years ago, here’s what’s happened. These are the cutest knitting needles I’ve ever seen or made, but they were too impractical to use as they are too heavy at the end. Secondly, they are so charming, I made a display stand for them, and over the years, the wool faded. They are still gracing our homeschool space with joy and whimsy, but they’ve collected dust, and turned dull over time. I may repurpose them as peg dolls in the future as it was a lot of work to make them in the first place, but they rarely got used consistently for knitting.
July 2025
Knitted Bunny


If you are new to Waldorf or new to knitting and handwork, the book Teaching Through Stories by Elizabeth Seward is just the right addition to your home library. This book walks you through the basics of knitting, offers stories to tell your children and students as you knit and has a collection of easy projects. What I like about today's project is that it's easy enough for a young child (my 8-year-old daughter knitted the white bunny) and satisfying enough for an older child (my 13-year-old knit the brown bunny). What's so exciting to see is the transformation of a little square into a three dimensional little bunny with ears, a little head and a soft belly to fill with wool. The tail is added on afterwards.
This bunny project is a great first project because it's easy, fast, and forgiving. It's just right for a brand new knitter because you can take the practice piece of knitting and turn it into an adorable little animal for the child to cherish. Simple instructions are in the book for this project. In this tutorial, I show how my 13-year-old son knit this square and then turned it into a bunny. Because he's been knitting for year, his piece was completed quickly, even with worsted weight yarn, with no knitting mistakes and he could do the assembly himself.
When my 8-year-old did this project, she needed constant supervision. When we (she worked alongside the author Elizabeth Seward!) didn't watch her the whole time, she would make knitting mistakes then keep going. Once she got the hang of it, she wanted to sit on the couch and knit on her own. What ended up happening is that once a mistake was made in knitting, it's really hard to recover from it unless you (the teacher) are an experienced knitter. Otherwise, you either live with the mistakes, or you unknit your project until you get to the mistake, correct it and move on. Some mistakes she made were prohibiting her from continuing knitting, and as I am not a skilled knitter, I would have had her bind off and start a new project. Elizabeth helped her unravel her knitting with her permission, by asking her first and explaining what she was going to do. Never do this without asking your child first, I've done that before to disastrous ends and caused my daughter to abandon knitting for a year.
Once Elizabeth unraveled to the mistake, she fixed it and even knit a couple rows for my daughter so she wouldn't feel so defeated at taking out so much of her work. Once my daughter knit a square, which towards the end felt like a laborious undertaking because after each row she asked if it was enough as she approached the end, it was time to bind off. I think Elizabeth helped her with that, as she reminds us that the point of the first project is to knit, not learn everything about knitting.
The thing about working with a new knitter versus an older child who has been knitting for a while is that the young student needs constant supervision and a lot of help to complete the project. Once the piece was off the knitting needles, Elizabeth helped finish the bunny with my daughter stuffing it and helping with the tail. My girl was overjoyed at her project! She was simply thrilled at the work she did and the outcome.
Now back to my son, he could complete this project with little help, and in fact, once he learned to do the bunny once, he could knit a dozen quickly with no help. I recommend using a lighter yarn for this project as the dark yarn made it hard to see and work with. When working with young students, use size 10 knitting needles and bulky weight yarn. I prefer Lamb's Pride, those some teachers start with a plied yarn. What was also really great about our time with Elizabeth was that before knitting, she taught my daughter how to make knitting needles. Then she knit with those needles she had just made!
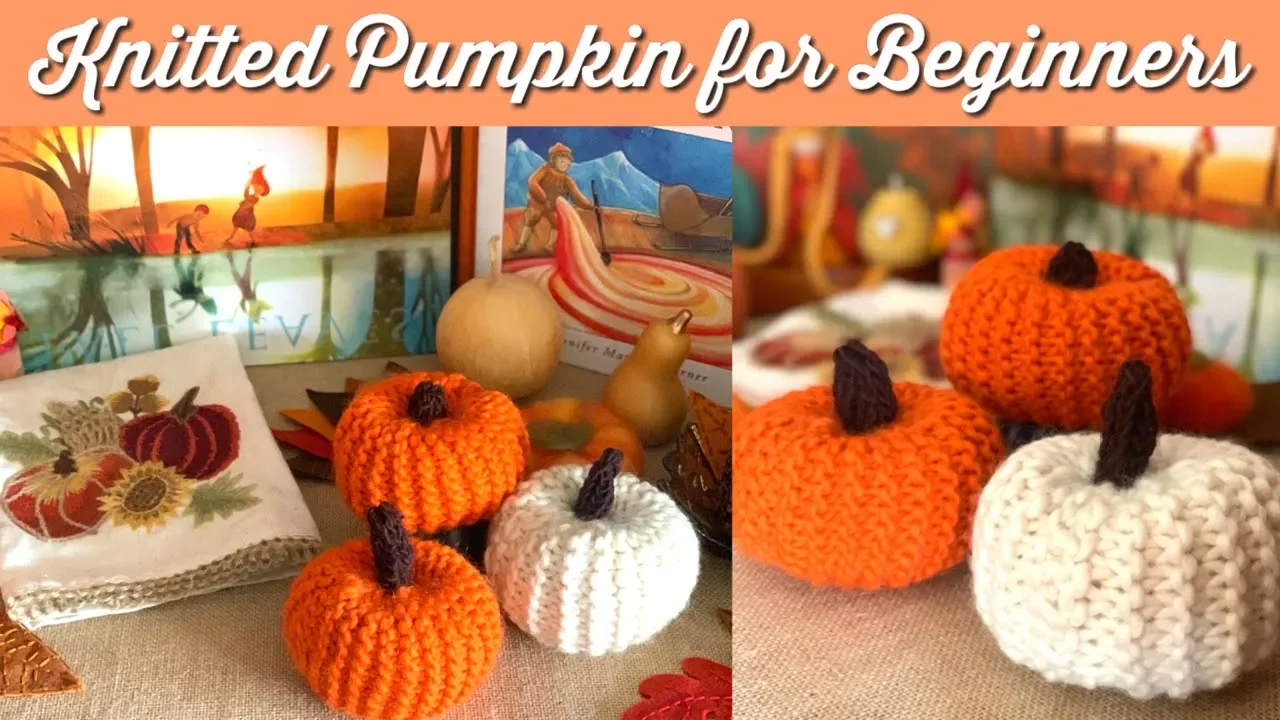
Knitted Pumpkin


Every fall, we seem to add a new autumn inspired project to our repertoire, and this year we are knitting pumpkins! This is a super easy and very satisfying project that takes little time and other than the stem, doesn't require many supplies. This tutorial is for beginners, but children and adults of all ages may enjoy this project.
Typically in grade 1 in a Waldorf school, students learn to knit. Often the first project is one that uses the practice piece a child knit and turns it into a simple animal. Once a student becomes more capable, the projects gently increase in difficulty. A super enjoyable project is one in which a student knits a rainbow ball. Like magic the colors are knit together one color after the other. Once the student has knit a long rectangle, it is sewn up the sides and cinched together on either end and just like that a flat rectangle turns into a three dimensional ball.
Taking the same concept to this project, we knit a rectangle that is twice as long as wide and sewed up the sides and cinched the top and bottom. The only difference is we added a stem of brown yarn using a knitting tower by Camden Rose. For the stem we used brown Lamb's Pride worsted weight yarn. For our pumpkins we used cream and orange bulky weight Lamb's Pride yarn and size 10 knitting needles. These knitting needles happen to be ones we made, but you can find knitting needles as well as all the supplies we used from A Child's Dream. Check out our Autumn projects and activities tutorial playlist.
Over the years, we have decorated our seasonal table with more than pumpkins. We’ve included peg dolls or finger puppets, candles, books, treasures from our nature walks and embroidered items. This year, a gourd we found on a hike graced our nature table. One year, I found a beautifully embroidered dish towel and thought it would be perfect for our season table. It was too beautiful to use in the kitchen. I also add felt leaves to the table. Some are embroidered from previous years, but many are waiting for some special thread. I try to rotate the books to delight the children, and then we are sure to read those books during our opening activities.
Pocket Dolly Tutorial

Have you seen the rainbow balls a grade 1 Waldorf students as one of their first handwork projects? Well this pocket dolly is easy and makes a great first project. The original pocket dolly project can be found in Elizabeth Seward’s book. The project I’m doing is slightly different and may be considered even easier! In fact there are several variations on this project.
In fact, with just a rectangle, you can unlock dozens of projects! Just the way you pinch, fold and shape with develop a unique project.For this project, I’m using about 1 oz of bulky weight Lamb’s Pride wool yarn in bright yellow. I’m using about 1 oz of wool batting and a five inch square of brown cotton jersey knit. You’ll also need knitting needles, thread, a sewing needle, and a darning needle. Supplies can be found at A Child’s Dream.
Directions for Project
Cast on 20 stitches Knit 40 rows (20 ridges)
Fold and sew bottom and a bit more than half way up the front.
Turn right side out and fill.
Make “head” by sewing a running stitch in a circle on a piece of 5”x5” jersey knit.
Make your circle as large as possible.
Add wool to jersey and pull thread like a drawstring bag to make “head”.
Add “head” to body and sew with yarn around the head so it’s snug in the body.
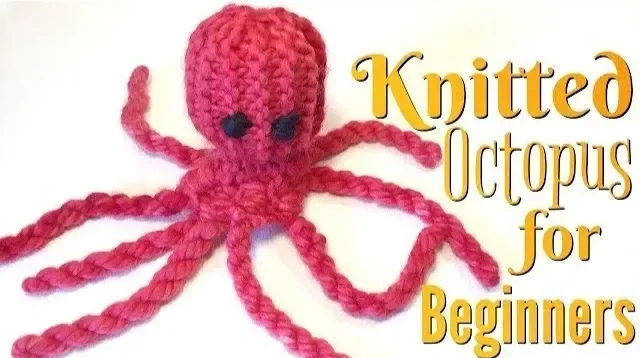
Knitted Octopus
How adorable is this little octopus?! What's great about it, it that it's super easy, easy enough for a brand new knitter. In fact, if you don't know how knit, I walk you through the basics, from one novice knitter to another ;)
For this project, I'm using bulky weight Lamb's Pride yarn in Cranberry Swirl. It's gorgeous and you can find it at A Child's Dream. I'm using size 10 needles. I'm using a large blunt needle for sewing the octopus together, wool batt for stuffing and black yarn for the eye.
Direction: Cast on 15 stitches knit 30 rows bind off Sew the top and side together to form a tube Fill the top 2/3 with wool batt or top Sew around the tube so you have a spherical head with a 'collar' Twizzle four pieces of yarn about 12-18 inches long (ply them together) Sew the twizzles to the collar Stitch eye and you're done!
