Grade 3 Handwork

Grade 3
In Grade 3, the nine-year-old student is going through the nine year change. This is a developmental milestone that is quite disruptive and chaotic for the student. In a time of anxiety and uncertainty, the curriculum supports the developing child with practical skills. In handwork, the student will learn how to weave to make simple clothes. In the core subjects, students will learn how to build shelters and a farm food. With these three basic skills of survival, the third grade student has peace of mind during this transition from the world of fantasy and imagination to the world of reality.
Supporting this transition for the Grade 3 student gives them a sense of competency, grounding, and connection to the environment.
If crochet was not taught in the year prior, it is taught in Grade 3. Unlike knitting, which uses two needles, crochet uses a single hook. This introduces a new rhythm and a new form of dexterity. Learning how to make functional items, such as potholders or bags or clothing, supports the child’s development and aligns with the child’s growing sense of order and responsibility.
Handwork projects allow for creative expression in the details and the colors used for projects, allowing both uniformity with the classroom and creative individuality.
In addition to weaving, the teacher may teach students how to spin wool, how to use natural plants to dye fabric and may even grow a dye garden to help children connect the lessons in farming with the lessons and hand work. These lessons are introduced basically, as the student will revisit these skills in high school.
Self-sufficiency is a major theme for the nine year-old child. And while there is deep understanding that sufficiency relies on community, working towards independence and mastery of skill, becomes a priority for the Grade 3 student.
Through their handwork, children experienced the joy of creating something that is both beautiful and useful with their own hands from materials that are accessible to the student, using simple tools, a garden and farm animals. In strengthening their will forces and stability through handwork, farming, and shelter building during this time of significant emotional and mental growth gives a sense of peace, calmness and purpose.
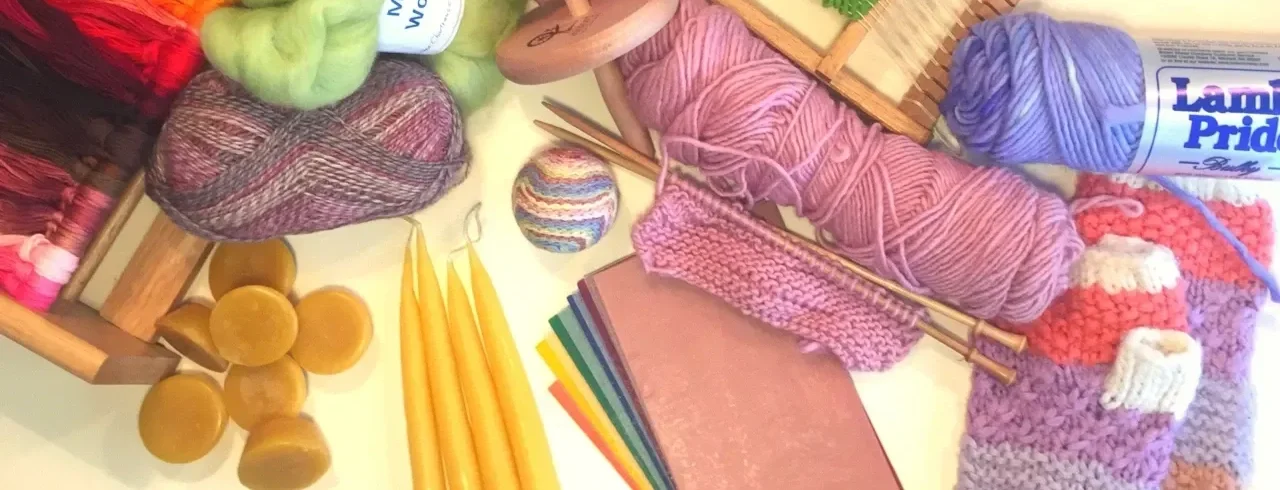
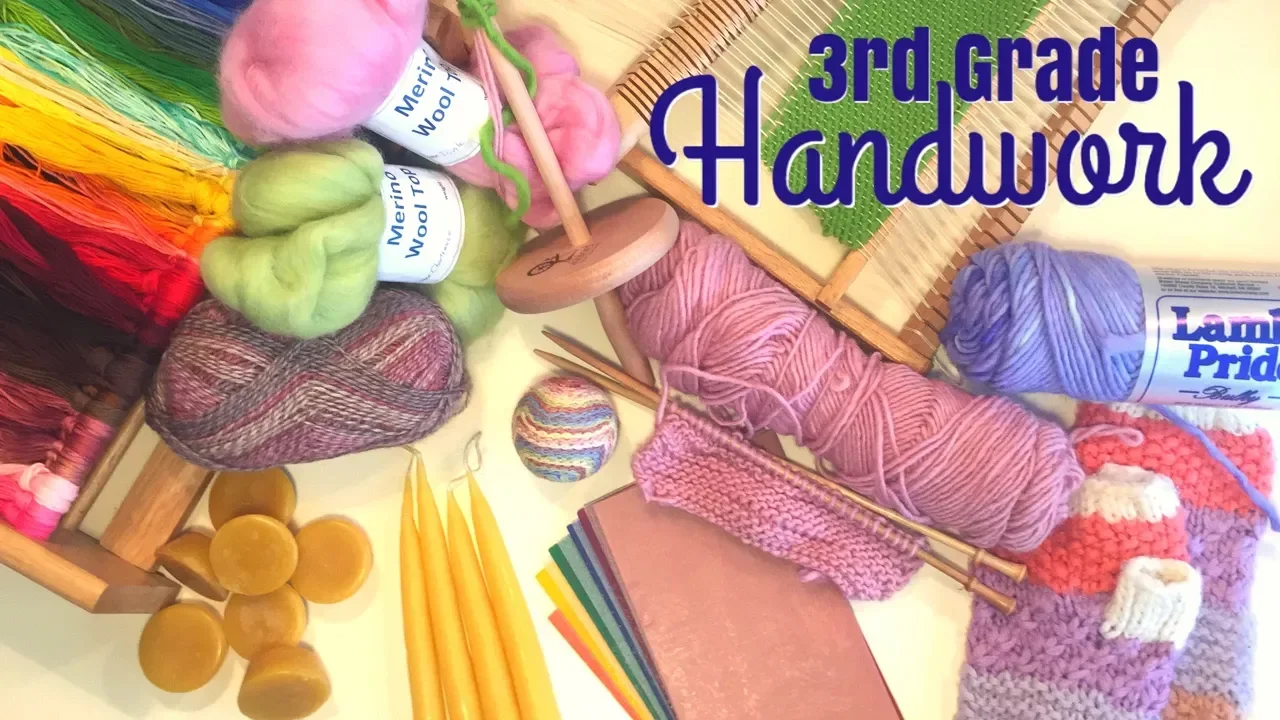
Grade 3 Handwork Materials
It's truly beautiful how the handwork in Waldorf education is specifically chosen to help the child on his emotional, educational and spiritual development. The third grade student is going through the nine year change and to help give the child a sense of purpose and comfort during this transition, the curriculum aims to teach the practical arts and skills to the child in the form of shelter building, farming and clothing. The handwork for the third grade student will reflect the curriculum with projects ranging from knitted scarves and hats to stitched bags and tunics. Additionally, candle making, weaving and working with clay or beeswax is introduced. While some things will have already been familiar to the child like working with beeswax and making candles, the projects this year take on a practical purpose.
Handwork Projects | Grade 3
-
Handwork for Grade 3
It's truly beautiful how the handwork in Waldorf education is specifically chosen to help the child on his emotional, educational and spiritual development. The third grade student is going through the nine year change and to help give the child a sense of purpose and comfort during this transition, the curriculum aims to teach the practical arts and skills to the child in the form of shelter building, farming and clothing.
-
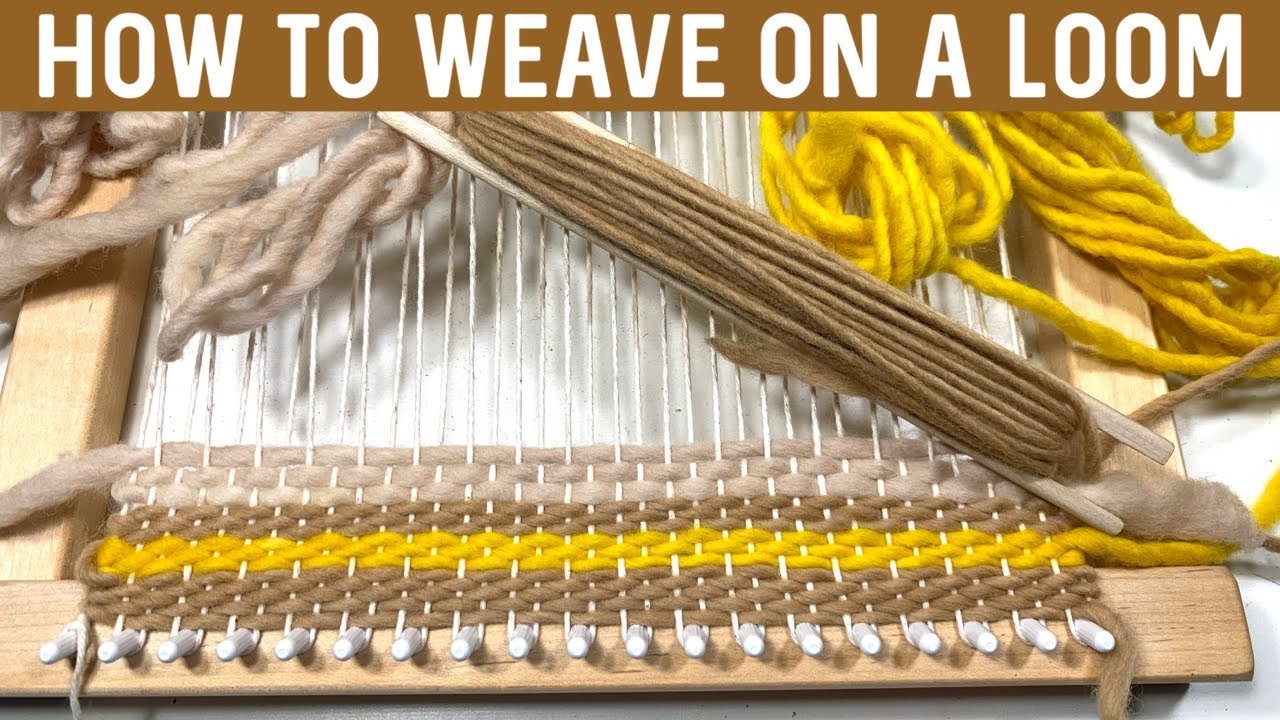
Weaving on a Loom
Weaving on a loom is a beautiful way to connect to the artisans of the past. Weaving is a skill and an art that dates back as far as civilization. You may weave without a loom, but if you have one, it’s important to give it a try. Be sure to name the parts of a loom: frame, warp, weft, pegs, shuttle and comb.
-
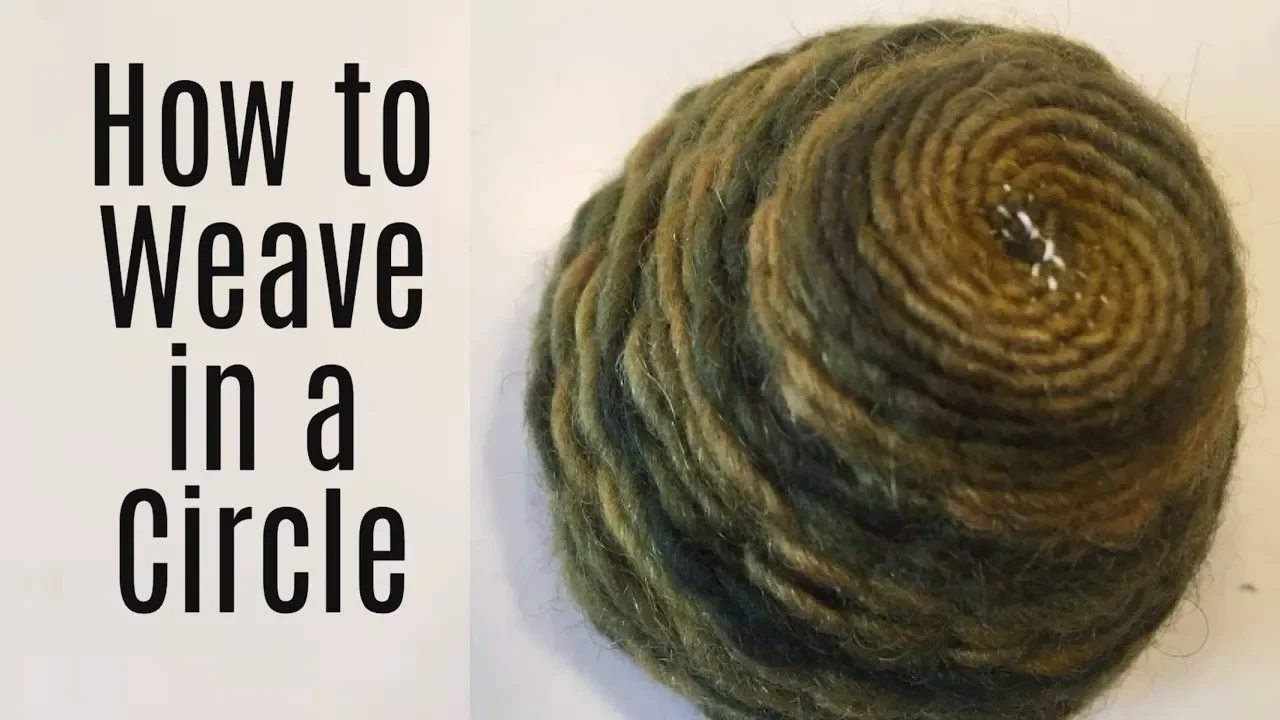
Circle Weaving
Circle Weaving is another simple weaving project that supports the Grade 3 student in their endeavor to master the basic skills for the necessities of life without machines. Learning these skills by hand brings comfort to the child experiencing the 9-Year Change.
-

Beginning Weaving
Weaving is a skill 3rd graders learn in conjunction with their Shelters Block. Learning the basic skills of shelter building, making clothes and farming ease the Grade 3 student as they go through the 9-Year Change.
-
How to Weave on a Loom
With a little effort, you can turn your weaving project into a bag. While I recommend using a small template, you can do a larger one as we did. However, a larger weaved bag in this style is not as spacious or sturdy as you’d like and it takes hours and hours to weave.
Grade 3 Handwork
Handwork for Grade 3 | Homeschool + Classroom
It's truly beautiful how the handwork in Waldorf education is specifically chosen to help the child on his emotional, educational and spiritual development. The third grade student is going through the nine year change and to help give the child a sense of purpose and comfort during this transition, the curriculum aims to teach the practical arts and skills to the child in the form of shelter building, farming and clothing. The handwork for the third grade student will reflect the curriculum with projects ranging from knitted scarves and hats to stitched bags and tunics. Additionally, candle making, weaving and working with clay or beeswax is introduced. While some things will have already been familiar to the child like working with beeswax and making candles, the projects this year take on a practical purpose.
Here are some of the tutorials I mentioned in the video:
Pine Needle Basket Weaving Tutorial, Circle Weaving, Weaving for Beginners, Dipping Candles, Wet Felting, The candle wax I'm loving right now is called Topanga Beeswax.
Main lesson books are some of the most beautiful and memorable projects from our homeschooling. We've accumulated a lot of them over the years. While we didn't always teach the lessons according to the grades, we do seem to have main lesson books for most main lesson blocks over the years. Today I'll share some from the 3rd grade Waldorf curriculum by Live-Education!
There are a number of additional resources I use when homeschooling, even when using a curriculum that doesn't require any. It's not always a good thing. Sometimes it give you more work and stretches lessons unnecessarily. Sometimes the extra books are golden! Today I share a wide assortment of additional books we used when putting together our main lesson blocks for 3rd grade. While some of these books were used extensively, others are ones I think will work with the Live Education! Waldorf homeschool curriculum.
When I first saw the third grade Waldorf curriculum, I wasn't interested in using it because there was so much content I didn't intend to use. A few years later, I realized the wisdom behind why these particular main lesson blocks are chosen for the 9-year-old student. I'll share those reflections in the video as well as give you an in-depth review of the Live Education! third grade curriculum with tips of how to use it.
We've gone through this curriculum before so you can to see my children's main lesson books. As we used our own resources for many of the main lesson blocks, you'll see how we tailored this year's curriculum to suit our religious needs and cultural background.
You'll need a number of supplies for the third year including the basics of main lesson books, additional resource books, crayons and color pencils, watercolors and watercolor paper as well as the materials for handwork projects. You can see the complete list of supplies for the third grade.
While you don't need any additional resource books for this year save a few for the lesson on Hebrew Myths and Culture, I do have a number of additional books that round out the 3rd grade curriculum. The bulk of them were used for the main lessons on Hebrew Myths and Culture. We used culturally relevant texts and religious books for those main lesson blocks. I share more resources that will come in handy for the parent/teacher, but they are by no means necessary to use the curriculum successfully.
You can check out my other Live-Education curriculum reviews:
Kindergarten, Grade 1, Grade 2, Grade 3, Grade 4 , Grade 5, Grade 6, Grade 7, and Grade 8 (coming soon).
You can see more videos in for Third Grade. More tutorials will be added to the playlist as they are made. Have a request? Share it with me!
Beginning Weaving
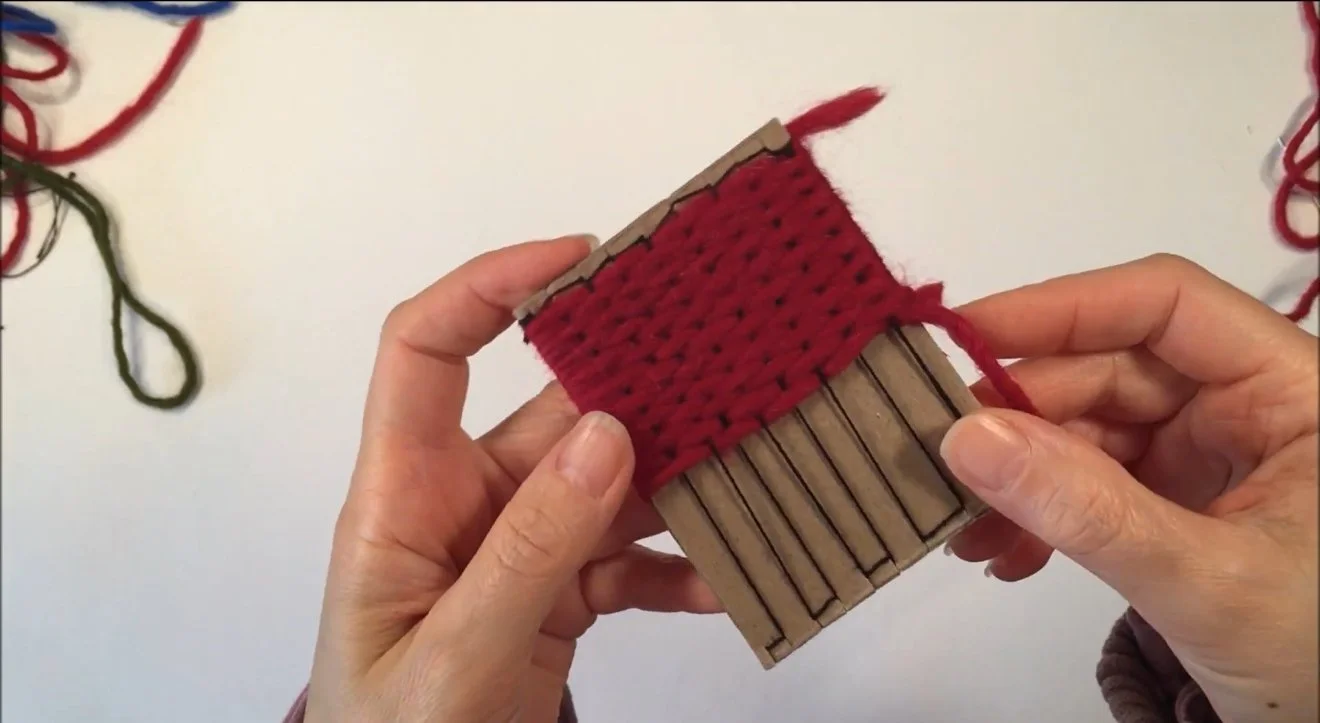
This tutorial will show you how to weave using a template you can make from chipboard. You can weave this into a pouch or purse. Supplies needed for this project: Yarn, chipboard (for template), embroidery thread, yarn needle or shuttle, pencil and scissors. Most supplies can be found at local crafts stores or from A Child's Dream. Level: easy Duration: under an hour Cost under $5 Check out the Circle weaving tutorial.
Circle Weaving
We are using the book "Classical Kids An Activity Guide to Life in Ancient Greece and Rome" by Laurie Carlson as inspiration of this project. You can find the book at Rainbow Resource For this project you will need embroidery string or floss, cardboard or chipboard, scissors, yarn, a bowl to make a circle and a shuttle (we used a popsicle stick). Optional: compass, protractor, knitting needle. Some supplies can be found at A Child’s Dream. For a circle with a diameter of about 5", the project takes about an hour to do. Level: easy The only complicated part of this project is making sure you wind the string around the notches correctly. Make sure you have an odd number.
How to Weave on a Loom
When doing a main lesson block, I look for a variety of books and projects for the children. For this unit, I set up our Harrisville Designs wooden loom for my 8-year-old daughter. Weaving is just right for a grade 3 student and it fit nicely with our American History unit that was primarily for my 12-year-old.
For this project, we just a sturdy child-sized loom. While this kit comes with all the supplies needed to weave a project, this happened to be a hand-me-down, so I collect our own supplies for this project. I used cotton string from Harrisville Designs to prepare the loom. Next I wove several rows for my daughter until the complicated pattern was set. We used bulky Lamb's Pride yarn that we dyed using natural materials like tea, avocado pits and onion skins.
After the pattern was established, I showed my daughter how to go under and over with the wooden pick stick, then send the shutter through the open space created when the pick stick is turned on its side. The process was repeated until the project was complete. Some problems we ran into was making the middle too tight. As my daughter sent the shutter back and forth, the middle of her project got tighter and tighter. A way to remedy this is to have a long metal or wooden dowel run the length of the loom so that the yarn goes around the metal as well as the cotton warping.
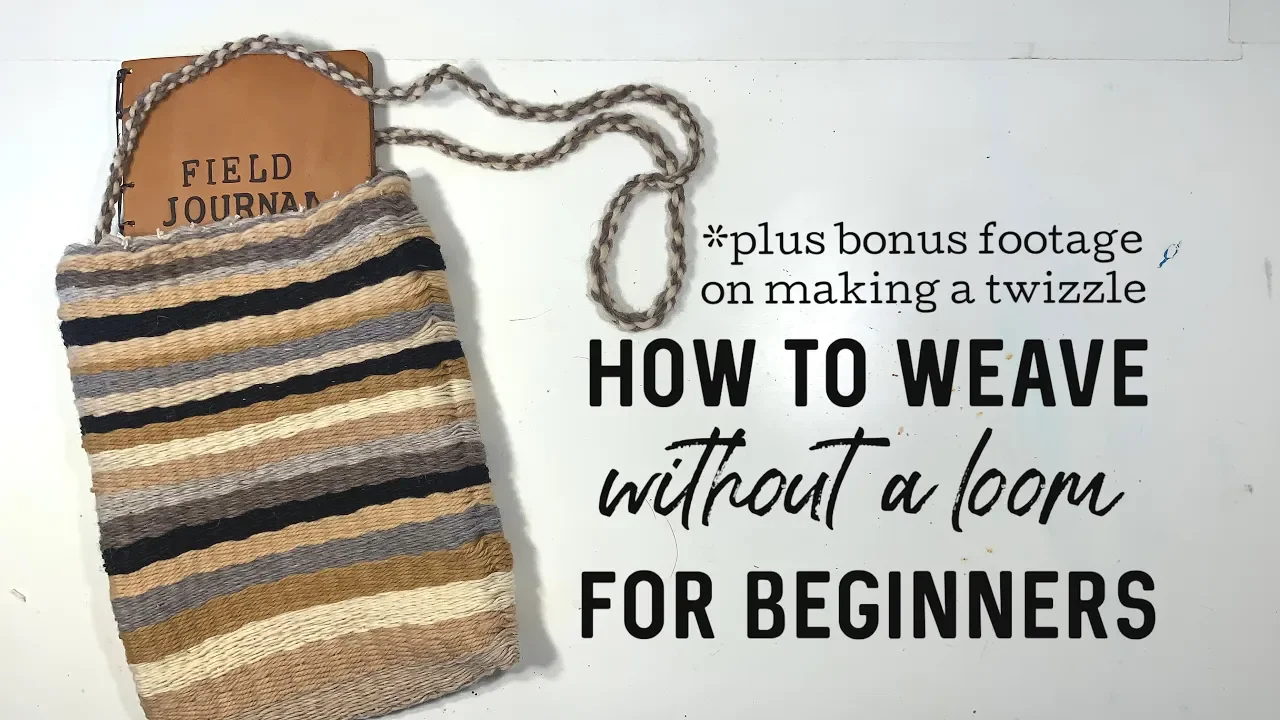
DIY Loom to Make a Bag
Weaving is one of those projects you need to dedicate yourself to. It takes time, perseverance and mindfulness. Weaving engages your mind and hands, and unlike knitting for instances, you can't easily take your eyes off your project. Weaving in found in the Waldorf curriculum starting at grade 3. It complements the the block on shelter, farming and clothing. With a bit of effort, you can actually weave fabric and potentially make your own rudimentary clothes! In this project, however, we are weaving a bag. With a bit more effort, you can optimize your weaving time and create a bag rather than a solid piece of fabric.
For this project, we are making our own DIY loom out of heavy cardboard or chipboard. I'm using chipboard from the backing of a watercolor paper pad. It's thick and difficult to bend which is just what we want. The piece I'm using is 9"x12". Along the top and bottom (9 inch side), I'm marking 1/2 inch increments. You can make your increments smaller for a tighter weave or larger for a looser weave. One thing to make sure of though, is that your last increment is as close to the edge of the chipboard as possible. If not, trim the chipboard because otherwise in the end, you'll end up with a large bit of unwoven yarn on either end of the project. It doesn't affect the project, but it'll be noticeable. If you look closely, you can see if in the correct project with teal colored bulky weight yarn. Make sure you have an odd number of increments/strings otherwise you won't have the opportunity to go over/under in an alternating pattern to create a proper weave. Once your increments are set, it's time to string up your loom. In this case, I made a mistake. I've shown you my mistake in the video and how I remedied the problem, but I also show you the correct way to do it. When weaving a bag, you want an opening! Do do this you need to string your loom so that the string goes around alternating tabs and comes down the same side before circling back up the other side in which you just string it up without wrapping it along the tab. This is very confusing at first! It took me a lot of practice and there are still times I do it wrong. Truthfully, there are a few ways to do this, and I've now done this about 4 different ways depending on the projects and sadly, one time, it was very wrong and this is the time you get to see! In the end, we found an alternative way to fix our mistake, and while it's not perfect, it works.
I debated showing you the mistake, but in the end, with your suggestions, I showed the mistake in a way I hope isn't confusing to the tutorial. I'm pleased with finding a solution to our problem even though it took so much time to fix. In the end, you can hardly tell and it salvaged weeks of work. Imagine starting over!!
We used yarn from Harrisville Designs as well as some home dyed yarn using natural materials like onions skins and tea. The yarn dyeing and weaving accompany our American History units by adding in Waldorf inspired handwork. I love having the opportunity to tailor our lessons to appeal to my child's interests and still work within the Waldorf Education philosophy. We initially used some tools that came in the Harrisville Designs Loom Kit, but ultimately, this was completely DIY.
My 8-year-old daughter worked on the Harrisville Design loom to make her project, while my 13-year-old son worked on the DIY loom to make a bag using a ruler to separate the string and a popsicle stick as a shuttle. This project is fast at first and you can complete 90% of it fairly quickly. The last part is challenging because the space is so tight. I helped with that part using a knitting needle with a sharp point and a wide eye to fight the yarn. I also helped make the twizzle with my son (which is the handle) and sewed it in for him, though these are things he's capable of doing at his age. He chose the pattern which was just an alternating of colors starting with wider bands at the bottom and tighter bands at the top. To keep in line with Waldorf philosophy, you'll want to be mindful to use darker colors at the bottom and lighter at the top where it opens. Also if there is an embroidery design on top of the weaving, you'll want to ensure that the bottom of the design is closed and the top open. In our case, I feel that the tighter bands would have been more appropriate at the bottom versus the top. Something to consider when you are embarking on your project!
