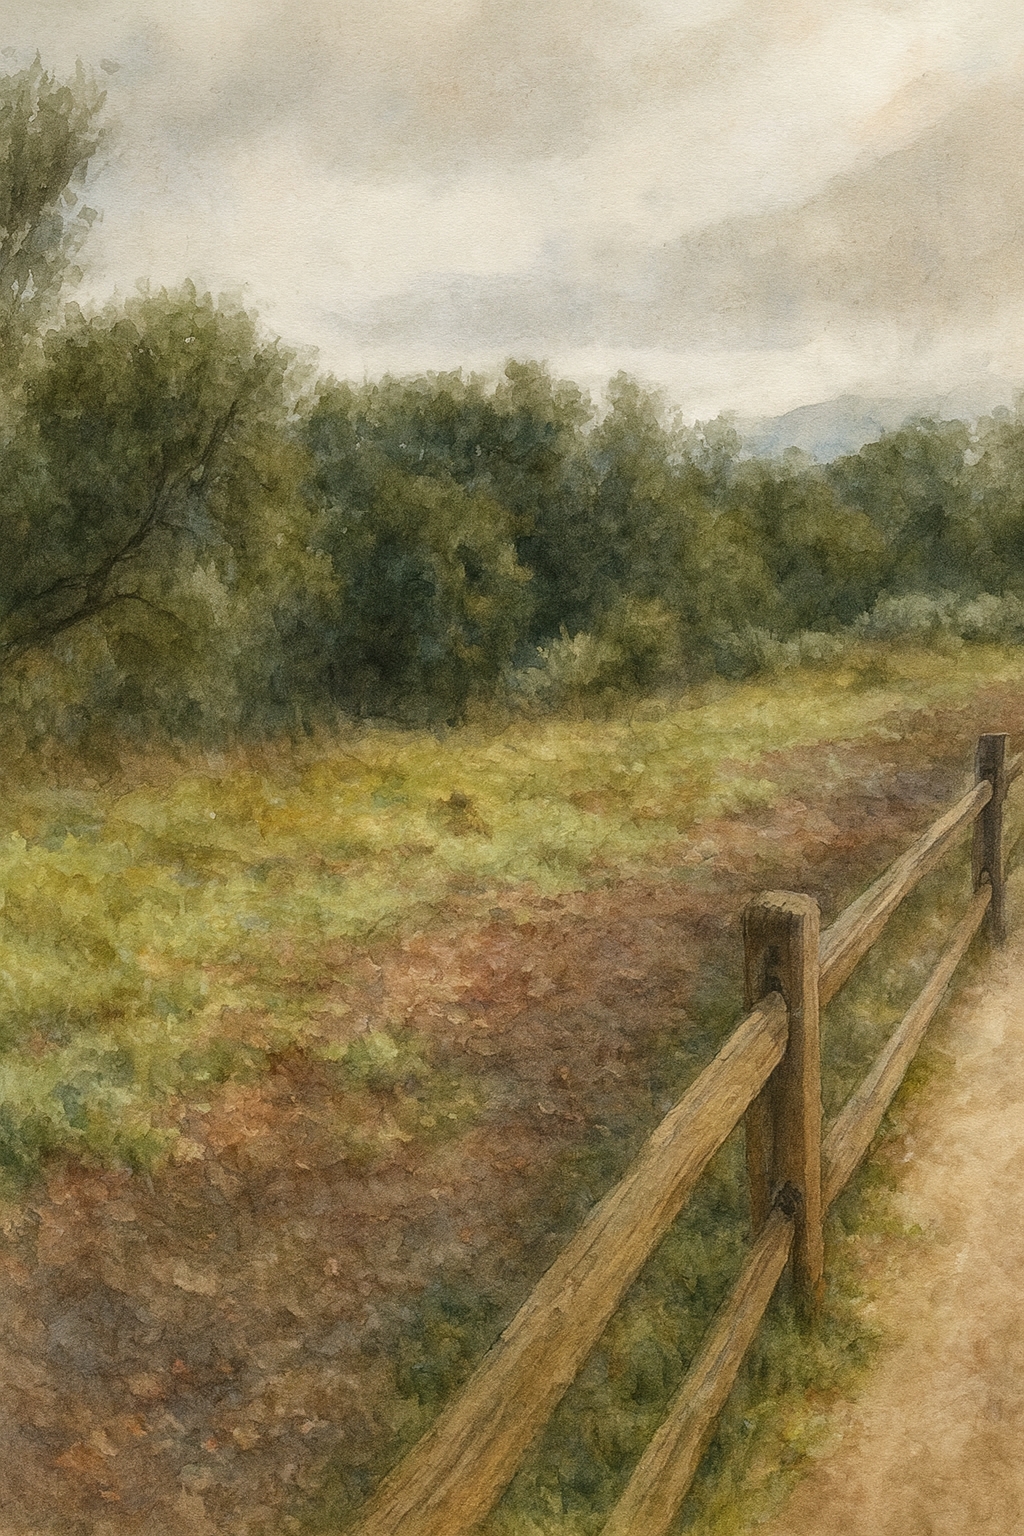
Autumn
Autumn
Southern California autumn is considered a second summer. We may have gone all of summer with mild to hot weather only to experience swelteringly hot temperatures that soar above 100°F (38°C) in the fall. While there’s a sense of coming inward, at the same time there is a hastiness for work. Autumn is traditionally a time for harvest, work, and preparation and a beginning of turning inward. It’s a time of work in preparation for the winter. And while we do not live in an agrarian society, remnants of the natural human intuition still remains. In autumn, the light begins to wane after the fullness of Summer. But Summer hasn’t left completely. Where we live, the hot weather persists. The dryness intensifies and if the winds pick up, we are at risk of fires. Autumn is fire season, which means that in preparation for such events, brush is cleared, open fires cease, and hope for rain is ever present.
The heat of a Southern California fall paired with days that are still lengthy means that plenty of work may be done and outdoor time may be spent. However, children are ready to settle down and learn after a summer of free and joyous play.
Autumn is a season of gathering and gratitude. Even if you choose not to celebrate the festivals in fall, traditions related to the harvest are valuable for children to experience as gratitude for the blessings bestowed upon us is a lifelong practice, not just a seasonal tradition.
As the days shorten and the evenings cool, a light rustle of the tree leaves hint at a fall approaching. While the weather is still fair, handwork such as dying or carding or collecting natural materials are good tasks as they require outdoor time. Processing beeswax and candle dipping in preparation for the winter month is another fall activity that children delight in. Autumn is a time of seeking inner balance and meaning. This task is one for the teachers and the adults as a children just reap the benefits of the harmony that’s achieved by that inner work.
Autumn Crafts & Activities
-
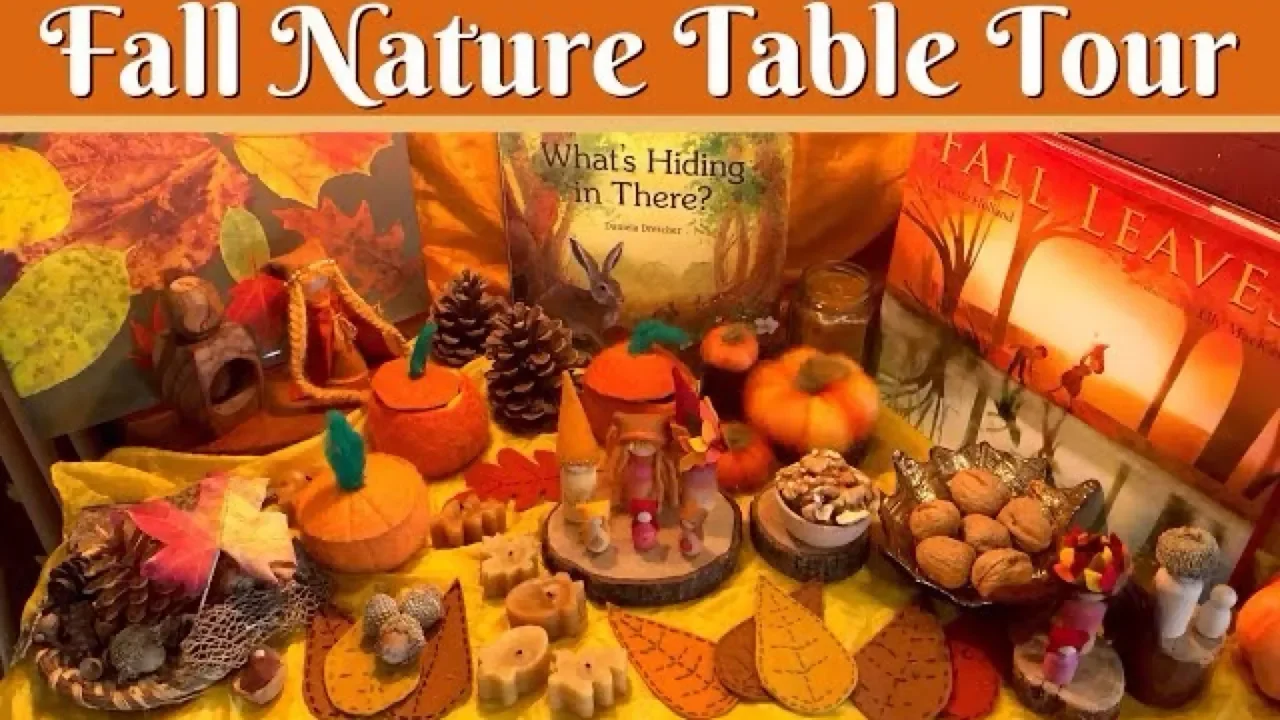
Fall Nature Table Tour
Our fall table ended up being more of a fall themed interactive table that my six-year-old loves for a few reasons. Before I tell you what she loved about it, let me share with you what's on our table. Our nature table is the top of a Kallax bookcase from IKEA. It's a snug space, but perfect for displays and perfect for standing-height play.
-
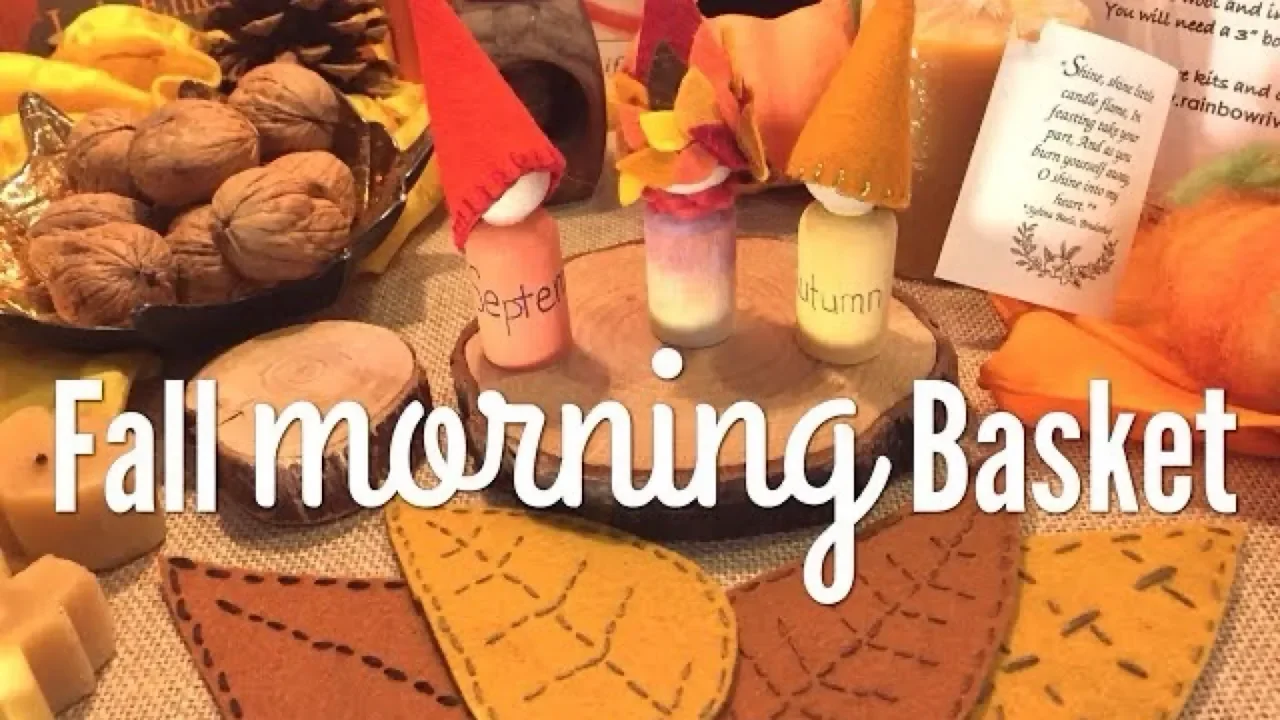
Fall Morning Basket | Autumn Themed Unit
Fall is my favorite season. It doesn't last long enough. September is still hot and by the time October is over, winter decorations are already hitting the stores! Eek! Too fast for me.
-
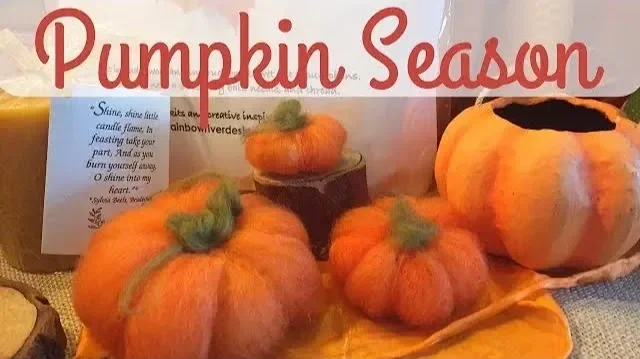
Needle Felting for Beginners | Pumpkin
Felting pumpkins is one of the easiest beginner projects. Just be careful when working with children as the needle is very sharp and it's all too easy to accidentally strike your unsuspecting finger while felting.
-

How To Make Candles | Autumn Craft
This is probably my favorite upcycling project yet! I’ve been saving the last bits of candle from our beeswax candles for a couple years waiting to make them into new candles. Recently, I found what I needed: A candle making pot!
-
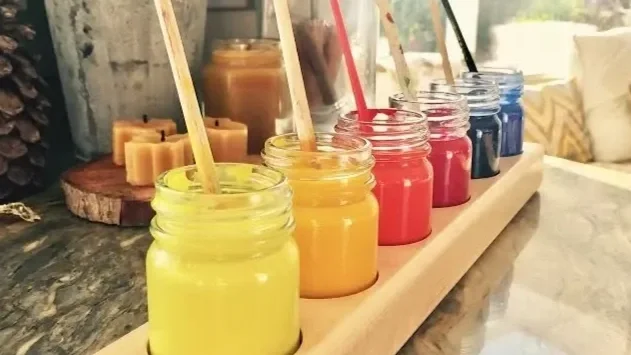
Watercoloring Pumpkins
Have you ever limited your paint pallet to just yellow, red and blue? Having the freedom to choose from a myriad of colors is thrilling, but equally thrilling is being able to make a variety of colors with just the three primary ones.
-
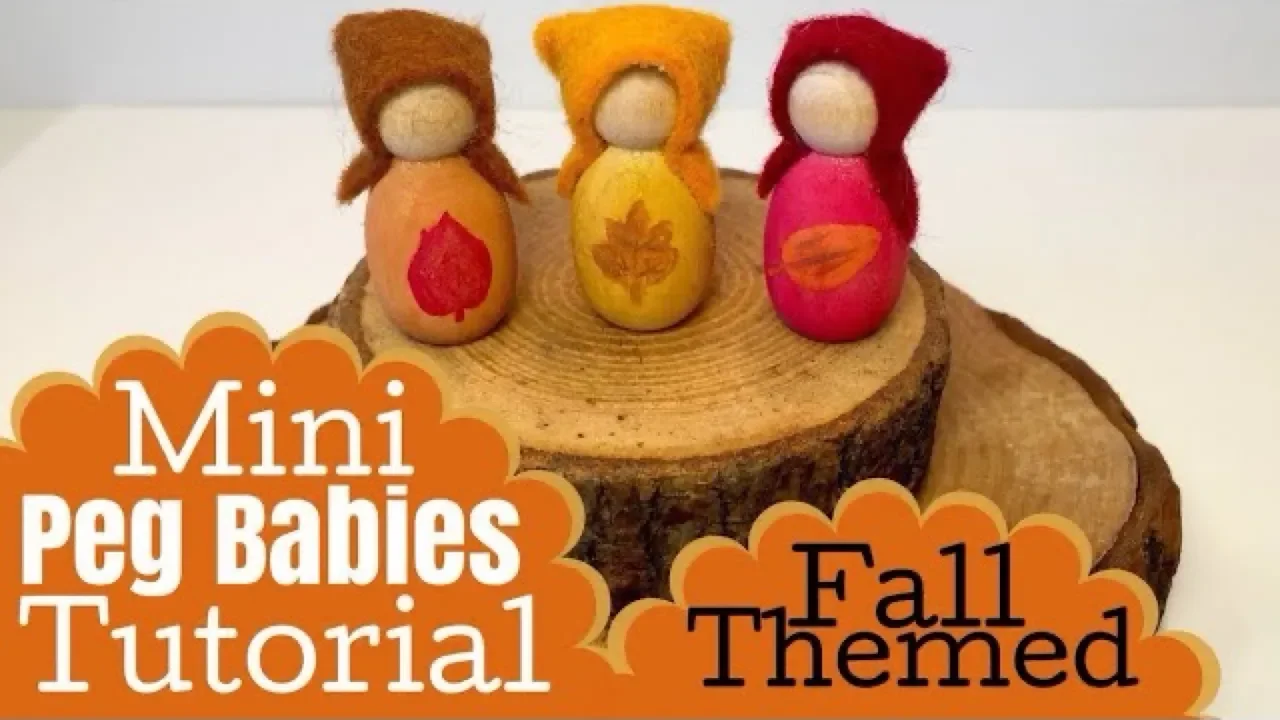
Mini Baby Peg Doll Tutorial
If peg dolls weren't cute enough, they go and make these tiny bunting babies! They are adorable no matter how you make them. This set is for our nature table in our homeschool room. They were easy to make and are perfect for using up scraps.
-
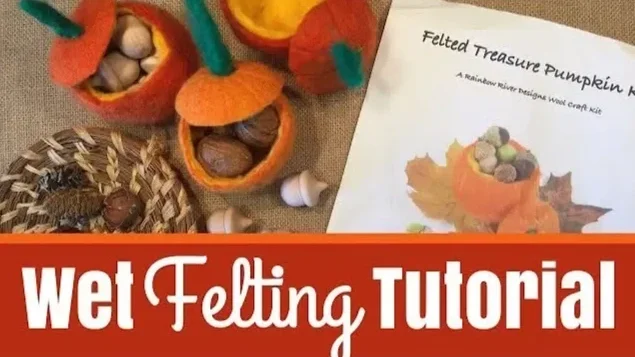
Wet Felting Tutorial for Beginners | Pumpkin
I admit when I bought this kit, I thought it was a needle felting pumpkin kit. But you can't imagine my joy when, after a moment of confusion, I realized it was a wet felting kit! I haven't done wet felting in years, and I'm excited to get back into it.
-
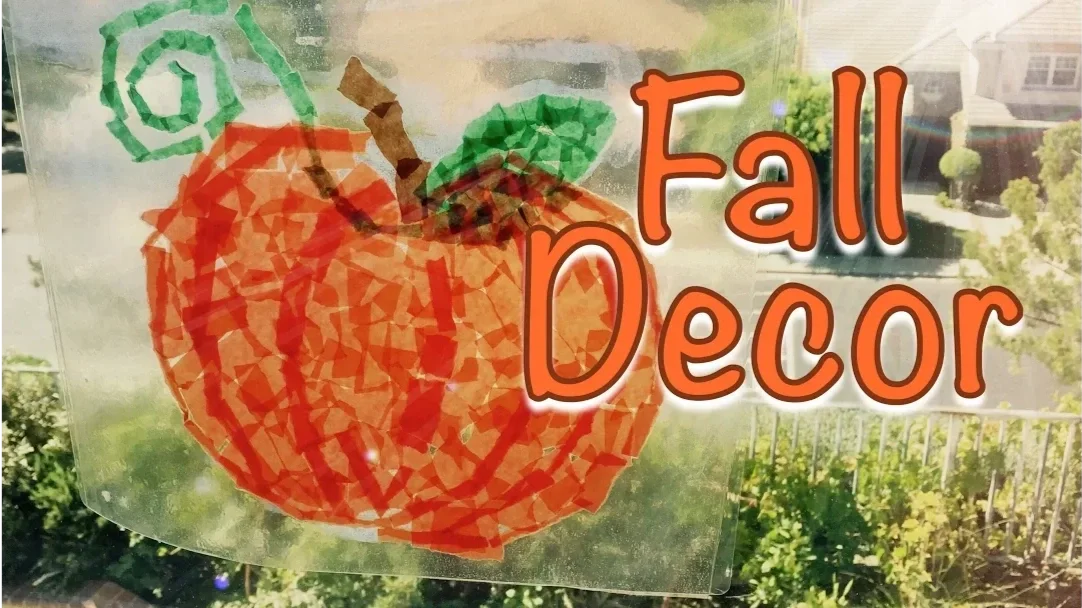
Window Art | Kite Paper| Pumpkin
Making decorative window art is fun and beautiful. These laminated translucent pumpkins can be reused each year. This is a great project for kids four years and up. If you aren't doing this project in the fall, you can print out a simple image of a tree or flower. I find that pencil drawings or silhouettes work best for this project.
-
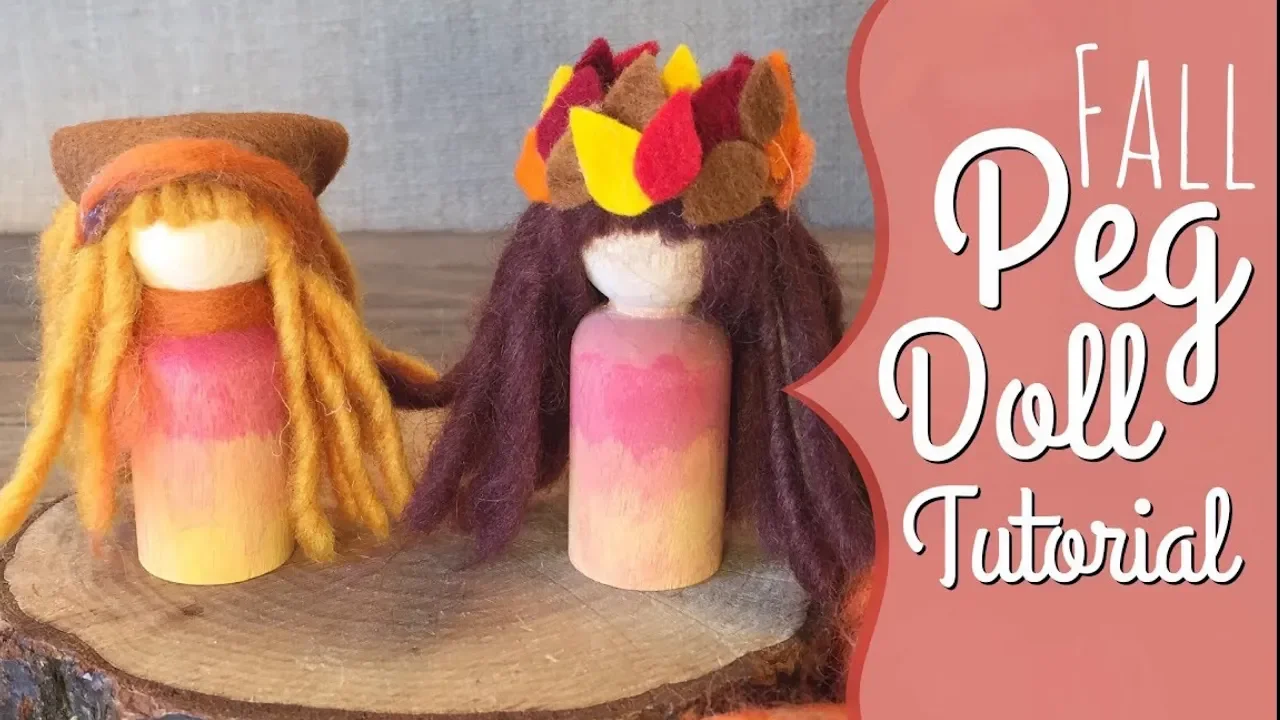
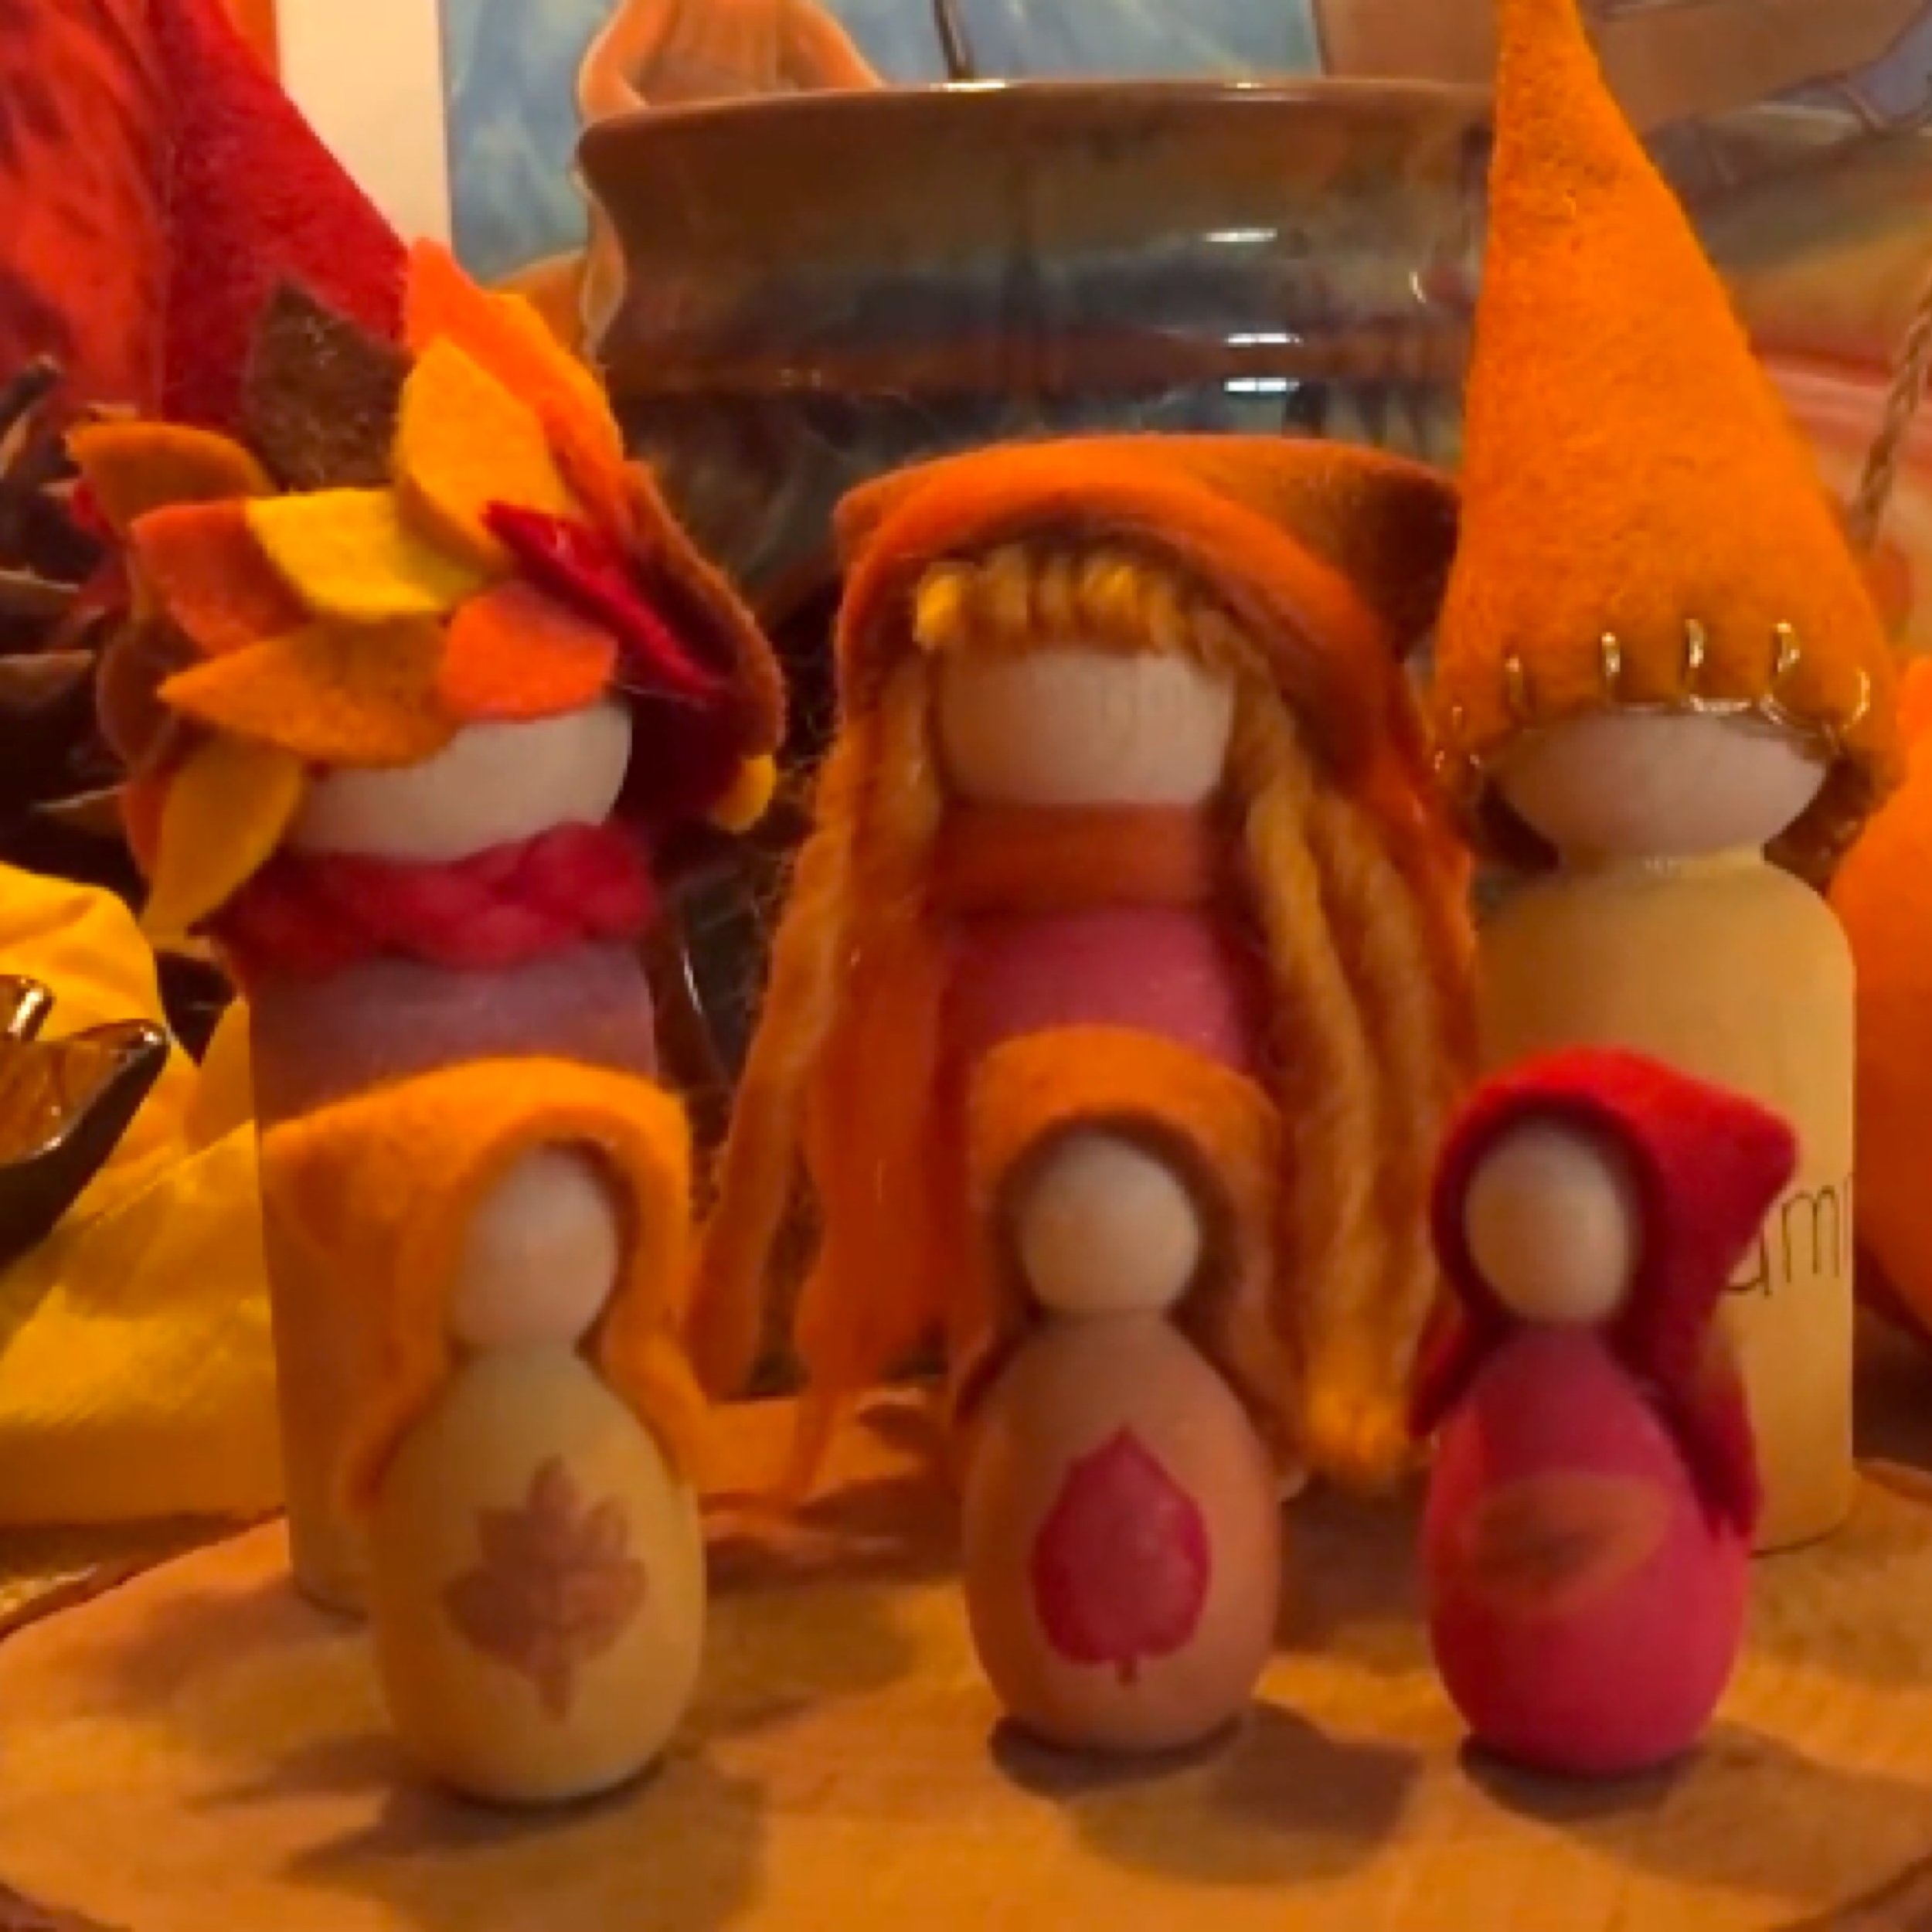
Fall Inspired Peg Dolls | Nature Table
It's official, it's no longer pumpkin season, it's peg doll season! We've made more peg dolls in the past month than all the peg dolls we've ever made combined. We're on a roll. And now we are adding themed ones to our nature table and having a blast doing it.
-

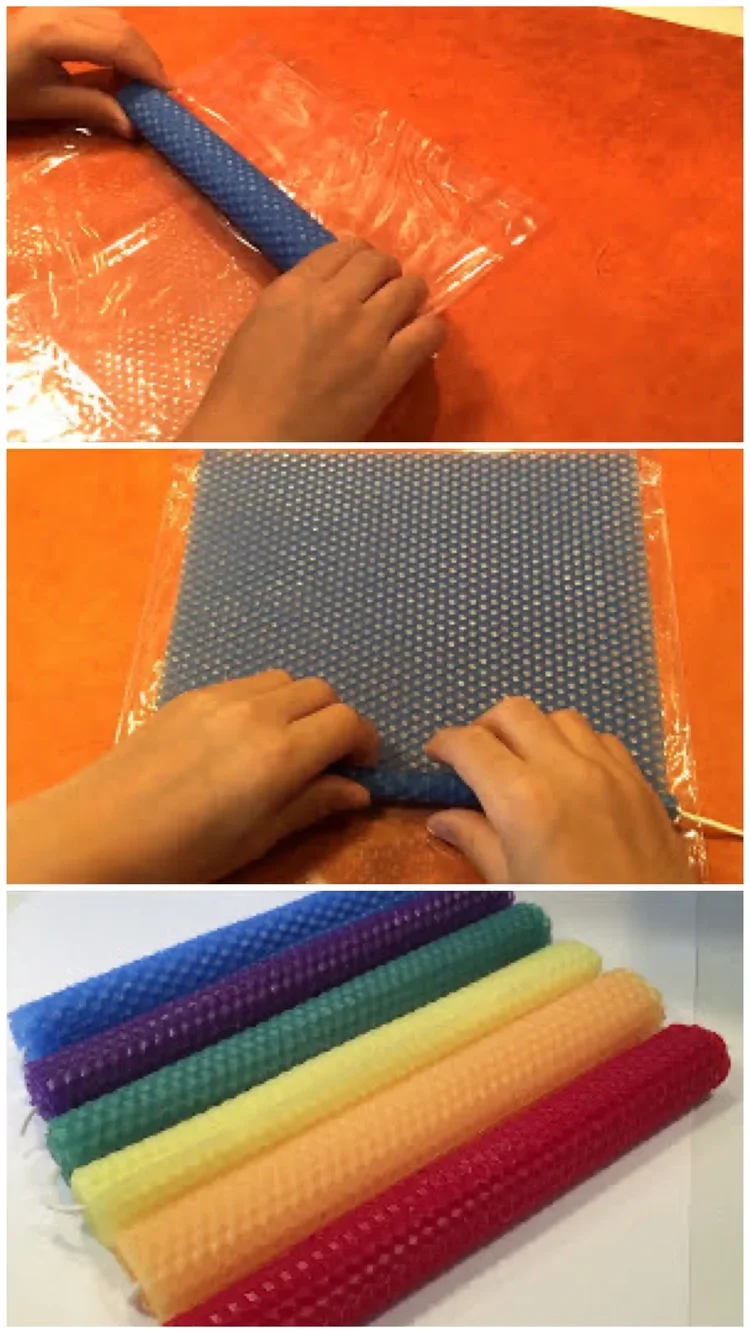
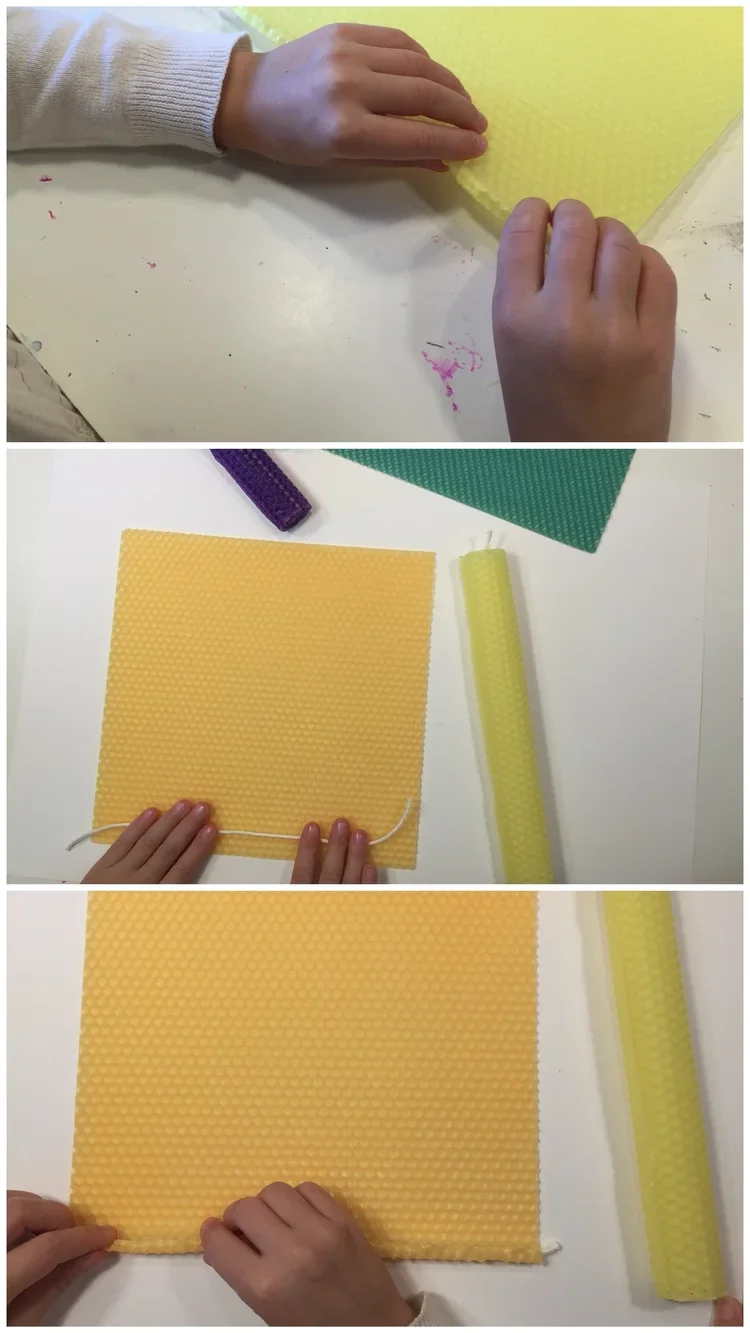
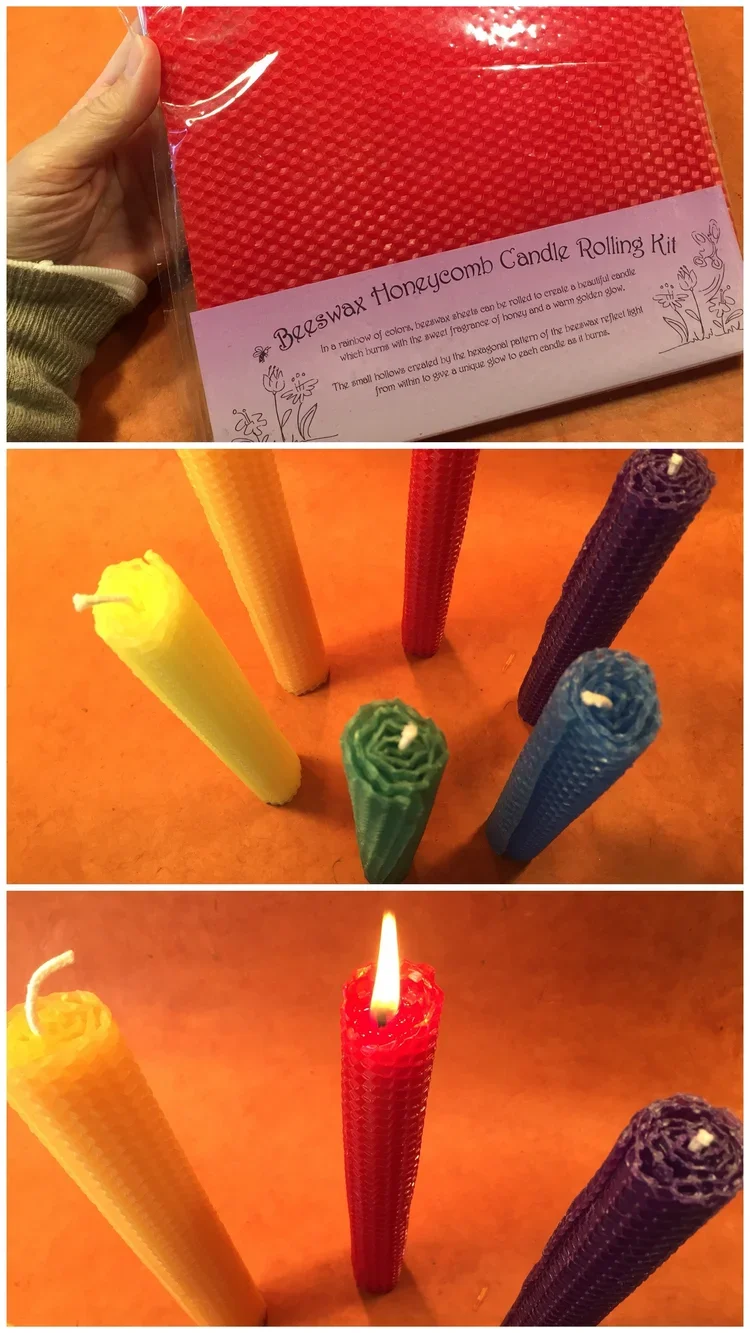
Honeycomb Candle Rolling Kit
This was the best activity we did during Kindergarten Week. My five-year-old daughter loved this project in part because she could do it all on her own! I showed my kids how to roll one, then they rolled the other five.
-

Apple Pie Tartlet Dessert
I had the best of intentions when I bought pound after pound of fresh gala apples at the start of apples season. I wanted to make all kinds of apple deliciousness. We did manage an apple pie and some caramel apples, but then our apples rested at the bottom of the crisper for literally months....
-

Moroccan Couscous
This is one of my favorite recipes of all time! It's so warming, nourishing and healthy; it's perfect for cool autumn days or for a cozy dinner with friends. I have my dear friend, Laura, and her husband to thank for sharing this recipe for me.
-

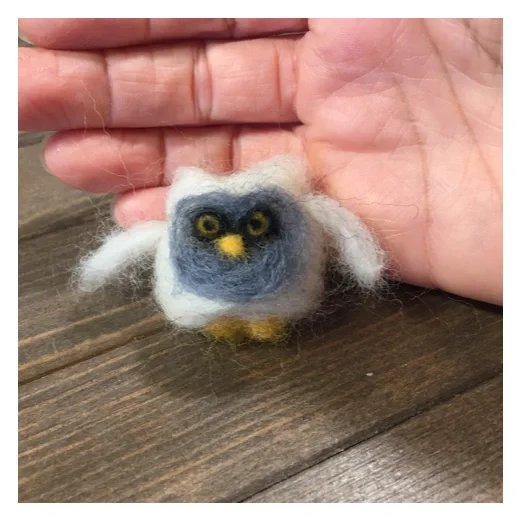
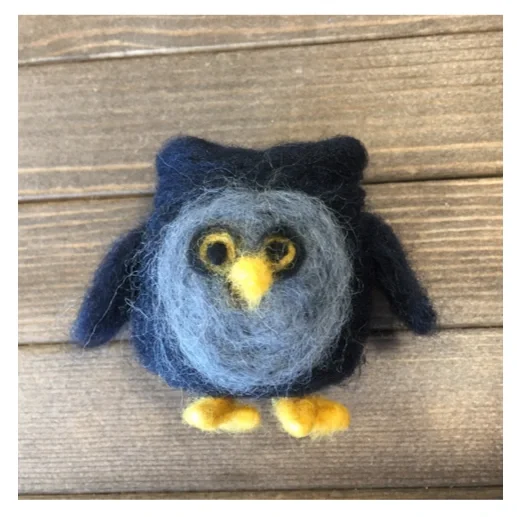
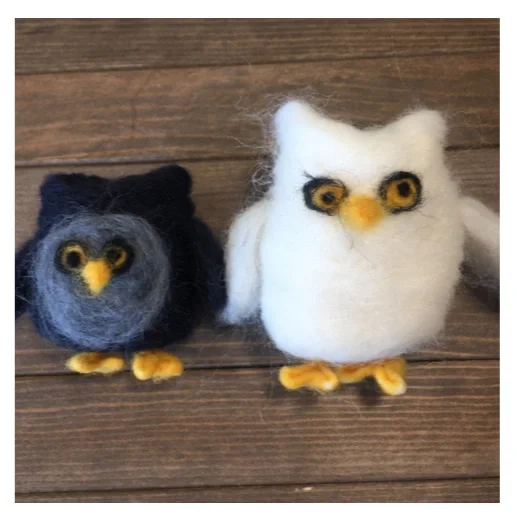
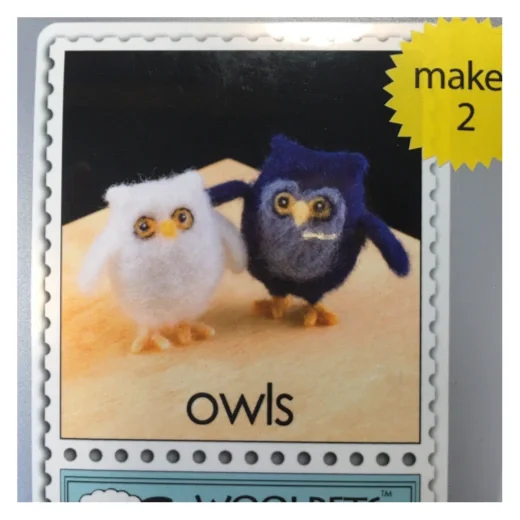
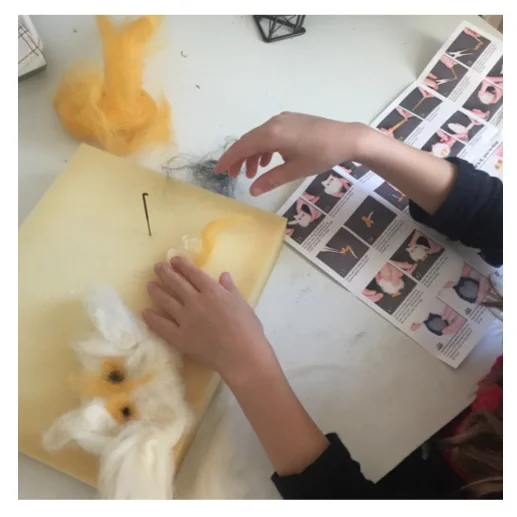
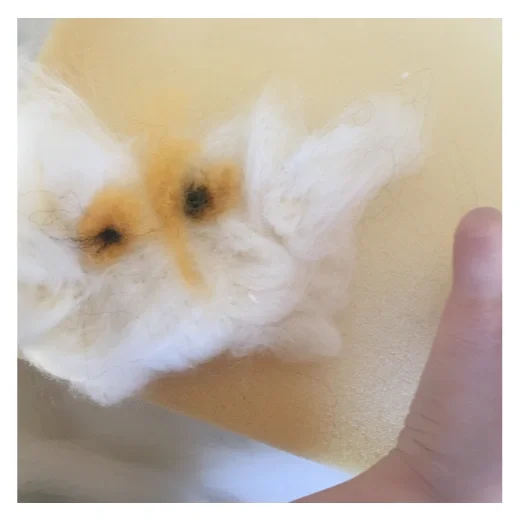
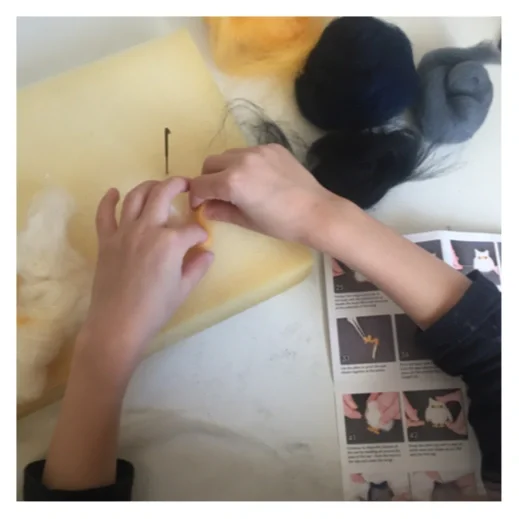
How to Make a Felted Owl
WoolPets are the best kits for beginners looking to try wool felting. The kits are also an amazing value, you can get at least 4 owls from this kit (the package says 2), and if they are a bit smaller, you can get 6 adorable owls :)
-
How to Bake Bread
Baking bread is a quintessential kindergarten experience in a Waldorf school. We take this tradition and bring it home. In this video, I'll show you a quick and easy recipe for making bread
-
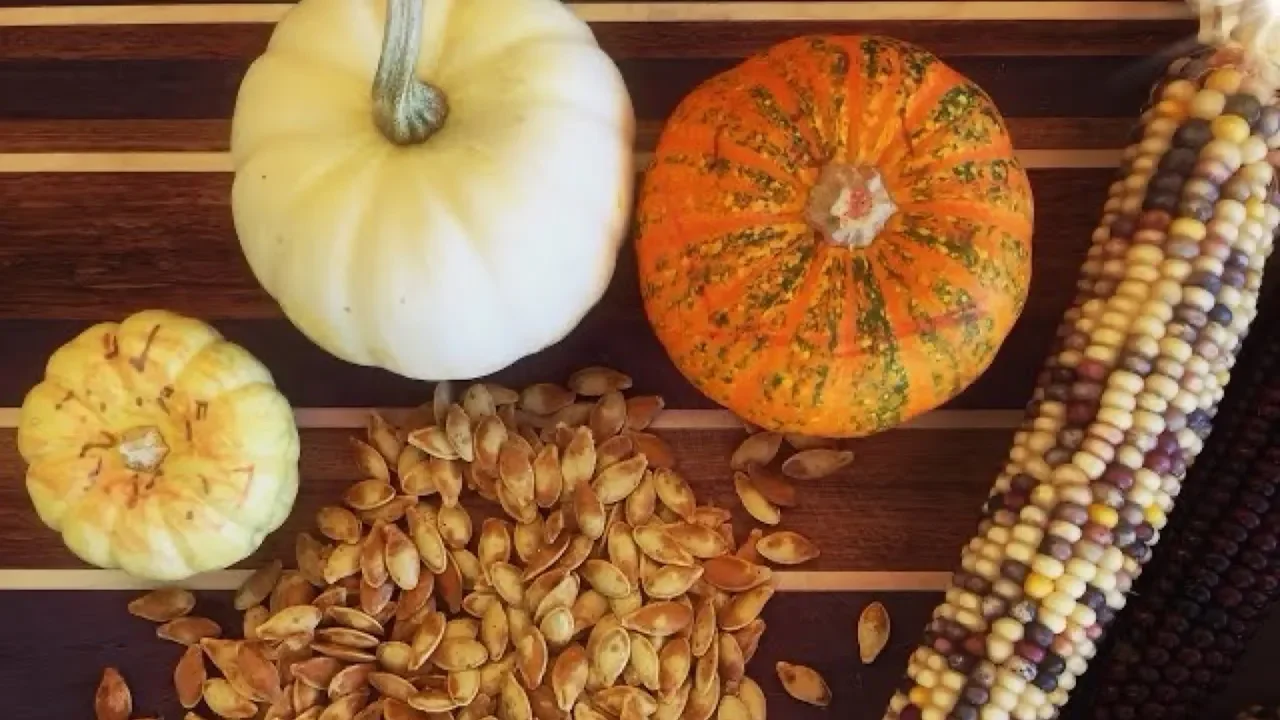
Roasted Pumpkin Seeds
Did you carve a pumpkin this fall? I hope you saved those pumpkin seeds because you can roast them with a bit of salt and olive oil for a fast, tasty and healthy snack. Don't forget to reserve a few seeds to plant them next spring/summer and hopefully you'll have your very own pumpkin next fall!
-
Vegetable Soup in a Pumpkin
This is a show stopping center piece that tastes great and looks amazing! Add drama and intrigue to your dinner party with this perfect-for-fall vegetable soup served in a pumpkin. It's actually easier than you'd think to make, is the perfect meal or appetizer for large groups and warms you to the bone on cold autumn nights.
-

How to Make Old Fashioned Pumpkin Pie
It is timely that our unit study on the Colonial Times, the voyage of the Mayflower and the first Thanksgiving nestled perfectly with this time of year. Reservations about the actual events aside, this pumpkin pie was delicious, easy and ties in well with our unit study.
-
Tortilla Soup Recipe
Tortilla soup is a family fall and winter favorite because it's so warming, hearty and delicious. It's also super fast! Not only can you make the soup in about 30 minutes, while it's simmering, you can garnish the soup with cilantro, avocado, pepper jack cheese and fresh homemade tortilla chips.
-
Walnut Shells Sleeping Babies
These little sleeping babies in walnut shells are adorable. They'd make charming ornaments, cute table scape decorations or one-of-a-kind party favors. We made them to decorate our Fall Nature Table, but truthfully, they were barely there before being swept away to be played with along with our peg dolls and finger puppets.
-
How to Knit a Pumpkin
Every fall, we seem to add a new autumn inspired project to our repertoire, and this year we are knitting pumpkins! This is a super easy and very satisfying project that takes little time and other than the stem, doesn't require many supplies.
-
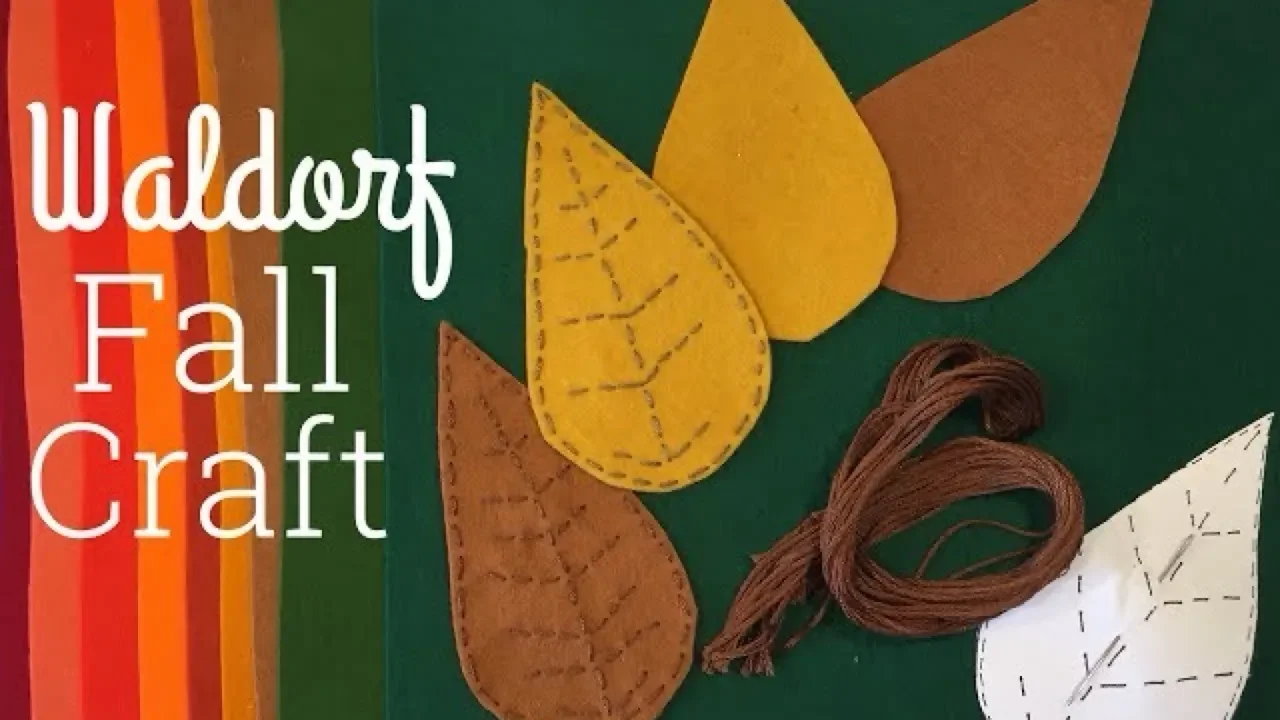
Waldorf Autumn Craft | Stitching and Embroidery
Welcome autumn with this simple, yet beautiful handwork project that's great for children about eight years and up. All you need is felt and embroidery thread. You also need a needle and a pair of scissors.
-

Pinecone Firestarter | Winter & Autumn
When thinking about fall and winter projects that feel distinctly Southern Californian, I decided to focus on pinecones and rosemary as both grow well where we live. And since it doesn't snow here and the weather is fair year long, I wanted to represent the season with natural treasures from our environment that were both functional as well as beautiful.
-

How to Make Waxed Leaves
For years I wanted to make waxed leaves because I saw my sister decorate her home with them and it looked stunning. It turns out making waxed leaves is easier than you expect and the results are beautiful. I can't say just yet how long the results last, but so far, the leaves are retaining their beautiful fall colors, they are flexible without cracking and they have a glistening sheen from the wax.

Autumn
Fall Nature Table Tour
Our fall table ended up being more of a fall themed interactive table that my six-year-old loves for a few reasons. Before I tell you what she loved about it, let me share with you what's on our table. Our nature table is the top of a Kallax bookcase from IKEA. It's a snug space, but perfect for displays and perfect for standing-height play. I've decorated the space with Sarah's Silks in fall colors and initially the space had an assortment of projects and activities to do, while currently it displays the projects we've completed over the last couple of months. You can find a basket of nature finds which includes seed pods, acorns, bark and pine cones, a bowl of walnuts and a nutcracker, three wet felted pumpkins and a bunch of needle felted pumpkins, several pinecones, several hand-stitched and embroidered leaves and a varied assortment of peg dolls and finger puppets. I decorated the space with fall inspired books that I changed out once during the season. On our school room table is a shallow basket which features our other nature finds: more pine cones and seed pods.
We'll trade out these decorations, toys and books for Winter inspired materials in December.
My daughter loves this space because it's hers. In the vastness of the school room, she has two spots she's claimed. Her vintage classroom desk and the surrounding space, and this nature table. She loves it because it changes more frequently than anything else in the room. She prefers decorations that change, and when furniture gets moved around. Unexpectedly this space turned into a magical play space where my daughter plays make-believe for hours. She sets up the peg dolls in and around the space and uses the accessories as props. She brings in her winter peg dolls and creates 'cliff houses' in the bookcase by scootching books backs to create little dwellings. After two months, she's just about done and ready to move on to a new setting. I noticed that she had lost interest about a month into this set up, so I removed everything and set it up again. Just doing that reinvigorated the space and inspired new play.
Fall Morning Basket
Fall is my favorite season. It doesn't last long enough. September is still hot and by the time October is over, winter decorations are already hitting the stores! Eek! Too fast for me. This year, I'm embracing fall as much as I can...well I already missing apple picking season at the semi-local orchards, but we have a lot of crafts, cooking and reading planed that's fall themed. While many of the things we'll do we've already made videos for, there are new activities I'll be sharing with you. In the meantime, you can check out these projects we've already done and hopefully you'll find something that inspires you.
Oh and before you check out the list of videos I have for you, don't forget to sign up for the giveaway. It's easy. Just leave a comment! Here's the nitty gritty:
-Must have a US address
-Leave a comment to enter
-Giveaway winner will be contacted via message reply to this video
-Giveaway winner announced via Instagram on Tuesday, October 10, 2017
-Giveaway HAS ENDED
If you don't win, don't despair, the book is on discount for 20% off at A Child's Dream. Sadly as of 2025, A Child’s Dream no longer carries this book.
Rolling Candles and another set of Rolling Candles
Oh and while you're at A Child's Dream, check out my personal favorites list:
Holland Wool Felt Collection - Autumn Tapestry
The Felted Pumpkin Kit is no longer available.
Wood Peg Doll - Female (8)
Wood Peg Doll - Man (10)
Finger Puppet bases are also no longer available as of 2025 when updating this post.
Wood Peg Doll - Bunting Baby - Bee (10)
Wood Peg Doll - Small (Child) (10)
Lyra opaque watercolor set is no longer available at A Child’s Dream but the Stockmar set is available.
Stockmar Opaque Watercolor Paint Set
Lamb's Pride Doll Hair Colors
Embroidery Floss Assortment Pack - 36 skeins
Create a Story Cards - Animal Village
Needle Felting for Beginners
Pumpkin
Felting pumpkins is one of the easiest beginner projects. Just be careful when working with children as the needle is very sharp and it's all too easy to accidentally strike your unsuspecting finger while felting.
You can find the products I used from A Child's Dream.
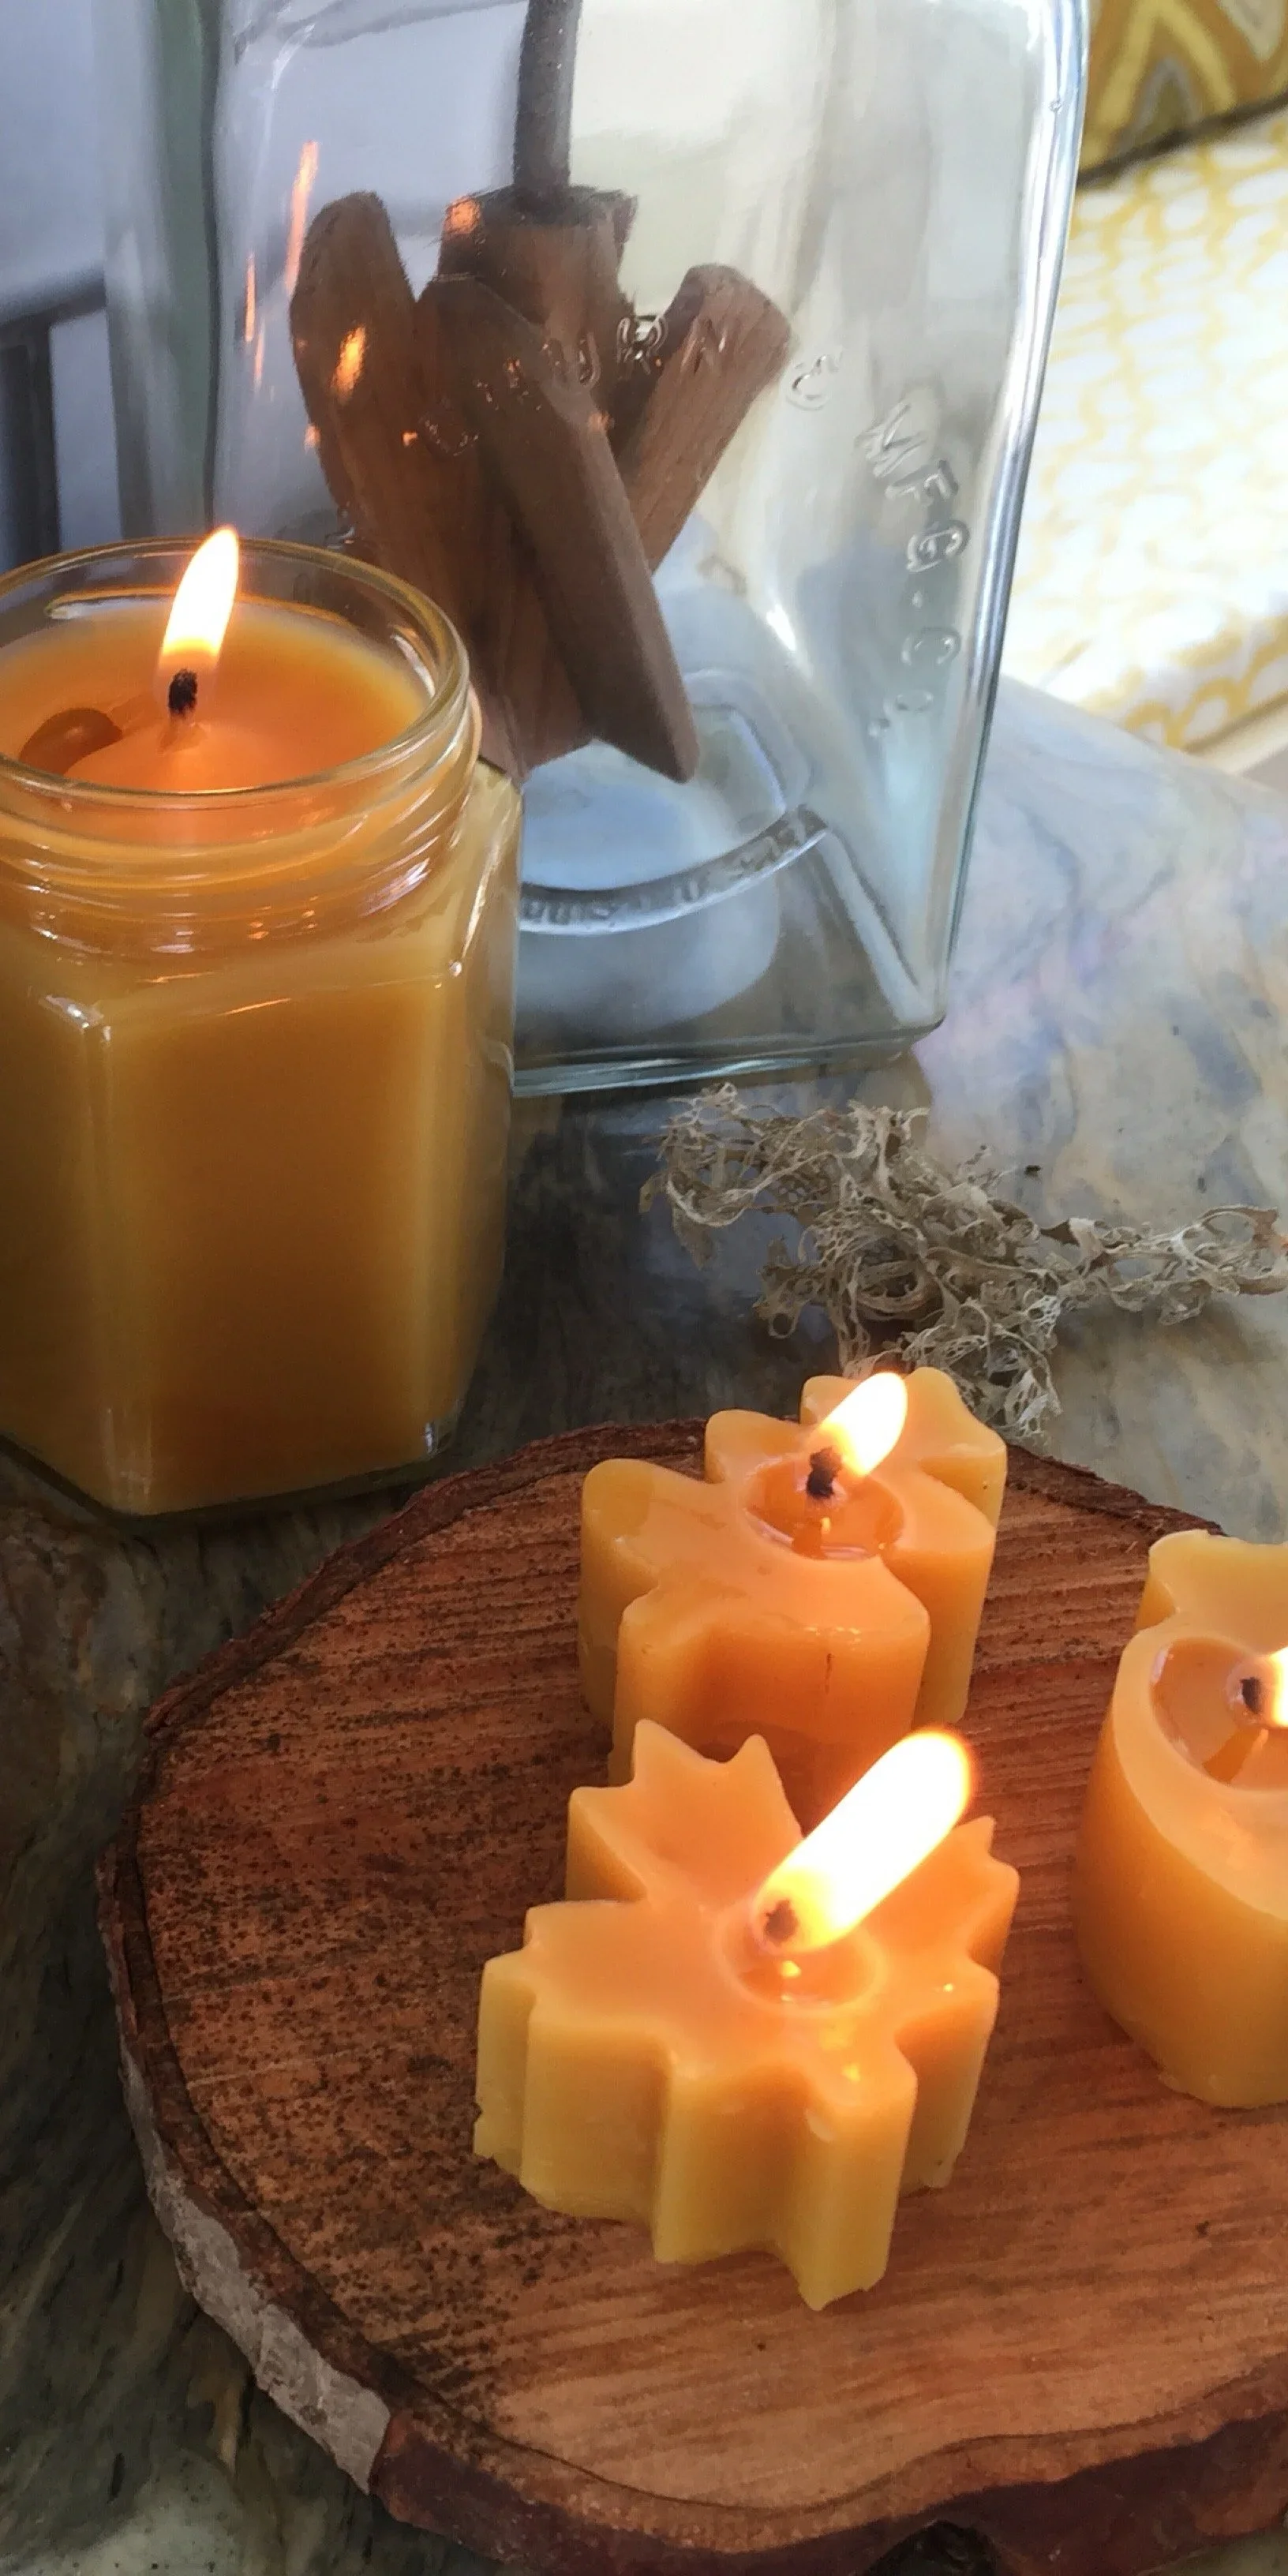
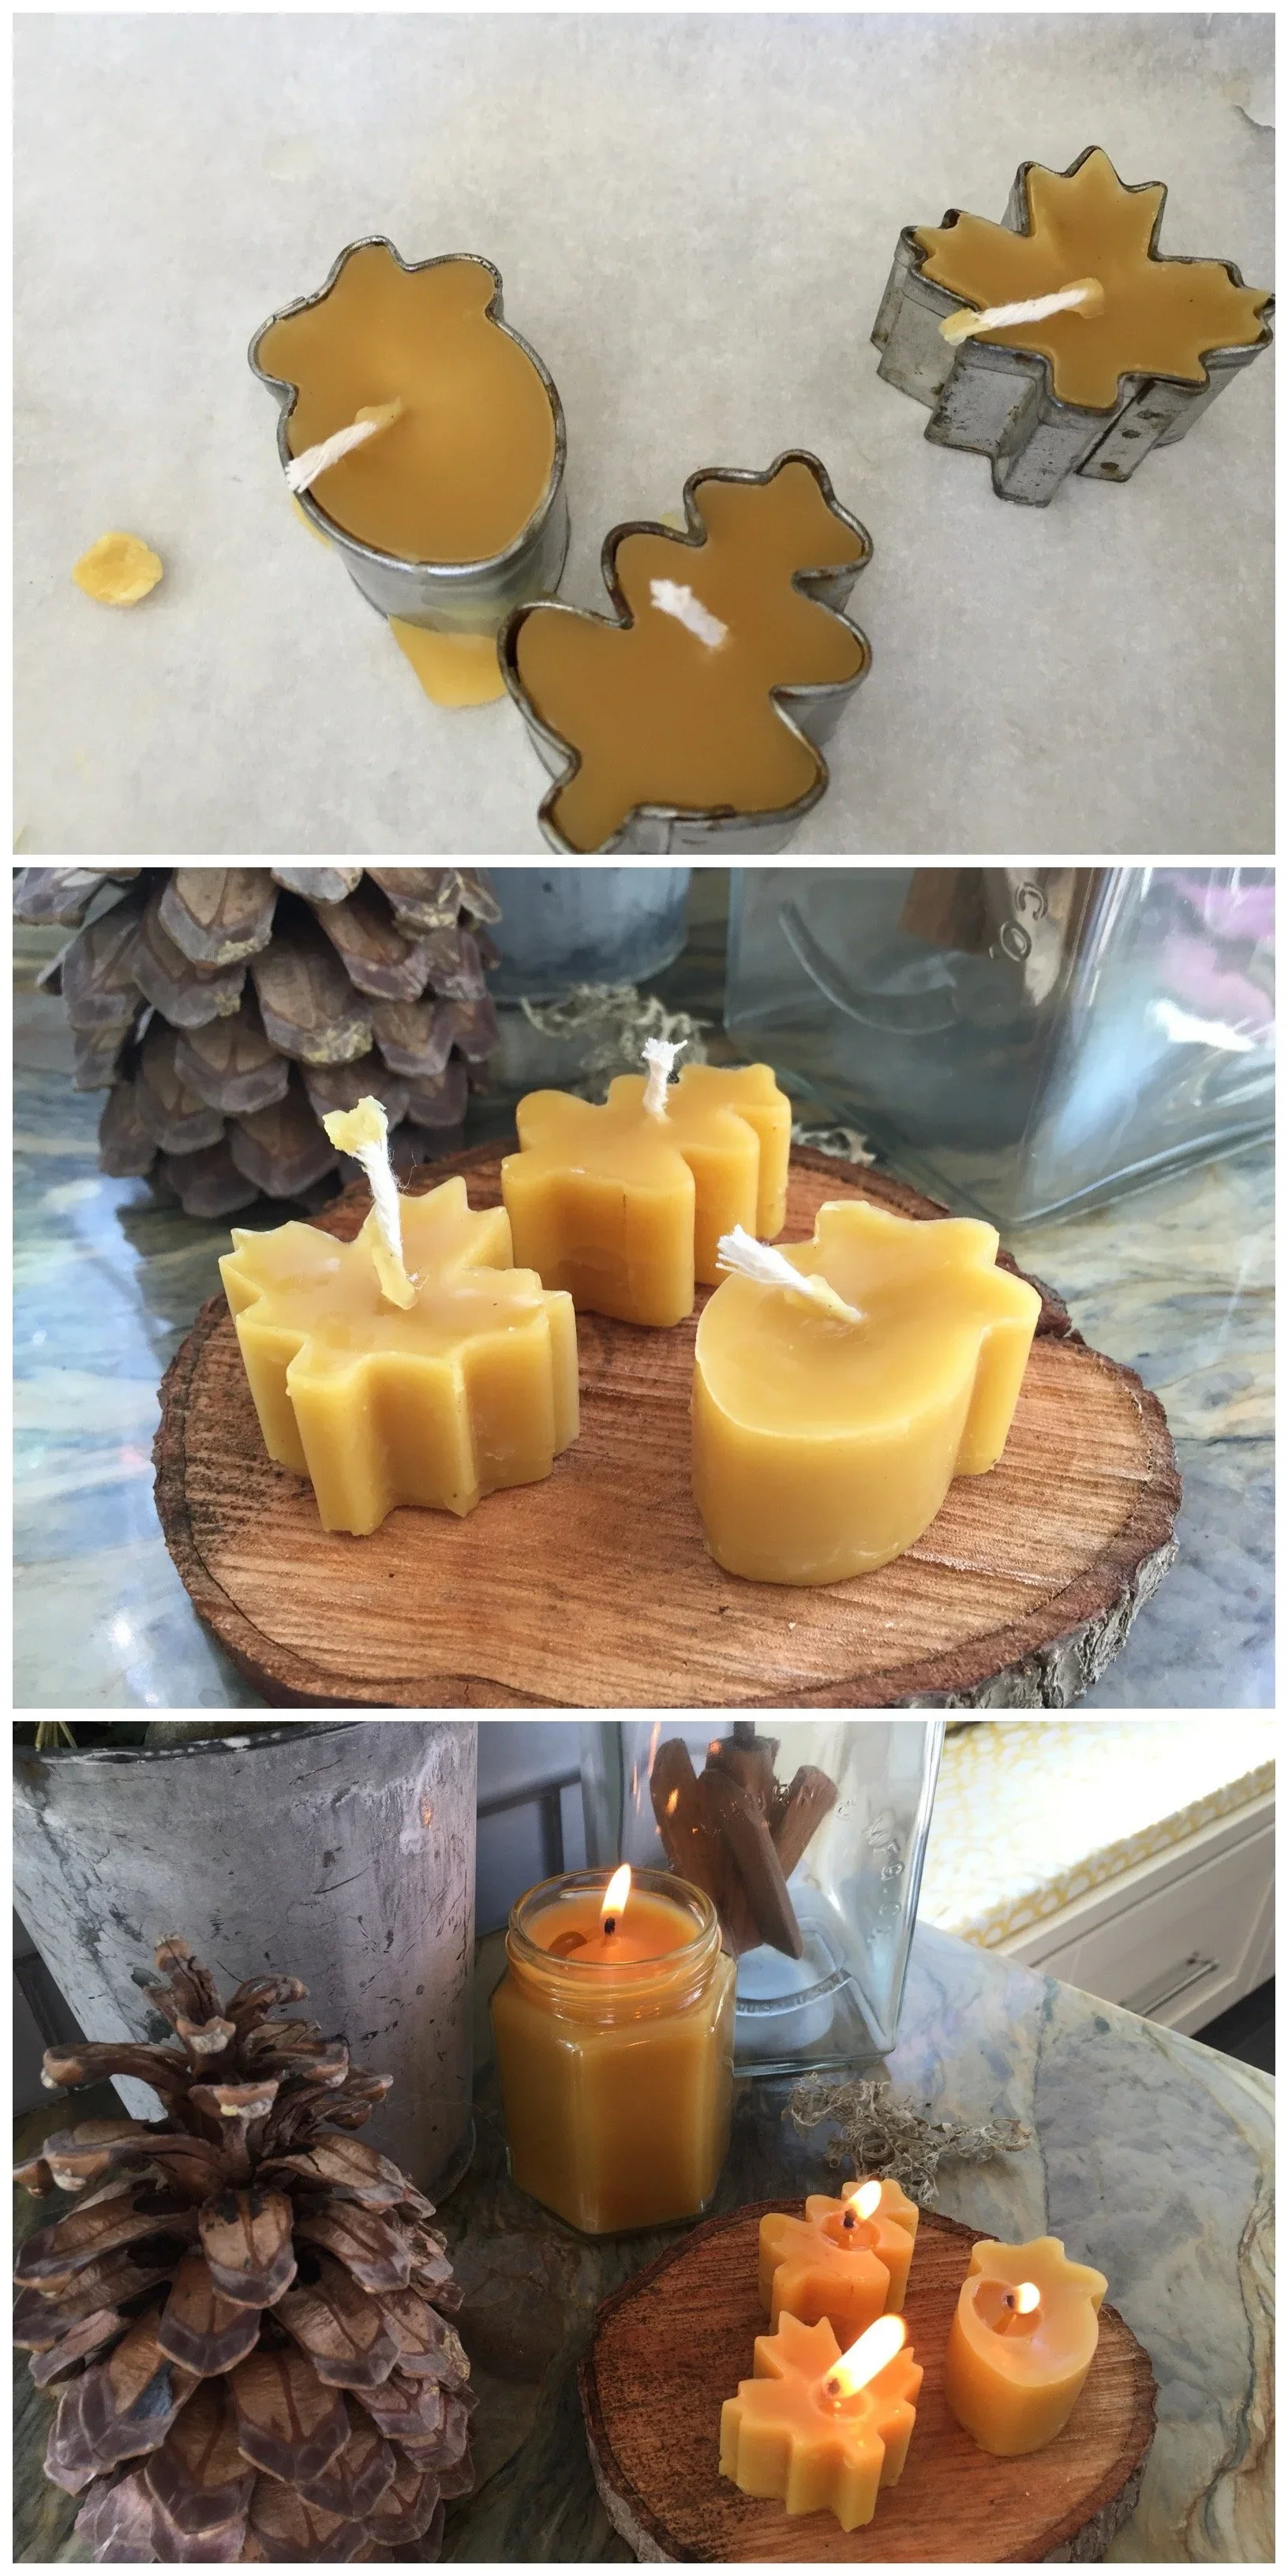
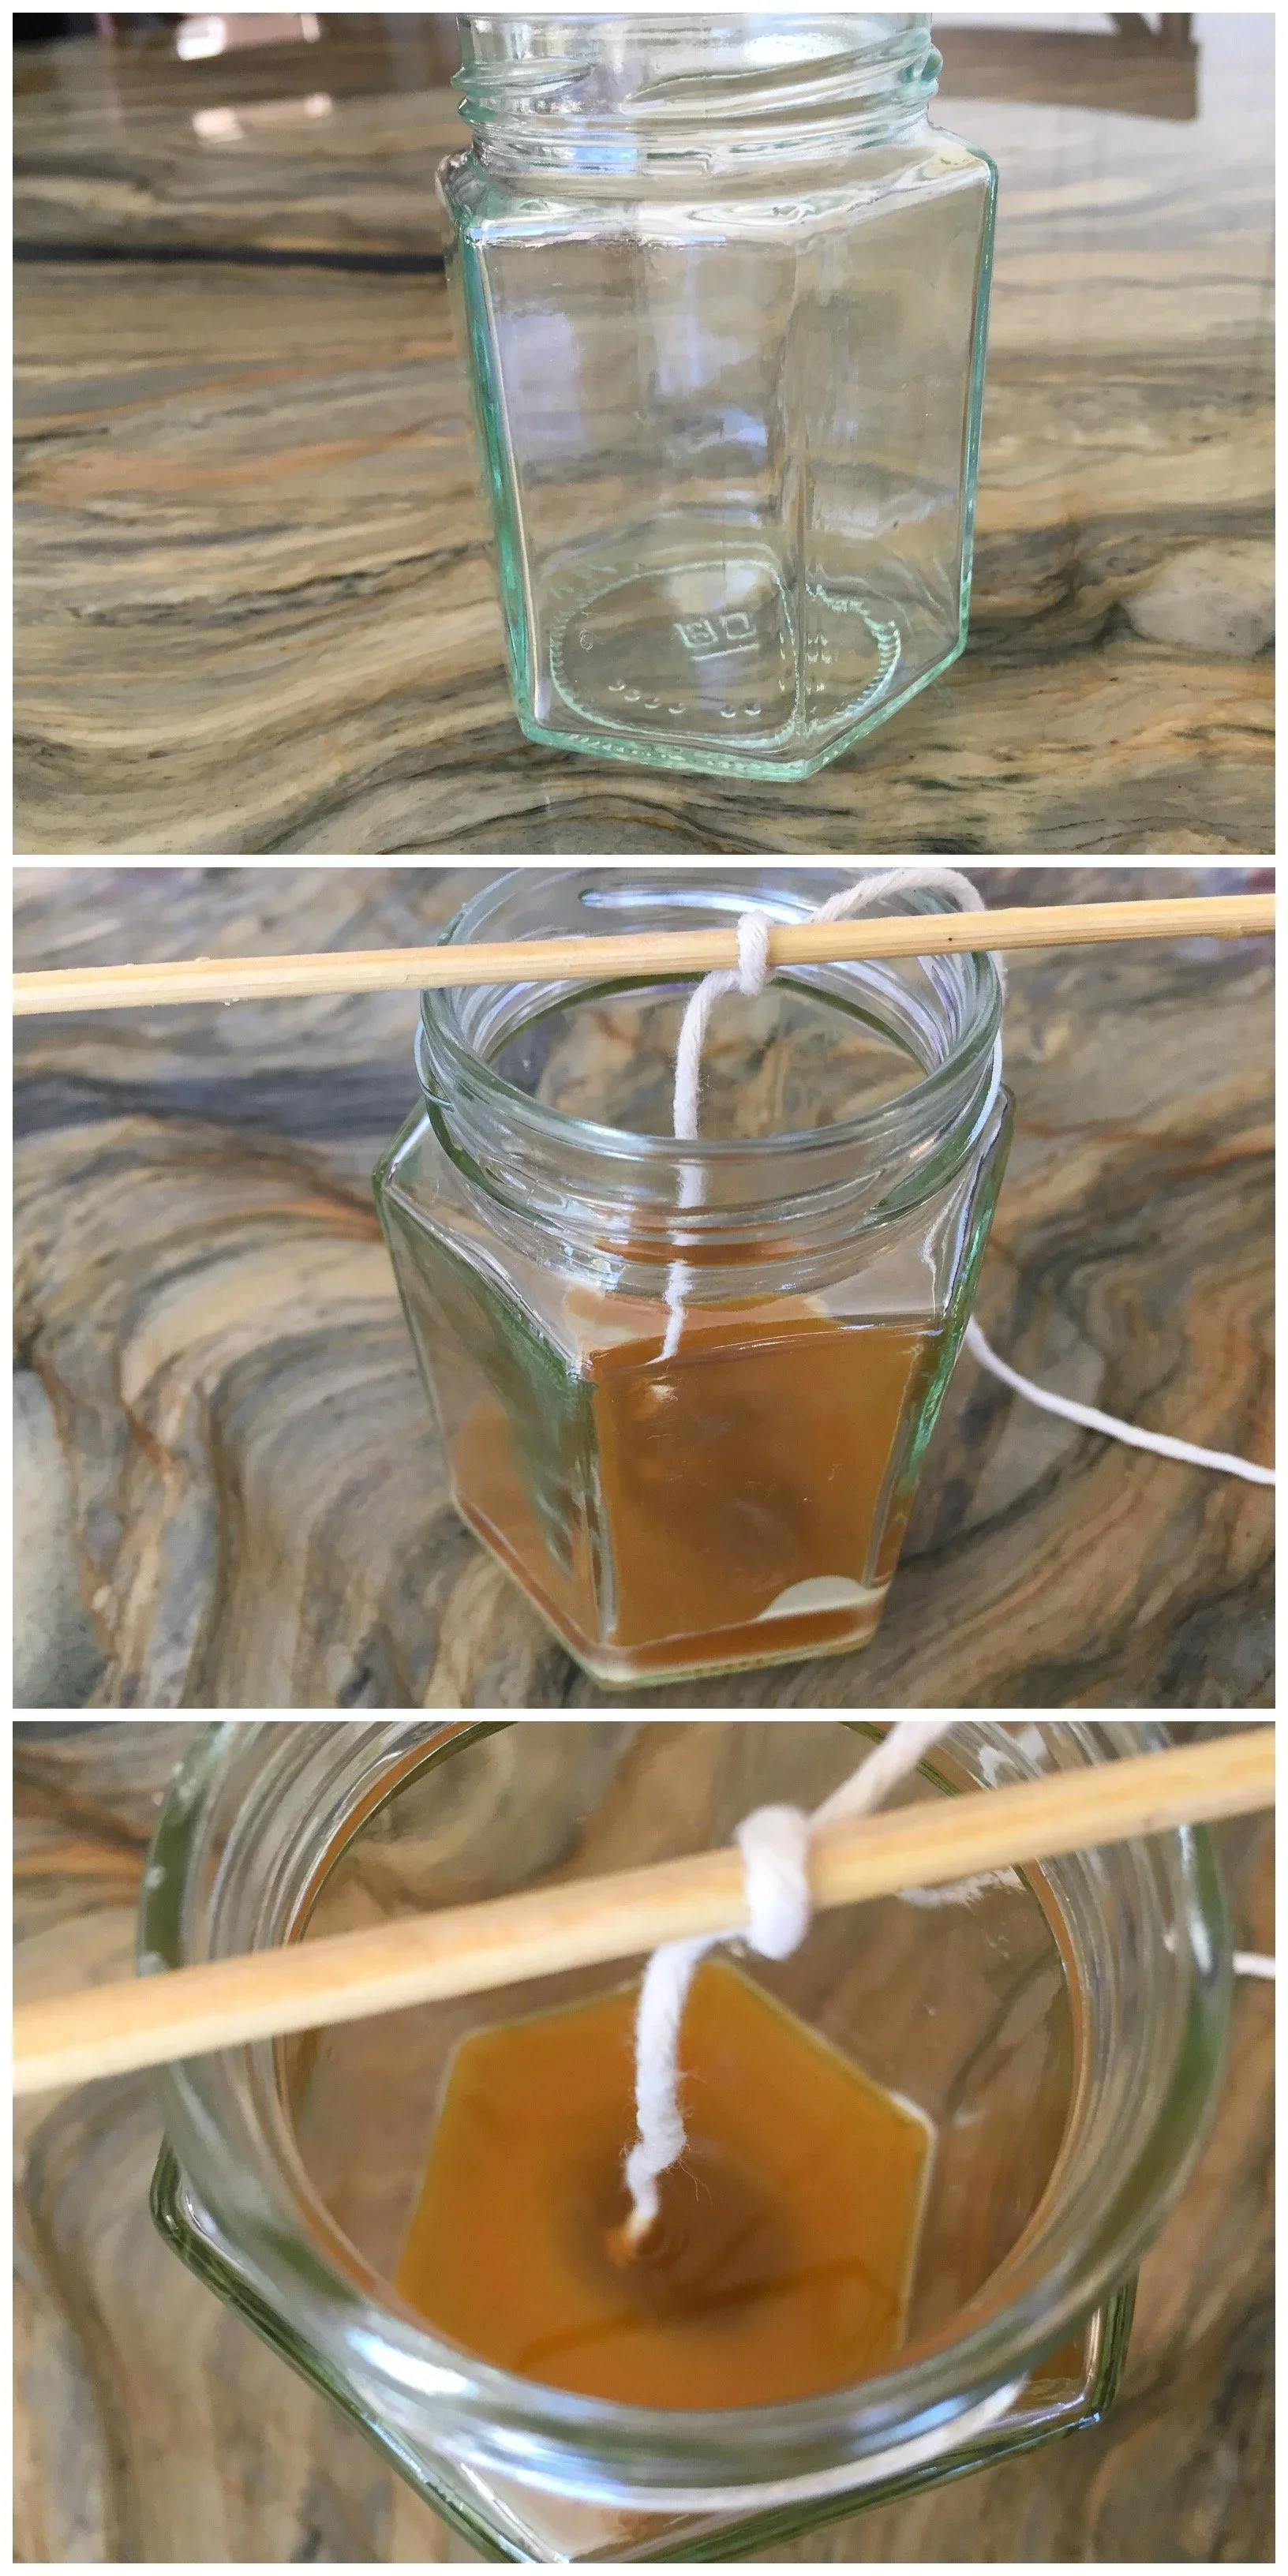
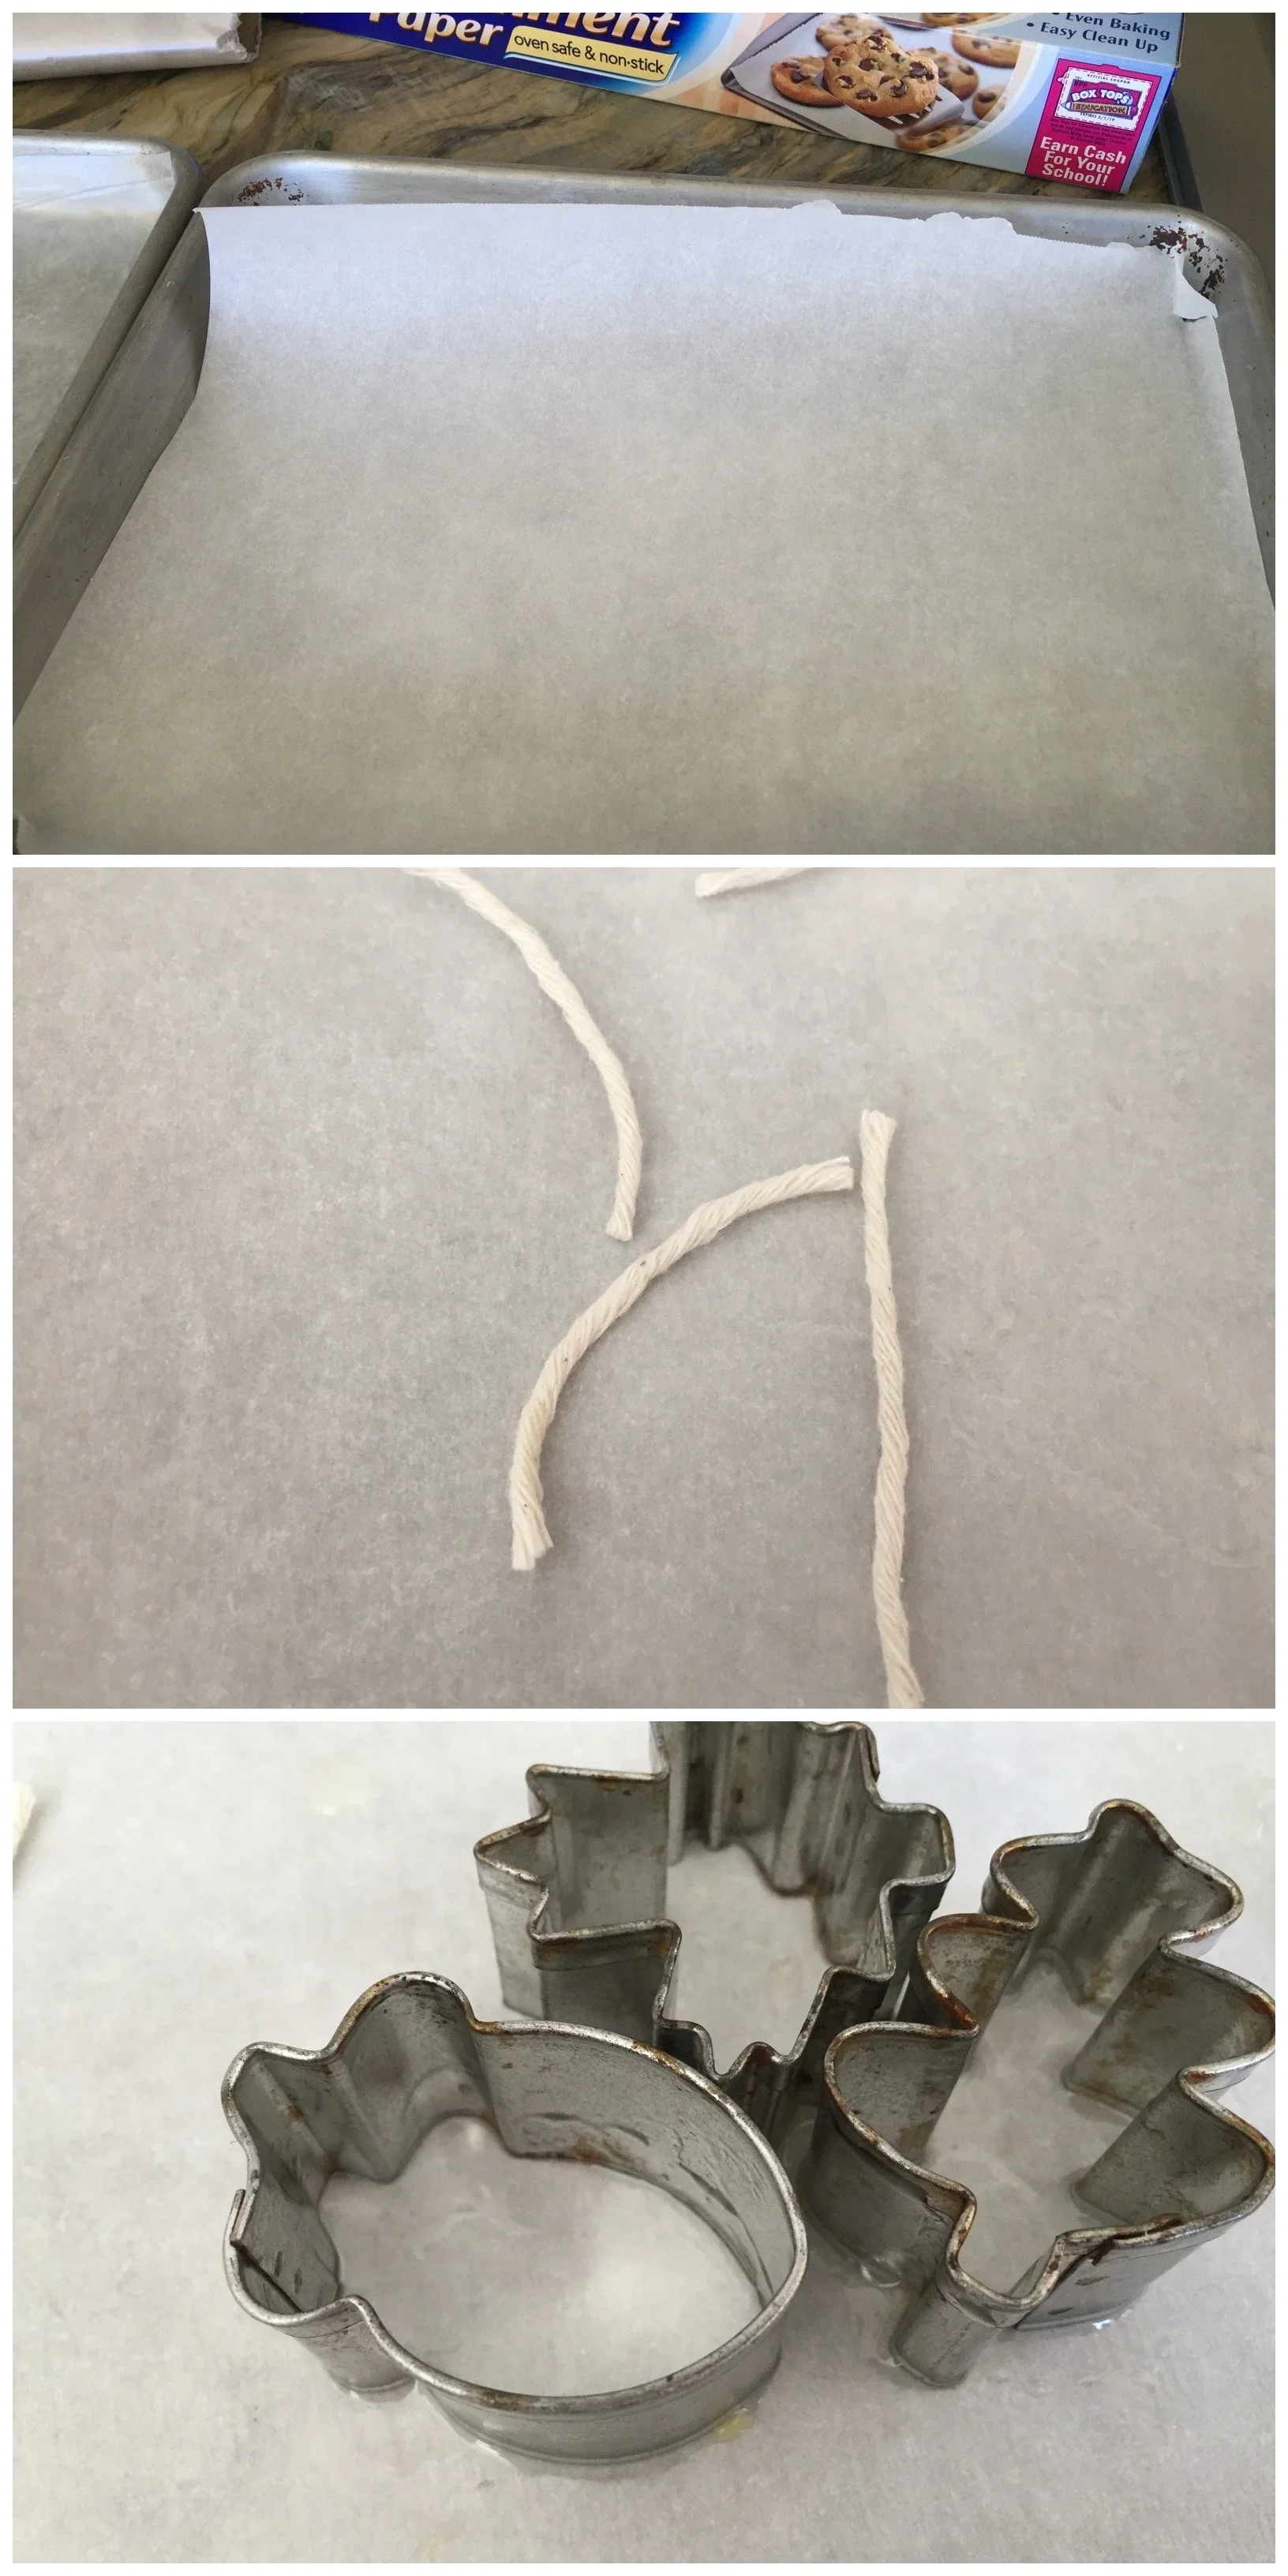
How To Make Candles
This is probably my favorite upcycling project yet! I’ve been saving the last bits of candle from our beeswax candles for a couple years waiting to make them into new candles. Recently, I found what I needed: A candle making pot! Even better, I found it for $4.50 instead of the $16.99 retail price (aren’t clearance sections exciting!?). Finally, I had everything I needed to make new candles. I tried three different kinds of candles, but one didn’t work. I tried to make thin honeycomb candle, but I couldn’t get the wax thin enough, and it just cracked when I tried to roll it. Next, I tried some leaf cookie cutter shapes to use a molds, and it worked! I was both surprised and impressed! I used baker’s twine as wicks and greased the inside of the molds with oil. These would have hardened on their own, but we put them in the freezer to speed along the process. They popped right out! There are perfect for fall and winter and add such a nice ambiance to our school room. We still had a lot of wax left over, so we filled a cleaned glass jar that was hexagonal shaped, appropriate for a beeswax candle 😉 Again I used baker’s twine as a wick and used a bamboo skewer to hang the wick in place. The problem was that a large crevasse formed in the center of the candle making it hazardous to burn as is and will need more wax to fill in the cavity. The beeswax retained its light waxy honey scent which may be an acquired aroma, but we love it!
Materials: Wax, candle making pot, baker’s twine for wick, scissors, jars or molds, parchment or wax paper.
Duration: 45 minutes
Cost: up to $30 (we spent $4.50 for our candle making pot and used left over candles, so our cost was considerable less).
Age: with adult help, ages 5 and up


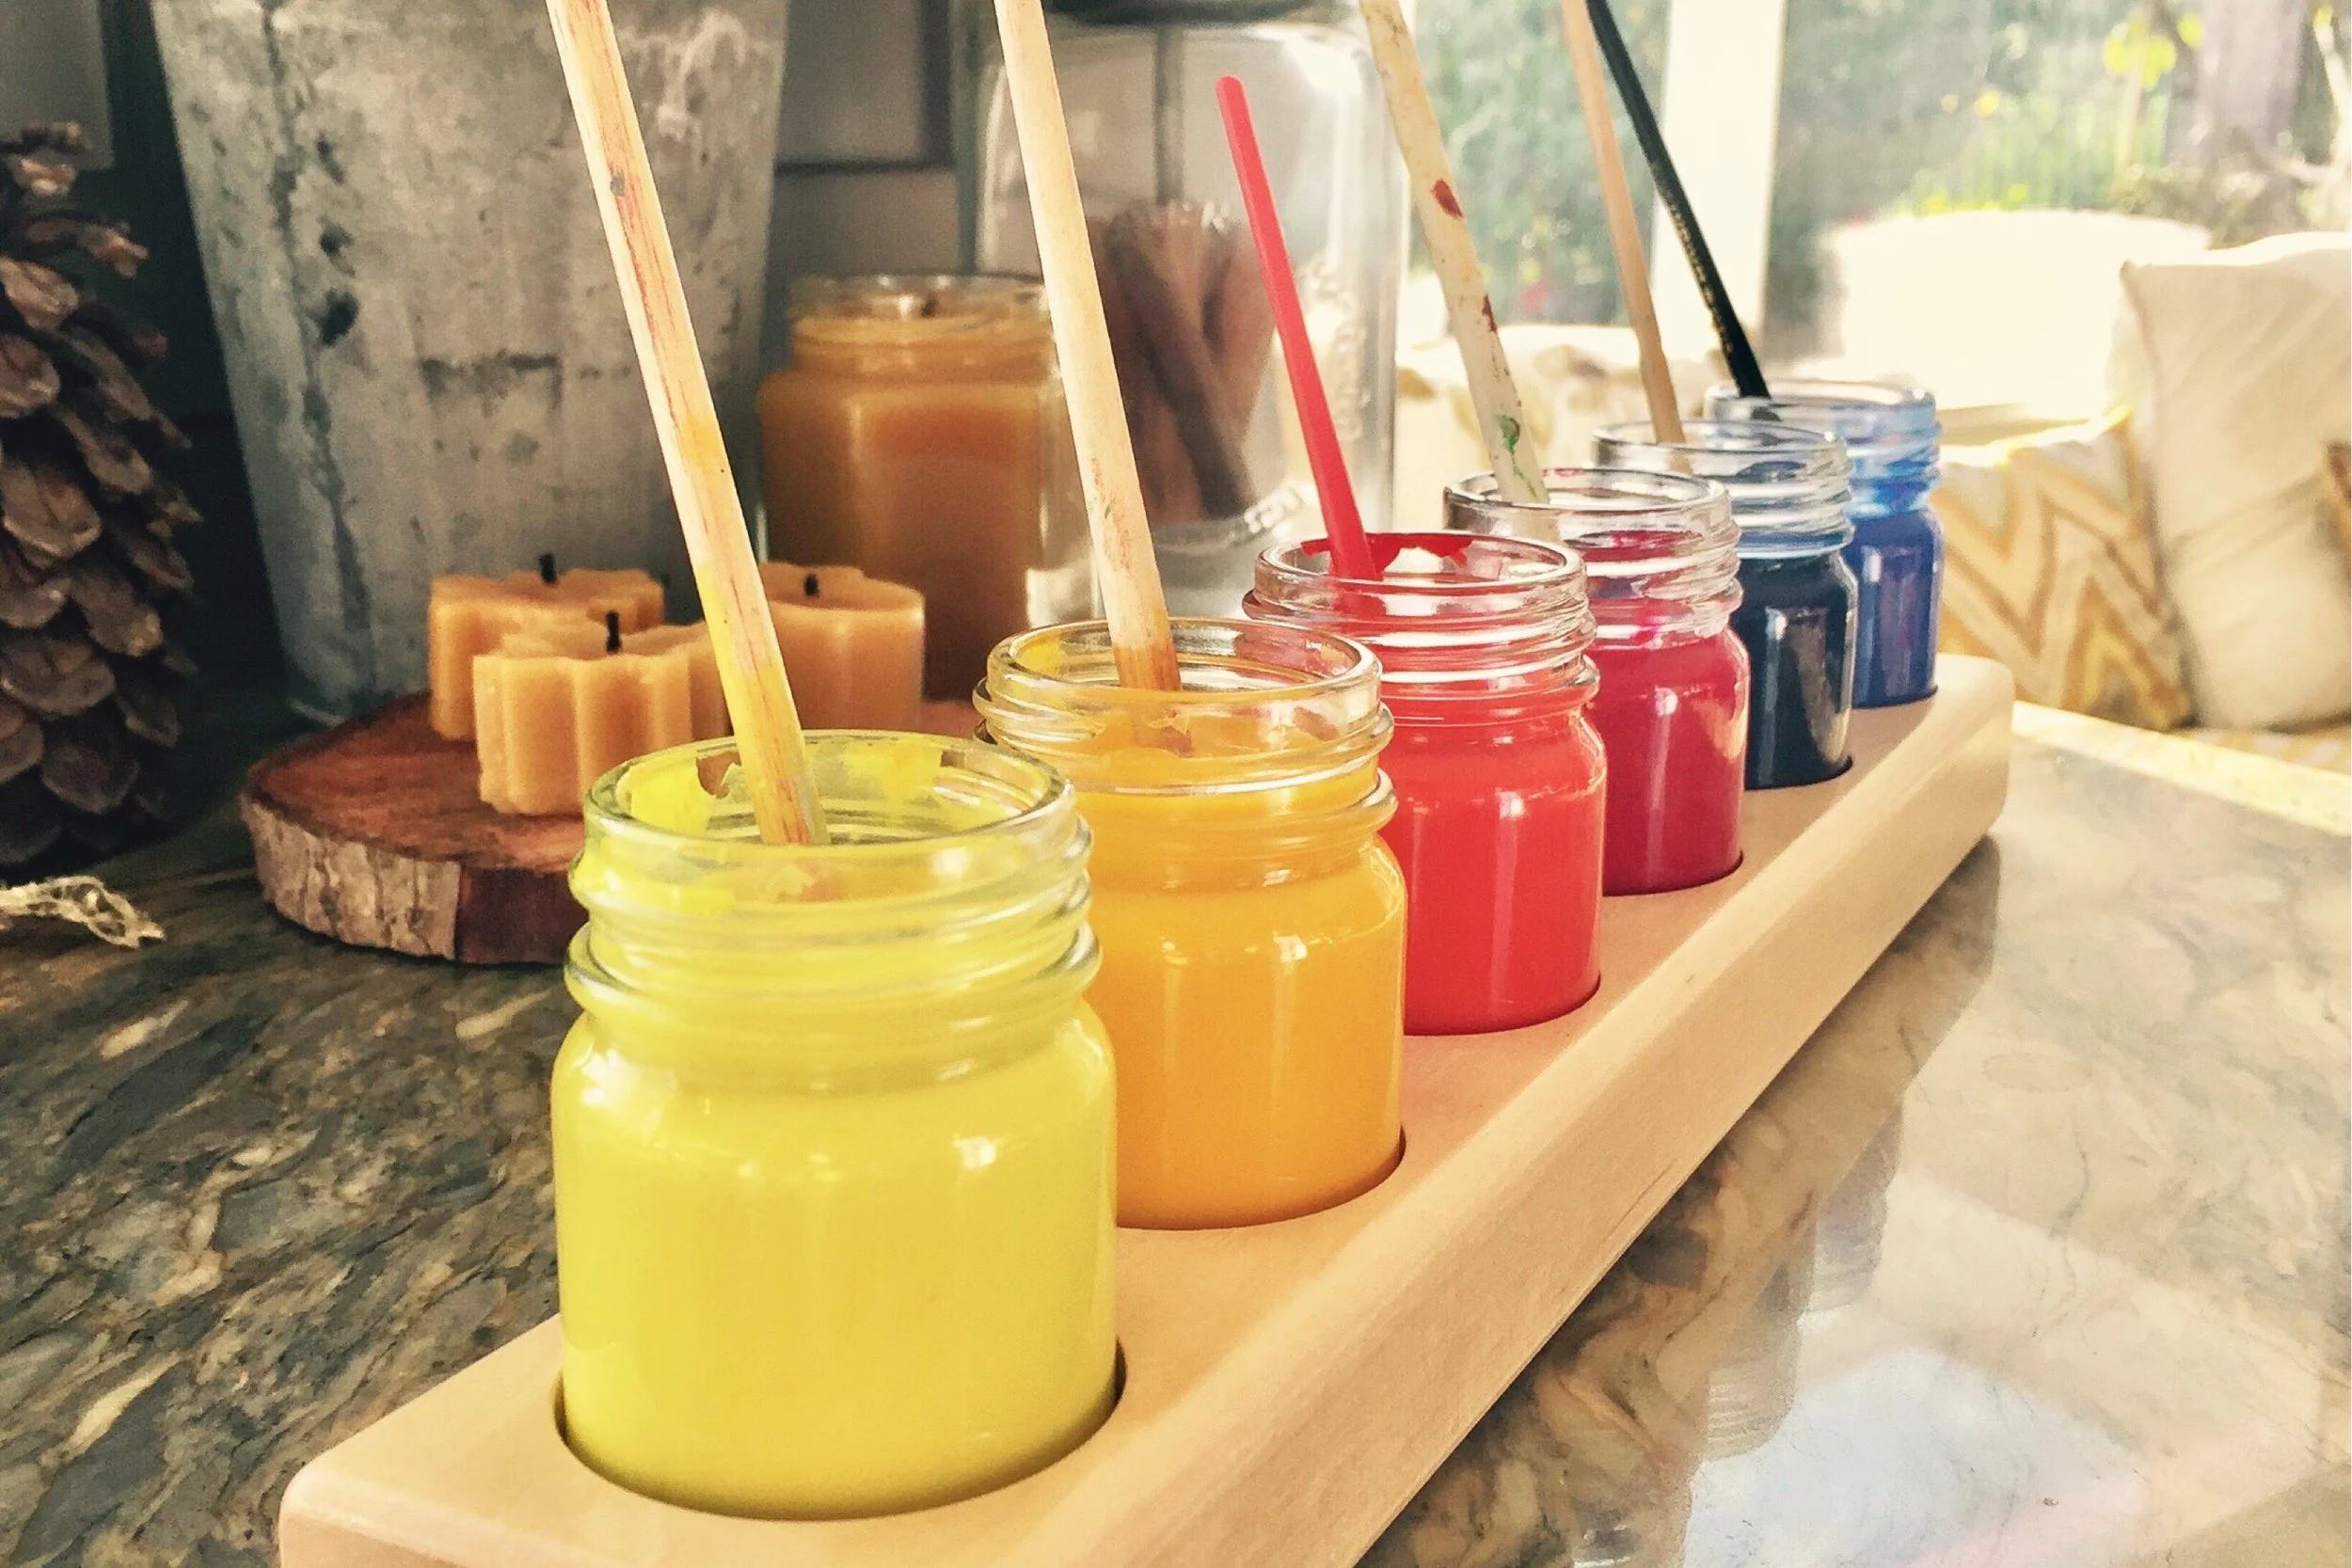
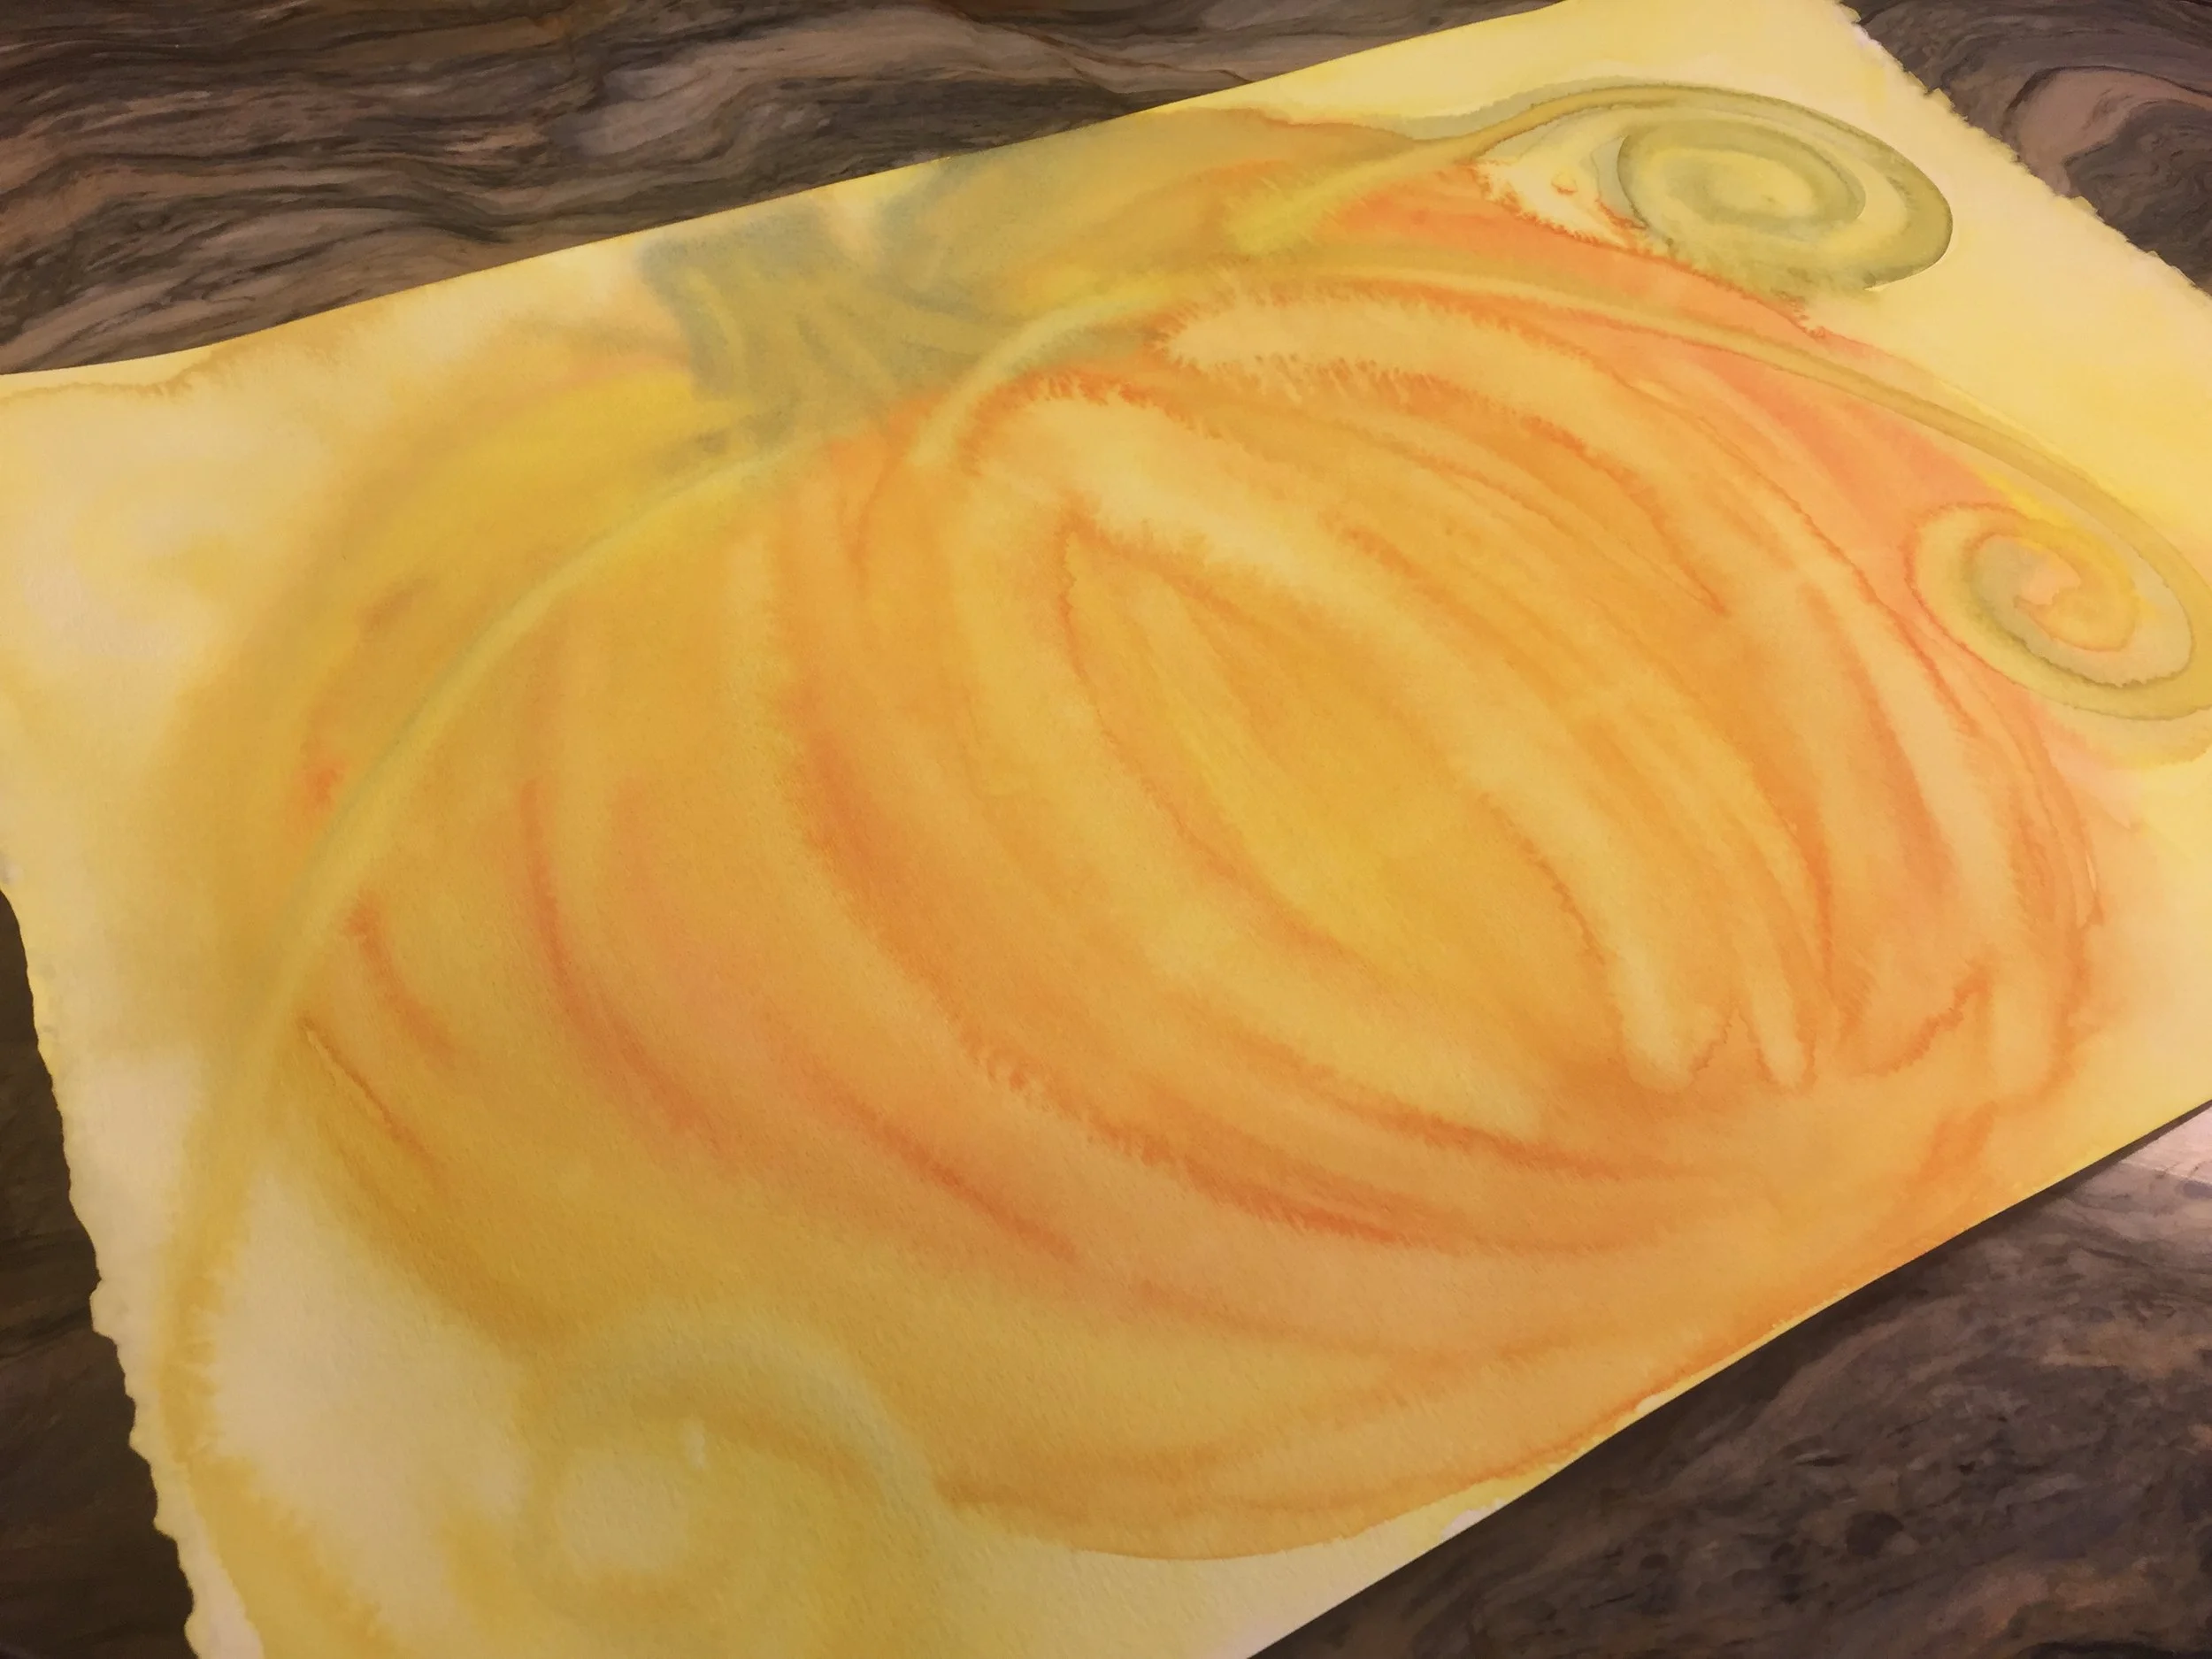
Watercoloring Pumpkins
Have you ever limited your paint pallet to just yellow, red and blue? Having the freedom to choose from a myriad of colors is thrilling, but equally thrilling is being able to make a variety of colors with just the three primary ones.
Today’s project is making pumpkins using just three colors: yellow, red and blue. We begin by painting the whole paper yellow. This is a good opportunity to tell a story about the bright sun and how grateful the pumpkin seedling was for the warmth and sunshine. Next you add some watered down red to the yellow to make the pumpkin. A blazing sunset might represent the red, or the special transformation that occurred to the pumpkin when it grew from a flower into a pumpkin. Next add the blue to the yellow surrounding the pumpkin to make your leaf finishing off with a bit of red and blue to make the stem.
My kids and I loved this project and now our paintings (mine included) are hanging in our school room.
You can find the Stockmar paints and watercolor holder with jars at A Child’s Dream. Paint brushes and watercolor paper are from Waldorf Supplies.
Find me on Instagram where I post our projects almost daily!
October 2016


Mini Peg Doll Tutorial
If peg dolls weren’t cute enough, they go and make these tiny bunting babies! They are adorable no matter how you make them. This set if for our nature table in our homeschool room. They were easy to make and are perfect for using up scraps. You can find the bunting baby peg dolls at A Child’s Dream. For this project, I used Lyra watercolor paints, and the gorgeous fall Holland Felt pack.
You can check out our other fall activities here.
Wet Felting Tutorial for Beginners
Pumpkin
I admit when I bought this kit, I thought it was a needle felting pumpkin kit. But you can't imagine my joy when, after a moment of confusion, I realized it was a wet felting kit! I haven't done wet felting in years, and I'm excited to get back into it. This kit, by Rainbow River Designs, comes with everything you need to get 2-3 pumpkins, except a ball and warm soapy water. Don't add too much soap, it foams up fast and gets very bubbly. You can find this kit at the Rainbow River Designs' Etsy shop as well as A Child's Dream.
sadly, this kit is no longer available at A Child’s Dream or the Etsy Shop, however, the raw materials are available from A Child’s Dream.
Kindergarten Craft
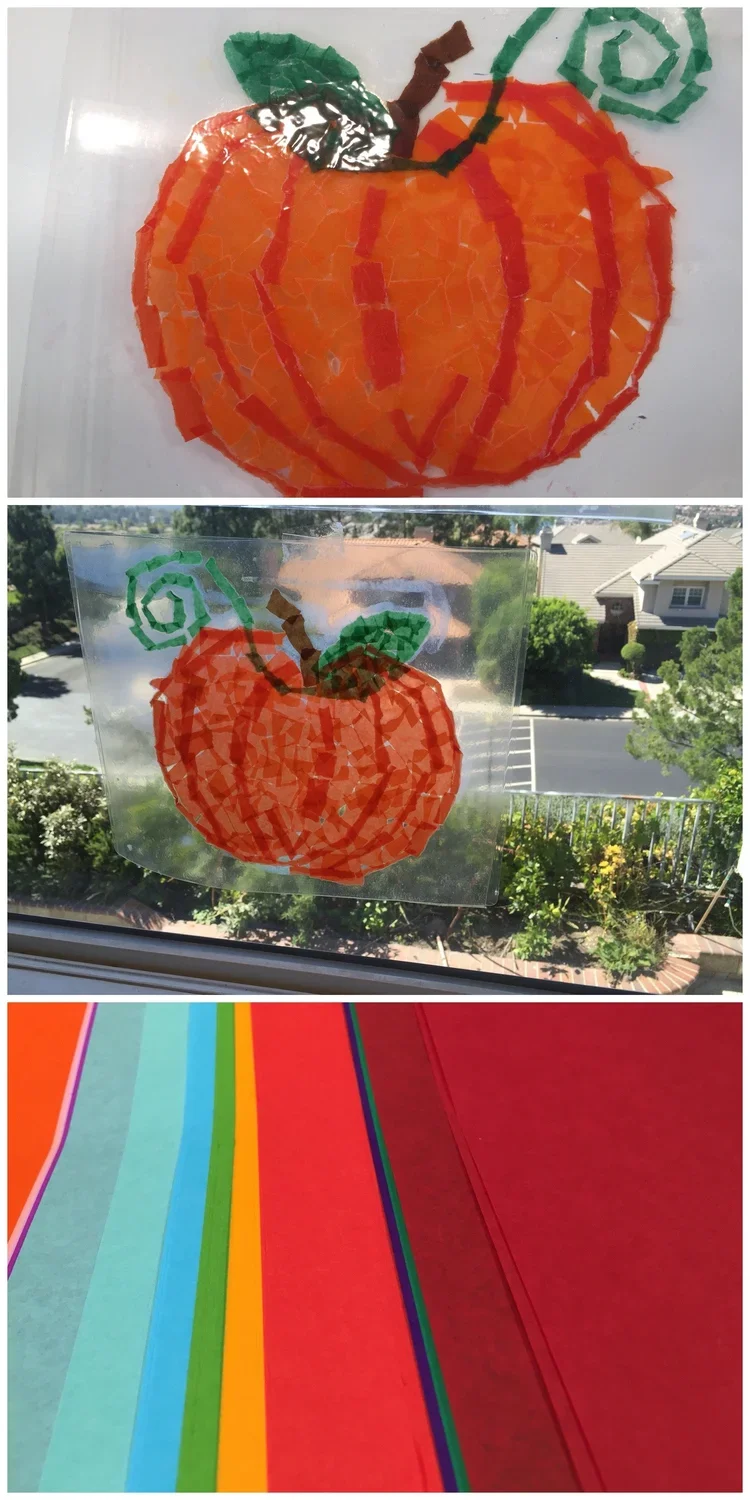
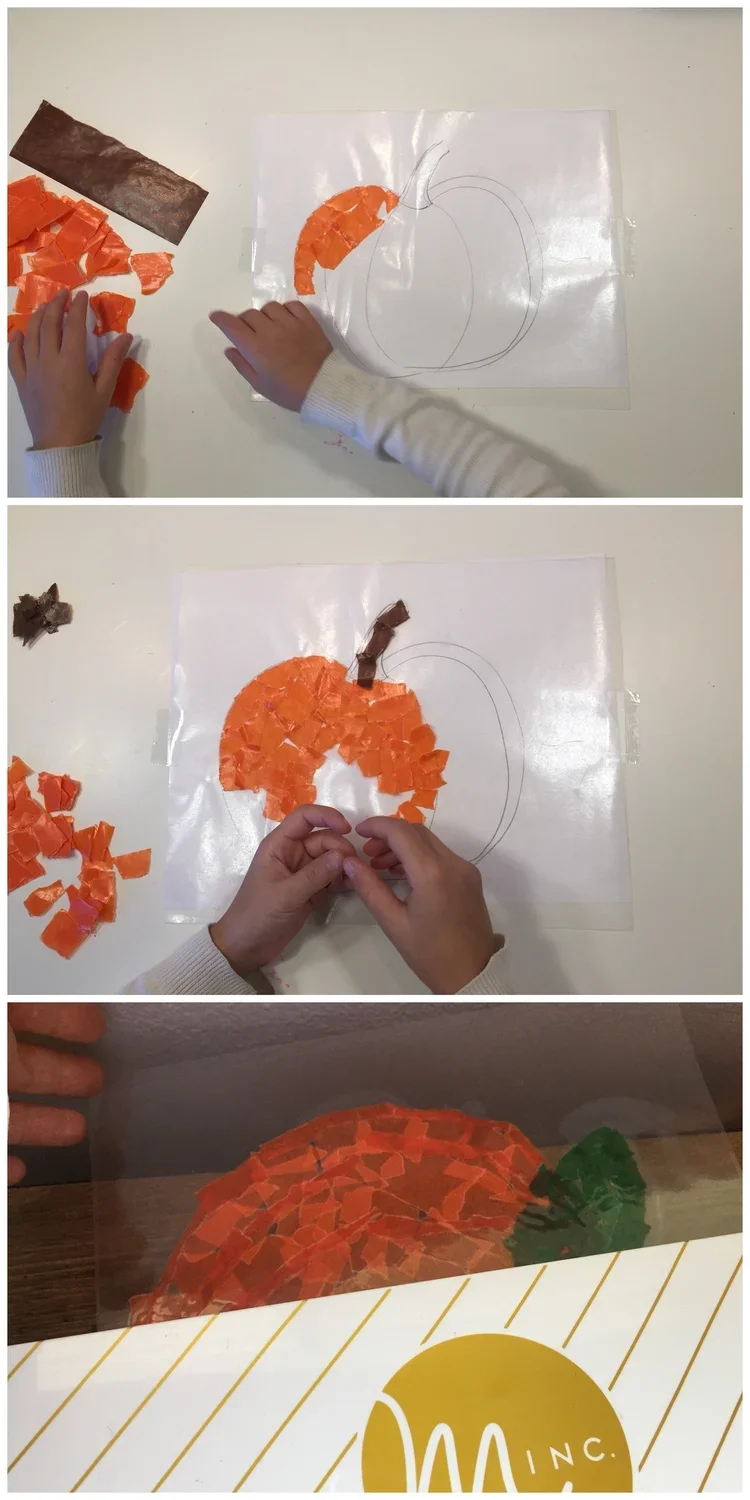
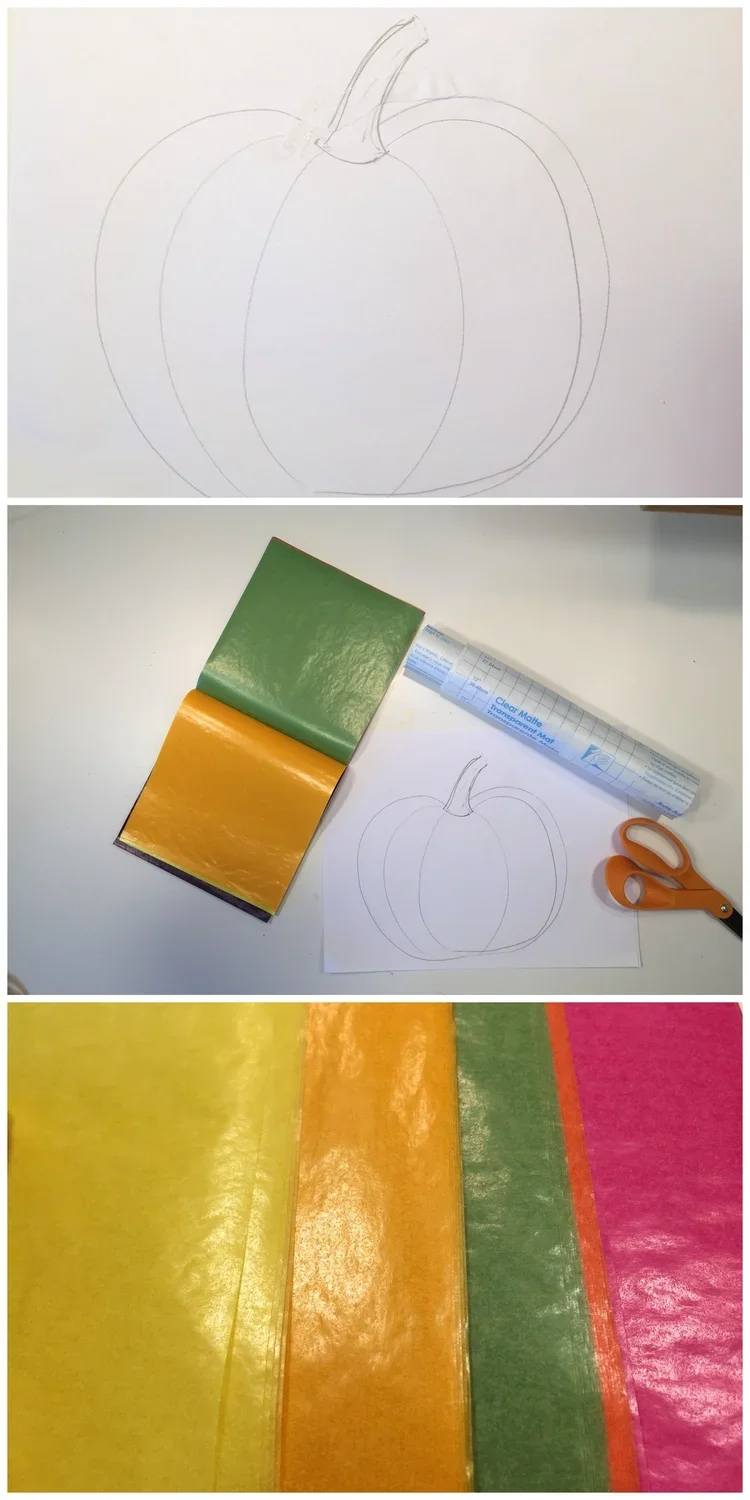
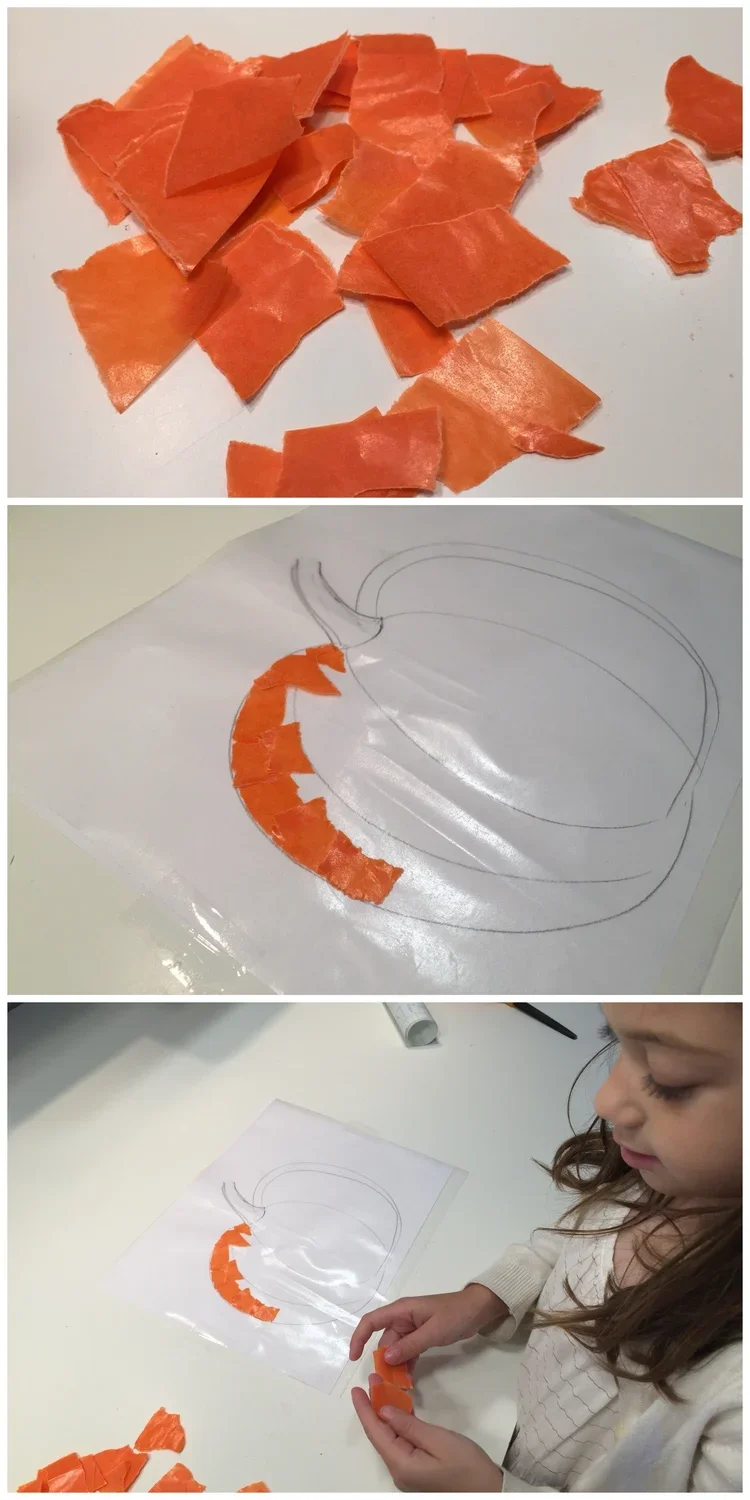
Pumpkin
Making decorative window art is fun and beautiful. These laminated translucent pumpkins can be reused each year. This is a great project for kids four years and up. If you aren’t doing this project in the fall, you can print out a simple image of a tree or flower. I find that pencil drawings or silhouettes work best for this project.
We used kite paper from A Child’s Dream, but you could use tissue paper, or alcohol inks on transparency paper.
Materials: Template (hand drawn or printed out), tissue paper or kite paper, Con-Tact paper, laminating sheets (and laminator), scissors and tape.
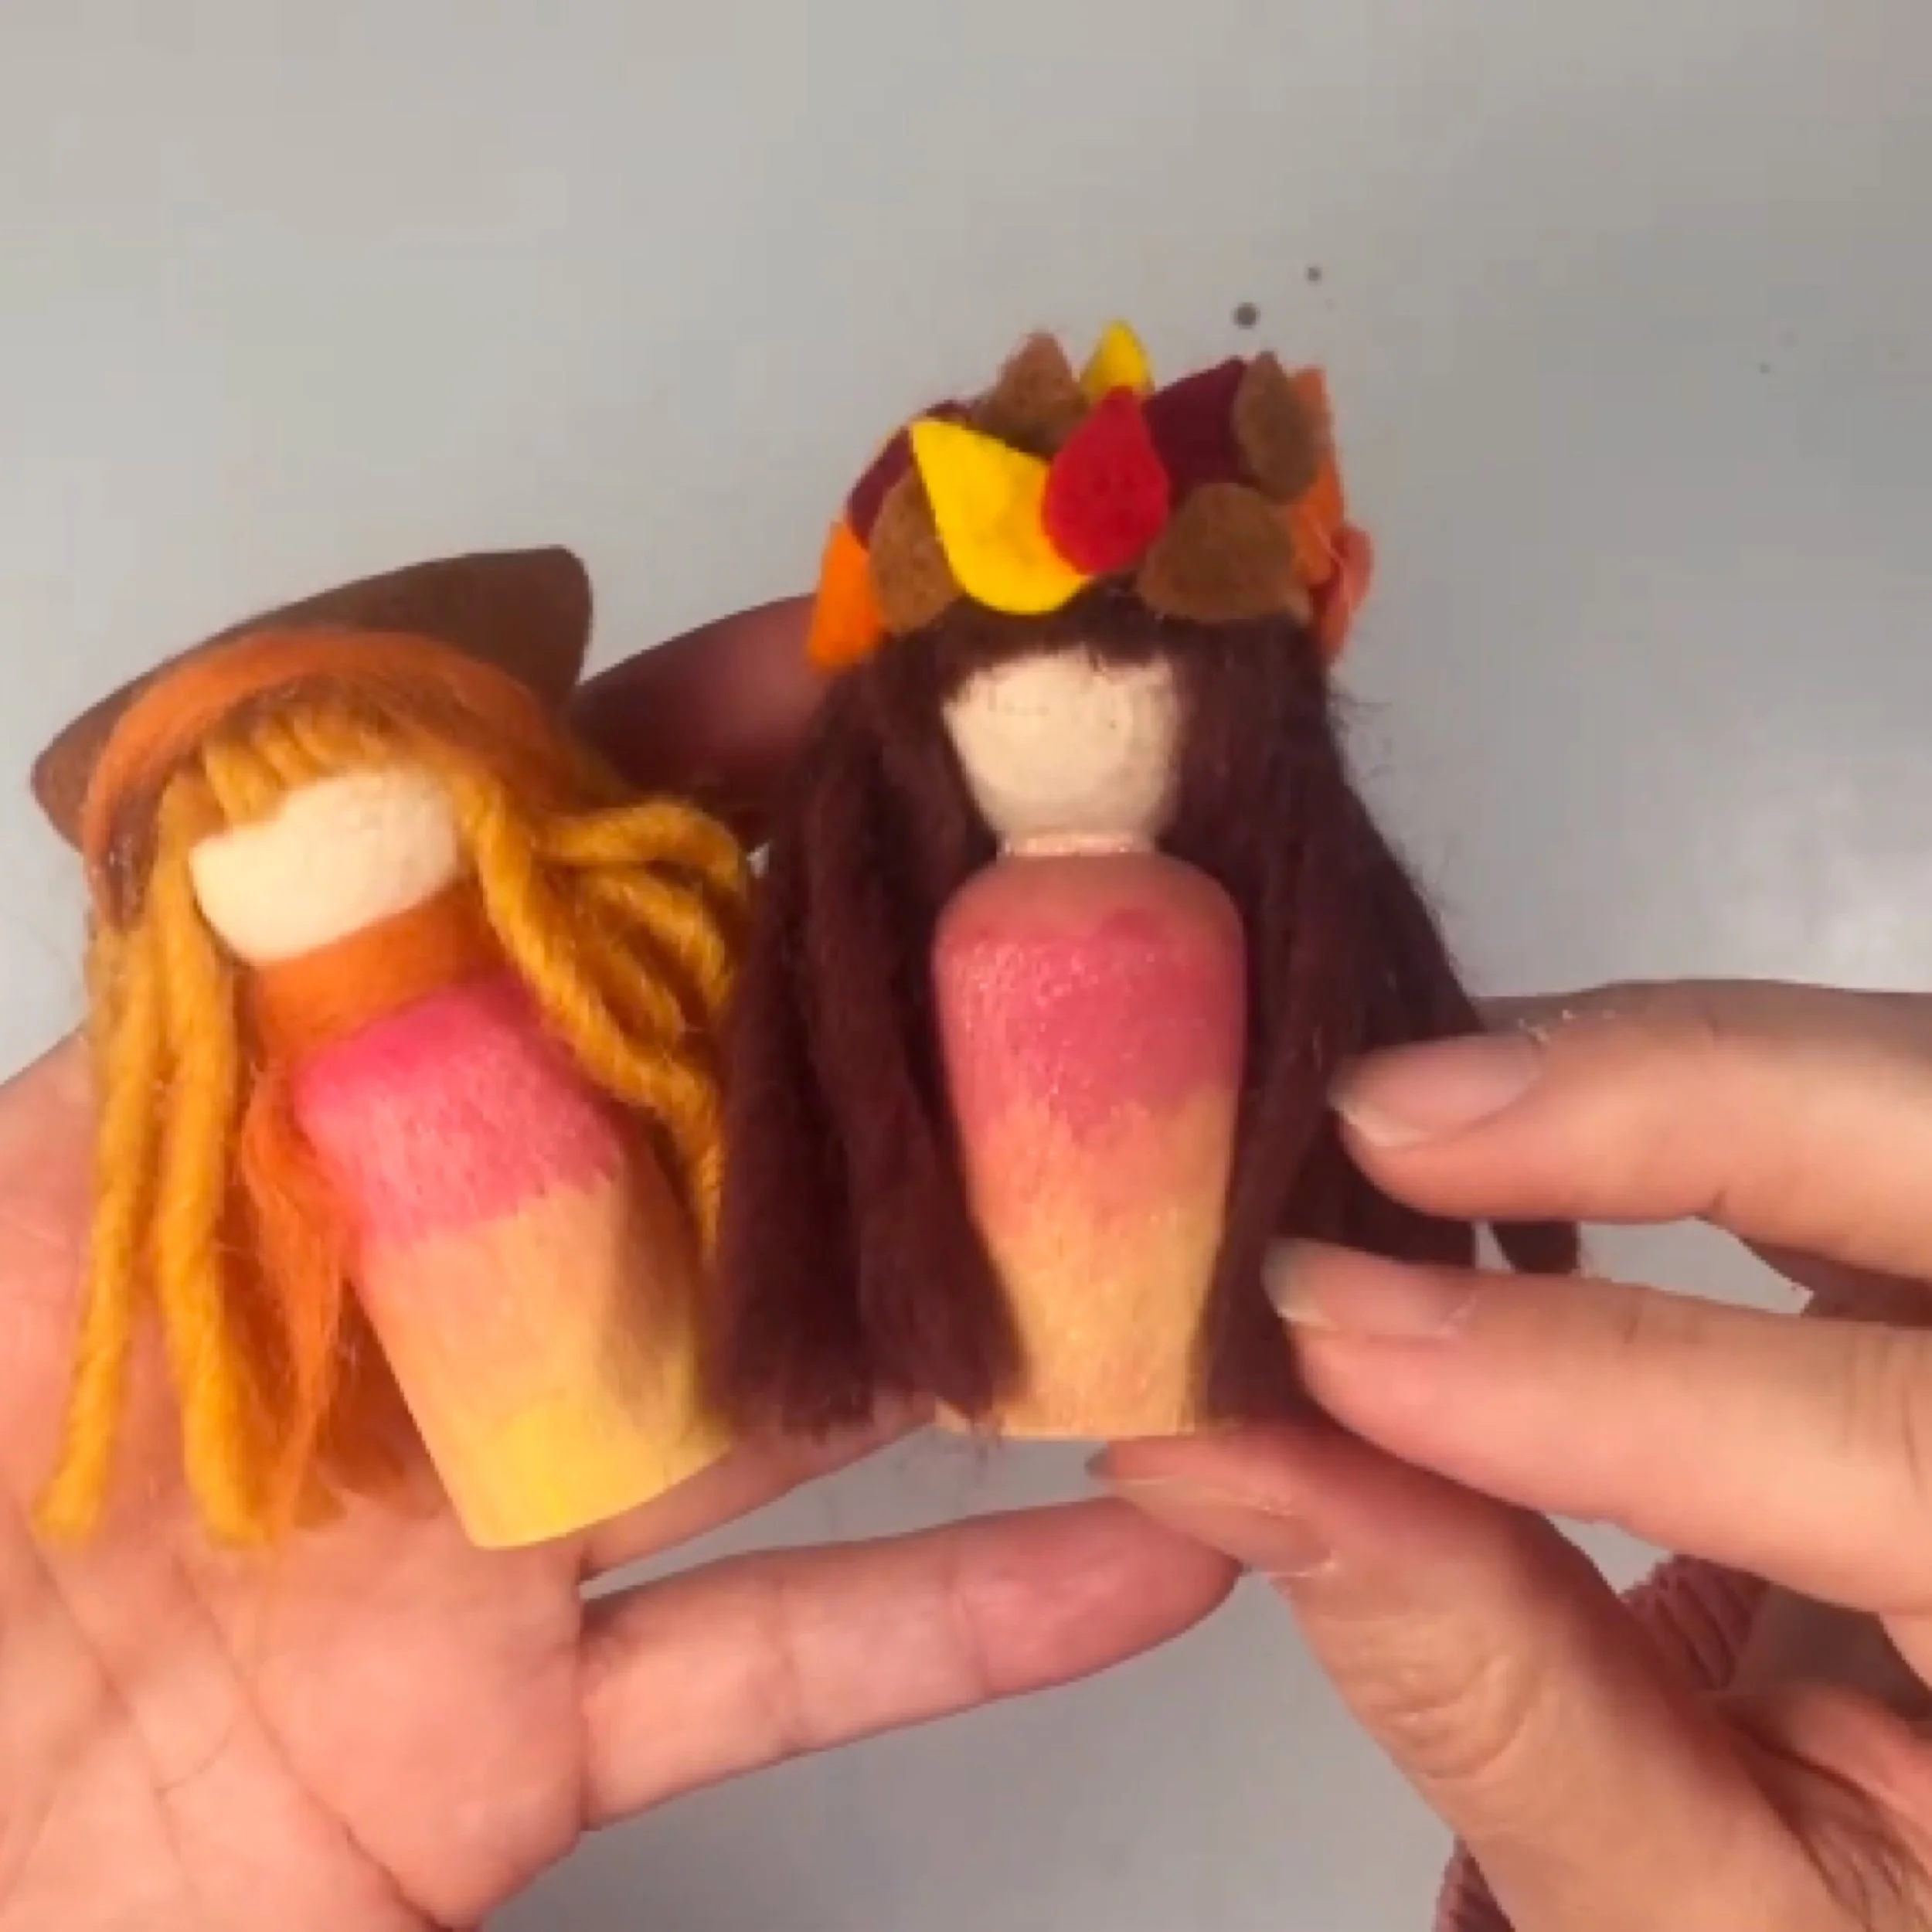
Fall Inspired Peg Dolls
It's official, it's no longer pumpkin season, it's peg doll season! We've made more peg dolls in the past month than all the peg dolls we've ever made combined. We're on a roll. And now we are adding themed ones to our nature table and having a blast doing it. All the materials are from A Child's Dream. I used the large peg dolls, Lyra paint, Lamb's Pride wool yarn, and Holland Felt. The shimmer was not from A Child's Dream. It's called Perfect Pearls.
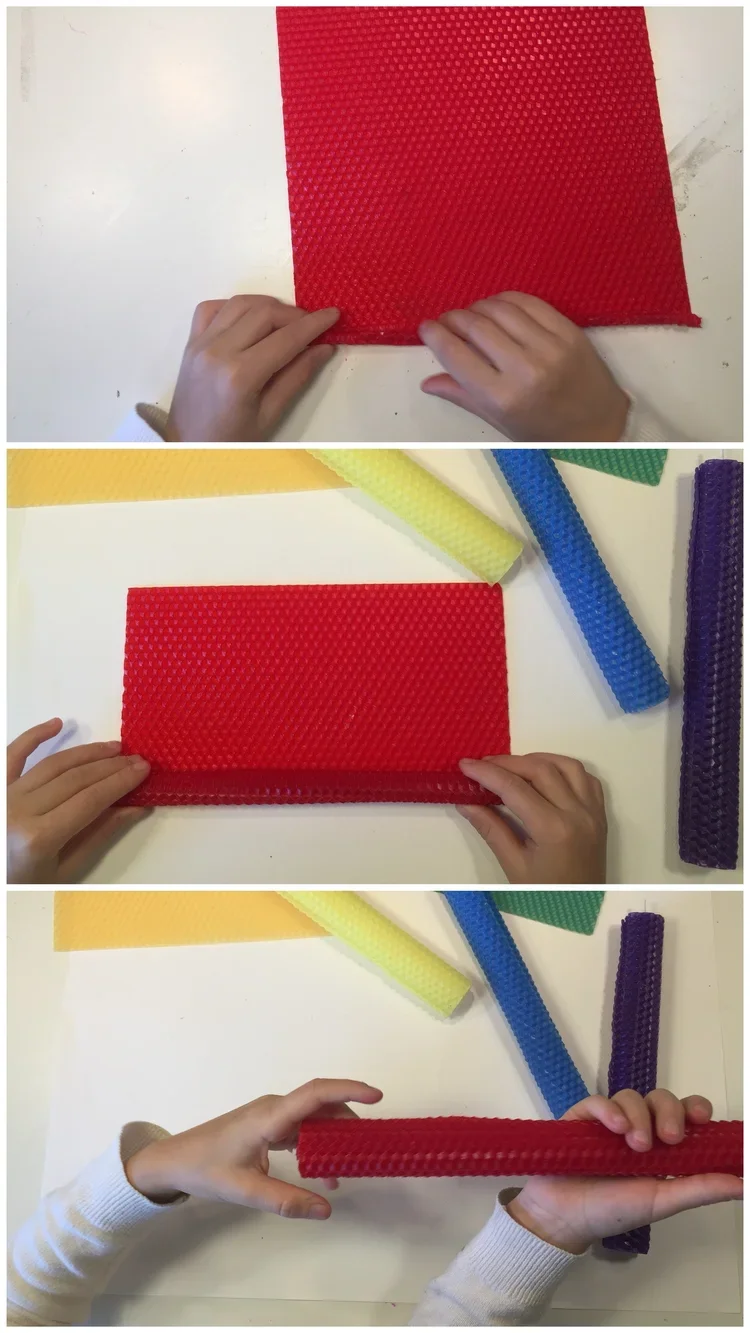
Honeycomb Candle Rolling Kit
This was the best activity we did during Kindergarten Week. My five-year-old daughter loved this project in part because she could do it all on her own! I showed my kids how to roll one, then they rolled the other five. We liked it so much, this project will certainly be added the next time we do Kindergarten Week. Kindergarten Week is a week I set aside from our normal homeschool schedule to focus on kindergarten crafts and activities. My 5th grader participated as well, and occasionally my 9th grader did too!
We rolled these beeswax candles from A Child’s Dream
These candles are best rolled on a warm day. If the wax is too cold, it may crack as you roll it. To warm up wax, you can use a hairdryer or place it a slightly warm oven (150 degrees or less) for about 30 seconds or less. This wax melts very fast, so don’t step away!
Once you roll them, trim the wick to about 1/4″. They burn fast because they aren’t dense, so never leave burning candles unattended.
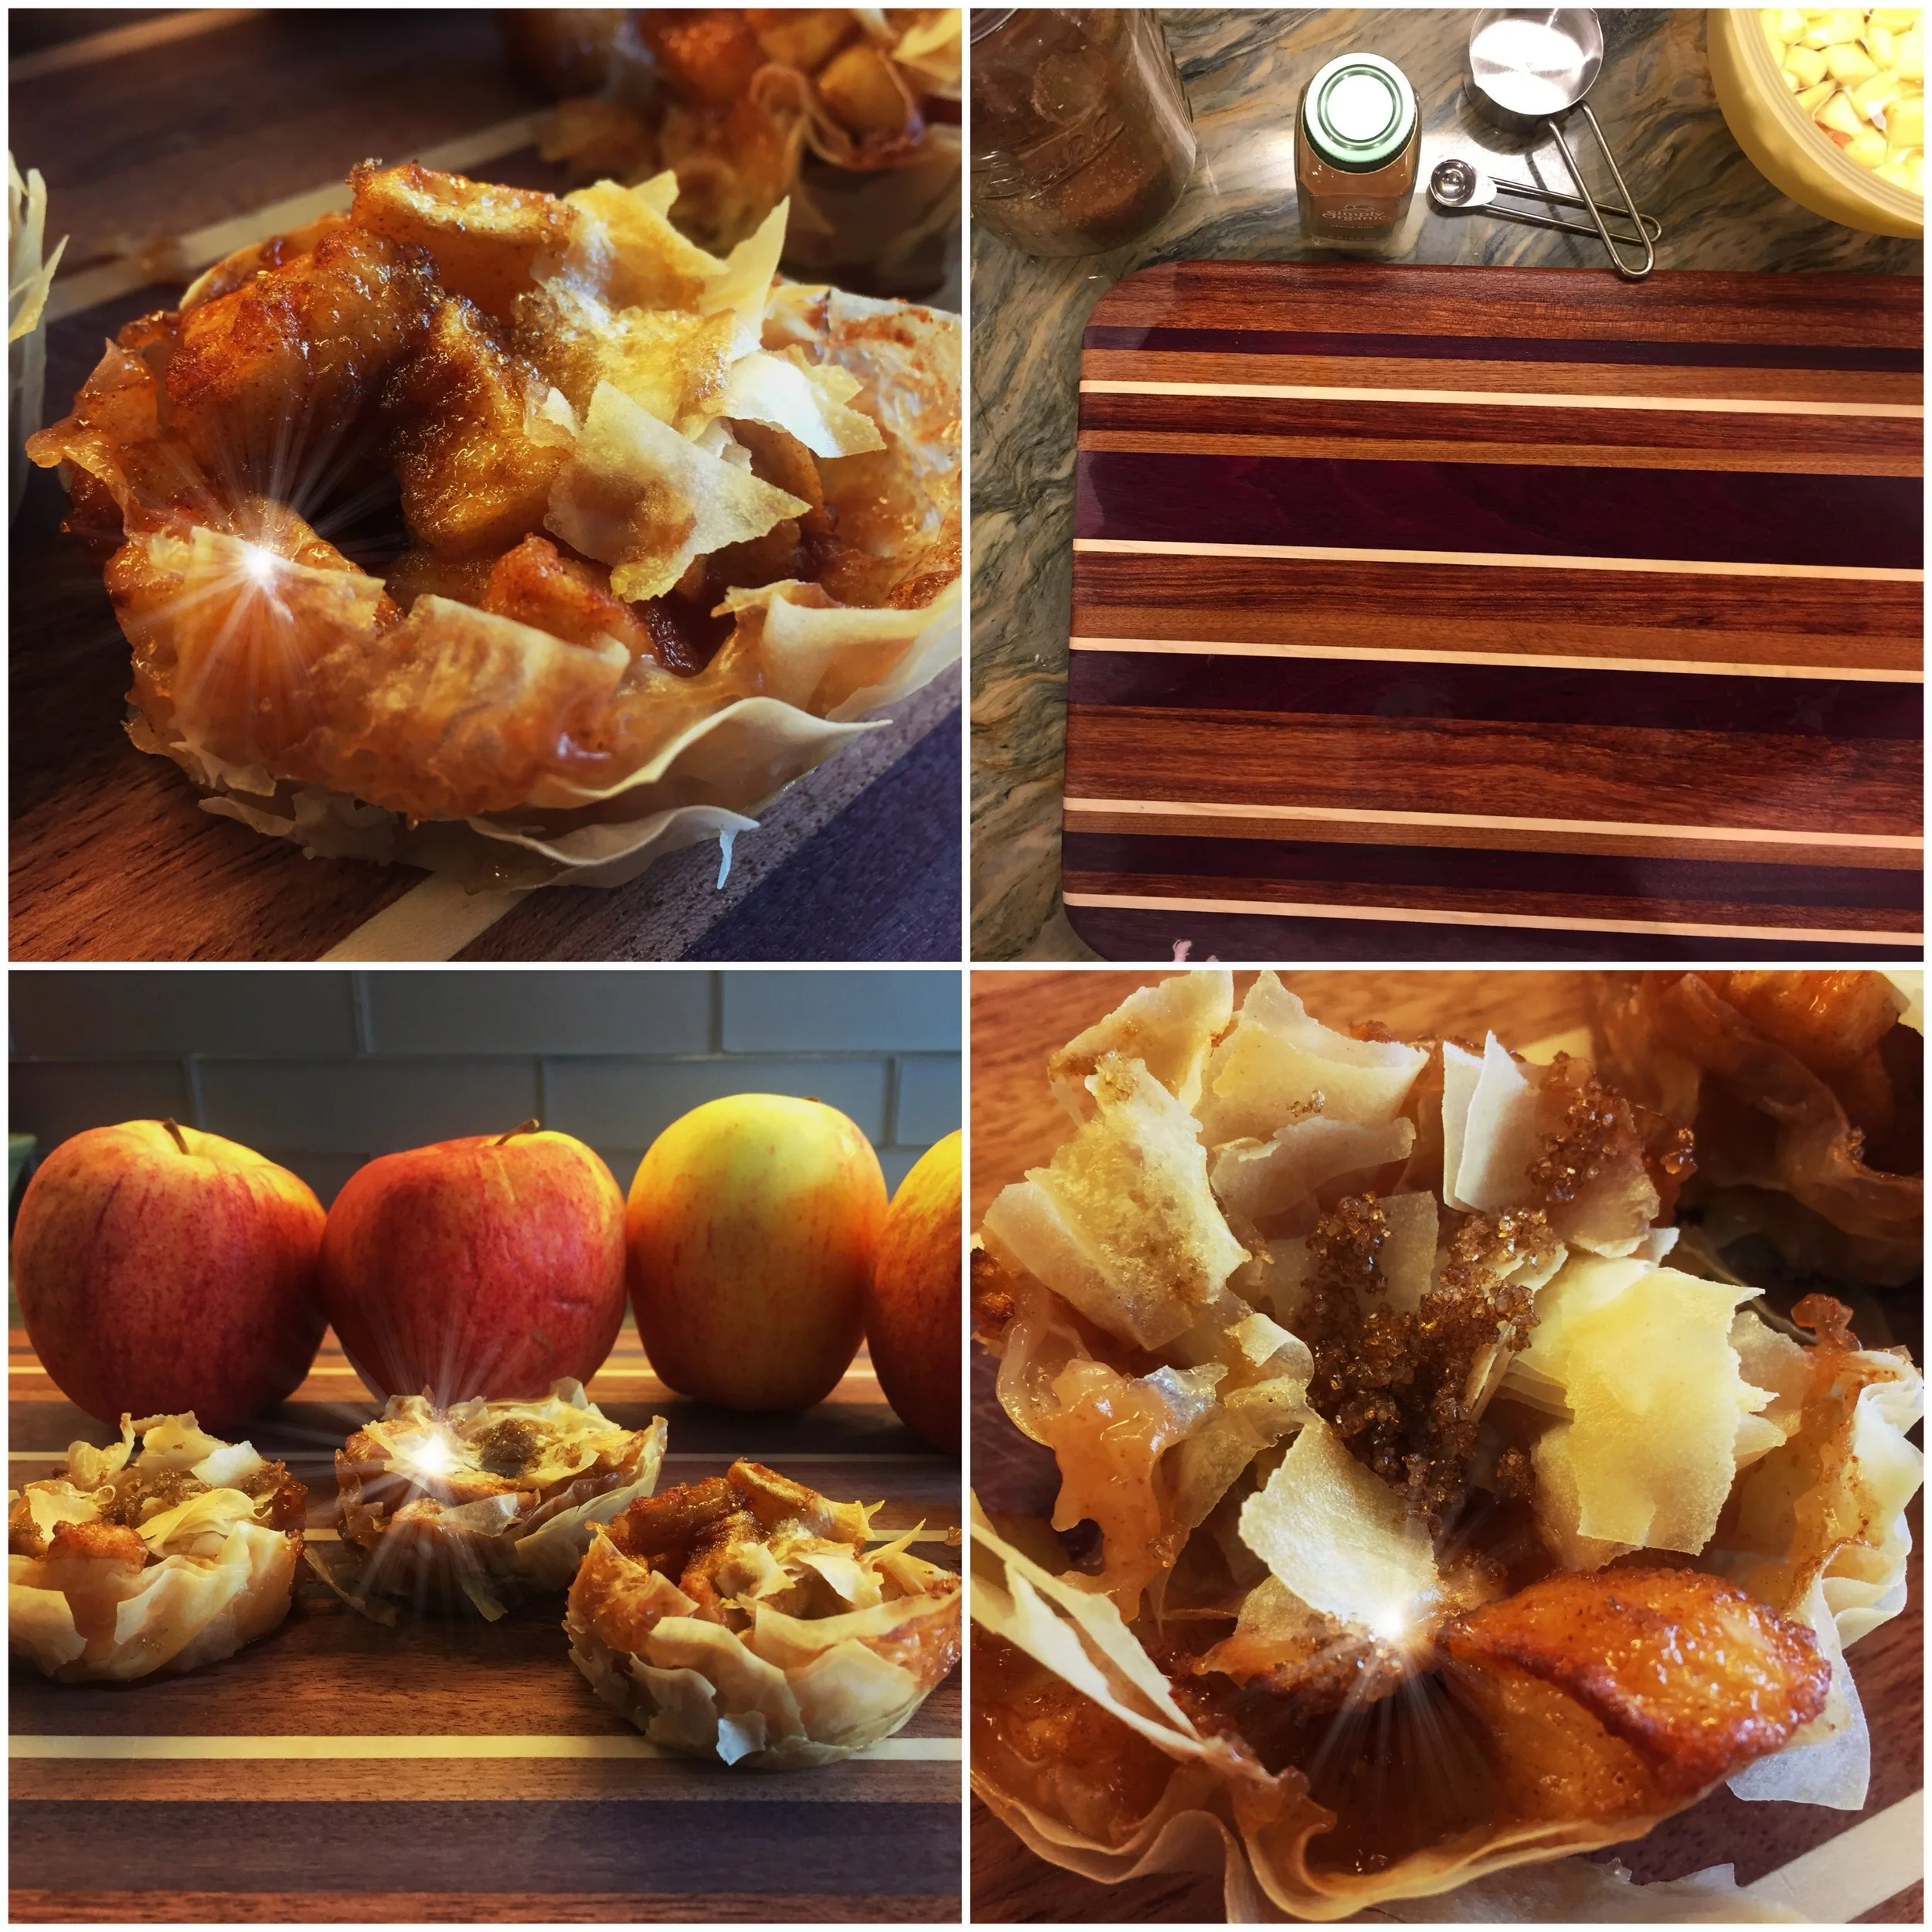
Apple Pie Tartlet Dessert
I had the best of intentions when I bought pound after pound of fresh gala apples at the start of apples season. I wanted to make all kinds of apple deliciousness. We did manage an apple pie and some caramel apples, but then our apples rested at the bottom of the crisper for literally months….
Finally I remembered to add phyllo dough to our shopping list…then another long pause. Finally, and I’m not sure how, but we decided to make these delicious charming apple tartlets. Maybe I was needing to clean out the refrigerator, or maybe the apples were getting too soft, or maybe it was shopping day and I needed room. No one remembers, and no one cares, but these desserts were awesome! And…EASY!! Plus they’d make a stunning addition to your dessert table. Or, you could make them when the kids get home from school. Or, you could make them just to have your home smell of cinnamon and apples. Who doesn’t love that!?
Recipe:
4-5 peeled and dices apples
Juice of one lemon
1/4 teaspoon of cinnamon
1/4 cup of brown sugar
1/2 teaspoon of vanilla
Phyllo dough and butter
Cupcake tin and circle cookie cutter
Directions: Preheat oven to 350 degrees F. Mix all ingredients together (except butter and phyllo dough). Set aside. Cut large round circles of phyllo dough using a cookie cutter (ours was the Martha Stewart biscuit cutters size 4 inches), and set about 4-5 sheets of phyllo over each cupcake spot. Spoon in a generous amount into the phyllo dough. It was mold into the cupcake tin. Put a pat of butter (1/4 teaspoon) on top of each and sprinkle with a bit of brown sugar. Bake at 350 degrees F for about 20 minutes. Let cool before taking them out of the cupcake tin.
Tip: If your phyllo dough doesn’t hold up well and falls apart when you remove these mini apples tartlets, try using more sheets of phyllo dough or make your ‘batter’ less moist.
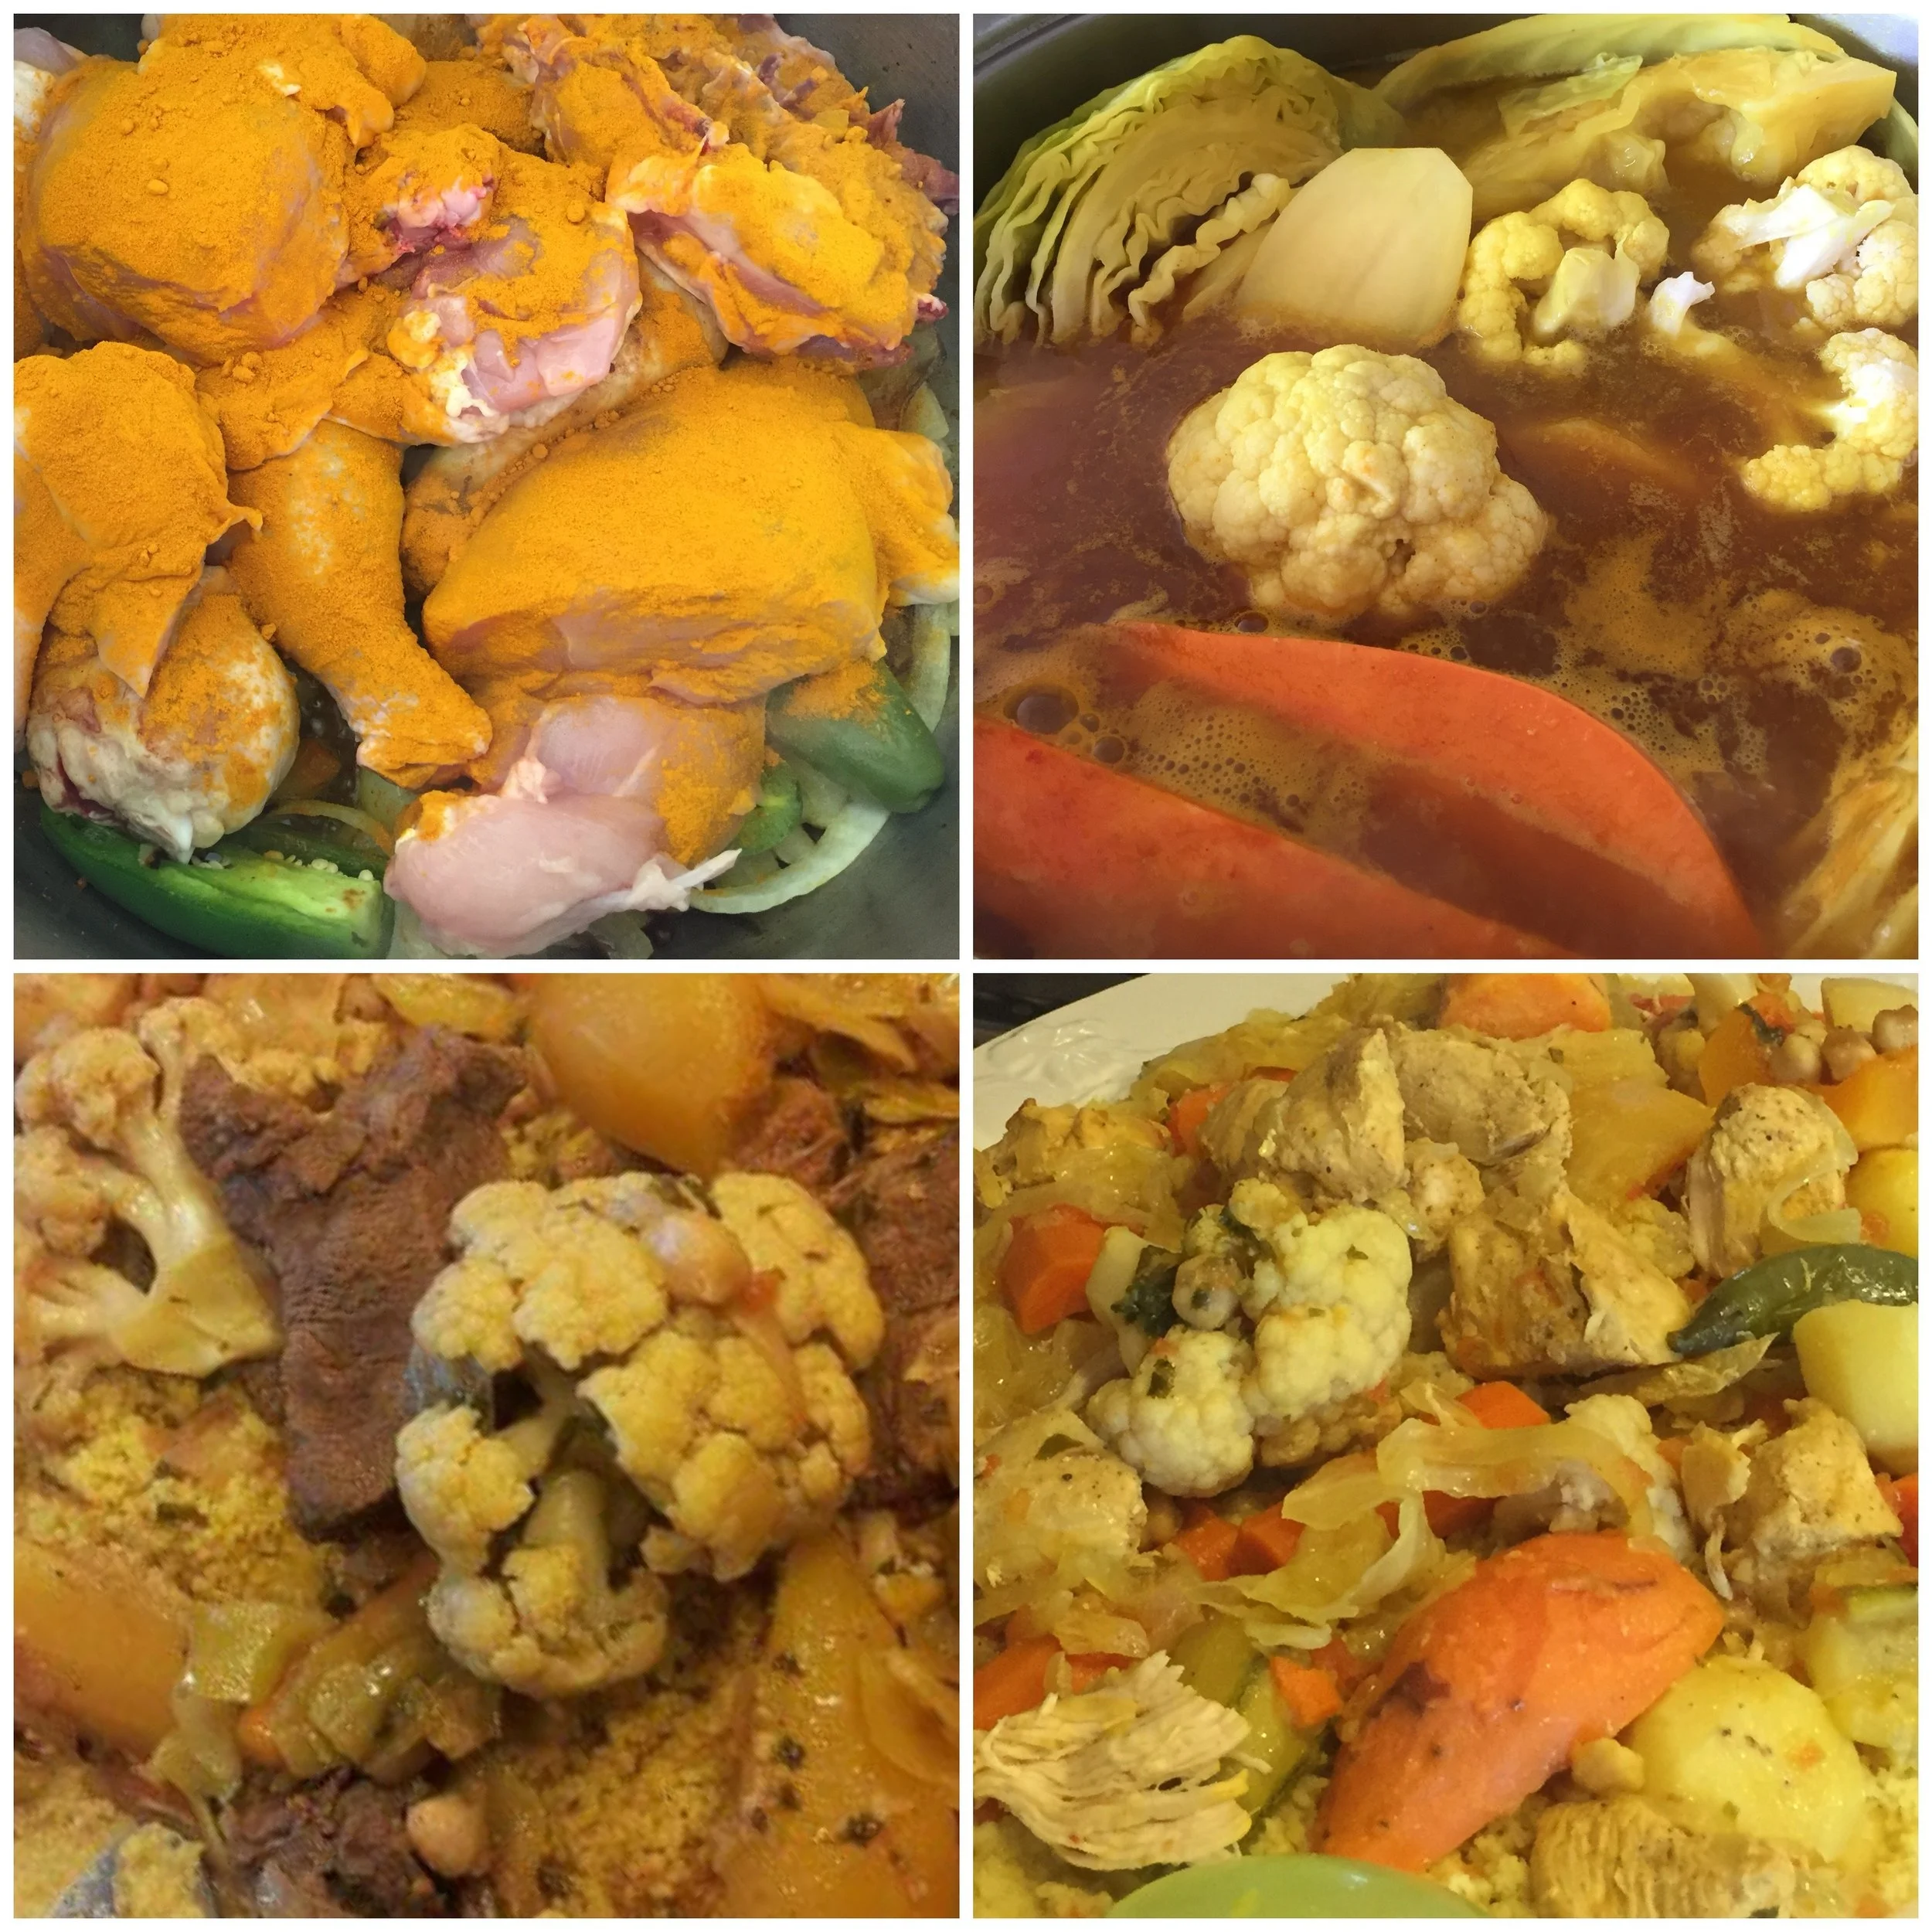
Moroccan Couscous
This is my favorite fall recipe of all time! It’s so warming, nourishing and healthy; it’s perfect for cool autumn days or for a cozy dinner with friends. I have my dear friend Laura and her husband to thank for sharing this recipe for me. Though the following recipe is altered from the traditional way Noureddine made his, it still turns out pretty good, but nothing compared to the original! I’d like to point out a couple differences between my version and his: firstly, I repeatedly forget to add cilantro to my recipe, but that is in the original one. Secondly, and more importantly, I make mine more like a soup or stew, whereas the original recipe calls for very little to no water. The vegetables steams as the meat and onions cook, and while releasing their own water, the vegetables then add to the liquid and then in turn add to the steam to finish cooking the rest of the vegetables.
This recipe is naturally dairy free and to make it vegan, simply omit the meat from this recipe. It’s so flavorful as it is, you won’t even miss the meat! To bulk up the protein, I’d recommend adding more garbanzo beans.
The complete is as follows and does differ from the one in the video. Please keep in mind that this is a very forgiving recipe and anything goes! To make the couscous base of this meal, simply follow the directions on the box of couscous. It’s super simple to make.
I love my peeler! Though I accidentally mentioned it was by Martha Stewart, it’s actually by Chef’n and can be found at Bloomingdale’s.
Moroccan Couscous-Chicken
Special thank you to Laura and Noureddine for this recipe 🙂
Ingredients:
1 chicken (whole with skin on or cut into 10 pieces-no skin)
2 onions-sliced
2 jalapeños
1 head of garlic-minced
Ginger (equal to garlic) – minced
1 small can of tomato sauce (8 oz.)
1 butternut squash-peeled and quartered
1 bag of carrots (about 6-8)-peeled
3-4 potatoes-peeled and cut in half long ways
2-3 sweet potatoes or yams-peeled and cut in half
1 acorn squash- peeled and cut in half long ways
1 head of cauliflower-washed and quartered
½ head of green cabbage-washed and quartered into wedges
1 can of garbanzo beans
1-2 boxes of couscous, follow directions of package
Spices: salt, pepper, cumin, turmeric, cayenne pepper
Optional: add other fall vegetables that are in season like squashes and root vegetables
Directions:
If cooking a whole chicken, wash and place it on a baking pan, season lightly with black pepper and salt and bake on 450-500 degrees for 10-15 minutes uncovered until the skin is dark golden brown and crackling. Reduced to 400 degrees, poke the skin of the chicken where the thigh and breast meet to let the juices run, and cover the chicken. Cook for another 45-60 minutes until the chicken is done, but not over cooked.
If cooking chicken pieces begin by browning an onion over medium heat, add the jalapeno at this time, trimming off the top if you want it spicier. As the chicken will cook quickly, just brown the chicken pieces before covering with water and bringing the water to a hot simmer. You may choose to heat water earlier in a separate pan, and add it to the chicken hot.
Add garlic, ginger, salt, pepper, a pinch of cayenne pepper, turmeric and cumin, and tomato sauce. Layer in the vegetables starting with the ones that take the longest to cook. I start with the dense squashes and carrots, then add to root vegetables and finish with cabbage and cauliflower on top. Lastly, add the garbanzo beans. Avoid mixing as this breaks up the vegetables, only lightly mix if necessary. I like my couscous soupy so I tend to add quite a bit of water, enough to nearly cover the vegetables. Though this is not traditional, it has become a family tradition and allows extra liquid for making the couscous.
When the vegetables are all tender, turn off the heat and prepare the couscous. Follow the direction of the package.
Presenting the dish is as important as cooking it. In a large shallow serving dish, add a thick layer of couscous, evenly spread the couscous around. Next add the vegetables and chicken pieces, or lay the whole chicken on the bed of couscous and then assort the vegetables around the chicken. Using a strainer, add soup to a bowl to add separately to each plate.
Hana’s Tip: Instead of using water to make the couscous, substitute couscous broth for water for a richer, tastier couscous.
Moroccan Couscous-beef
Ingredients:
2-3 lbs. beef stew cut into bit size chunks
2 onions-sliced
2 jalapeños
1 head of garlic-minced
Ginger (equal to garlic) – minced
1 small can of tomato sauce (8 oz.)
1 butternut squash-peeled and quartered
1 bag of carrots (about 6-8)-peeled
3-4 potatoes-peeled and cut in half long ways
2-3 sweet potatoes or yams-peeled and cut in half
1 acorn squash- peeled and cut in half long ways
1 head of cauliflower-washed and quartered
½ head of green cabbage-washed and quartered into wedges
1 can of garbanzo beans
1-2 boxes of couscous, follow directions of package
Optional: add other fall vegetables that are in season like squashes and root vegetables
Directions:
Over medium heat, brown an onion, take care not to burn the onion add the jalapeno at this time, trimming off the top if you want it spicier. Toss in meat and brown lightly. Cover with water and let simmer on medium heat until meat is nearly tender, this may take 2-3 hours, bear in mind there will still be 45 minutes of cooking to follow, don’t over cook the meat or it will be stringy.
Add garlic, ginger, salt, pepper, a pinch of cayenne pepper, turmeric and cumin, and tomato sauce. Layer in the vegetables starting with the ones that take the longest to cook. I start with the dense squashes and carrots, then add to root vegetables and finish with cabbage and cauliflower on top. Lastly, add the garbanzo beans. Avoid mixing as this breaks up the vegetables, only lightly mix if necessary. I like my couscous soupy so I tend to add quite a bit of water, enough to nearly cover the vegetables. Though this is not traditional, it has become a family tradition and allows extra liquid for making the couscous.
When the vegetables are all tender, turn off the heat and prepare the couscous. Follow the direction of the package.
Presenting the dish is as important as cooking it. In a large shallow serving dish, add a thick layer of couscous, evenly spread the couscous around. Next add the vegetables and meat. Using a strainer, add soup to a bowl to add separately to each plate.
Hana’s Tip: Instead of using water to make the couscous, substitute couscous broth for water for a richer, tastier couscous.

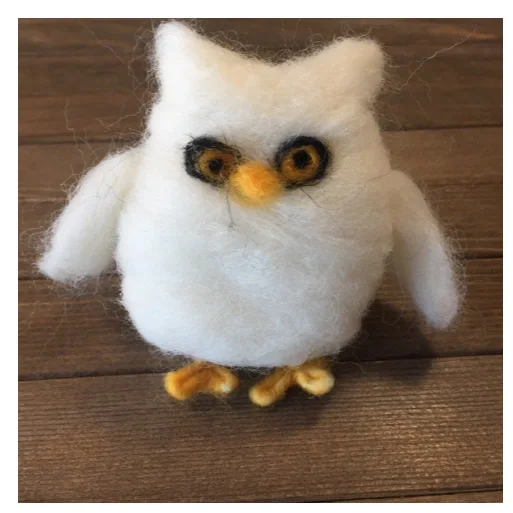
How to Make a Felted Owl
WoolPets are the best kits for beginners looking to try wool felting. The kits are also an amazing value, you can get at least 4 owls from this kit (the package says 2), and if they are a bit smaller, you can get 6 adorable owls :)
Check out our Owl Unit Study for more projects and activities:
You can this kit and others at A Child's Dream.
You can also find them at Rainbow Resource.
The wool in this kit is the softest I've used. The projects are as mentioned, with this intermediate project really being for someone who's tried needle felting before.
The only thing you'll want to buy is a foam pad. It can find them at Jo-Ann and other fabric stores.
Give this project a try! It's perfect for a cold winter day :)
Though we didn’t pick up this kit with our supplies we got for our kindergarten curriculum recently, we did intend to add it to the KG schedule. Originally I had intended to make these owls with my 10 year old 5th grader for my kindergartener to play with, but before I had completed the set up for this project, my five year old had removed the directions, and make her own! I was really impressed. She did fantastic! So even though the package indicated this project is for 10 year olds and up, you can certainly modify it for a younger child.
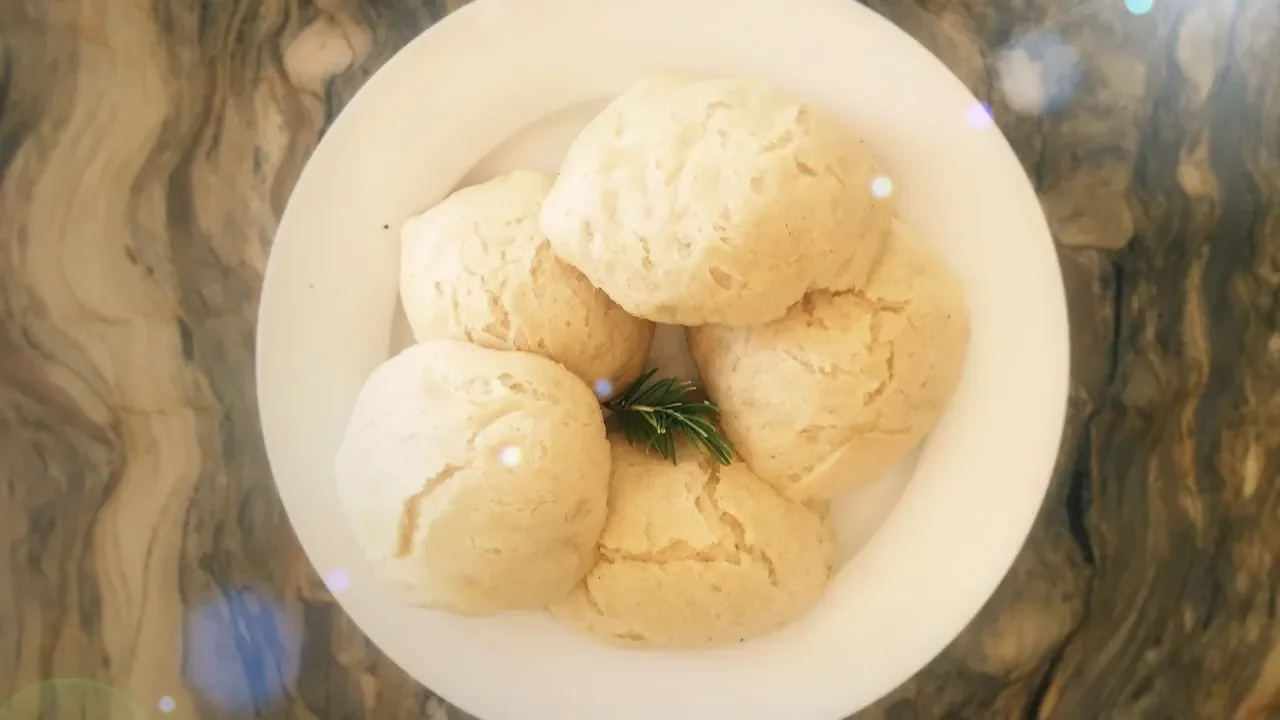
How to Bake Bread
Baking bread is a quintessential kindergarten experience in a Waldorf school. We take this tradition and bring it home. In this video, I'll show you a quick and easy recipe for making bread: 1 tablespoon sugar (I use brown sugar) 1/2 teaspoon of salt 1/4 teaspoon of yeast 2 cups of warm water 4 cups of flour Mix ingredients together in a non-metal bowl (ceramic or plastic) with a wooden spoon (don't use metal). Add a loose fitting lid (optional, add oil to dough so it doesn't dry out). After it has doubled in size (2-4 hours), shape it into medium-sized balls using your hand that have been oiled with olive oil to keep the dough from sticking. Bake for 12 minutes at 430 degrees on an oiled pan or in a pan lined with parchment paper. Serve piping hot with olive oil.
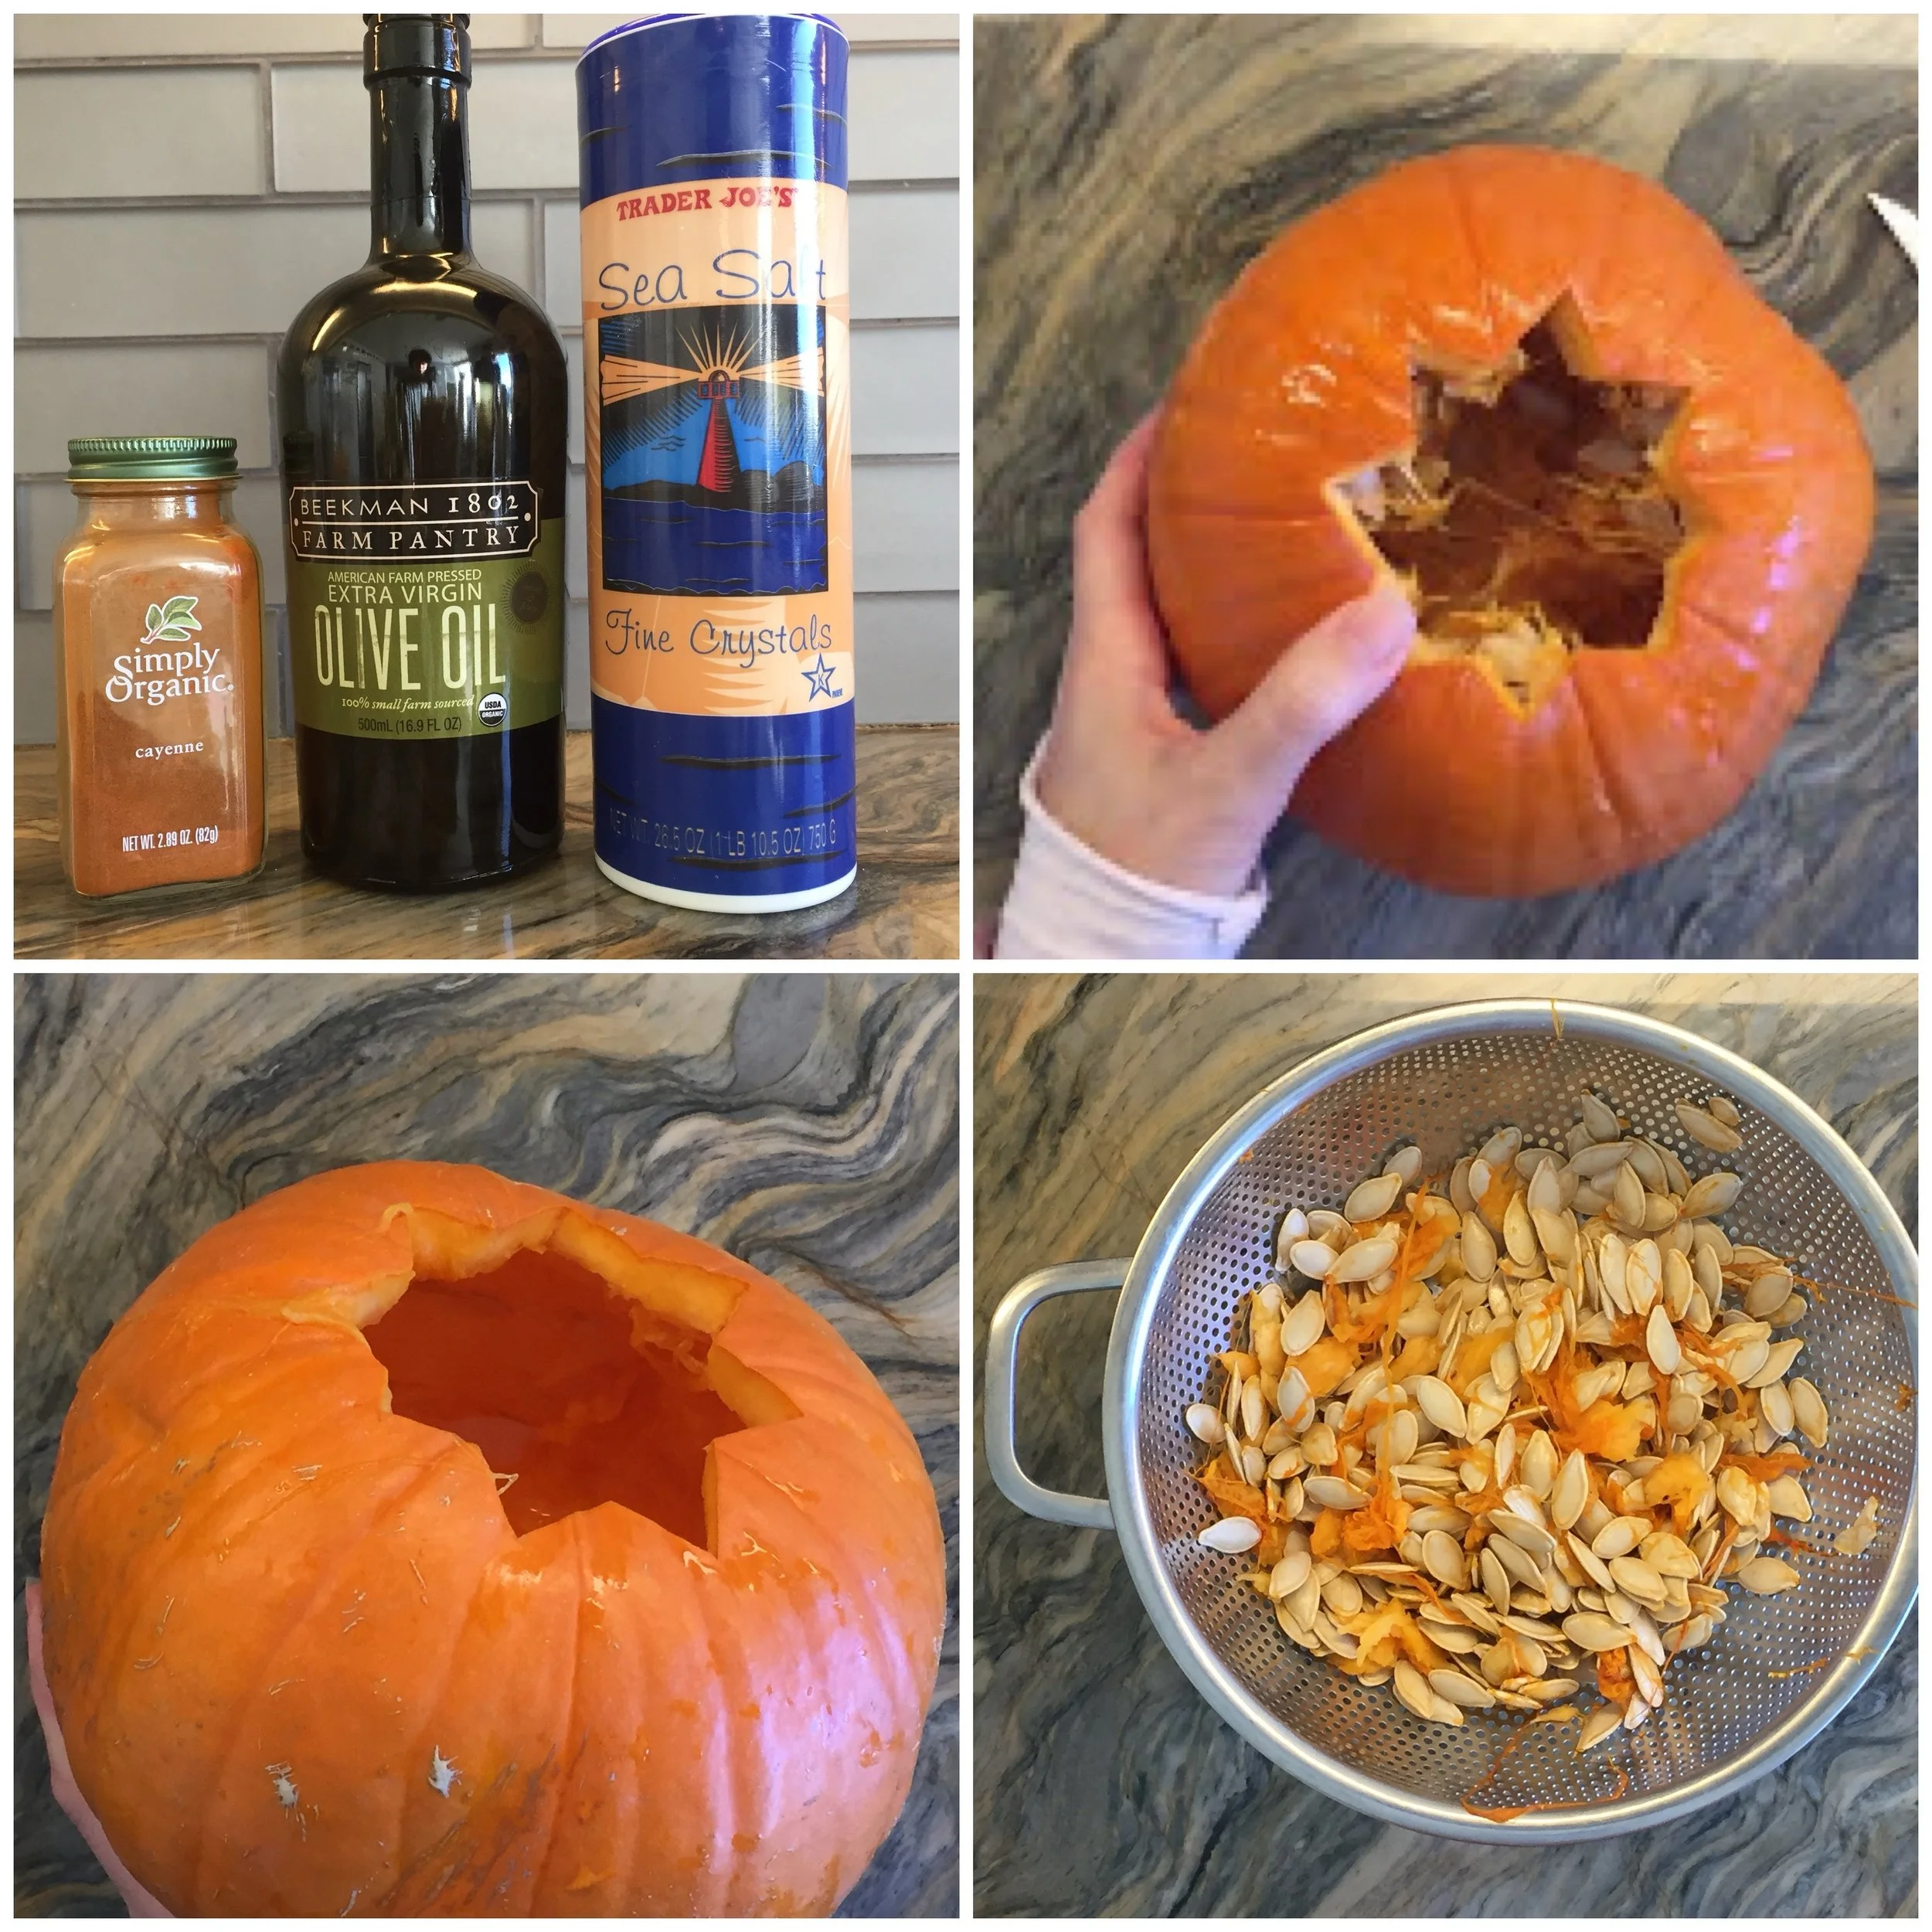
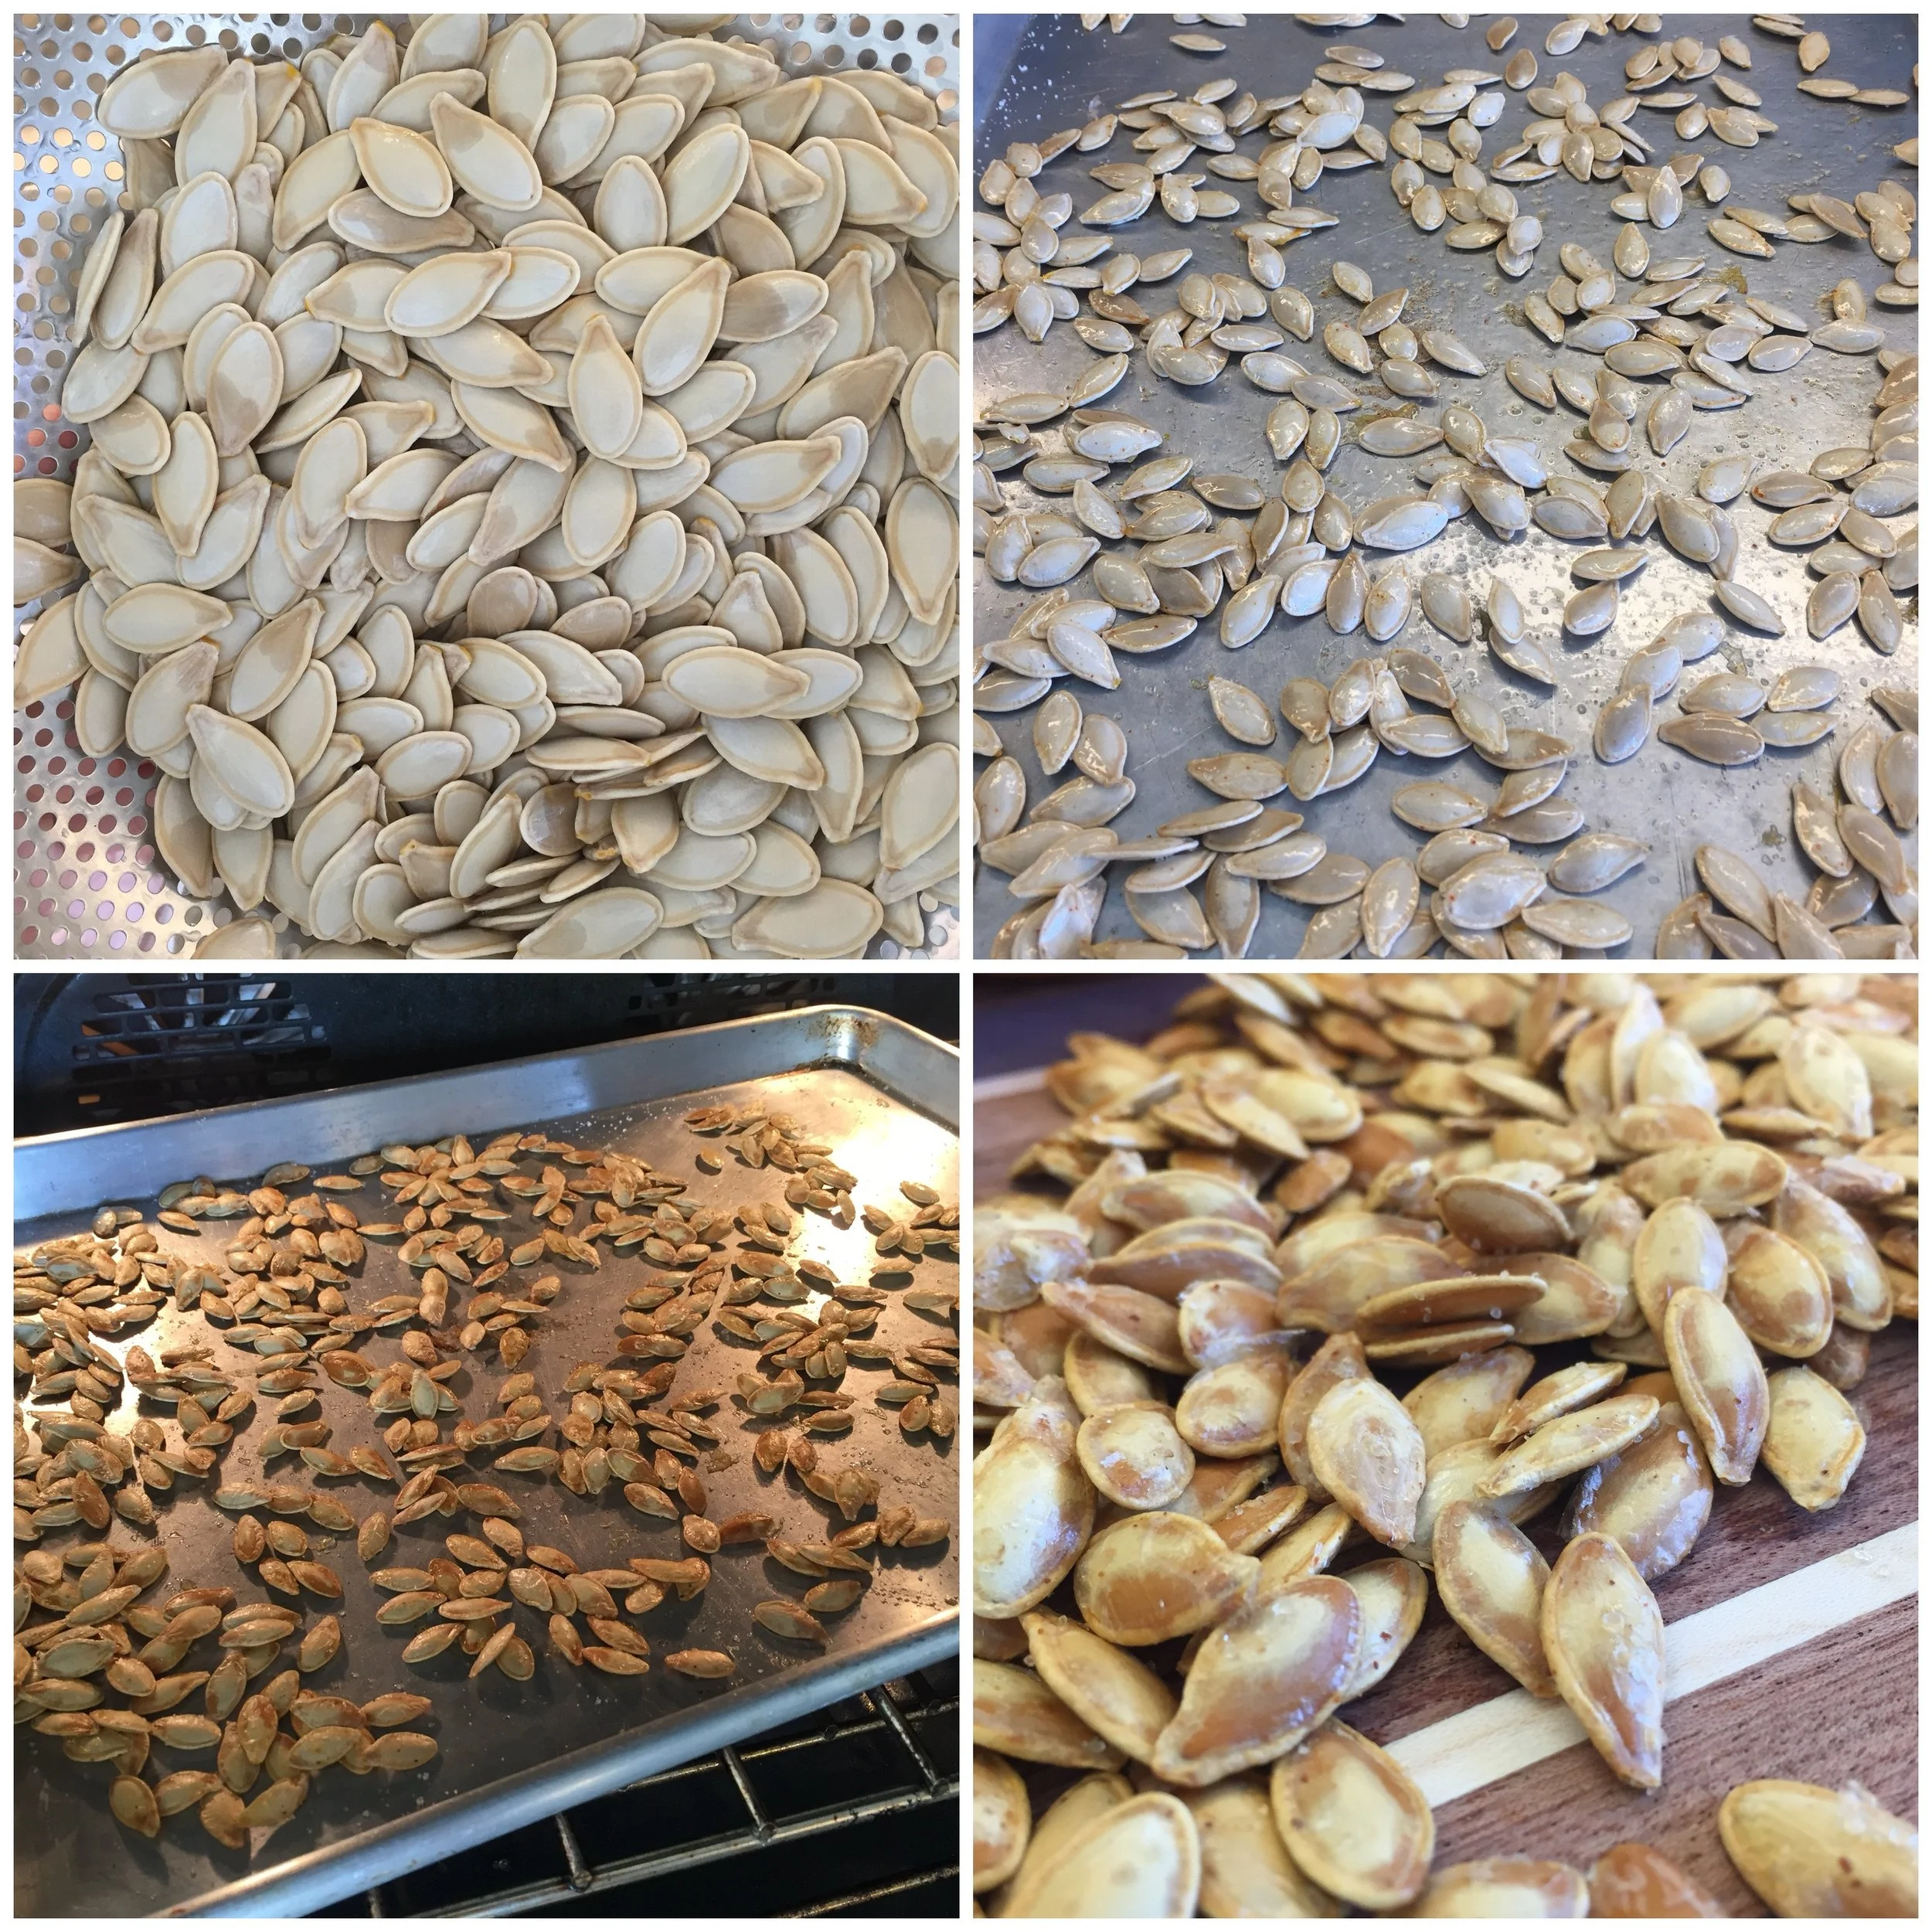
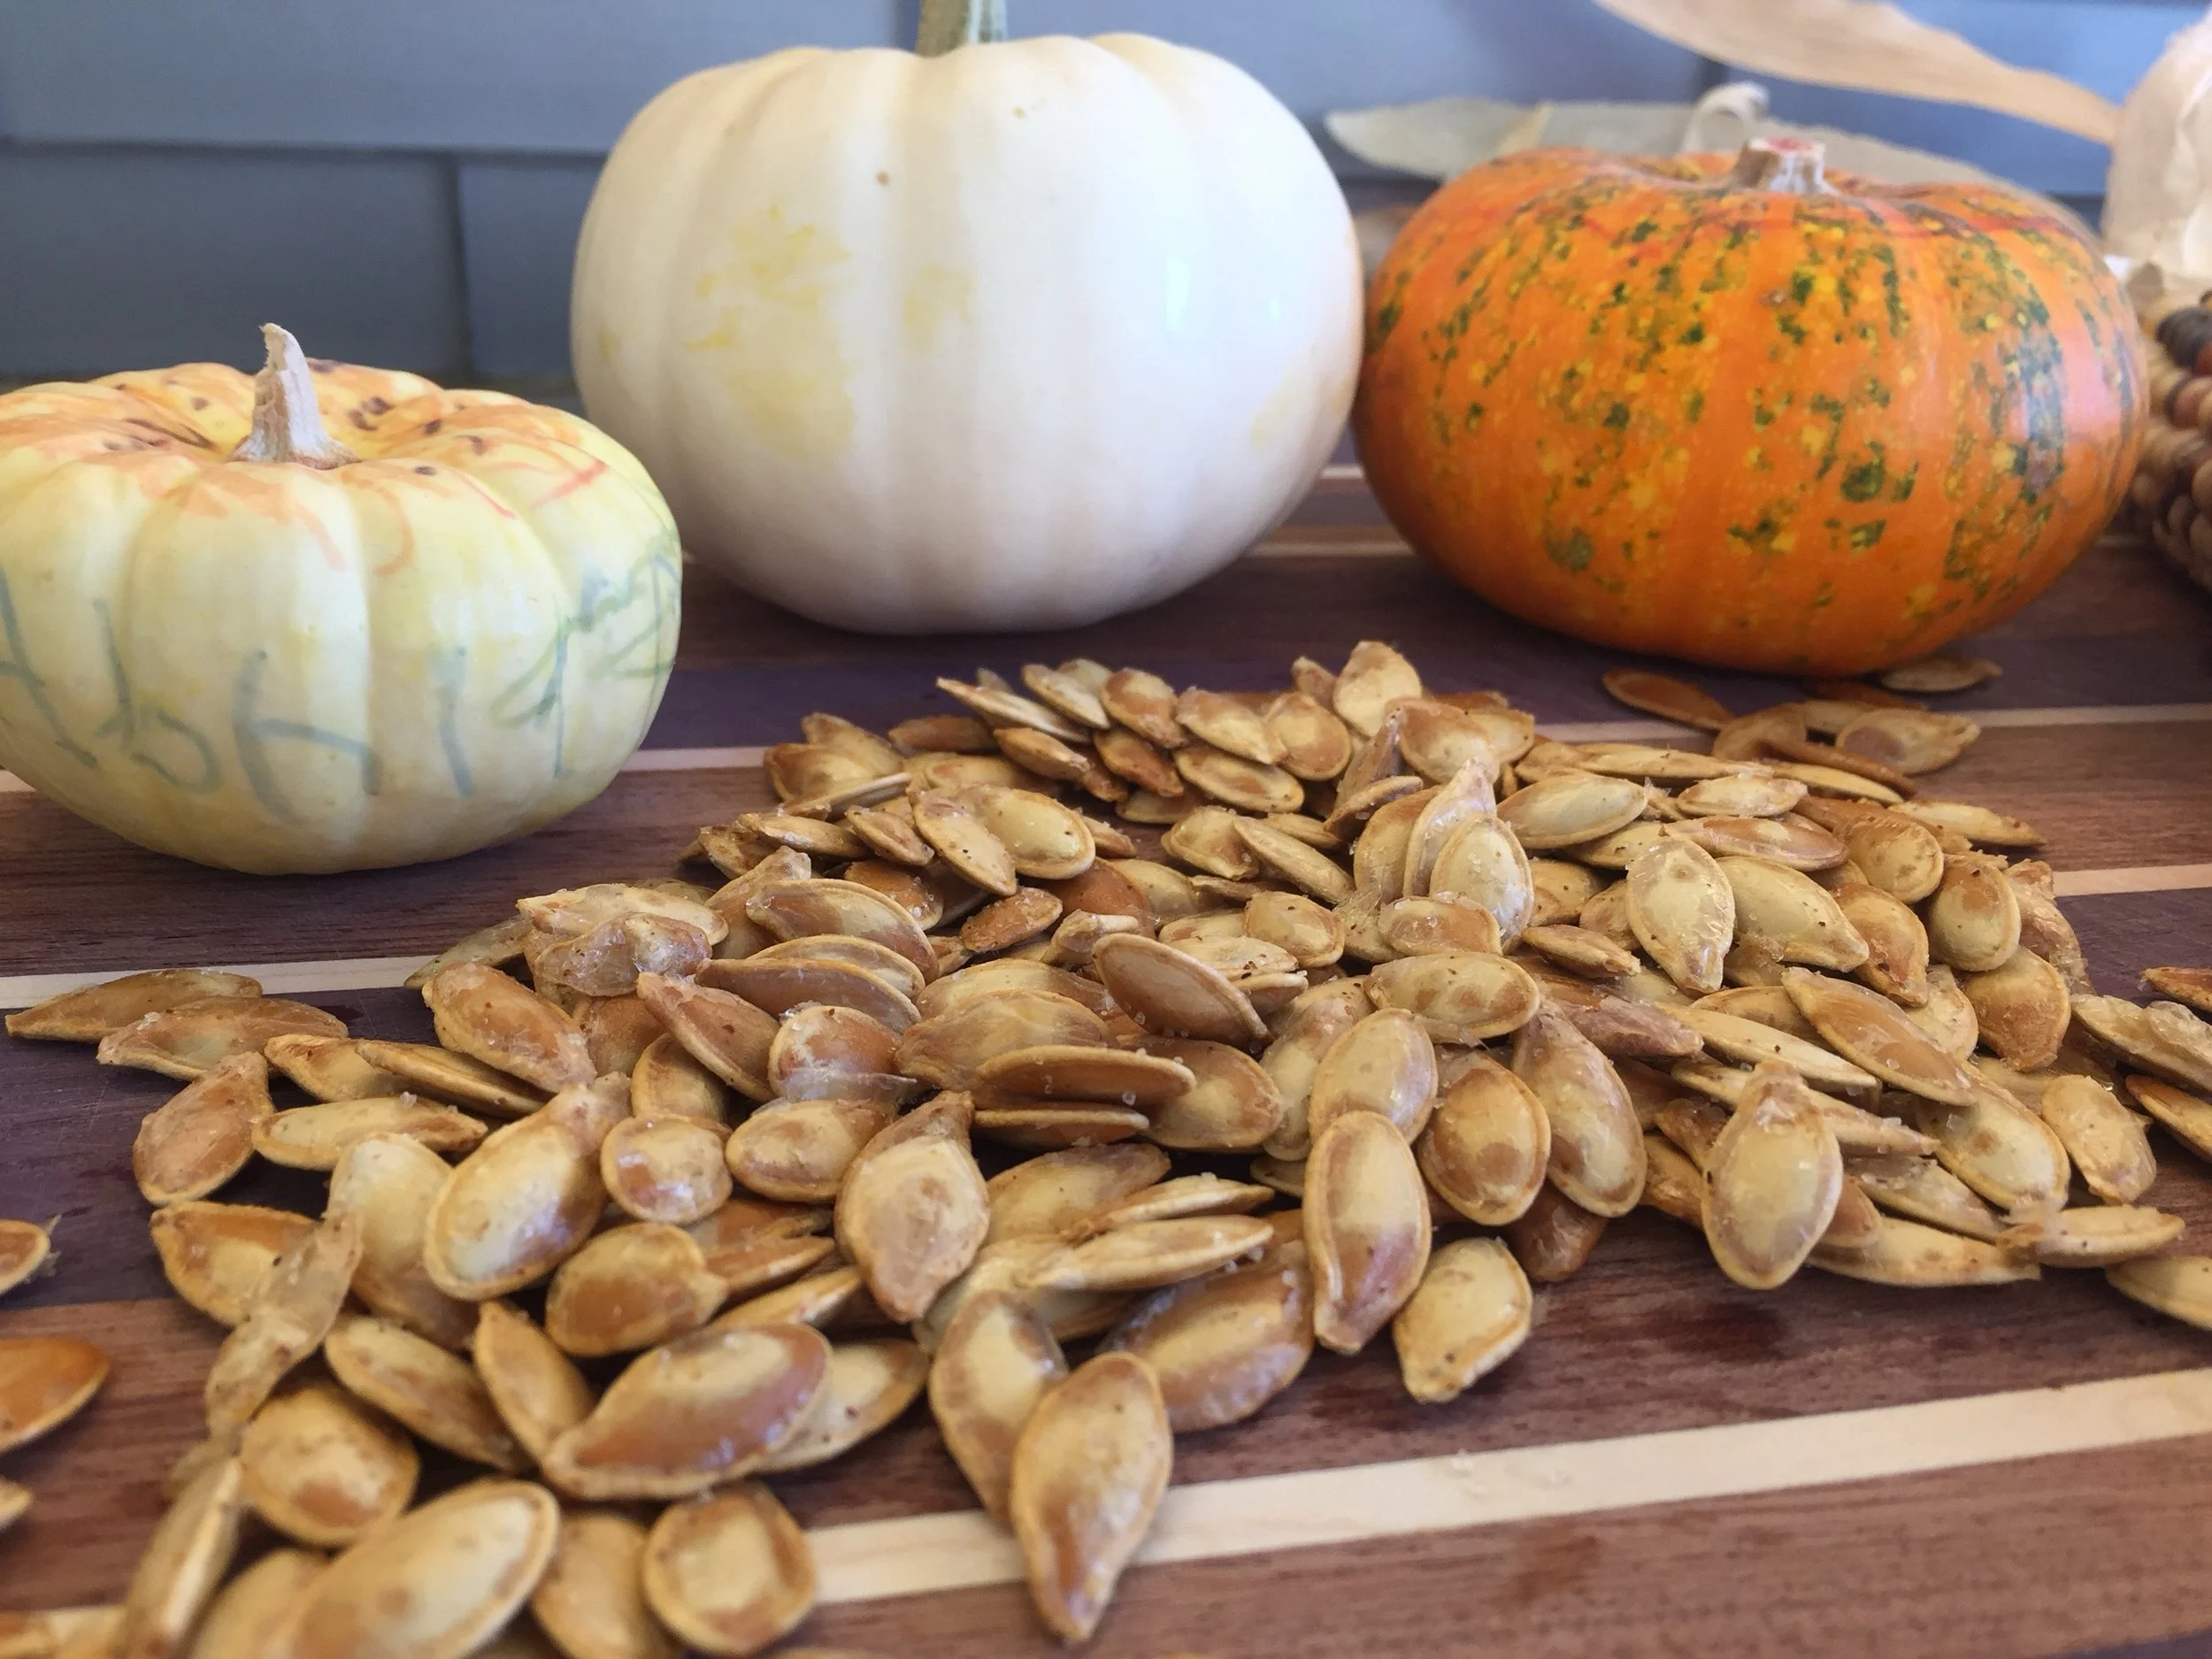
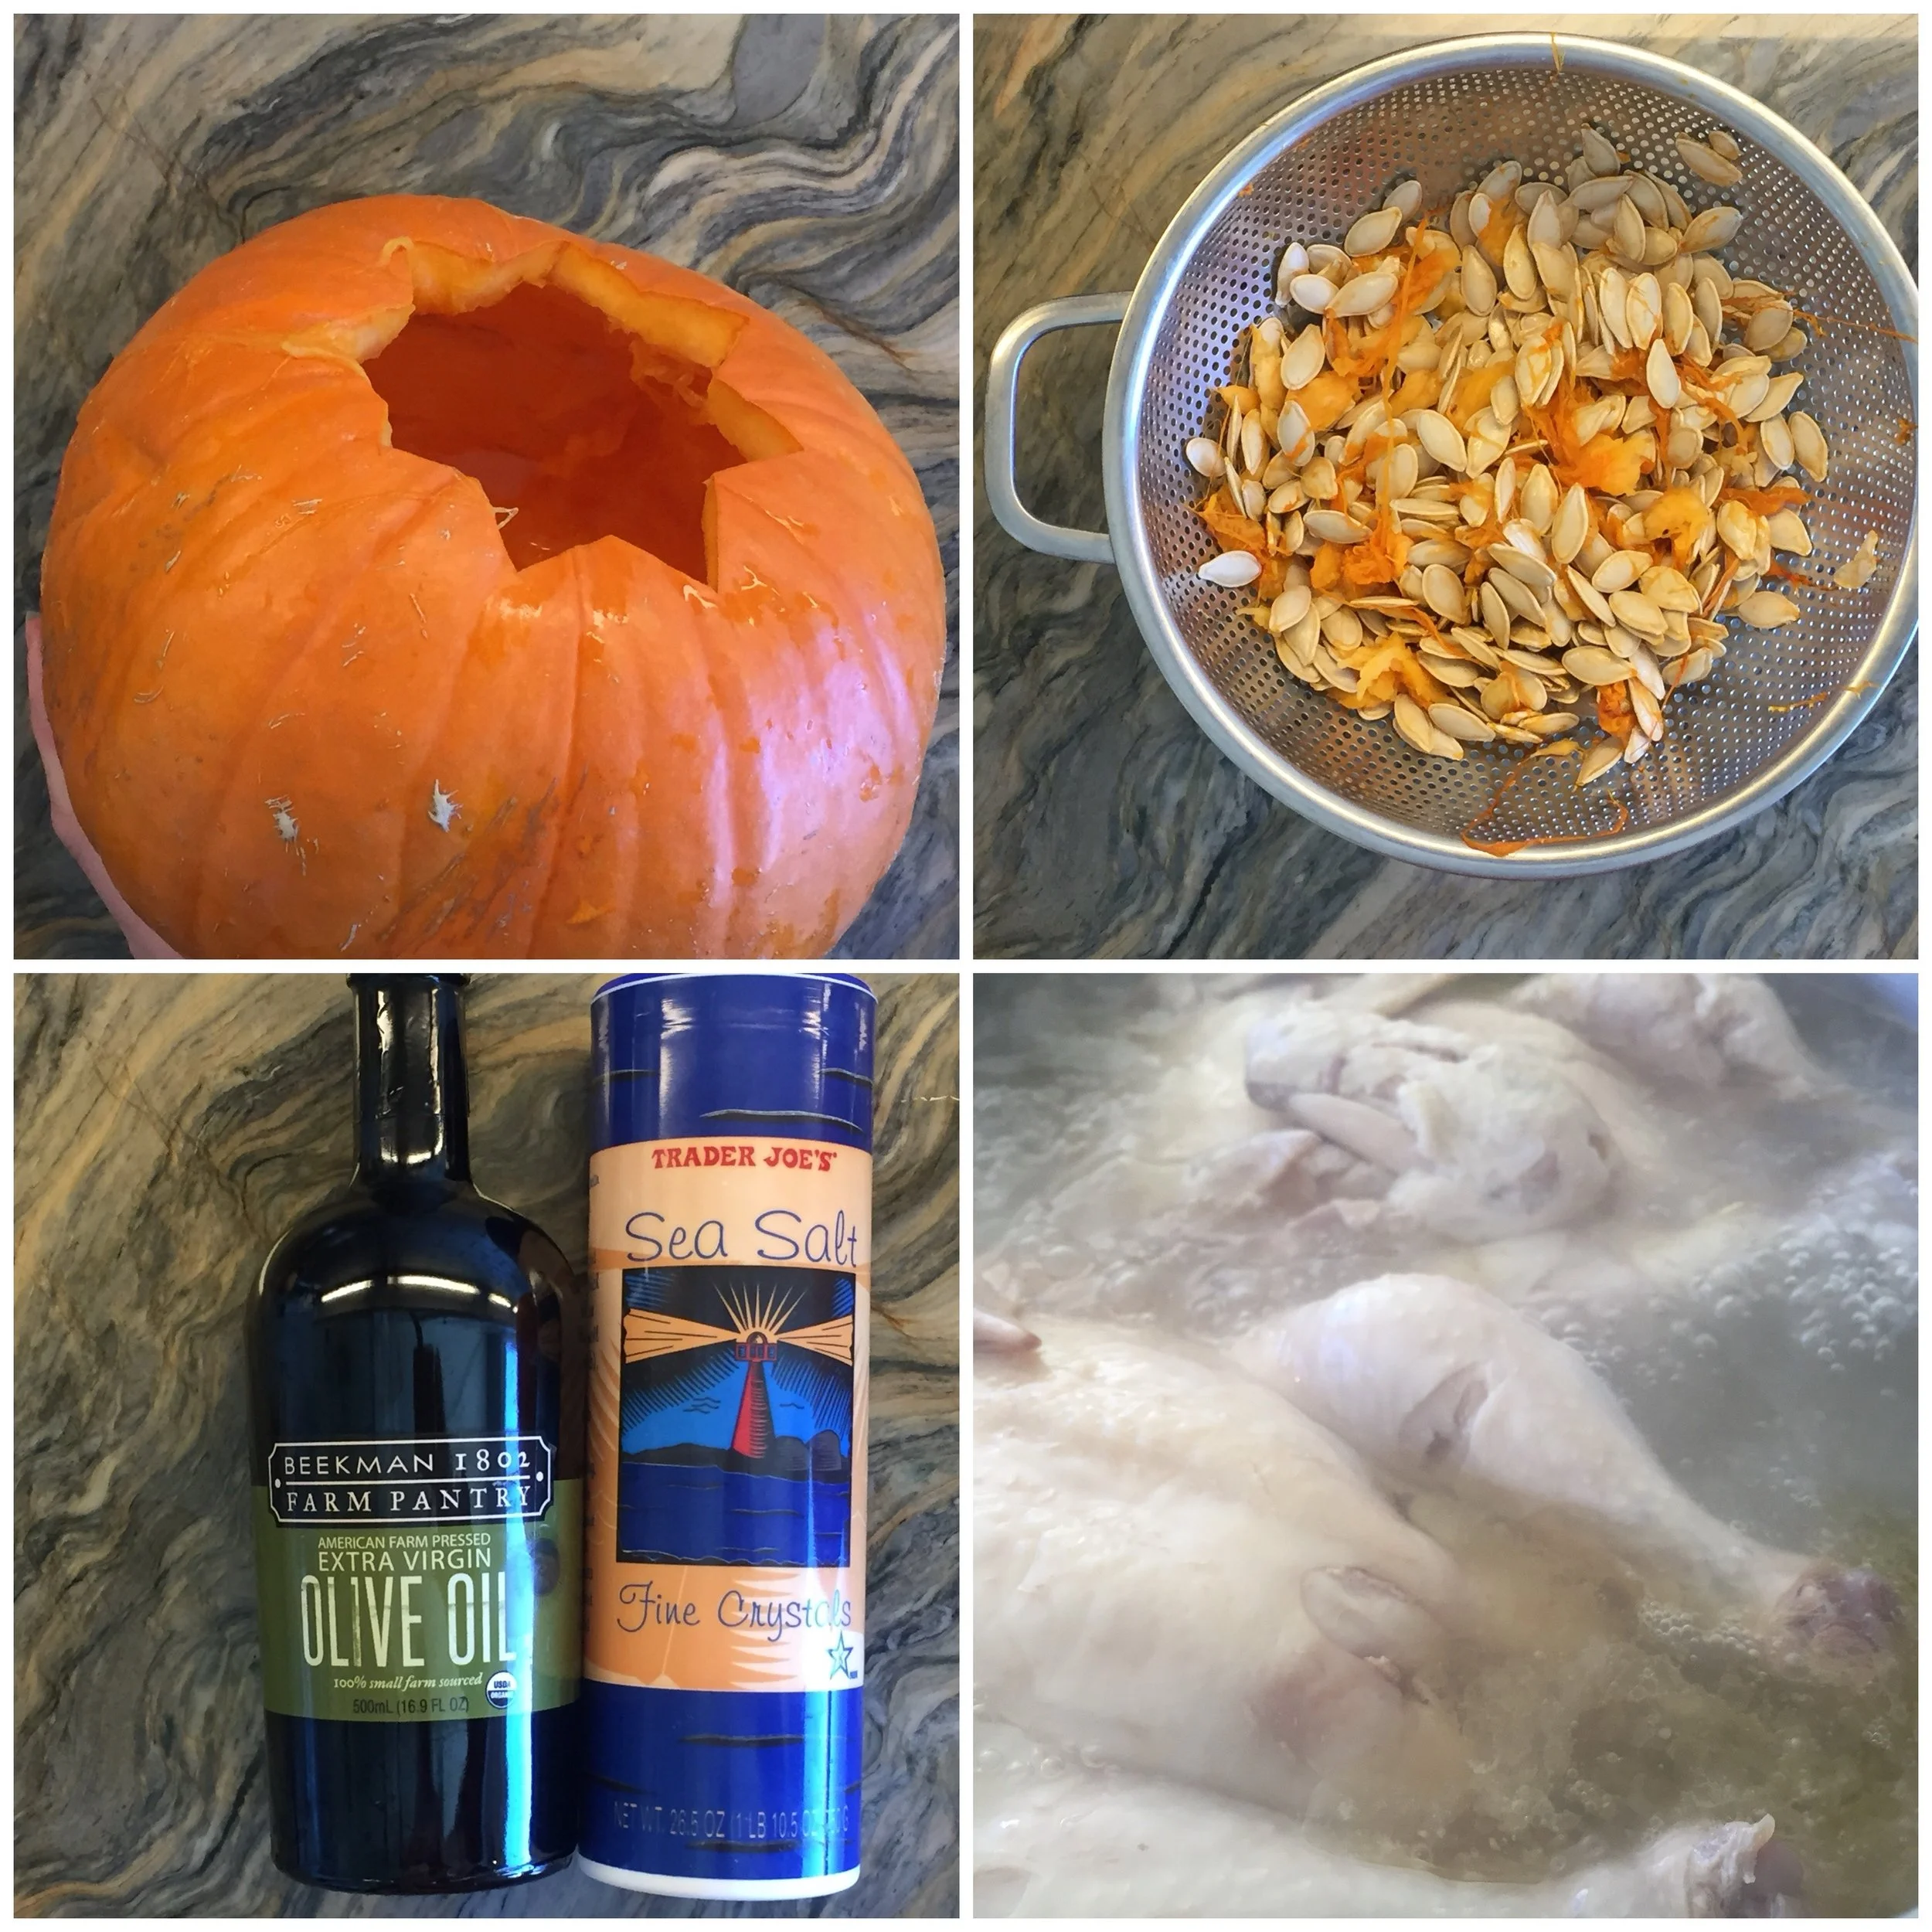
Roasted Pumpkin Seeds
Did you carve a pumpkin this fall? I hope you saved those pumpkin seeds because you can roast them with a bit of salt and olive oil for a fast, tasty and healthy snack. Don't forget to reserve a few seeds to plant them next spring/summer and hopefully you'll have your very own pumpkin next fall!
Recipe:
Pumpkin seeds, olive oil, salt and a pinch of cayenne.
Directions: Remove seeds from pumpkin and wash them in water. Let dry. Toss with olive oil, salt and cayenne pepper. Spread over a baking tray. Bake on 400 F for 15 minutes. Rotate midway. Remove from oven and let cool before enjoying this wonderful snack.
This recipe perfectly fits with our Colonial Times unit study.
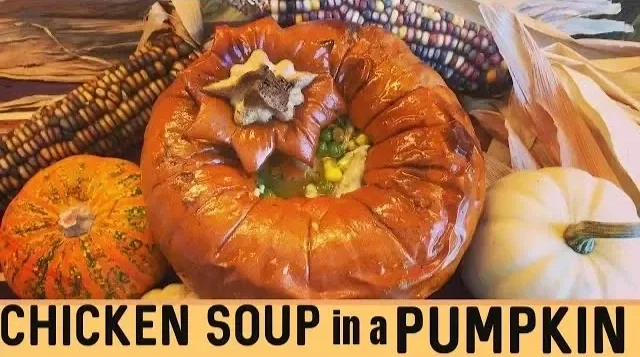
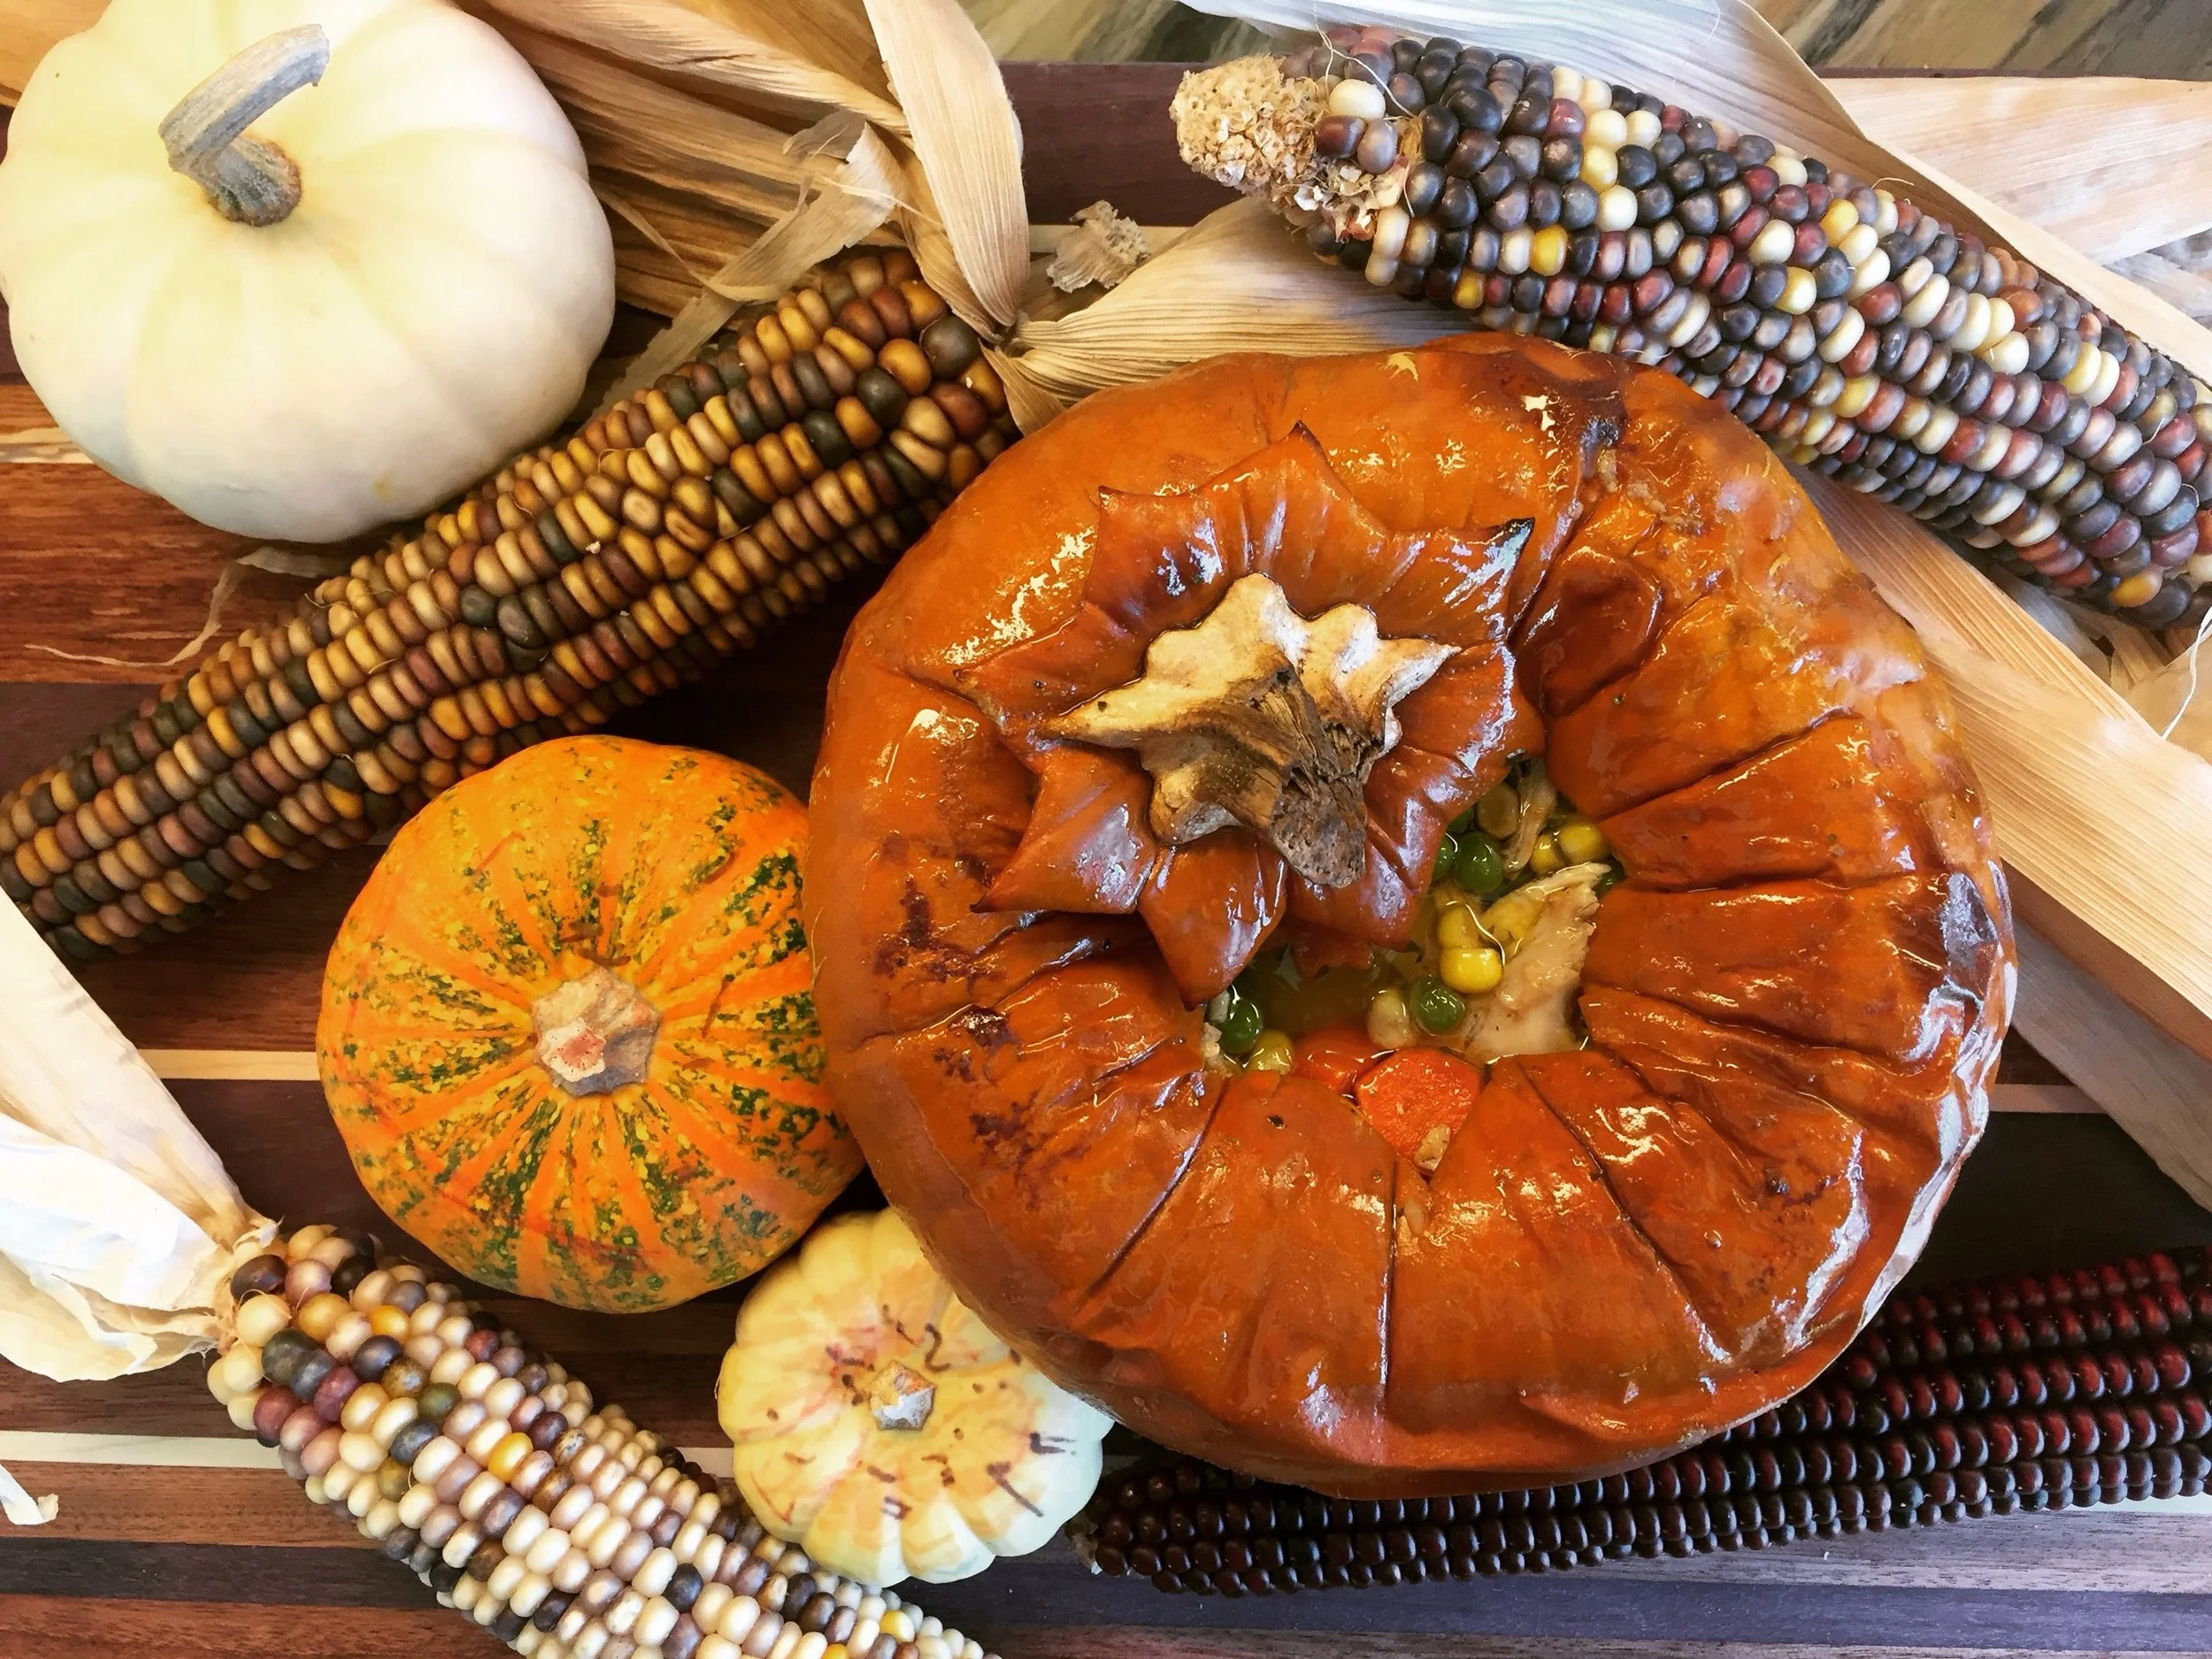
Vegetable Soup in a Pumpkin
This is a show stopping center piece that tastes great and looks amazing! Add drama and intrigue to your dinner party with this perfect-for-fall vegetable soup served in a pumpkin. It’s actually easier than you’d think to make, is the perfect meal or appetizer for large groups and warms you to the bone on cold autumn nights.
You can make this recipe vegan friendly by omitting the chicken, and you’ll barely notice the loss because this soup is naturally flavorful. Adding chicken makes it a complete meal. Cooking your whole chicken in water gives you a flavorful broth that’s ready for the tender vegetables. It’s lightly seasoned with salt, pepper, cayenne and parsley, but you could add any variety of seasonings.
Recipe:
1-2 whole chickens
2 onions
4-5 medium organic potatoes
1 bag of organic onions
1 bunch of organic celery
1 bag of organic peas
1 bag of organic corn
1 teaspoon of fresh ground black pepper, cayenne and dried parsley.
Salt to taste
Directions:
In a large pot, simmer 1-2 whole chickens with skin on, in enough water to cover the chickens completely (the chicken will float to the top, but that’s okay, you can rotate it midway). Bring chicken broth to a high simmer and cook until the meat falls away easily (about 1 hour).
Meanwhile, cut the top off a medium or small pumpkin. Remove the seeds and fibers. Drizzle olive oil and sprinkle salt on the inside, rotating the pumpkin to coat the inside. Add some olive oil to the outside and rub over the pumpkin. Place in a pre-heated 450 degree oven and bake for 25-35 minutes. Don’t overcook the pumpkin or it won’t hold up to the soup.
Meanwhile, dice and sauté two medium onions. Lightly brown with olive oil and salt. Add sliced carrots and let cook for a few minutes. To that add sliced celery and continue to sauté for a few minutes. Lastly, add peeled and diced potatoes and cook for a few minutes.
Check on and remove pumpkin from oven if done.
Check on chicken. If it pulls from the bone easily, remove the chicken from the broth and let it cool in a strainer. To the broth, add all the vegetables, the bag of corn and peas and the seasonings. Let cook for about 10 minutes on a medium simmer.
Meanwhile, debone the chicken and add it to the soup.
Prepare pumpkin by placing it on a serving dish and spoon vegetable soup into the pumpkin.
Serve remaining soup in a separate dish. This is a perfect way to use up any uncarved pumpkins from Halloween!
Don’t toss those seeds, though! They can be easily roasted up with salt and olive oil for a tasty healthy snack.
This recipe perfectly accompanies our Colonial Times unit study.

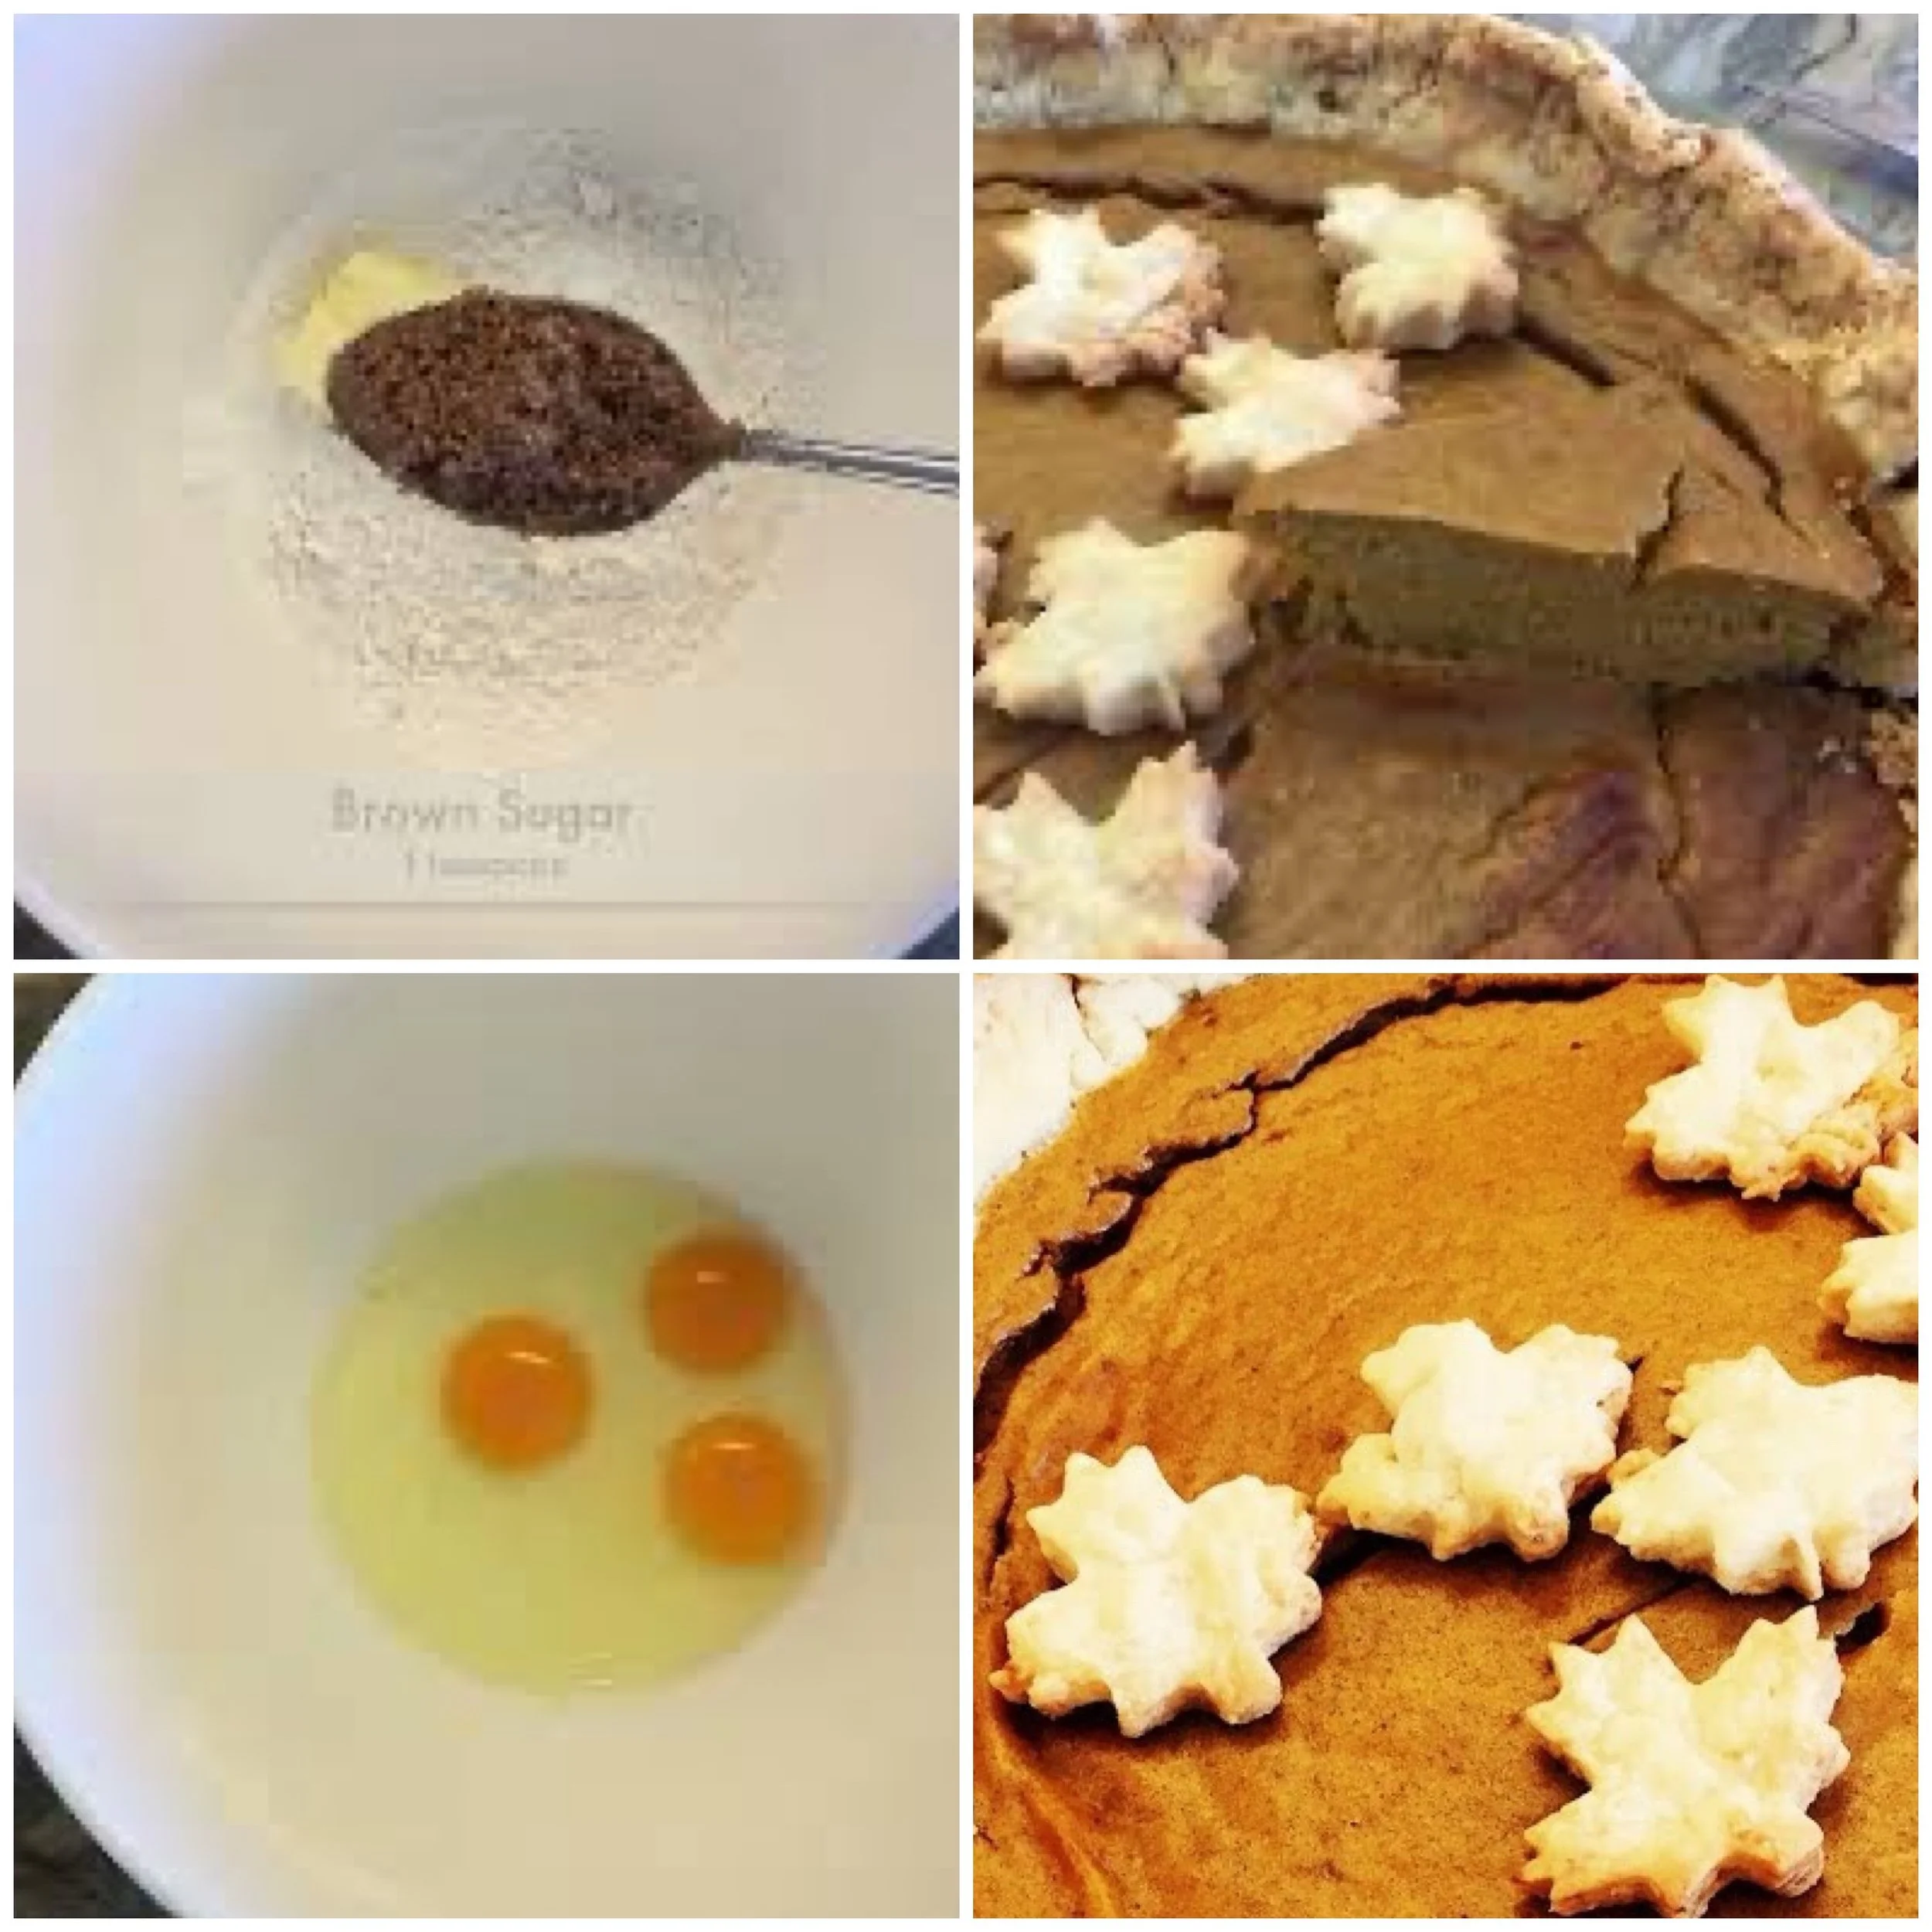
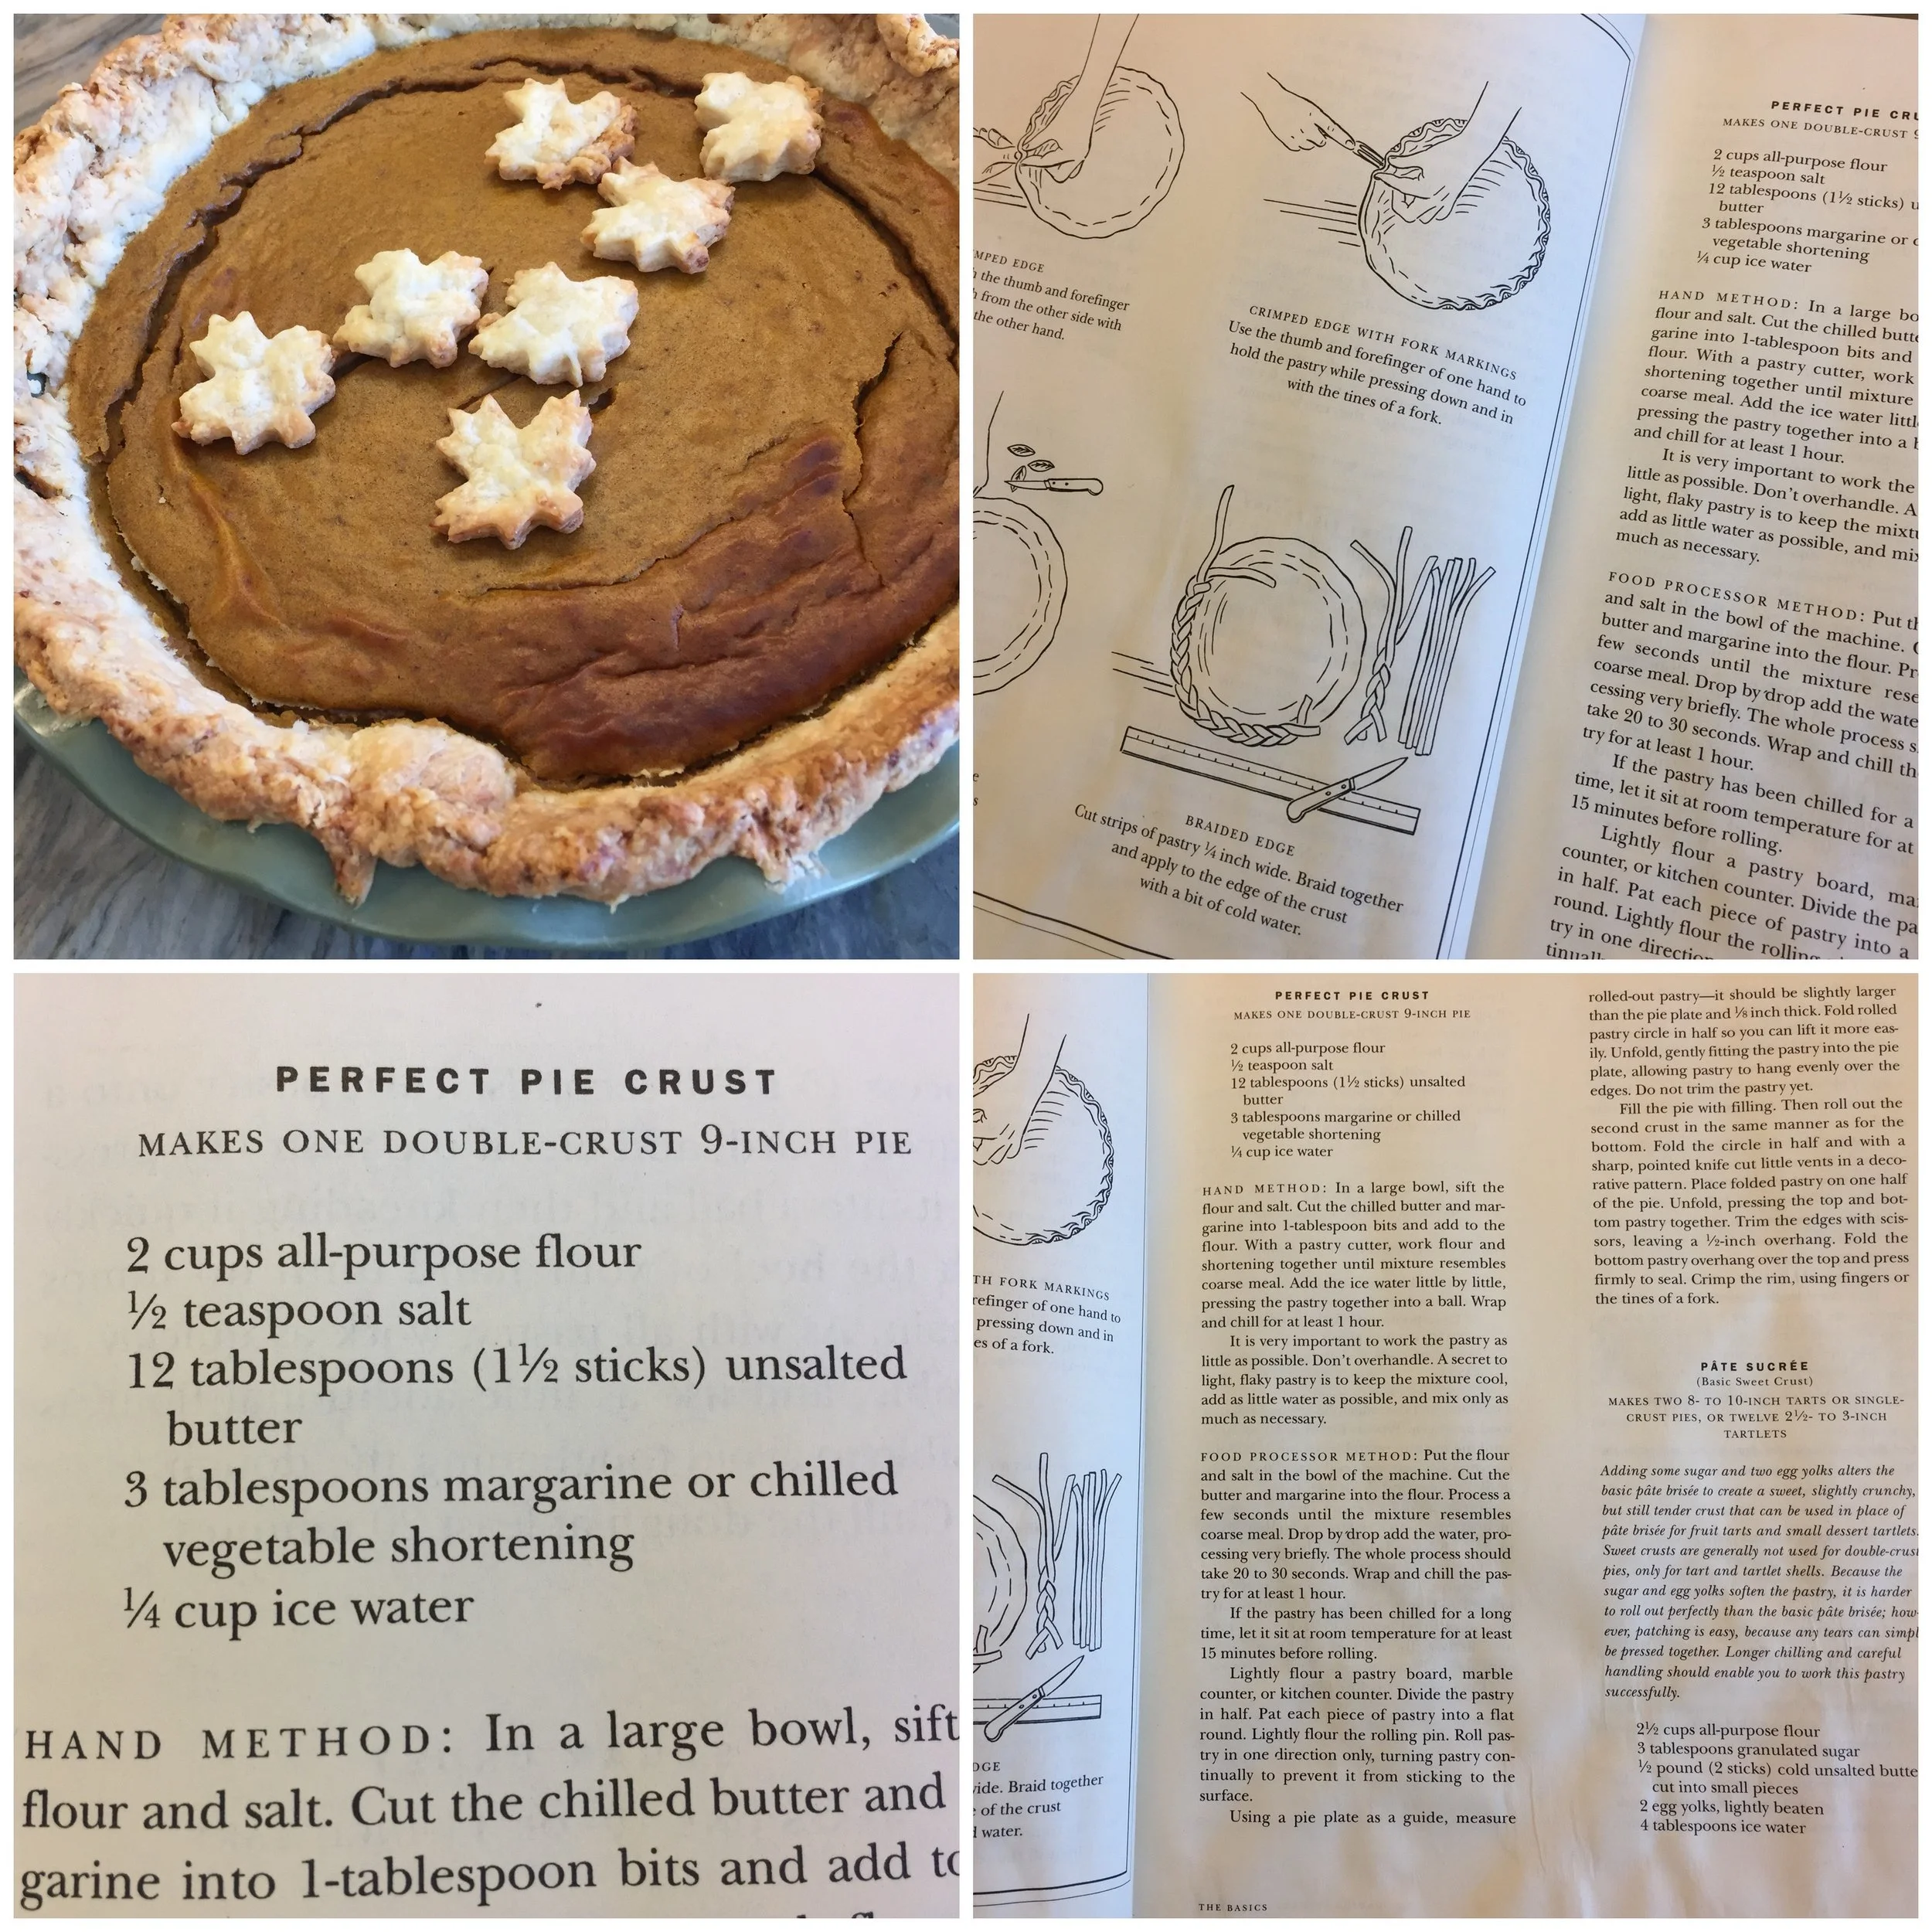
How to Make Old Fashioned Pumpkin Pie
It is timely that our unit study on the Colonial Times, the voyage of the Mayflower and the first Thanksgiving nestled perfectly with this time of year. Reservations about the actual events aside, this pumpkin pie was delicious, easy and ties in well with our unit study.
I can’t believe I this is my first year making pumpkin pie…it’s so good! I got this recipe from my Martha Stewart cookbook edited by Roy Finamore 1995. The “Perfect Pie Crust” is on page 7 and the Brown Sugar Pumpkin Pie is on page 490.
The ingredients for the Pie Crust:
2 cups flour
1.5 sticks of butter
1/4 tsp. salt
up to 1/4 cup of iced water
Directions:
Cut in butter into sifted flour. Use a pastry tool if needed, but don’t over incorporate or heat the butter. At salt if your butter is unsalted. I added a little bit of brown sugar. Add a bit of iced water to help mix the remaining flour into the mixture.
Roll out pie crust large enough for the pie tin. I found it easier to do this between two sheets of wax paper. You may need to chill the dough. Set the pie crust in the pie pan and put it in the fridge while you make your filling.
The ingredients for Pumpkin Pie:
1 can pumpkin puree (15 oz)
3 eggs
1/2 cup heavy cream
1/2 cup brown sugar
1/2 teaspoon ground allspice
1/2 teaspoon ground cinnamon
1/2 teaspoon ground ginger
(or 1.5 teaspoons pumpkin pie spice mix)
1/2 teaspoon salt
Direction:
Mix all ingredients together until well incorporated. Fill pie and bake at 425 degrees Fahrenheit for 15 minutes, then drop the temp to 375 and bake for about 30 minutes until a knife cuts clean.
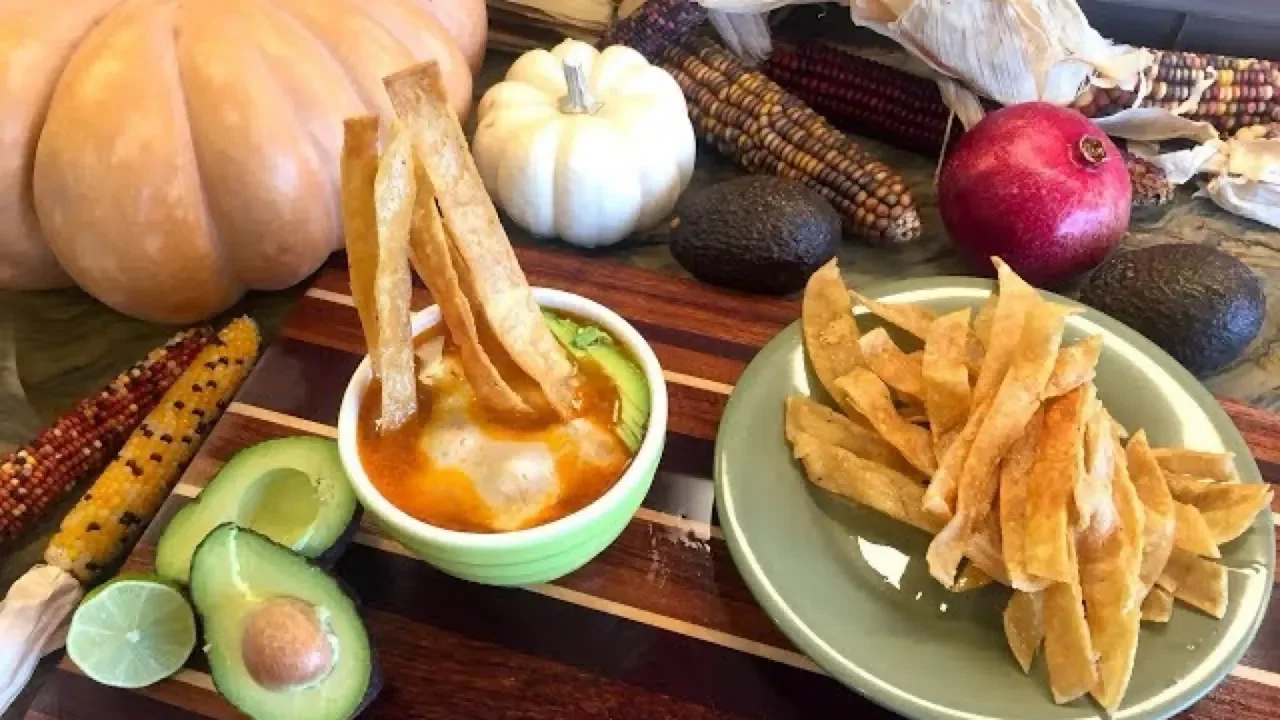
Tortilla Soup Recipe
Tortilla soup is a family fall and winter favorite because it's so warming, hearty and delicious. It's also super fast! Not only can you make the soup in about 30 minutes, while it's simmering, you can garnish the soup with cilantro, avocado, pepper jack cheese and fresh homemade tortilla chips.
Check out this super easy recipe:
Tortilla Soup
(Inspiration from the soup at El-Torito and my friend “L”)
Ingredients:
2 lbs. chicken breast cut into bite-sized pieces
3-5 limes
1-2 oranges
1 bunch cilantro
1 head of garlic, crushed
Cumin, salt, pepper, cayenne pepper, turmeric all to taste
2 jalapeños
2 onions (quartered and sliced)
1 bag of carrots cut into thin slices
1 bag of frozen corn
4-6 medium sized russet potatoes
1 large can of crushed tomatoes (non-seasoned)
1 bag of corn tortillas
2 avocados
Pepper jack cheese
Corn oil (or canola)
Directions:
Directions: Marinate chicken by placing chicken pieces in a large shallow bowl. Add the juice of 4 limes and 2 oranges, crushed garlic, and all spices (enough to thoroughly coat chicken; you can always add more spices as the soup cooks). Let sit for no more than 30 minutes (the lime juice will ‘cook’ the chicken, so do not marinate overnight). In the meantime, brown the onions for about 10 minutes so they are translucent but not crispy. Next, over medium to high heat, add enough oil to coat bottom of a large bottom soup pot. Brown chicken by removing chicken from marinade and carefully placing into hot pot (reserve marinade for later). Add to the chicken the browned onions, remaining marinade, jalapeños, carrots and 10 cups of water. Bring water to a boil and cook for 5 minutes, then add potatoes and another 10 cups of water. Bring to a boil and add corn and can of tomatoes. Cook for about 20-30 minutes then check flavor and consistency, add more water if needed, or salt, etc. Add chopped cilantro (1⁄2 a bunch) in the last 5 minutes of cooking to retain a more vibrant green color). When you are ready to serve, cut up avocado, slice pepper jack cheese and slice limes. In a frying pan, add 1⁄2 inch of oil and bring to medium-high heat, add one layer of sliced tortilla and fry till golden on each side. Plate soup by ladling a large serving into a ‘pasta’ style bowl, top with sliced cheese, avocado slices, a sprig of cilantro. Lastly, add crisp tortilla chips vertically into soup (like a pyramid) and serve hot.
Hana’s Tip: When serving the soup, add the tortilla chips hot out of the frying pan for a dramatic ‘hisss’. To speed the process of making tortilla soup, heat water in a separate pot while the chicken is marinating. This soup keeps well for a few days, but the tortilla chips are best when they are freshly fried.

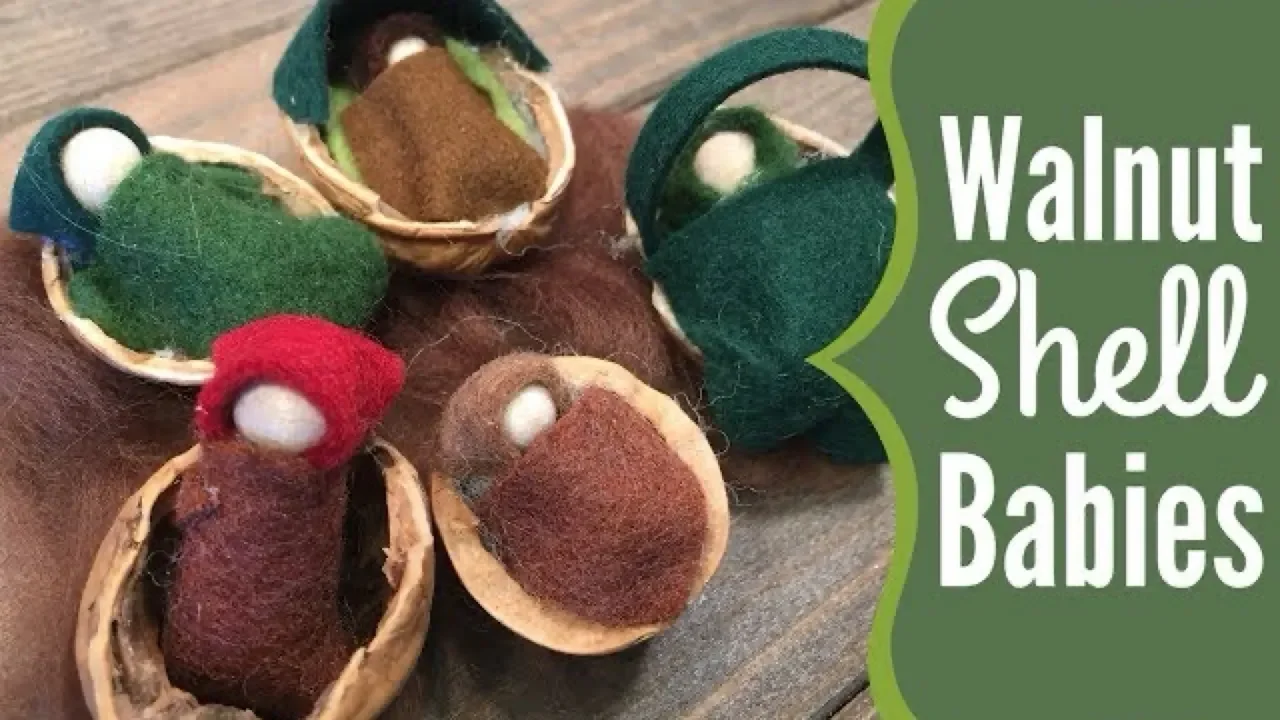
Walnut Shells Sleeping Babies
These little sleeping babies in walnut shells are adorable. They'd make charming ornaments, cute table scape decorations or one-of-a-kind party favors. We made them to decorate our Fall Nature Table, but truthfully, they were barely there before being swept away to be played with along with our peg dolls and finger puppets.
For such a tiny craft, you'd think they'd be easy to make, but working with such a tiny space was actually a bit challenging at times. First we cracked walnuts carefully so we could get full shell halves. This only happened half the time. I'm using a gorgeous nutcracker from A Child's Dream. Next we fill the walnut shell with wool top. For the babies, some were directly on the wool, others on blankets and still others were removable.
For more Fall Crafts, check out this playlist.
For Winter Crafts, check out this playlist.
For Spring Crafts, Check out this playlist.
Materials for today's projects:
Nutcracker: Sadly, this product is no longer available.
Autumn wool felt is from A Child’s Dream.
Mini wooden balls
Additional supplies: hot glue gun, glue sticks, scissors and wool top for stuffing.
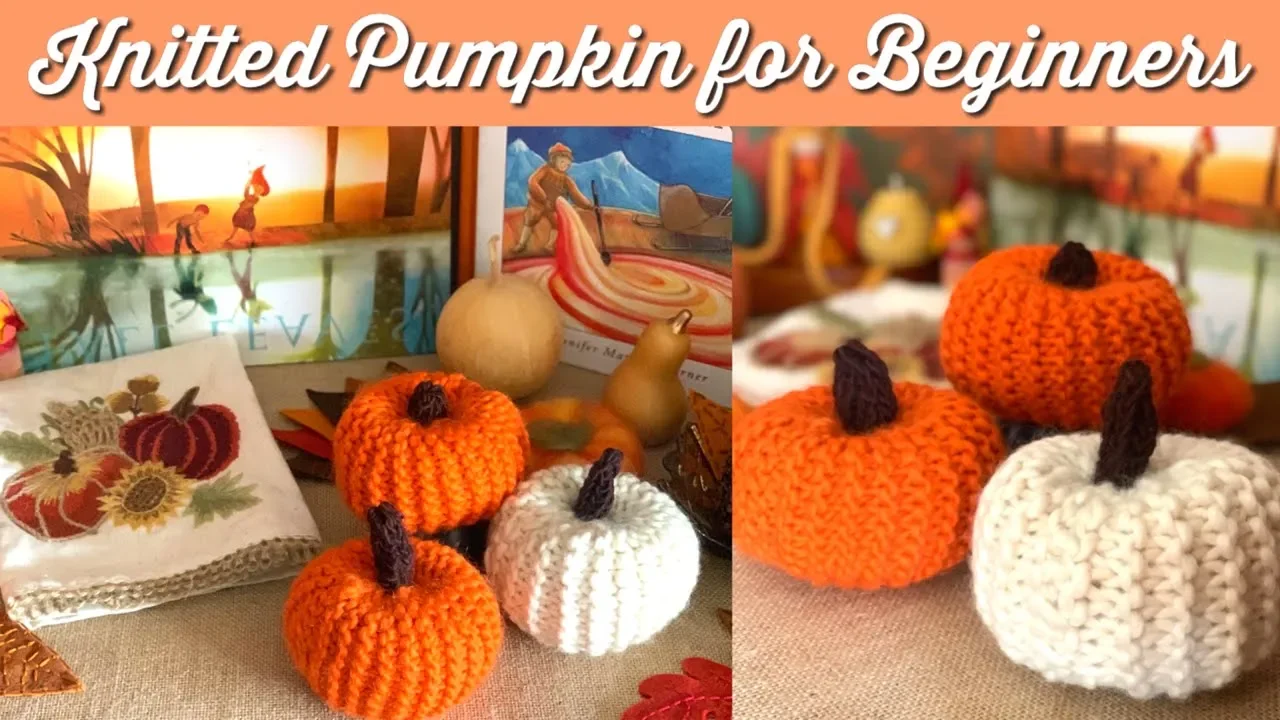
Knitted Pumpkin


Every fall, we seem to add a new autumn inspired project to our repertoire, and this year we are knitting pumpkins! This is a super easy and very satisfying project that takes little time and other than the stem, doesn't require many supplies. This tutorial is for beginners, but children and adults of all ages may enjoy this project.
Typically in grade 1 in a Waldorf school, students learn to knit. Often the first project is one that uses the practice piece a child knit and turns it into a simple animal. Once a student becomes more capable, the projects gently increase in difficulty. A super enjoyable project is one in which a student knits a rainbow ball. Like magic the colors are knit together one color after the other. Once the student has knit a long rectangle, it is sewn up the sides and cinched together on either end and just like that a flat rectangle turns into a three dimensional ball.
Taking the same concept to this project, we knit a rectangle that is twice as long as wide and sewed up the sides and cinched the top and bottom. The only difference is we added a stem of brown yarn using a knitting tower by Camden Rose. For the stem we used brown Lamb's Pride worsted weight yarn. For our pumpkins we used cream and orange bulky weight Lamb's Pride yarn and size 10 knitting needles. These knitting needles happen to be ones we made, but you can find knitting needles as well as all the supplies we used from A Child's Dream. Check out our Autumn projects and activities tutorial playlist.
Over the years, we have decorated our seasonal table with more than pumpkins. We’ve included peg dolls or finger puppets, candles, books, treasures from our nature walks and embroidered items. This year, a gourd we found on a hike graced our nature table. One year, I found a beautifully embroidered dish towel and thought it would be perfect for our season table. It was too beautiful to use in the kitchen. I also add felt leaves to the table. Some are embroidered from previous years, but many are waiting for some special thread. I try to rotate the books to delight the children, and then we are sure to read those books during our opening activities.
Waldorf Autumn Craft
Stitching & Embroidery
Welcome autumn with this simple, yet beautiful handwork project that’s great for children about eight years and up. All you need is felt and embroidery thread. You also need a needle and a pair of scissors. I’ve made a pattern (with the help of the original sample made by Melanie Hatch, a master Waldorf handwork teacher) that you can download for free by visiting my website.
You can find the felt and embroidery floss at A Child’s Dream.
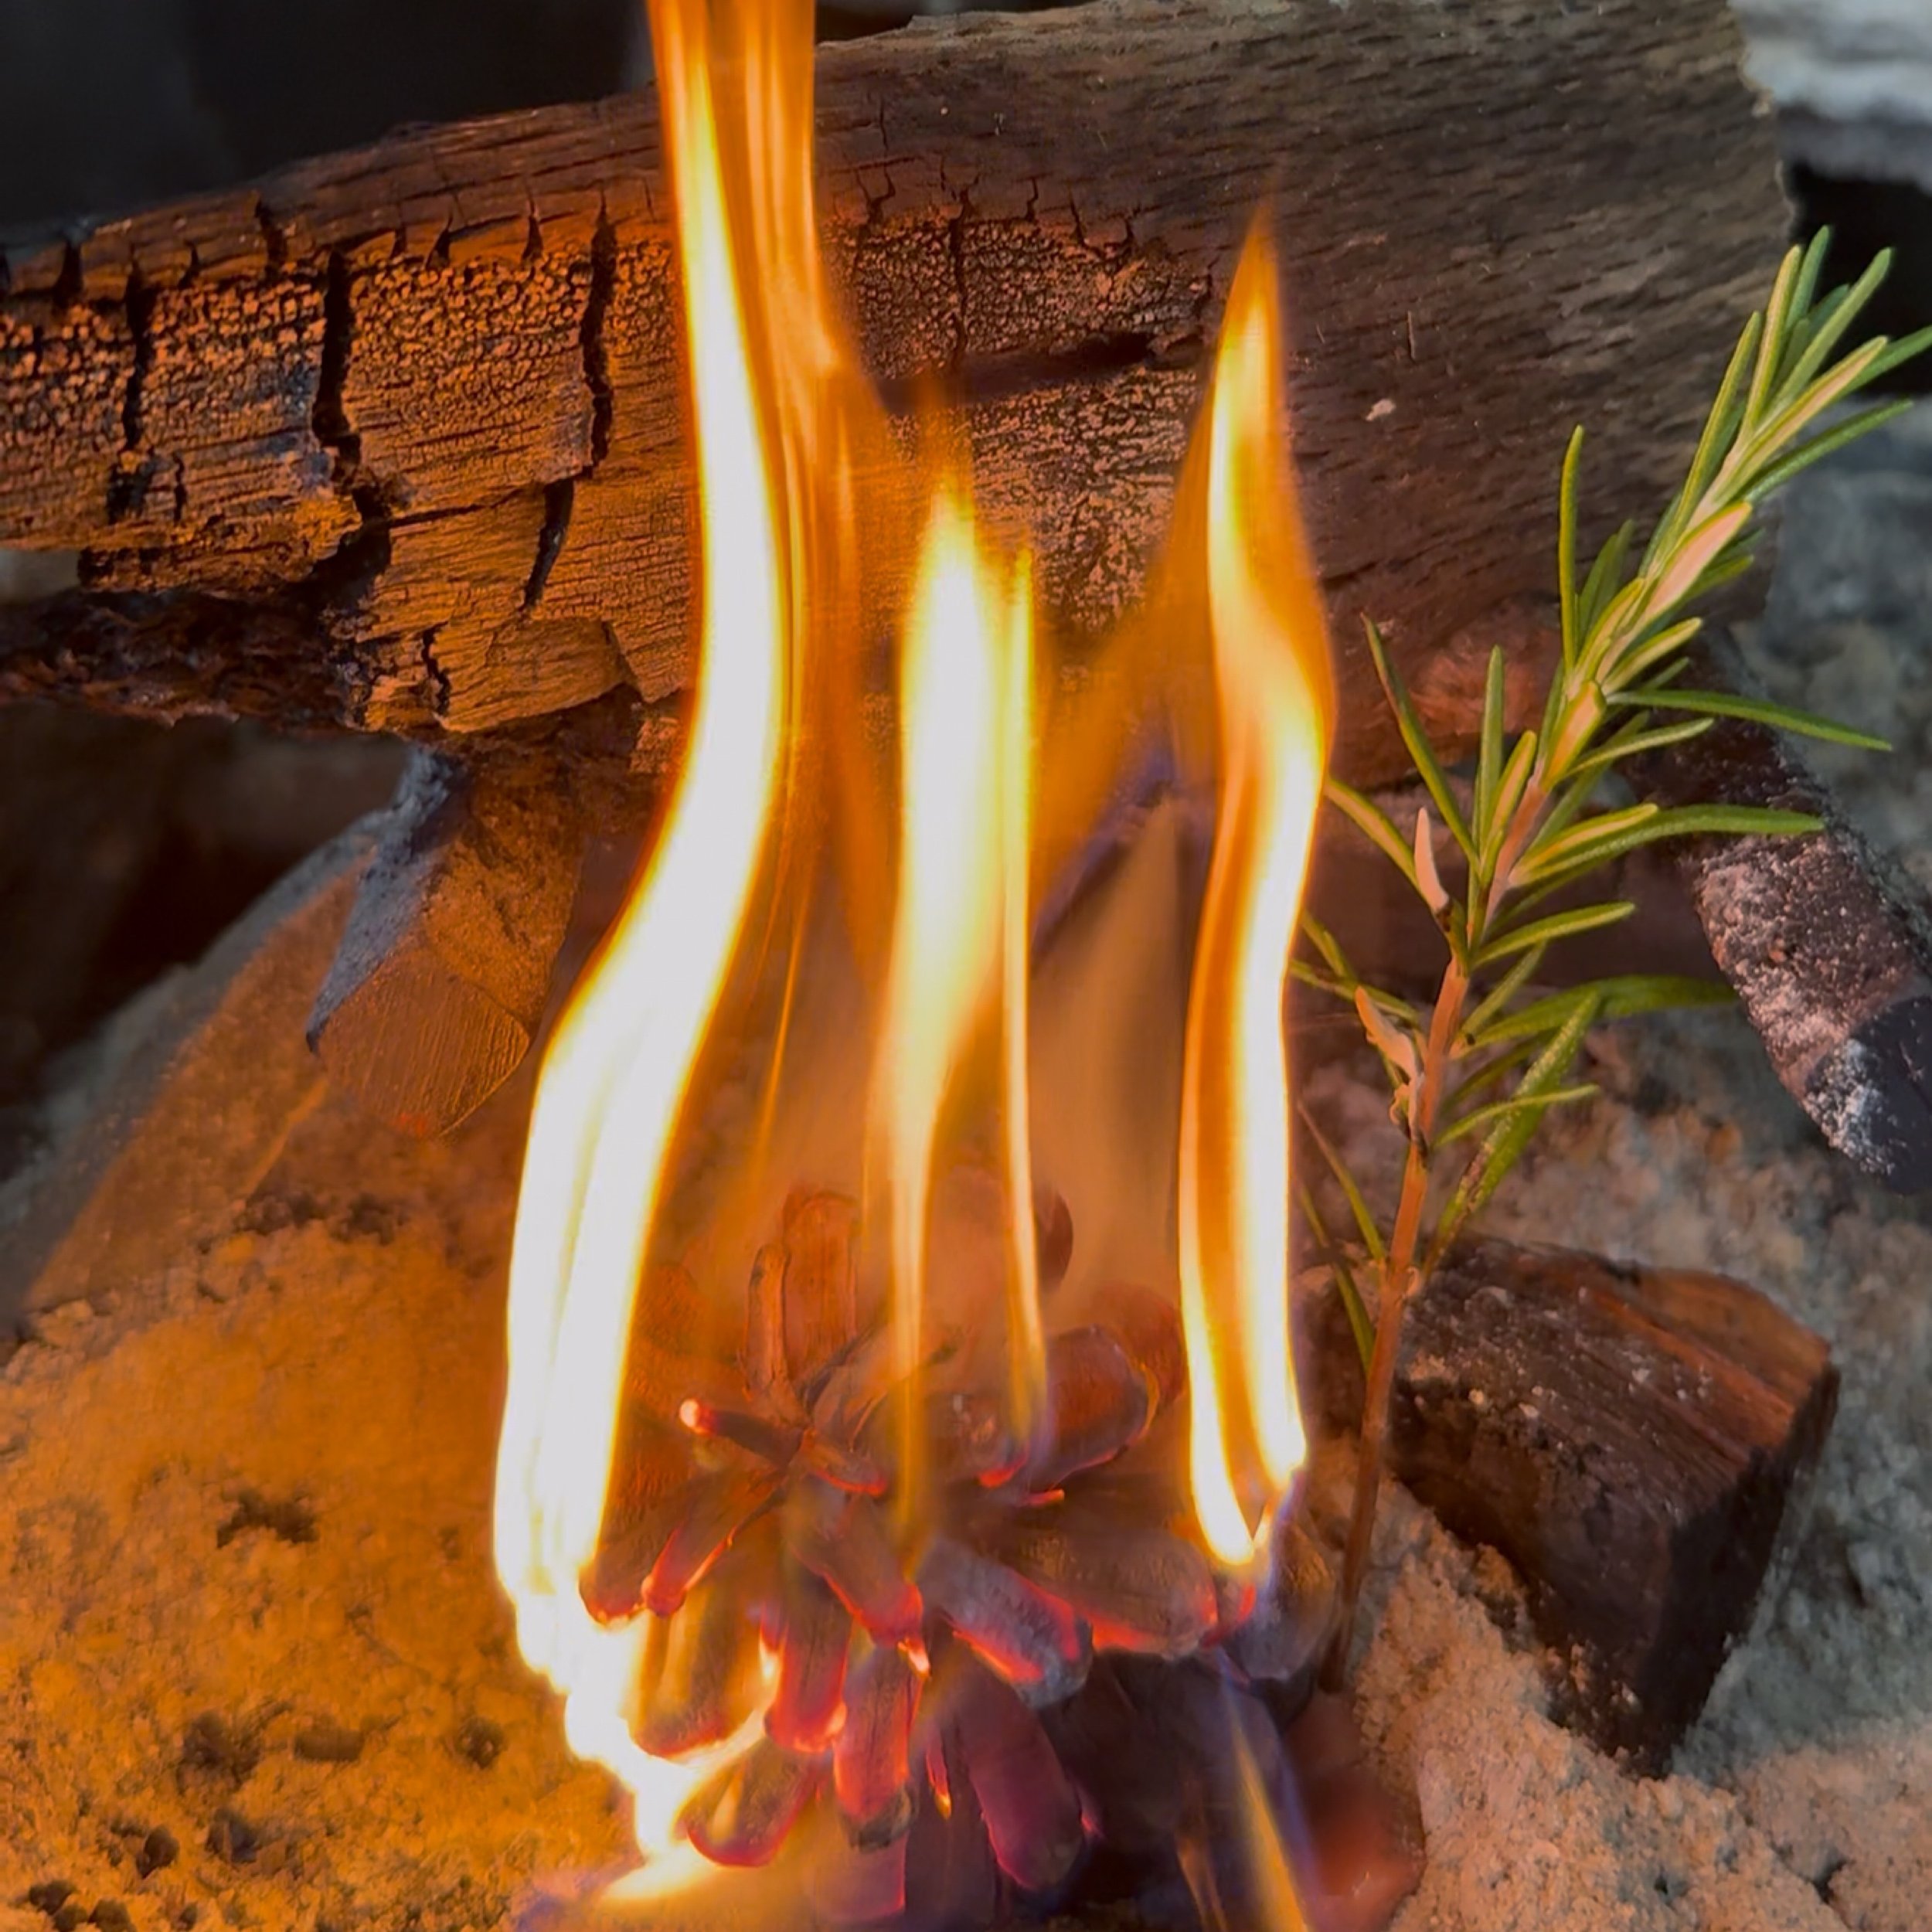
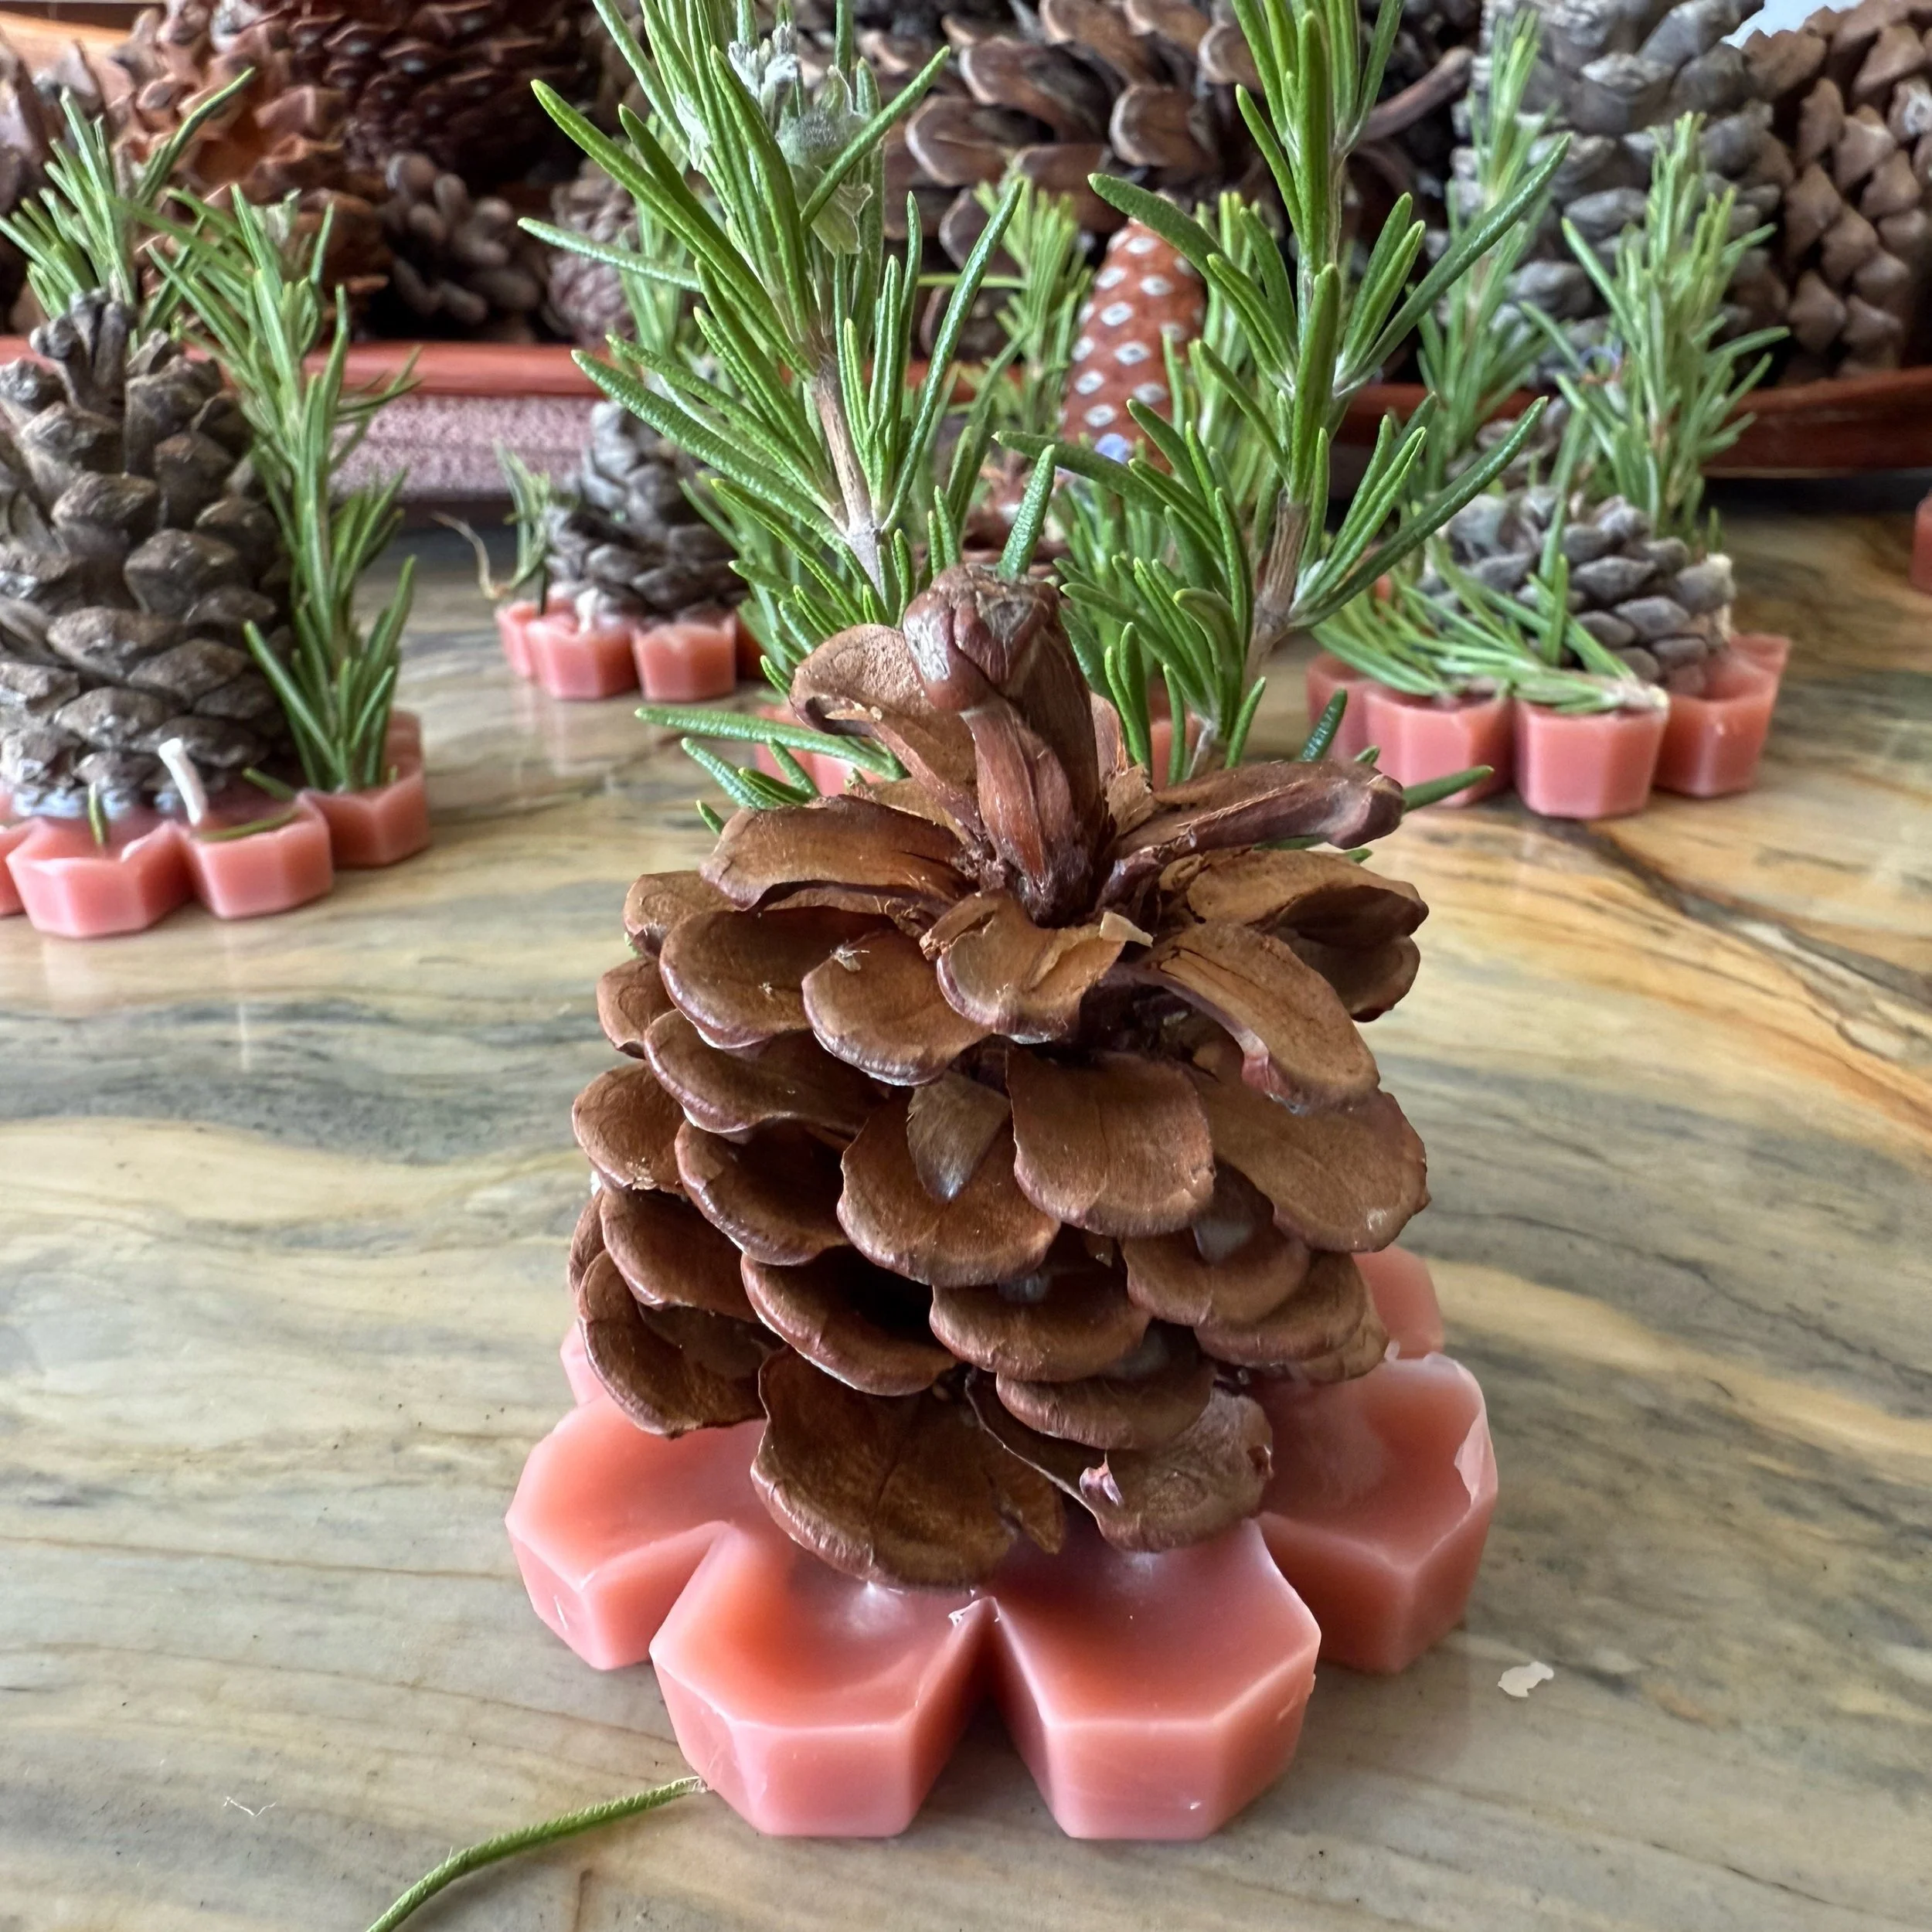
Pinecone Firestarter
Winter & Autumn
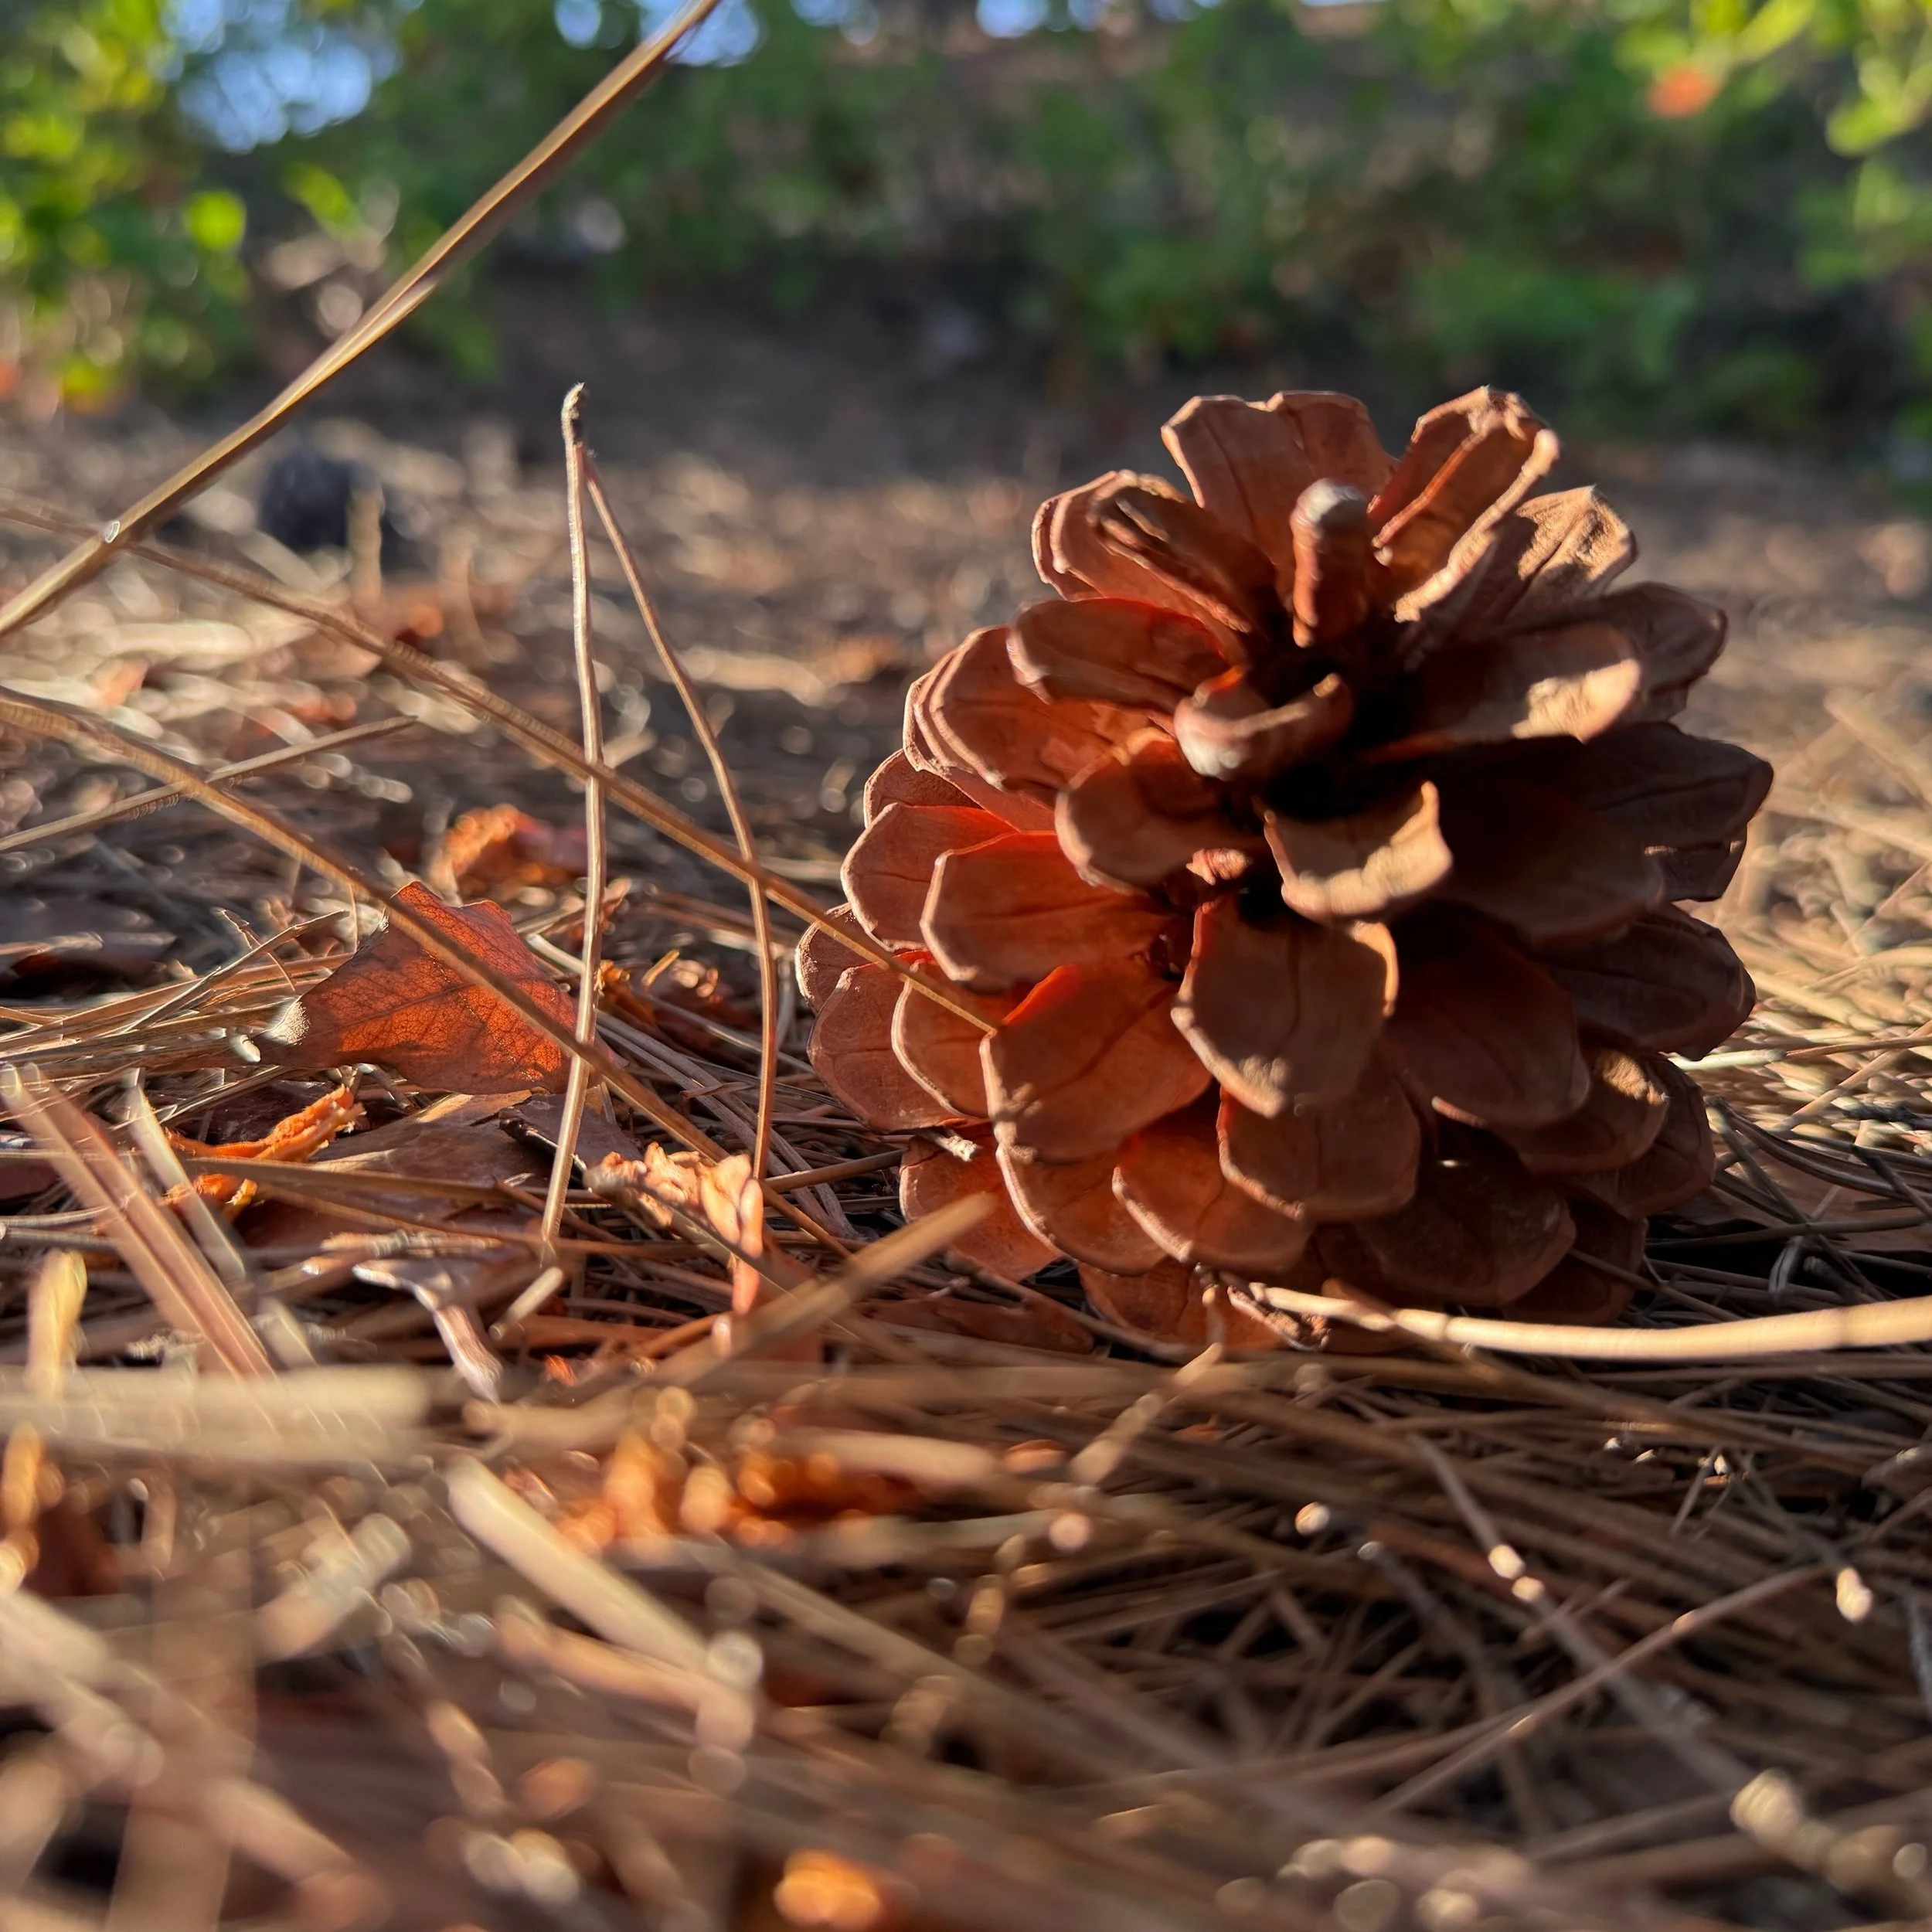
When thinking about fall and winter projects that feel distinctly Southern Californian, I decided to focus on pinecones and rosemary as both grow well where we live. And since it doesn't snow here and the weather is fair year long, I wanted to represent the season with natural treasures from our environment that were both functional as well as beautiful.
While on a nature walk in my neighborhood, I collected a variety of pinecones. I intended to use the small ones for fire starters, but the large ones looked so pretty, I collected them to decorate our space.
Because these were collected from the neighborhood, I wanted to ensure they were completely dry before using them as our neighborhood using sprinklers to water the landscape.. First I laid out the pinecones and seed pods in the backyard so any critters could crawl out of the pinecones, then I popped them in the oven for 10 minutes at 200 degrees to help ensure they are dried out.
In the meantime, I went to my backyard where I have multiple rosemary bushes and trimmed several sprigs.
While they were drying, I melted beeswax as well as leftover wax from old candles in my candle pot. I'm using a silicone mold by Melting Pots which is no longer available, but this alternative works similarly.
Pour melted wax into the mold filling 1/3- 1/2 of the way full. While the wax is still warm, add your small pinecones and sprigs of rosemary. Add a short cotton twine wick. I like baking twine rather than waxed wicks typically used for candle making.
Once the wax has cooled and hardened, you may pop out the wax with pinecone embedded and trim the wicks to about 1/4 inch.
The ones we made without pinecones and added the pinecones next to or over top actually worked better as the wax melted and formed a well rather than pour out and extinguishing.
This idea originally came from Fern. Here is her video.
We also made fire starters using seed pods which worked really well. Check out the blog post here.


How to Make | Waxed Leaves
For years I wanted to make waxed leaves because I saw my sister decorate her home with them and it looked stunning. It turns out making waxed leaves is easier than you expect and the results are beautiful. I can't say just yet how long the results last, but so far, the leaves are retaining their beautiful fall colors, they are flexible without cracking and they have a glistening sheen from the wax.
First, collect an assortment of leaves. I found some fallen on my morning walk, some I picked from my peach tree (my favorite) and others I picked up off the rain soaked ground (the large sycamore leaves). If the leaves are not dry, let them dry out completely. If you need to, you may lay them between something heavy to keep them from curling up on the sides. For the wax, I used primarily beeswax, with some trace amounts of coconut oil and wax from left over candles (possibly soy). I heated up the wax until it melted in my candle pot.
Next, I carefully dipped the leaves ensuring they were completely covered in wax. I let it drip off into the pot, twisting the leaf around so the wax could drip off evenly. I didn't place it on waxed paper until the wax had cooled. If the wax is too hot, or the leaves contain some moisture, the candle wax may bubble. In the end, it does not affect the leaves, but take care that the wax doesn't splatter. Once cooled, the leaves keep their beautiful color and shine from the wax. I used Topanga beeswax, a candle pot and found leaves.